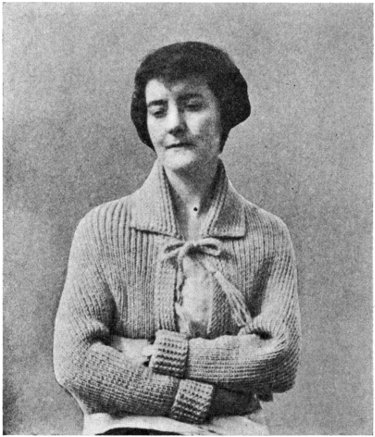
The Project Gutenberg EBook of Rake Knitting Patterns, by Bertha Thompson

This eBook is for the use of anyone anywhere at no cost and with
almost no restrictions whatsoever.  You may copy it, give it away or
re-use it under the terms of the Project Gutenberg License included
with this eBook or online at www.gutenberg.org/license


Title: Rake Knitting Patterns

Author: Bertha Thompson

Release Date: May 5, 2019 [EBook #59440]

Language: English

Character set encoding: UTF-8

*** START OF THIS PROJECT GUTENBERG EBOOK RAKE KNITTING PATTERNS ***


Produced by Susan Skinner, Tim Lindell and the Online
Distributed Proofreading Team at http://www.pgdp.net (This
file was produced from images generously made available
by The Internet Archive/American Libraries.)
RAKE KNITTING PATTERNS
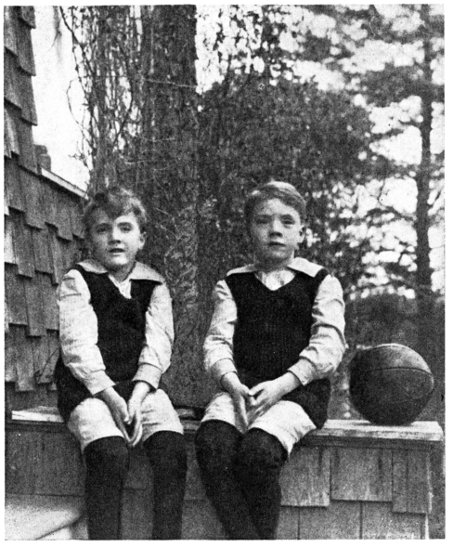
Twins wearing rake knitted sweaters made by a patient at
Kenilworth Hospital, Biltmore, N. C.
Rake Knitting Patterns
Bertha Thompson
Organizer and Director of Occupational Therapy and Principal
of the Summer School of Occupational Therapy,
Woodstock, N. Y.
THE BRUCE PUBLISHING COMPANY
MILWAUKEE, WISCONSIN
Copyright 1923
The Bruce Publishing Company
Printed in the United States of America
Dedicated to the happiness
of the sick and convalescent.
Who does not remember the spool-knitter of his childhood, perhaps
a home made affair—a large empty spool with four wire brads
driven in around the opening at one end—on which one made an
endless rope of colored yarns, to use, maybe, for reins when playing
horse. Our ex-service patients in the army and public health
service hospitals have seized upon the principle of this toy, and
have applied it in making “rakes” of various sizes on which they
have “knitted” a large number of articles, from silk neckties to
wool shawls, caps, sweaters and capes. They have found real interest
and pleasure in this pastime. The patient flat on his back in
a plaster cast, sometimes with the use of only one hand, has been
able to make garments as attractive and well-made as the man who
is up and about.
The results of their experiments in “rake knitting” have been
so very worth while, that I have wanted to make them available for
the use of the sick and convalescent everywhere. Therefore I have
prepared this pamphlet of patterns. It does not pretend to exhaust
the possibilities of “rake knitting,” but merely offers a few patterns
which have been used successfully in knitting with two and four-fold
yarn.
Special thanks are due the patients of Kenilworth Hospital,
U. S. P. H. S., Biltmore, N. C., who worked out some of these patterns
and allowed me to photograph some of their finished work.
| Page |
| Chapter 1—Tools and Materials | 9-12 |
| Chapter 2—Winding a Long Rake | 13- 6 |
| Chapter 3—Winding Round Rakes | 17- 8 |
| Chapter 4—General Instructions | 19-21 |
| 1—How to Change from Single or Double Stitch to Triple Stitch. |
| 2—How to Change from Triple Stitch to Single or Double Stitch. |
| 3—How to Cast Off Stitches in Shaping Garments. |
| 4—How to Add Stitches in Shaping Garments. |
| 5—How to Cast Off Knitting from the Rake. |
| 6—How to Take Up the Loose Stitches at the Beginning
of the Knitting. |
| 7—How to Sew Garments Together. |
| 8—How to Make Buttonholes. |
| 9—How to Determine the Quantity of Yarn Required for
Any Pattern. |
| 10—How to Adapt the Patterns for Smaller or Larger Garments. |
| 11—How to Make Other Patterns. |
| Chapter 5—To Make Shawls and Scarfs | 22- 4 |
| General Directions. |
| Explanation of Diagrams of Borders. |
| Narrow Scarfs and Mufflers. |
| Chapter 6—Harmonious Combinations of Colors in Shawls | 25-43 |
| Color Arrangements Suggested for Eighteen Borders. |
| Chapter 7—Bed Jacket | 44- 7 |
| Chapter 8—Boy’s Slipover Sweater | 48-51 |
| Chapter 9—Child’s Sweater Jacket | 52- 6 |
| Chapter 10—Men’s Sweaters | 57-64 |
| 1—Buttoned Down the Front, with Sleeves, Collar and Pockets. |
| 2—Slipover, with Sleeves, Collar and Pockets. |
| 3—Slipover, Sleeveless and without Collar. |
| Chapter 11—Cap | 65- 6 |
| Chapter 12—Stocking Cap | 67- 9 |
{9}
Chapter 1.
TOOLS AND MATERIALS.
Tools.
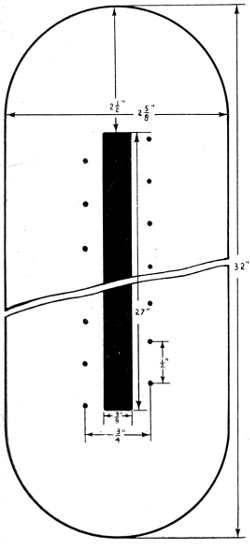
Rakes—See Figs. 1, 2, 3 and 4.
Picks—See Figs. 5 and 6.
Steel crochet hook No. 1.
Darning needle long enough to take wool.
Scissors.
A few thumb tacks or brass headed carpet tacks.
The rakes can be made by a carpenter, or by anyone who can
use a hammer, saw and plane.
STRAIGHT RAKES.
DIMENSIONS.
Length—32″.
Width—2⅝″.
Thickness—¾″ to ⅞″.
Opening down the center (black)
27″ long.
⅜″ wide.
SETTING OF NAILS.
RAKE No. 1
Nails ½″ apart in rows ¾″ apart, set as in drawing.
RAKE No. 2
Nails ⅜″ apart in rows ¾″ apart.
RAKE No. 3
Nails ⅜″ apart in rows ⅝″ apart.
RAKE No. 4
Nails ⁵⁄₁₆″ apart in rows ¹⁰⁄₁₆″ apart.
SHORT RAKES, with the same setting of nails are useful for knitting
collars, pockets and belts.
{10}
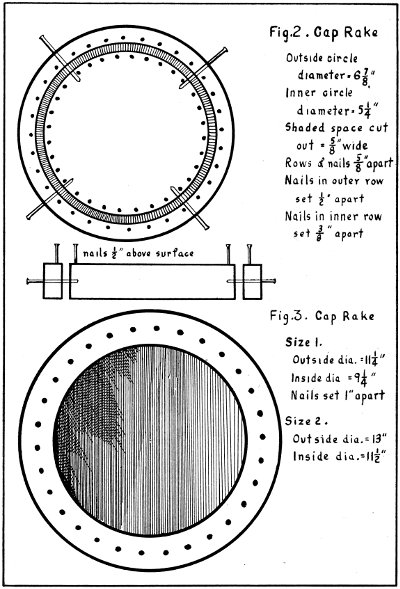
Fig. 2. Cap Rake
- Outside circle diameter = 6⅞″
- Inner circle diameter = 5¼″
- Shaded space cut out = ⅝″ wide
- Rows of nails ⅝″ apart
- Nails in outer row set ½″ apart
- Nails in inner row set ⅜″ apart
- Nails ½″ above surface
Fig. 3. Cap Rake
Size 1.
- Outside dia. = 11¼″
- Inside dia. = 9¼″
- Nails set 1″ apart
Size 2.
- Outside dia. = 13″
- Inside dia. = 11½″
{11}
{12}
Yellow poplar or red gum makes a rake that is light to handle,
and holds the nails securely.
Select well-seasoned lumber, free from knots, about ¾ to ⅞
inch thick. Rakes made from thinner wood give in the middle and
are not satisfactory.
The opening within the rake can be cut out with a keyhole saw,
or better still with a jig saw or a band saw, if such is available.
The rakes must be well-planed and sandpapered, and no roughness
left anywhere to catch the wool when knitting.
The dimensions for the rakes are given in Figs. 1, 2 and 3.
The long rakes (Fig. 1) are set with 1 inch finishing nails or
with 1 inch, No. 16 wire brads. The nails must be set carefully as
indicated in the drawing and project evenly ⅜ inch above the surface
of the wood.
The small double round rake (Fig. 2) is set with 1 inch finishing
nails.
The large round rake (Fig. 3) is set with 1½ inch No. 10 wire
brads, or with wooden pegs whittled from ⅜ inch doweling, leaving
a small head to prevent the yarn from slipping off too easily. The
pegs should be securely glued into holes drilled just the right size
to take them. Many patients prefer the wooden pegs in the round
rakes. Such a rake was sold in some stores during the war and
used for knitting hospital stockings to cover surgical dressings.
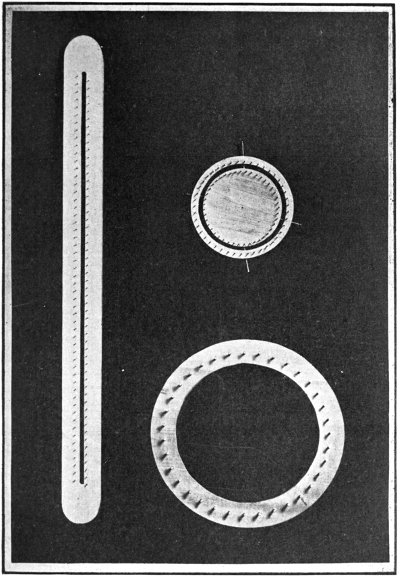
For a pick, an ordinary nutpick, (Fig. 5) will serve very well,
or one can be made from a 3 inch finishing nail, set in a wooden
handle, bent and filed into shape as shown in Fig. 6, and finished
with emery cloth, and oil and pumice.
Materials.
Four-fold yarn or silky wool is used for most garments.
Medium and heavy-weight sweater yarns may be used for men’s
sweaters.
Two-fold yarn and silky wool is used for light-weight garments.
{13}
Chapter 2.
WINDING A LONG RAKE.
Three different stitches are commonly used in rake knitting.
- 1. Single or plain stitch—Fig. 7.
- 2. Double or cross-stitch—Fig. 8.
- 3. Triple cross-stitch—Fig. 9.
To Cast Stitches on a Long Rake.
Take the long rake, shown in Fig. 1, with nails set ½ inch
apart, in rows ¾ inch apart.
Drive a thumb tack or a carpet tack into the side of the rake
near each end until the head is just a little above the surface of the
wood. This is to hold the yarn after winding.
First Winding.
The same for all stitches.
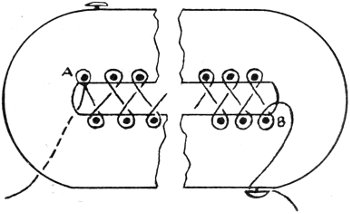
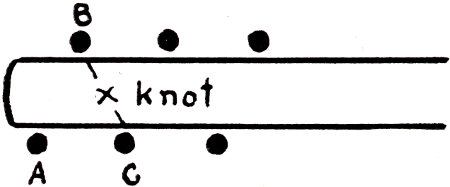
1. Tie yarn to nail A, leaving an end 3 or 4 inches long which
is slipped through the opening of the rake. Let the rake rest in the
left hand. With the right hand wind the yarn around the nails as
shown in the diagram. Do not pull the yarn too tight; just hold it
easily between thumb and finger. When the last nail (B) is
reached, wrap the yarn once around the tack to hold it.
2. Draw the smooth flat side of the pick rapidly down the
length of the rake between the rows of nails. This pushes the yarn
to the bottom of the nails, and leaves space above for the second
winding of yarn.
{14}
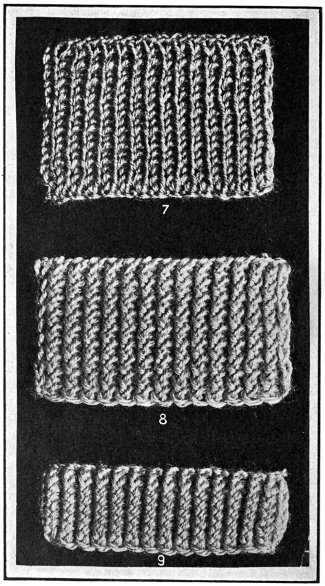
Fig. 7. Single or Plain Stitch.
Fig. 8. Double or Cross Stitch.
Fig. 9. Triple Cross Stitch.
{15}
Second Winding.
In single or plain stitch, (Fig. 7) do not cross the yarn.
1. The first winding ended at B with the last cross at C.
2. Wind the yarn around D and E without crossing it, and so
on back to the end of the rake where the first winding began. Wrap
the yarn around the tack.
3. The yarn has passed twice in front of each nail with the exception
of nail B.[1]
4. With the pick lift the lower thread (first winding) over the
upper thread, (second winding) and off the nail. Do not stretch
the yarn more than just enough to lift it over the head of the nail.
Do this at each nail along one side, then along the other, leaving
out the nail B which has just one thread. This completes the first
row of stitches.
5. Draw the smooth flat side of the pick rapidly down the
length of the rake between the rows of nails to push down the yarn,
and make room for the next winding.
Second Winding—Continued.
In double or cross-stitch. (Fig. 8)
1. The second winding is the same as the first winding; that
is, the yarn is crossed.
2. With the pick lift the lower thread over the upper thread
as in single or plain stitch. This completes the first row of stitches.
3. Draw the smooth flat side of the pick along between the
rows of nails to make space for the next winding.
Triple cross-stitch. (Fig. 9)
1. Wind once over and back as if for double or cross-stitch.
2. Wind the yarn a third time across the rake, crossing it as
in the first and second winding.
{16}
3. Three threads now pass in front of each nail except A and
B. Lift the lower thread (first winding) over the upper two
threads and off the nail. Do this at all the nails except A and B.
This completes the first row of stitches.
4. Push threads to the bottom of the nails by drawing the
smooth flat side of the pick rapidly along between the rows of
nails.[2]
To make the second row of stitches, wind once across the rake,
and lift the lower thread off as described above. Push threads to
the bottom of the nails, and wind back over the rake for the third
row of stitches, and so on.
{17}
Chapter 3.
WINDING ROUND RAKES.
The round cap rakes illustrated in Figs. 2 and 3 are wound according
to the following directions:
Round Cap Rake (Fig. 2.)
Stitches are cast on this round rake in the same way as on the
long rake described in Chapter 2, except that the winding continues
around the rake.
Single or double stitch may be used.
1. Tie the yarn to one of the nails.
2. Wind once around the rake as directed in Chapter 2 for the
first winding, until the nail to which the yarn is tied is reached
again.
3. Continue winding until this nail is reached a second time,
that is, until two threads pass in front of each nail.
4. Wrap yarn around a thumb tack in the side of the rake.
5. Lift the lower thread (first winding) over the upper thread
(second winding) and off the nails. When only one thread remains
around each nail, run the smooth flat side of the pick around between
the rows of nails to push down the threads, and make room
for the next winding.
6. Continue by winding once around the rake; that is, until
two threads again pass in front of each nail. Lift the lower thread
over the upper thread and off the nails to complete the row of
stitches.
{18}
Round Cap Rake (Fig. 3.)
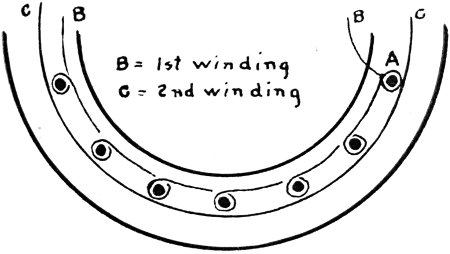
To knit a cap on this rake the single stitch is used, as a rule.
1. To cast on stitches, tie yarn to a nail, (Fig. 12), and wind
to the left, until nail A is reached again.
2. Then, holding the yarn in the left hand, pass it along in
front of nail A, and above the first winding, and lift the lower
thread on the nail over the upper and off the nail.
3. Move the rake around a little until the yarn held in the left
hand passes in front of nail B. Be sure it is above the thread
already on the nail. Lift lower thread over the upper thread and
off the nail.
4. Continue in this way around and around the rake until the
knitting of the cap is complete. The pattern for a cap is described
in Chapter 12.
{19}
Chapter 4.
GENERAL INSTRUCTIONS.
1. How to Change from Single or Double Stitch to Triple Stitch.
Wind across the rake and back, crossing the yarn. There are
now three threads on the nails. Lift the lowest thread over the
upper two threads and off the nails.
2. How to Change from Triple Stitch to Single or Double Stitch.
Lift the lower two threads together over the upper thread and
off the nails.
3. How to Cast Off Stitches in Shaping Garments.
Lift the stitch from one nail onto the next in the other row.
Lift the stitch already on this nail over the new one, and off the
nail.
4. How to Add Stitches in Shaping Garments.
Wind one or more of the empty nails according to directions,
when the end of the row of stitches is reached. Wind back across
the rake and knit these new stitches in the same way as the others.
5. How to Cast Off Knitting from the Rake.
There are two ways to do this.
1. Leave a length of yarn, when cutting off the ball, long
enough to knit once across the rake.
Beginning at the opposite end of the rake, with a large knitting
needle lift a stitch first from one row of nails and then from the
other until all the stitches are on the needle.
Then cast off as in ordinary knitting. (See directions in any
book on knitting.)
2. Another way is to take off the stitch from the first nail with
a crochet hook, then the stitch from the first nail in the other row,
and draw this one through the stitch already on the hook. Then
take off the next and draw it through the stitch on the hook, and so
on until all the stitches have been crocheted from the rake.[3]
It will be found that sometimes, with certain yarns, this makes
a very tight edge. In this case it is better to use the length of yarn
left hanging, and having lifted off two stitches, instead of drawing{20}
the second through the first, draw a loop of the yarn through both,
leaving this loop on the hook. (This is called a slip stitch.) Take
off the next stitch and repeat. Continue until all the stitches have
been crocheted from the rake.
6. How to Take Up the Loose Stitches at the Beginning of the
Knitting.
Examine a piece of knitting that has just been cast off the rake.
It will be observed that the last row is much tighter than the
first.
To take up these loose stitches at the beginning, crochet once
across, using the slip stitch described in paragraph 2 of section 5
of this chapter.
7. How to Sew Garments Together.
Use one strand of yarn and a short darning or tapestry needle.
Match the stitches, take up one thread on each side, and do not
draw the yarn too tightly.
8. How to Make Buttonholes.
Cast stitches off two to six nails, depending on the size of the
buttonhole to be made, beginning at the sixth nail from the edge.
Add these nails again in the very next row of knitting.
Crochet around the buttonholes with a single stitch or finish
with a buttonhole stitch, using one strand of yarn.
Loops may be made instead of buttonholes by crocheting along
the edge to be fastened, leaving loops of chain-stitch long enough
to go over the button.
9. How to Determine the Quantity of Yarn Required for Any
Pattern.
Some yarns work up more quickly than others, and some stretch
more.
This difference in yarns makes it impossible to give exact quantities
required for any pattern which would apply to all brands of
yarn, or to give the exact number of nails that must be used to knit
a given width.
Therefore the size of the finished garment is indicated instead.
Where a quantity is given, it is only approximately estimated from
the kinds of yarn I have used.
Select a good brand of yarn, and find out by experiment how
far one ounce will go. Choose the rake you are going to use. Knit
a piece 6 or 12 inches wide. Make a note of the number of nails it{21}
takes. With this as a guide it will not be difficult to estimate the
amount of yarn needed for any of the patterns in this pamphlet. It
is always better to get a little too much than not to have enough.
It is often difficult to match a yarn, particularly at local stores.
10. How to Adapt the Patterns for Smaller or Larger Garments.
The measurements are given on each pattern. It will readily be
seen that these can be changed to make the garment smaller or
larger.
Having made the experiment suggested in section 9, and having
found out how many nails it takes to knit a piece 6 or 12 inches
wide, with a given kind of yarn, it will not be difficult to find out
how many nails to use in knitting the size garment desired.
11. How to Make Other Patterns.
Almost any simple, straight-line garment can be knitted on a
rake.
Make an outline drawing of the garment as it will look before
the seams are sewed together.
Decide upon the measurements, length, width, etc.
Having made the experiment suggested in section 9, it will not
be difficult to work out the new pattern.
{22}
Chapter 5.
TO MAKE SHAWLS AND SCARFS.
GENERAL DIRECTIONS.
1. Rakes used for knitting shawls and scarfs.
For four-fold yarn and silky wool use rakes No. 1 or No. 2
shown in Fig. 1.
For two-fold yarn or silky wool use rakes No. 2 or No. 3.
2. Single or double stitch is used in knitting shawls. (See
Chapter 2.)
3. Quantity of yarn required. (Read section 9 of Chapter 4.)
Four-fold yarn, 16 to 18 ounces, for the body of the shawl
(ground color). Six ounces for an average width border.
{23}
Four-fold silky wool, 14 to 16 ounces for the ground color. Four
to 5 ounces for the border.
Two-fold yarn or silky wool, about 7 to 8 ounces for the ground
color. Two to 3 ounces for the border.
4. Average length of shawl, 60 to 72 inches when finished.
5. To join yarns of different color. Tie a square knot between
nails B and C, Fig. 13, and cut the ends off close to the knot.
6. To make a good edge to which the fringe can be knotted,
crochet once across the end of the shawl, using the slip stitch described
in section 5 of Chapter 4.
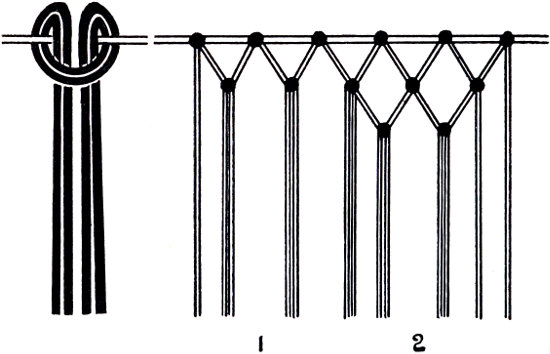
7. Do not make the fringe too heavy. Double two or three
lengths of yarn and knot into the shawl at the bottom of each rib.
These may be left hanging or may be knotted in various ways. (See
Fig. 14.)
{24}
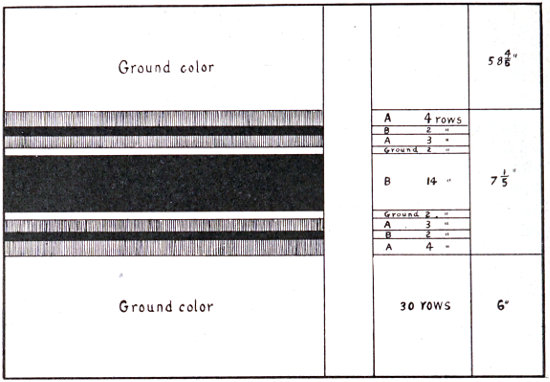
Explanation of Diagrams of Borders.
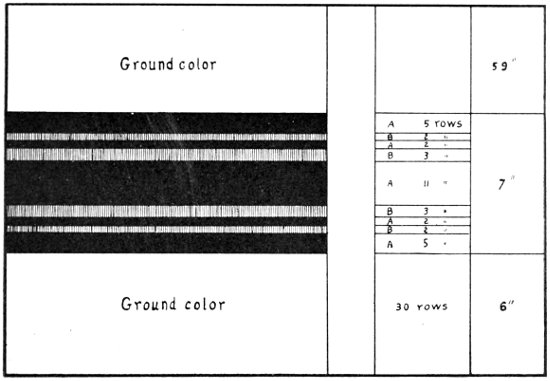
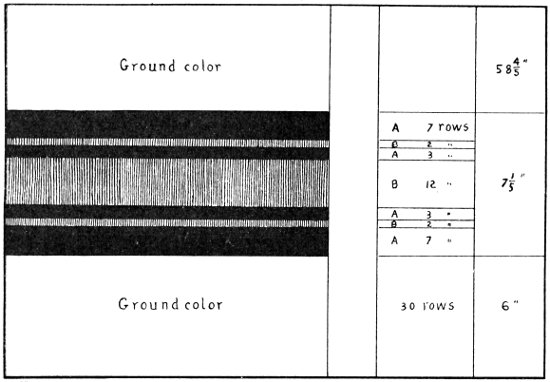
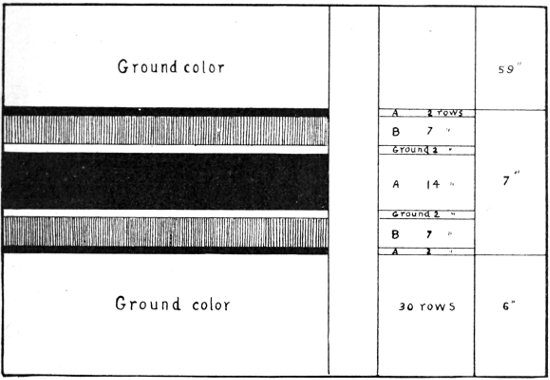
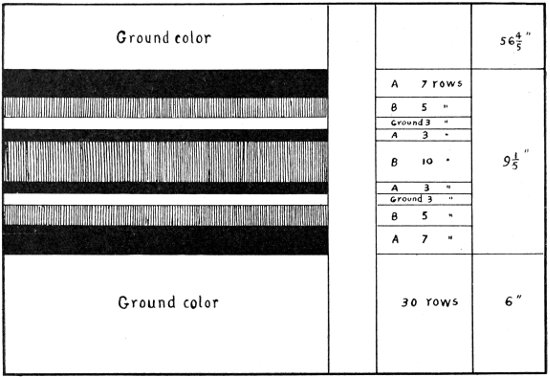
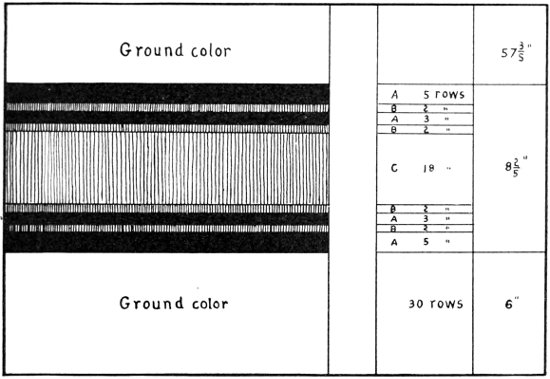
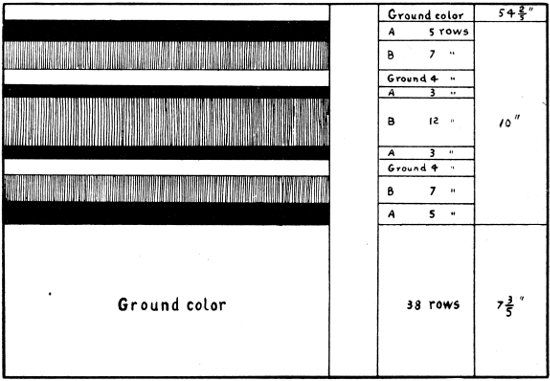
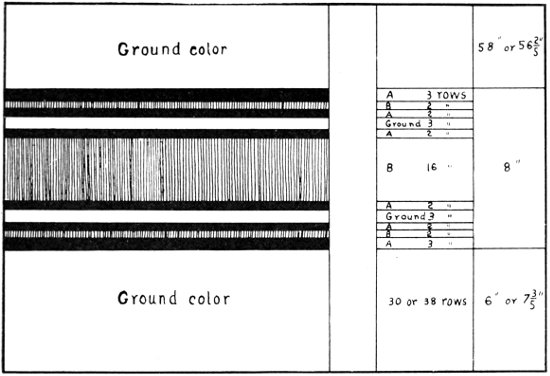
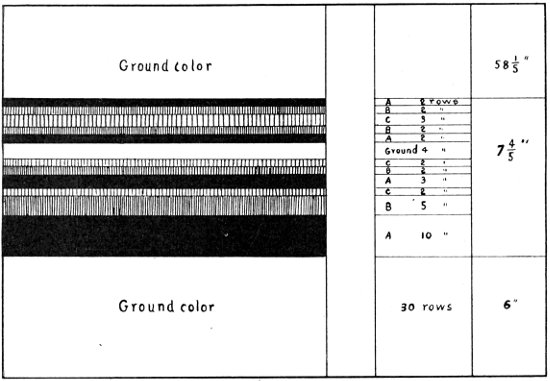
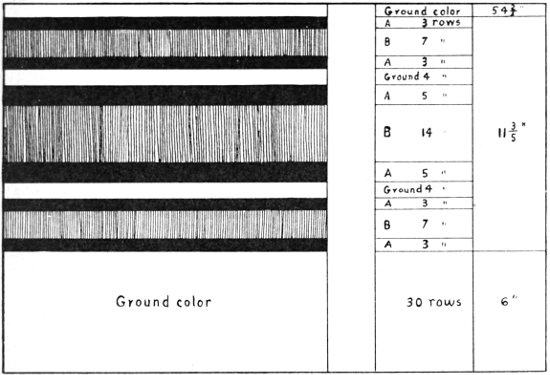
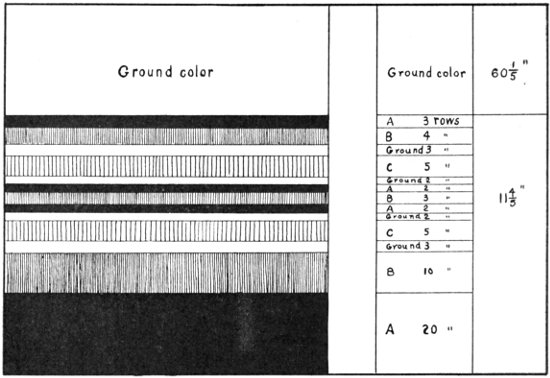
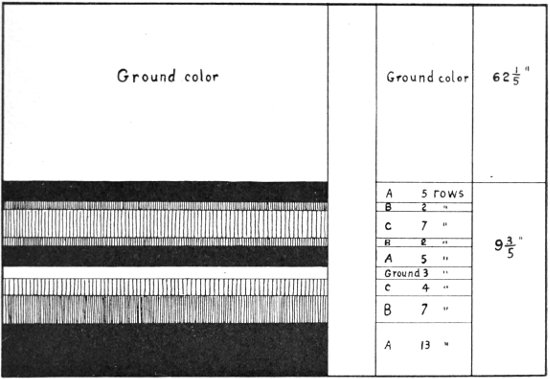
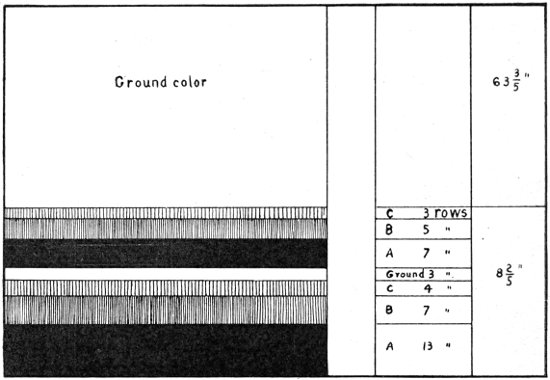
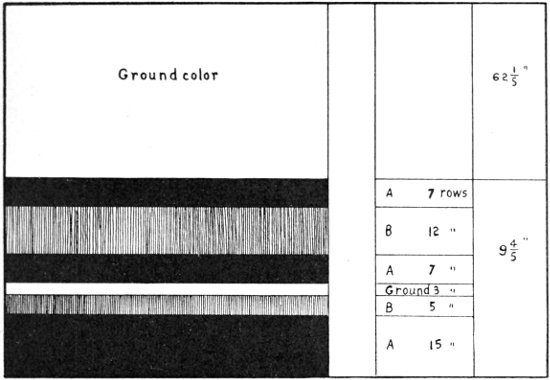
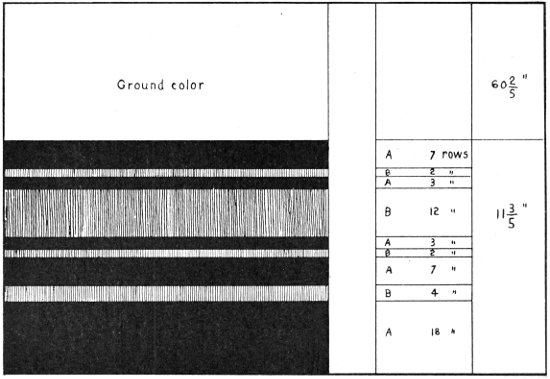
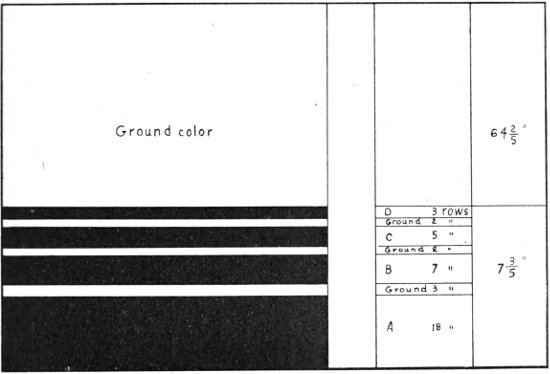
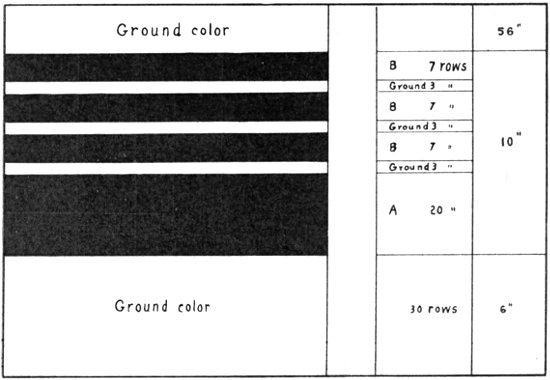
Figs. 16 to 33 show some borders for shawls which may be
worked out in one or more colors.
The number of rows of knitting required for each stripe are
given.
To find out how long to make the center of the shawl, measure
the distance from the beginning of the knitting to the edge of the
last stripe in the border. Allow the same for the border on the
other end, and subtract the number of inches required for both
from the entire length of the shawl.
Narrow Scarfs and Mufflers.
Almost any of the designs for borders can easily be adapted for
use in narrow scarfs or mufflers.
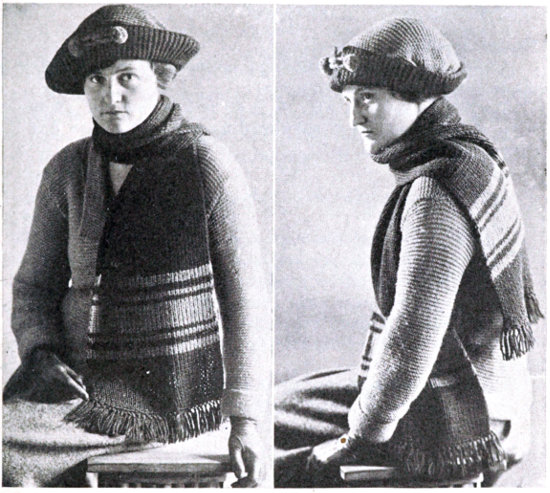
The scarf shown in Fig. 15 is 60 inches long and 10 inches
wide. It took 6 ounces of silky wool for the ground color and 1¼
ounces for the border.
{25}
Chapter 6.
HARMONIOUS COMBINATIONS OF COLORS IN
SHAWLS.
In planning the colors to be used in a shawl or scarf, the Standard
Color Card of America will be found very helpful. This may be
obtained from the Textile Color Card Association of the United
States, Inc., 315 Fourth avenue, New York. The card contains 133
standard colors, and is being very widely used in every branch of
industry interested in color. The manufacturers of knitting yarns
have based their standard colors on this card, which is so well-known
among dealers throughout the country that it is possible to
order a color by its name and number, stating that these have been
taken from the standard color card. The Textile Color Card Association
is very glad to give full information concerning the color
card and its use.
Some of the color arrangements in the following pages have
been taken from this color card.
Where the standard trade name for a color is not commonly
known, I have given the more usual descriptive name.
The colors are lettered to correspond to the letters used in the
diagrams, the main color of the shawl being called the ground color.
Where strongly contrasted colors are used, a narrow line of
black (one or two rows of knitting) between the colors will help to
harmonize them.
The following suggested color combinations are only a few of
the many good combinations of colors which may be used.
{26}
Blue ground.
- 1. Medium green-blue ground.
- A—A cool shade of tan (buff).
- B—Old rose.
- 2. Japan-blue ground.
- A—Black.
- B—Garnet.
Purple ground.
- 1. Dark red-purple ground (amethyst).
- A—Black or dark yellow-green.
- B—Orange.
- 2. Dark red-purple ground (amethyst).
- A—Light amethyst (orchid) or black.
- B—Medium turquoise-blue.
Brown ground.
- 1. Chestnut-brown ground.
- A—Apricot.
- B—Deep turquoise-blue.
- 2. Dark brown ground.
- A—Topaz.
- B—Tan.
Green ground.
- 1. Medium yellow-green ground.
- A—Deep cream.
- B—Salmon.
- 2. Yellow-green ground.
- A—Black.
- B—Burnt-orange.
Gray ground.
- 1. Pearl-gray ground.
- A—Lavender.
- B—Coral.
Pink ground.
- 1. Laurel-pink ground.
- A—Light yellow-green.
- B—Coral.
{27}
Blue ground.
- 1. Turquoise-blue ground.
- A—Blue-lavender (cornflower).
- B—Pale-yellow.
- 2. Copenhagen-blue ground.
- A—Old rose.
- B—A cool shade of tan (buff) or the same as the ground.
Green ground.
- 1. Light yellow-green ground.
- A—Wild-rose.
- B—Light yellow.
- 2. Dark yellow-green ground.
- A—Yellow tan (chamois).
- B—Light yellow-green or the same as the ground.
Brown ground.
- 1. Chestnut-brown ground.
- A—Yellow-green.
- B—Tan.
Gray ground.
- 1. Silver-gray ground.
- A—Peacock blue.
- B—Cherry.
- 2. Pearl-gray ground.
- A—Lavender.
- B—Pink or coral.
Purple ground.
- 1. Amethyst ground—dark.
- A—Light amethyst (orchid).
- B—Pearl-gray.
{28}
Blue ground.
- 1. Peacock-blue ground.
- A—Black.
- B—Burnt-orange.
- 2. Sapphire-blue ground.
- A—Fawn.
- B—Orange or a lighter shade of ground.
Green ground.
- 1. Dark yellow-green ground.
- A—Black.
- B—Burnt-orange.
- 2. Dark yellow-green ground.
- A—Light yellow-green.
- B—Black.
Tan ground.
- 1. Tan ground.
- A—Dark brown.
- B—Topaz.
Brown ground.
- 1. Seal-brown ground.
- A—Green-blue.
- B—Champagne.
- 2. Chestnut-brown ground.
- A—Tan.
- B—Gold brown or burnt-orange.
Purple ground.
- 1. Red-purple ground (heliotrope).
- A—Silver-gray.
- B—Lavender.
Coral ground.
- 1. Coral ground.
- A—Silver-gray.
- B—Pink.
{29}
Green ground.
- 1. Hunter-green ground.
- A—Orange.
- B—Black.
- 2. Medium yellow-green ground.
- A—Deep cream.
- B—Burnt-orange or salmon.
Nile-green ground.
- A—Light amethyst (orchid).
- B—Corn-color (maize).
Blue ground.
- 1. Green-blue ground.
- A—Terra-cotta or henna.
- B—Black.
- 2. Light green-blue ground.
- A—Ocean-green.
- B—Lavender.
- 3. Delft-blue ground.
- A—Old rose.
- B—Silver-gray.
Scarlet ground.
- 1. Scarlet ground.
- A—Black.
- B—Emerald-green.
Pink or old rose ground.
- 1. Salmon-pink or old rose ground.
- A—Amethyst.
- B—Silver or pearl-gray.
- 2. Tearose-pink ground.
- A—Cream.
- B—Coral.
Light or dark purple ground.
- 1. Lilac ground.
- A—Wistaria.
- B—Pearl-gray.
- 2. Dark amethyst ground.
- A—Light amethyst (orchid).
- B—Silver-gray.
Brown ground.
- 1. Brown ground.
- A—Topaz or burnt-orange.
- B—Tan.
{30}
Cream ground.
- 1. Cream ground.
- A—Black.
- B—Gold.
- 2. Corn-color ground.
- A—Nile green.
- B—Light amethyst (orchid).
Burnt-orange ground.
- 1. Burnt-orange ground.
- A—Seal brown.
- B—Turquoise-blue or gold.
Black ground.
- 1. Black ground.
- A—Burnt-orange.
- B—Peacock-blue.
- 2. Black ground.
- A—Pearl-gray.
- B—Amethyst.
Green ground.
- 1. Dark yellow-green ground.
- A—Light yellow-green.
- B—Orange.
- 2. Dark yellow-green ground.
- A—Brown or black.
- B—Burnt-orange.
Light or dark purple ground.
- 1. Dark purple ground.
- A—Light purple (orchid).
- B—Silver-gray.
- 2. Light amethyst ground.
- A—Dark amethyst.
- B—Silver-gray.
Gray ground.
- 1. Silver-gray ground.
- A—Lavender.
- B—Old rose or pink.
- 2. Pearl-gray ground.
- A—Medium green-blue.
- B—Light green-blue.
{31}
Pink or old rose ground.
- 1. Strawberry ground.
- A—Black.
- B—Peacock-blue.
- C—Gold.
- 2. Old rose ground.
- A—Copenhagen-blue.
- B—Pearl-gray.
- C—Pink.
Blue ground.
- 1. Dark green-blue (sapphire) ground.
- A—Black.
- B—Burnt-orange.
- C—Henna.
- or
- A—Burnt-orange.
- B—Black.
- C—Henna.
- 2. Green-blue ground.
- A—Black.
- B—Amethyst.
- C—Old rose.
Green ground.
- 1. Yellow-green ground.
- A—Amethyst.
- B—Black.
- C—Apricot.
- 2. Nile-green ground.
- A—Light amethyst.
- B—Black.
- C—Corn-color.
- 3. Yellow-green ground.
- A—Amethyst.
- B—Burnt-orange.
- C—Deep yellow tan (chamois).
Purple ground.
- 1. Amethyst ground—dark.
- A—Light amethyst (orchid).
- B—Pearl-gray.
- C—Pink.
- 2. Purple ground.
- A—Pearl-gray or champagne.
- B—Black.
- C—Light amethyst.
Brown ground.
- 1. Chestnut-brown ground.
- A—Tan.
- B—Golden-brown or burnt-orange.
- C—Topaz.
- 2. Seal-brown ground.
- A—Green-blue.
- B—Black.
- C—Champagne.
Tan ground.
- 1. Champagne ground.
- A—Light green.
- B—Black.
- C—Turquoise-blue or burnt-orange.
- 2. Buff ground.{32}
- A—Seal-brown.
- B—Yellow-green.
- C—Orange.
Gray ground.
- 1. Pearl-gray ground.
- A—Dark amethyst.
- B—Black or cream.
- C—Light amethyst.
- 2. Silver-gray ground.
- A—Lavender.
- B—Amethyst.
- C—Pink.
Blue ground.
- 1. Peacock ground.
- A—Black.
- B—Burnt-orange.
- 2. Green-blue ground.
- A—Black.
- B—Henna or corn-color.
- 3. Green-blue ground.
- A—Light yellow-green.
- B—Light green-blue.
Purple ground.
- 1. Dark amethyst ground.
- A—Light amethyst.
- B—Silver-gray.
Gray ground.
- 1. Silver or pearl-gray ground.
- A—Amethyst.
- B—Orchid.
Green ground.
- 1. Emerald-green ground.
- A—Black.
- B—Scarlet (orange-red).
- 2. Dark-green ground.
- A—Light green.
- B—Corn-color.
{33}
Cream ground.
- 1. Deep cream ground or corn-color.
- A—Black.
- B—Salmon or burnt-orange or lavender.
- 2. Deep yellow-cream ground (chamois).
- A—Seal-brown.
- B—Gold.
- 3. Apricot ground.
- A—Terra-cotta or henna.
- B—Orange.
- 4. Deep cream ground.
- A—Light amethyst.
- B—Pink.
Salmon ground.
- 1. Salmon ground.
- A—Terra-cotta.
- B—Yellow.
Green ground.
- 1. Yellow-green ground.
- A—Black.
- B—Burnt-orange or gold.
- 2. Dark yellow-green ground.
- A—Light yellow-green.
- B—Cream.
Coral or strawberry ground.
- 1. Coral ground.
- A—Light yellow-green or black.
- B—Laurel pink.
- 2. Strawberry ground.
- A—Black.
- B—Gold or peacock-blue.
Brown ground.
- 1. Seal-brown ground.
- A—Topaz or burnt-orange.
- B—Tan or deep cream.
{34}
Brown ground.
- 1. Chestnut-brown ground.
- A—Olive-green.
- B—Golden-brown.
- C—Tan.
- 2. Seal-brown ground.
- A—Burnt-orange.
- B—Medium green-blue.
- C—Champagne.
Tan ground.
- 1. Tan ground.
- A—Peacock-blue.
- B—Black.
- C—Burnt-orange or cherry.
- 2. Fawn ground.
- A—Seal-brown.
- B—Moss-green.
- C—Gold.
Green ground.
- 1. Dark yellow-green ground.
- A—Medium green-blue.
- B—Light yellow-green.
- C—Cream or a yellow-tan (chamois).
- 2. Nile-green ground.
- A—Light amethyst (orchid).
- B—Pink.
- C—Yellow.
Blue ground.
- 1. Turquoise-blue ground.
- A—Strawberry.
- B—Black.
- C—Orange.
- 2. Deep green-blue ground (sapphire).
- A—Fawn.
- B—Light amethyst (orchid).
- C—Orange.
{35}
Blue ground.
- 1. Deep green-blue ground.
- A—Black.
- B—Henna.
- 2. Peacock-blue ground.
- A—Black.
- B—Burnt-orange or cherry.
Mahogany or terra-cotta ground.
- 1. Mahogany ground or terra-cotta.
- A—Burnt-orange.
- B—Cream.
- 2. Terra-cotta ground.
- A—Deep turquoise-blue.
- B—Burnt-orange.
Green ground.
- 1. Gray-green ground.
- A—Black.
- B—Orange or gold.
- 2. Bronze-green ground.
- A—Gold.
- B—Deep yellow-tan (chamois).
- 3. Nile-green ground.
- A—Lavender.
- B—Pale yellow.
Tan ground.
- 1. Champagne ground.
- A—Seal-brown.
- B—Topaz or burnt-orange.
- 2. Tan.
- A—Black.
- B—Strawberry or heliotrope.
Purple ground.
- 1. Amethyst ground—dark.
- A—Silver-gray.
- B—Light amethyst or pink.
{36}
Gray ground.
- 1. Silver-gray ground.
- A—Dark amethyst—fringe the same.
- B—Light amethyst (orchid).
- C—Pink or light green-blue or Nile-green.
- 2. Pearl-gray ground.
- A—Sapphire-blue—fringe the same.
- B—Coral.
- C—Light yellow-green.
Tan ground.
- 1. Tan ground.
- A—Chestnut—fringe the same.
- B—Topaz.
- C—Golden-brown.
- 2. Champagne ground.
- A—Seal-brown—fringe the same.
- B—Burnt-orange.
- C—Deep green-blue (electric).
Cream ground.
- 1. Deep cream ground.
- A—Black—fringe the same.
- B—Burnt-orange.
- C—Peacock-blue.
- 2. Corn color ground.
- A—Dark amethyst or wistaria—fringe the same.
- B—Light amethyst.
- C—Nile-green.
- 3. Deep cream ground.
- A—Old rose or coral—fringe the same.
- B—Tearose-pink.
- C—Yellow.
Blue ground.
- 1. Light green-blue ground.
- A—Dark green-blue—fringe the same.
- B—Amethyst.
- C—Orange.
Green ground.
- 1. Light yellow-green ground.
- A—Dark yellow-green—fringe the same.
- B—Deep yellow-tan (chamois).
- C—Orange.
{37}
Pink or old rose ground.
- 1. Old rose ground.
- A—Amethyst—fringe the same.
- B—Black.
- C—Pink.
- 2. Salmon-pink ground.
- A—Old rose—fringe the same.
- B—Pearl-gray.
- C—Copenhagen-blue.
- 3. Strawberry ground.
- A—Black—fringe the same.
- B—Peacock-blue.
- C—Gold.
Blue ground.
- 1. Deep green-blue ground.
- A—Black—fringe the same.
- B—Henna.
- C—Burnt-orange.
- 2. Turquoise-blue ground.
- A—Amethyst—fringe the same.
- B—Black.
- C—Orange.
- 3. Light blue ground.
- A—Dark blue—fringe the same.
- B—Light green.
- C—Yellow or deep cream.
Green ground.
- 1. Light yellow-green ground.
- A—Medium yellow-green—fringe the same.
- B—Amethyst.
- C—Apricot.
- 2. Yellow-green ground.
- A—Black—fringe the same.
- B—Burnt-orange.
- C—Deep yellow-tan (chamois).
Tan ground.
- 1. Buff ground.
- A—Seal-brown.
- B—Yellow-green.
- C—Orange.
{38}
Tan ground.
- 1. Tan ground.
- A—Chestnut-brown—fringe the same.
- B—Olive-green.
- C—Topaz.
- 2. Champagne ground.
- A—Seal-brown—fringe the same.
- B—Topaz.
- C—Orange.
Lavender ground.
- 1. Lavender ground.
- A—Dark amethyst or wistaria—fringe the same.
- B—Wild-rose.
- C—Silver-gray.
- 2. Lavender ground.
- A—Black—fringe the same.
- B—Dark amethyst.
- C—Turquoise-blue or gold.
Yellow-pink ground.
- 1. Pale yellow-pink ground.
- A—Dark salmon—fringe the same.
- B—Amethyst.
- C—Yellow.
- 2. Pale yellow-pink ground.
- A—Light amethyst (orchid).
- B—Nile-green.
- C—Yellow.
Deep cream ground.
- 1. Deep cream ground.
- A—Light yellow-green—fringe the same.
- B—Black.
- C—Orange.
Blue ground.
- 1. Light green-blue ground.
- A—Medium green-blue ground—fringe the same.
- B—Amethyst.
- C—Silver-gray.
{39}
Tan ground.
- 1. Tan ground.
- A—Chestnut-brown—fringe the same.
- B—Orange.
- 2. Champagne or fawn ground.
- A—Seal-brown—fringe the same.
- B—Burnt-orange, topaz, yellow-green or deep turquoise-blue.
Blue ground.
- 1. Green-blue ground.
- A—Dark yellow-green—fringe the same.
- B—Deep yellow-tan (chamois).
- 2. Peacock-blue ground.
- A—Black—fringe the same.
- B—Henna or burnt-orange.
- 3. Japan-blue ground.
- A—Black—fringe the same.
- B—Garnet.
Gray ground.
- 1. Silver-gray ground.
- A—Wistaria—fringe the same.
- B—Lilac.
- 2. Silver or pearl-gray ground.
- A—Amethyst.
- B—Orchid.
Old-rose or pink ground.
- 1. Tearose ground.
- A—Coral pink—fringe the same.
- B—Deep cream.
- 2. Old-rose ground.
- A—Amethyst—fringe the same.
- B—Yellow.
Lavender ground.
- 1. Lavender ground.
- A—Amethyst—fringe the same.
- B—Silver-gray.
{40}
Gray ground.
- 1. Silver-gray ground.
- A—Sapphire blue.
- B—Light blue.
- 2. Pearl-gray ground.
- A—Amethyst or wistaria.
- B—Orchid or lilac.
Cream ground.
- 1. Deep cream ground or pale apricot.
- A—Mahogany—fringe the same.
- B—Burnt-orange.
- 2. Deep yellow-cream ground.
- A—Yellow-green—fringe the same.
- B—Gold, orange or salmon.
Tan ground.
- 1. Tan ground.
- A—Brown—fringe the same.
- B—Topaz.
- 2. Champagne ground.
- A—Seal-brown—fringe the same.
- B—Fawn.
Corn color ground.
- 1. Corn color ground.
- A—Burnt-orange.
- B—Orange.
- 2. Corn color ground.
- A—Amethyst.
- B—Nile-green.
Blue ground.
- 1. Light blue ground.
- A—Delft-blue—fringe the same.
- B—Silver-gray.
- 2. Turquoise-blue ground.
- A—Black—fringe the same.
- B—Strawberry.
{41}
- 1. Ground—Ecru.
- Stripes—Seal-brown.
- 2. Ground—Warm tan.
- Stripes A and C—Dark brown.
- Stripes B and D—Golden-brown or orange.
- 3. Ground—Cool tan (buff).
- Stripes—Green-blue (electric blue).
- 4. Ground—Corn color.
- Stripes—Burnt-orange or A and C black, and B and D orange.
- 5. Ground—Light yellow-green.
- Stripes—Dark yellow-green.
- 6. Ground—Light yellow-green.
- Stripes—A and C dark yellow-green, B and D orange.
- 7. Ground—Medium yellow-green.
- Stripes—A and C black, B and D orange or salmon.
- 8. Ground—Old China-blue.
- Stripes—Japan-blue.
- 9. Ground—Burnt-orange.
- Stripes—A, black, B, C, D, peacock-blue.
- 10. Ground—Tearose-pink.
- Stripes—Coral or laurel-pink.
- 11. Ground—Strawberry.
- Stripes—Black.
- 12. Ground—Silver-gray.
- Stripes—Amethyst, heliotrope or salmon pink.
{42}
{43}
Borders 17 and 18 (Figs. 32 and 33.)
- 1. Ground—Tan.
- Stripes—Hunter-green or dark brown.
- 2. Ground—Tan.
- Stripe A—Dark brown.
- Stripes B—Golden-brown, topaz or orange.
- 3. Ground—Chestnut-brown.
- Stripe A—Topaz.
- Stripes B—Tan.
- 4. Ground—Seal-brown.
- Stripes—Champagne, orange or green.
- 5. Ground—Green-blue.
- Stripes—Cream, silver-gray or black.
- 6. Ground—Peacock-blue.
- Stripes—Burnt-orange.
- 7. Ground—Delft or Copenhagen-blue.
- Stripes—Silver or pearl-gray, or light yellow-green.
- 8. Ground—Strawberry.
- Stripes—Black.
- 9. Ground—White or cream.
- Stripes—Black or some good color.
- 10. Ground—Salmon-pink.
- Stripes—Terra-cotta.
- 11. Ground—Yellow-green.
- Stripes—Orange edged with black.
- 12. Ground—Purple.
- Stripes—Lavender or silver-gray edged with black.
- 13. Ground—Burnt-orange.
- Stripes—Dark brown, olive-green, black or peacock-blue.
- 14. Ground—Old-rose or coral.
- Stripes—Amethyst, deep yellow-green or black.
{44}
Quantity of Yarn Required.
Four-fold—about 18 ounces of wool yarn, or 16 ounces of silky
wool.
Two-fold—8 to 9 ounces.
Rake.
For four-fold yarn use No. 1 rake shown in Fig. 1.
For two-fold yarn use No. 2 rake shown in Fig. 1.
Stitches.
For the body of the jacket—single stitch as described in Chapter
2.
For cuffs and collar—double stitch.
{45}
DIRECTIONS.
Read carefully the instructions given in Chapters 2 and 4.
To Knit the Cuffs, Sleeves and Body of the Jacket.
1. Knit the cuff directly in the center of the rake so as to allow
room for adding the same number of stitches on either end in shaping
the sleeve. (See Fig. 35.)
2. Cast stitches on 44 nails, 22 in each row. (See Chapter 2.)
3. Knit 2½ inches of double stitch (Chapter 2) to make the
cuff, A, B, D, C, Fig. 35.
4. To shape the sleeve, C, D, E, F, when using four-fold yarn,
increase the number of stitches by adding one more nail at the end
of every row of winding until all the nails of the rake are in use.
Use single stitch. (See Chapter 2.)
5. For a looser sleeve, or for two-fold yarn, add two nails at
a time for the first 6 inches, and then one nail at a time for the rest
of the sleeve. (See dotted line in Fig. 35.)
6. Knit 33 inches—single stitch.
7. Cast off stitches as described in section 3 of Chapter 4, to
shape the second sleeve. Where you added one nail at a time in
shaping the first sleeve, cast off one nail at a time in shaping the
second sleeve. If you added two nails, cast stitches off two nails
at a time, until only 44 nails, 22 in each row, are left.
8. Knit 2½ inches double stitch to make the second cuff.
9. Cast the knitting from the rake as described in section 5 of
Chapter 4.
10. Take up loose stitches at the beginning of the first cuff as
described in section 6 of Chapter 4, and sew up the seams of the
sleeves.
To Knit Collar No. 1. (Fig. 36.)
1. Cast stitches on twelve nails, six in each row, and knit 7
inches, double stitch.
2. With the next winding of yarn add 24 nails, all at one time,
to the right of the knitting, to form the wide part of the collar
(H-I). Eighteen nails in each row are now being used.
3. Continue knitting for 18 inches with double stitch.
4. Cast stitches off 24 nails added above, leaving twelve nails,
six in each row.
5. Continue knitting for 7 inches—double stitch.
6. Cast knitting from the rake.
7. Crochet around the outer edge of the collar, using single
crochet stitch.
{46}

BED JACKET
Cuffs, sleeves, and body
of jacket in one piece.
Two collars
Fig. 35
Fig. 36—Collar No. 1.
Fig. 37—Collar No. 2.
Fig. 38
{47}
8. Sew the collar to the body of the jacket as indicated in the
drawing. (See directions in section 7, Chapter 4.)
9. Fold collar back along the dotted line.
10. Make a cord and tassels and fasten under the collar. A
very good cord can be knitted on four nails of the rake, two in each
row, using single stitch, or a “spool knitter” can be made from a
large empty spool with four 1-inch No. 16 wire brads driven in
around the opening at one end. The winding of a spool knitter is
similar to the winding of the round cap rake, Fig. 3. (See Chapter
3.)
To Knit Collar No. 2. (Fig. 37.)
1. Cast stitches on 40 nails, twenty in each row.
2. Knit double stitch for 7 inches.
3. Cast stitches off 24 nails at one end of knitting to produce
M N, Fig. 37.
4. On the next winding add these 24 nails again.
5. Knit 18 inches—double stitch.
6. Cast off the same 24 nails again, thus producing O P, Fig.
37.
7. On the next winding add these 24 nails again.
8. Knit 7 inches—double stitch.
9. Cast knitting from the rake.
10. Crochet once around the outer edge of the collar with a
single crochet stitch.
11. After the collar is sewed to the body of the jacket it is
folded back as indicated by the dotted line in the drawing, and fastened
with crochet covered buttons and loops. (See Figs. 37 and
38.)
{48}
Chapter 8.
BOY’S SLIPOVER SWEATER.
(Without sleeves or collar—See Frontispiece and Figs. 39 and
40.)
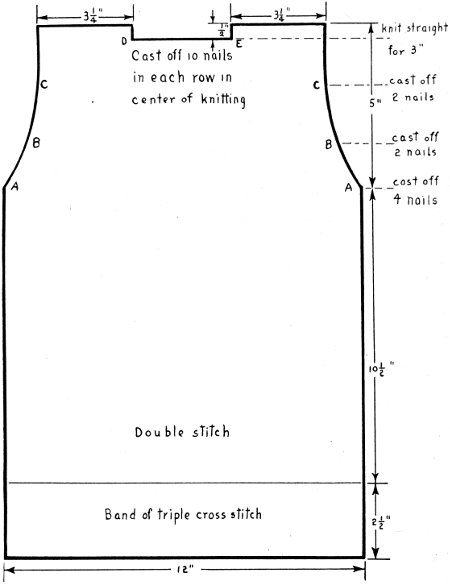
Fig. 39. Pattern for Back of Boy’s Slipover Sweater.
{49}
Quantity of Yarn Required.
6 ounces of four-fold yarn.
Rake.
No. 2 (⅜ inch—¾ inch) makes a very good sweater.
No. 3 (⅜ inch—⅝ inch) makes a closer sweater.
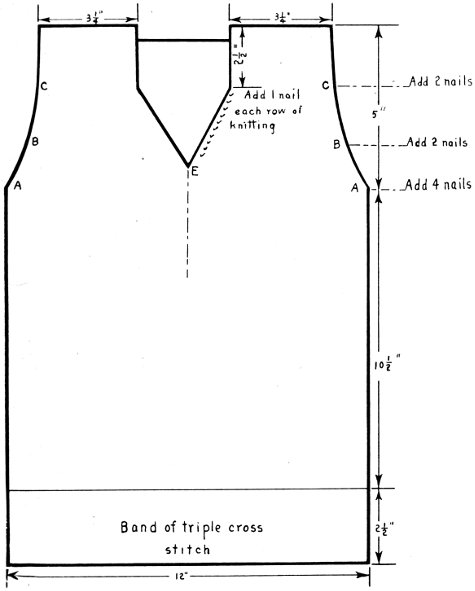
Fig. 40. Pattern for Front of Boy’s Slipover Sweater.
{50}
Stitches.
Triple stitch for the bands at the bottom of sweater and double
stitch for the body part, as described in Chapter 2.
DIRECTIONS.
Study Figs. 39 and 40 carefully and consult them as you follow
the directions given here. The back and front of the sweater are
knitted in one piece.
To Knit the Back of the Sweater (Fig. 39.)
1. Cast stitches on about 80 nails, 40 in each row, as described
in Chapter 2.
2. Knit 2½ inches of triple stitch. (See Chapter 2.)
3. Change from triple stitch to double stitch by winding rake
and lifting the two lower threads over the upper thread and off the
rake. (See section 2, Chapter 4.)
4. Knit 10½ inches double stitch. (See Chapter 2.)
5. Cast stitches off four nails at both end of knitting, A-A.
6. Knit 1¼ inches.
7. Cast stitches off two nails at each end of knitting, B-B.
8. Knit 1¼ inches.
9. Cast stitches off two more nails at each end, C-C.
10. Knit 2 inches.
11. Cast stitches off twenty nails, ten nails in each row, directly
in the center of the knitting to make the back of the neck. (See
section 3, Chapter 4.)
The knitting is now in two parts and two balls of yarn must be
used.
To Knit the Front of Sweater Refer to Fig. 40.
12. Knit the shoulders straight for 3 inches.
13. Then, to make the V neck, every time the yarn is wound
toward the center, add one nail on each shoulder piece until the two
parts of the knitting meet in the center at E.
14. Add two nails at C and B on both armholes.
15. Add four nails at A on both armholes.
16. If the sweater is to be left open down the front for a few
inches and laced with a cord, continue using the two balls of yarn,
winding each from the side of the sweater to the center only and
back to the side.
If the sweater is to be closed from the point E down, cut off
one ball when the last winding brings it to the armhole at A. Continue
knitting the full width of the front with the other ball.
{51}
17. Knit 10½ inches.
18. Change from the double stitch to triple stitch for the band
by winding once across the rake and back to make three threads
around each nail before lifting the lowest thread over the upper
two and off.
19. Knit 2½ inches triple stitch, to correspond to the band at
the bottom of the back of the sweater.
20. Cast knitting from the rake. (See section 5, Chapter 4.)
21. Take up the loose stitches at the beginning of the knitting
at the lower edge of the back. (See section 6, Chapter 4.)
22. Sew up the under arm seams. (See section 7, Chapter 4.)
23. Crochet around the armholes and the neck with a single
crochet stitch. If the neck has been left open down the front for a
few inches, crochet around this opening, making loops for the cord
lacing.
A man’s slipover sweater may be made in the same way by simply
changing the measurements.
{52}
Chapter 9.
CHILD’S SWEATER JACKET.
This child’s sweater jacket is suitable for children ranging in
age from 4 to 6 years. It is made with sleeves, a collar, pockets,
and a belt.
For body of sweater see Figs. 39 and 40.
For sleeves, collar, and pockets see Figs. 42, 43, 44 and 45.
Quantity of Yarn Required.
Twelve ounces of four-fold yarn.
Rake.
No. 2 (⅜ inch × ¾ inch) Fig. 1.
No. 3 would make a very closely knitted sweater.
Stitches.
Double stitch for the band at the bottom, the cuffs, and the top
of the pockets.
Single stitch for the rest of the sweater.
DIRECTIONS.
To make the body of the sweater, follow the directions given
for the boy’s slipover sweater in Chapter 8, with the following
changes:
1. Knit the bands at the bottom with double stitch instead of
triple stitch, and the body of the sweater with single stitch instead
of double.
2. Cast off only sixteen nails at the back of the neck, eight in
each row. (See section 11, Chapter 8.)
3. Leave the sweater open all the way down the front; that is,
continue using two balls of yarn, and wind from the sides to the
center only and back to the sides. (See section 16, Chapter 8.)
To Knit the Sleeves (Fig. 42.)
1. Begin to knit the sleeve at the top. Cast stitches on sixteen
nails in the center of the rake, eight nails in each row.
2. Using the single stitch, add two nails in each winding until
about 60 nails are in use, 30 nails in each row. The sleeve should
measure about 10 inches at E F, Fig. 42.
3. Knit five rows, then cast a stitch off one nail on one side of
the sleeve.
{53}
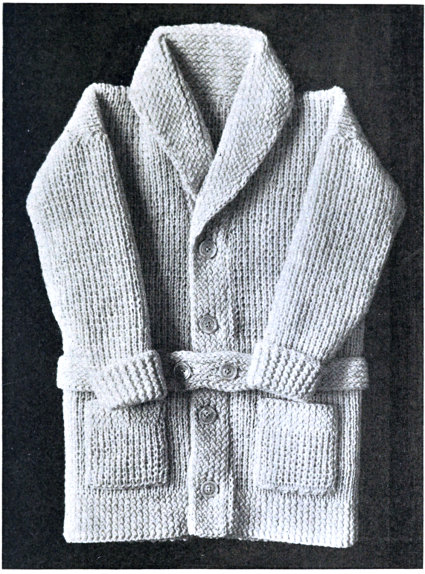
Fig. 41. Child’s Sweater Jacket Made by a Patient at Kenilworth Hospital.
4. Knit five rows, then cast a stitch off one nail on the other
side.
5. Knit four rows, cast a stitch off one nail on the first side of
the sleeve.
6. Knit four rows, cast a stitch off one nail on the other side.
{54}
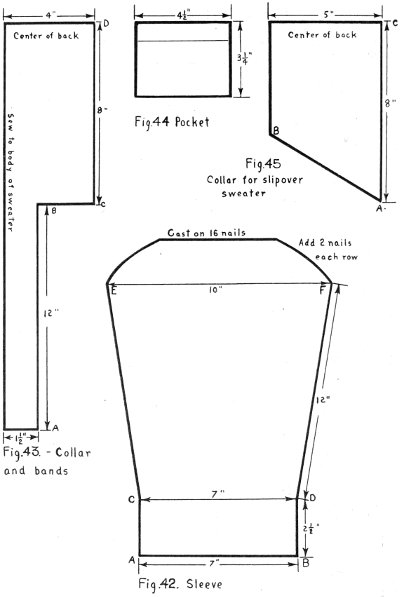
Fig. 42. Sleeve
Fig. 43. Collar and bands
Fig. 44. Pocket
Fig. 45. Collar for slipover sweater
{55}
7. Repeat 5 and 6 for three times; that is, until six more nails
have been dropped, three on each side of the sleeve.
8. Then every three rows of knitting, drop two nails at a time,
first on one side of the sleeve and then on the other, until only 42
nails remain in use, 21 in each row.
9. When the sleeve measures 12 inches from D to F, change
to a double stitch on the next winding. Knit 2½ inches double
stitch for the cuff.
10. Cast the knitting from the rake.
To Knit Collar and Bands (Fig. 43.)
The collar and the bands for down the front are made in one
piece.
1. To find the exact length required, measure from the bottom
edge of the front of the sweater to point E at the neck. (See Fig.
40.) This gives the length A-B of the band shown in Fig. 43.
Measure from E around the neck of the sweater to the center of the
back. This gives the length C-D, Fig. 43, of one-half of the collar.
2. Cast stitches on twelve nails, six in each row. Knit 2½
inches of band A-B with double stitch, and the rest of the length
single stitch. Remember to provide for the buttonholes. (See directions
given in section 8, Chapter 4.)
3. When the band is the required length, with the next winding
add 24 nails to the right of the knitting, twelve nails in each
row, making 36 nails in all. Knit the collar until a piece of the
required length has been made.
4. Cast stitches from the 24 nails added above for the collar.
5. Knit the second band, using double stitch for the last 2½
inches.
6. Cast knitting from the rake.
7. Take up the loose stitches at the beginning of the first band,
as described in section 6 of Chapter 4. Crochet around the outer
edge of the collar with a single crochet stitch.
To Knit the Pockets (Fig. 44.)
1. Cast stitches on 30 nails.
2. Knit 2¼ inches of single stitch.
3. Knit 1 inch of double stitch.
4. Cast knitting from the rake.
To Knit the Belt.
1. Knit a length as long as desired, using twelve nails and a
single stitch. Make two buttonholes, 3 inches apart, near the end{56}
that will wrap over. This end may be pointed by casting off one
stitch on each row of knitting for the last eight or ten rows.
The parts of the sweater are now ready to be sewed together as
described in section 7 of Chapter 4.
Fig. 45 shows the pattern for a collar when the sweater is made
slipover style, closed down the front.
1. Cast stitches on four nails, two in each row. Keep one side,
A-C, of knitting straight. On the other side add two nails at a time
until the collar is wide enough. About twenty nails in each row
makes a good collar. Use single stitch.
2. Continue knitting on these 40 nails until the straight edge
of the collar is long enough to go from the point of the V in the
front, around to the upper end of the V on the other side.
3. Cast stitches off two nails at a time, to slope the collar to
correspond to the other end, until only four nails remain.
4. Cast knitting from the rake. Crochet around the outer edge
of the collar with a single crochet stitch.
Remember that it is the straight edge of this collar which is
sewed to the sweater.
{57}
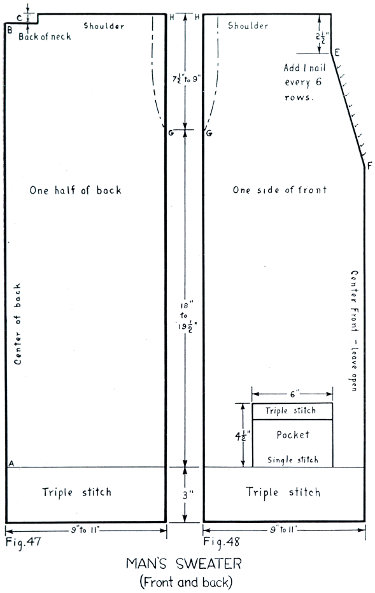
The following three styles of men’s sweaters (Figs. 46, 47, 48,
49, 50, 51) are described in this chapter:
1. Buttoned down the front, with sleeves, collar and pockets.
2. Slipover, with sleeves, collar and pockets.
3. Slipover, sleeveless and without collar. (See Boy’s Slipover
Sweater, Chapter 8.)
SWEATER No. 1.
This man’s sweater is buttoned down the front and is made with
sleeves, a collar and pockets.
Quantity of Yarn Required.
32 ounces of four-fold yarn.
If heavy sweater yarn is used it will require 42 ounces, and the
sweater must be knitted on rake No. 2. (Fig. 1.)
Rake.
For four-fold yarn use rake No. 4 (⁵⁄₁₆ inch—¹⁰⁄₁₆ inch) Fig.
1.
Stitches.
Single and triple cross-stitch. (See Chapter 2.)
DIRECTIONS.
Read carefully the general directions given in Chapter 4, and
study Figs. 47, 48, 49, 50 and 51. Consult them as you follow the
directions given here. The back and the front of the sweater are
knitted in one piece.
To Knit the Back of the Sweater.
Compare Fig. 47 with Fig. 39. It will be seen at once that there
is a great similarity.
1. Cast stitches on 144 nails, 72 in each row.
2. Knit 3 inches of triple cross-stitch.
3. Change to single stitch as described in section 2 of Chapter
4, and knit 25½ to 28½ inches, depending on the desired length AB
of the sweater. (See Fig. 47.)
4. Cast stitches from 28 nails, fourteen in each row, in the
center of the knitting to make the back of the neck (C). The knitting
is now in two parts and two balls of yarn must be used.
{58}
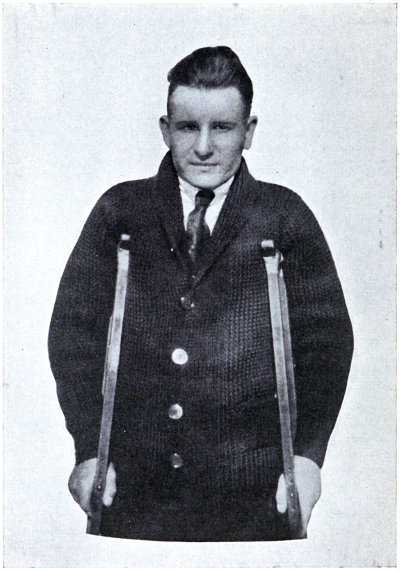
Fig. 46. A Patient Wearing a Rake Knitted Sweater of Heavy Yarn Made by Himself.
To Knit the Front of the Sweater.
1. Knit the shoulder pieces straight for 3 inches, Fig. 48.
{59}
MAN’S SWEATER
(Front and back)
Fig. 47 Fig. 48
{60}
2. To shape the V neck (E-F) on every sixth row when the
yarn is wound on the nails toward the center, add one nail on each
shoulder piece until the two parts of the knitting meet in the center.
Sleeve for man’s sweater.
Fig. 49
{61}
3. As the sweater is to be buttoned down the front, continue to
use two balls of yarn, winding each from the side of the sweater
to the center only and back to the side.
4. Knit until the fronts measure the same as the back, remembering
to make the last 3 inches with triple cross-stitch to correspond
to the band at the bottom of the back. Section 1 of Chapter
4 describes how to change from single to triple cross-stitch.
5. Cast knitting from the rake.
6. Take up the loose stitches at the lower edge of the back as
described in section 6 of Chapter 4.
7. Sew up the side seams as described in section 7 of Chapter
4. Make opening GH for sleeves about 7½ to 9 inches.
To Knit the Sleeves.
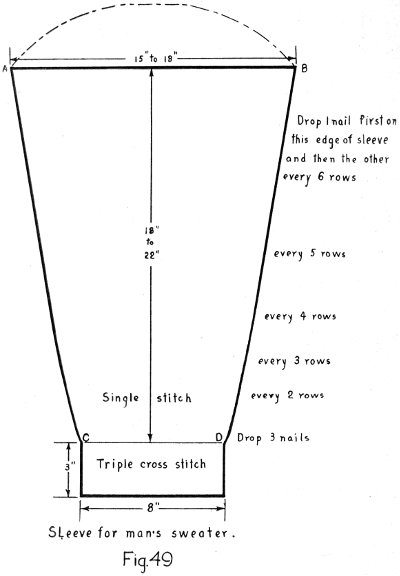
1. Cast stitches on about 100 nails, 50 in each row, to produce
the straight line AB, Fig. 49.
Note:—The sleeve at the top should measure the same as the
armhole.
2. To shape the sleeve, cast stitch from one nail at a time every
six rows of knitting, first on one side of the sleeve and then on the
other, as indicated on the drawing. Then every five rows, every
four rows, every three rows, every two rows, until the sleeve is long
enough (about 18 to 22 inches) and narrow enough at the cuff
(about 8 inches). On the very last row at this point three nails
should be dropped altogether on each side of the sleeve. Watch
carefully the shaping of the sleeve as you narrow so as not to get
it too tight at any point.
3. Change to triple cross-stitch by winding once across the
rake and back, to make three threads around each nail before lifting
the lower thread over the upper two and off.
4. Knit 3 inches of triple cross-stitch for the cuff.
5. Cast the knitting off the rake.
6. Sew up the seam of the sleeve, and sew the sleeve in the
armhole of the sweater so that the seam in the sleeve and the side
seam of the sweater come together. (See section 7 of Chapter 4
for directions for sewing.)
7. Make other sleeve to match.
To Make Collar and the Bands for Down the Front.
Two styles of collar are shown by Figs. 50 and 51.
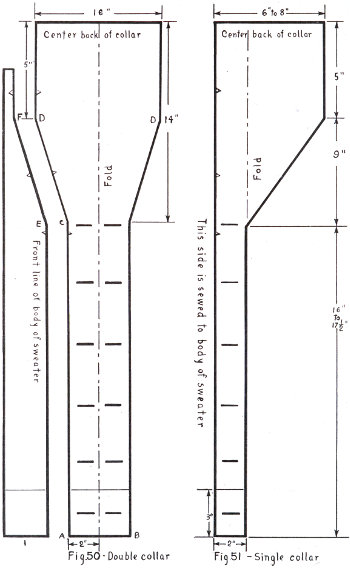
Fig. 50—Double collar
Fig. 51—Single collar
Double Collar and Bands.
1. Cast stitches on 32 nails, sixteen in each row, to make AB,{63}
Fig. 50.
2. Knit 3 inches of triple cross-stitch.
3. Change to single stitch.
4. Measure the edge of one of the front pieces of the sweater
to find out how long the bands (BC) must be. Decide how far
apart the buttonholes are to come. To make the buttonholes, cast
off stitches on nails, 6, 7, 8, 9, 10, 11,—22, 23, 24, 25, 26, 27, and
add them again on the next winding.
5. When the band is long enough, increase the width of the
knitting to make the collar by adding one nail at each end on every
sixth or seventh row of knitting until the distance C D, Fig. 50,
measures the same as the side E F of the V neck of the sweater
front shown in Fig. 48.
6. Knit straight for about 10 inches, which is usually the distance
around the neck of the sweater, measured from point E in
Fig. 48 on one side, to the same point on the other.
7. Cast stitch off one nail at each end on every sixth or seventh
row of knitting, reversing what you did in section 5 above, until
there are again only 32 nails in use.
8. Knit the second band, omitting the buttonholes. Make the
last 3 inches with triple cross-stitch.
9. Cast knitting from the rake.
10. Take up the loose stitches at the beginning of the first band.
11. Double the collar and bands along the dotted line, being
sure that the two parts of the buttonholes come together. Sew to
the body of the sweater as indicated in the diagram, finding the
exact center of the collar and of the sweater, and sewing from the
center to the fronts.
12. Crochet the buttonholes, or finish them with a buttonhole
stitch, using a single strand of yarn.
Single Collar and Bands.
1. Knit band on sixteen nails, eight in each row. Cast stitches
off nails 6, 7, 8, 9, 10, 11, and add them again on the next winding,
to make the buttonholes. Knit the first 3 inches with triple cross-stitch,
and then change to single stitch.
2. When the band is long enough, as described in section 4,
for the double collar, increase the width of the knitting to form the
collar by adding one nail on the right only every five or six rows,
until the collar is wide enough.
3. Knit the collar straight for about 10 inches, as described in
section 6, for the double collar.
{64}
To be sure of your measurements, lay the collar and band along
the edge to which it is to be sewed, noting that with this single
collar and bands, it is the straight edge which comes next to the
body of the sweater.
4. Cast stitches off the nails added above, one nail every five
or six rows, reversing what you did in section 2, until only sixteen
nails remain in use.
5. Knit the second band, omitting the buttonholes. Knit the
last 3 inches with triple cross-stitch.
6. Cast knitting from the rake.
7. Take up the loose stitches at the beginning of the first band.
8. Sew the long, straight edge of bands and collar to the body
of the sweater, and fold the collar back along the dotted line.
Pockets.
1. For a pocket 5 inches wide, cast on about 70 stitches, 35
nails in each row.
2. Knit 3½ inches single stitch.
3. Knit 1 inch triple cross-stitch.
4. Cast knitting from the rake.
5. Sew pockets to the front of the sweater just above the band
of triple cross-stitch.
SWEATER NO. 2.
This sweater is of the slipover style, with sleeves and a collar.
Follow the foregoing directions for sweater No. 1, with the following
changes:
1. When the two parts of the front have come together in the
center, after shaping the V neck, drop one ball of yarn when winding
brings it to the armhole. Continue knitting the full width of
the front with the other ball.
2. To make a double collar, omit the bands and cast on eight
stitches, four in each row, and knit as directed for the double collar,
ending with eight nails. Cast knitting from the rake.
To make a single collar, cast stitches on only four nails and
proceed as for the single collar in Style No. 2, ending with four
nails. Cast knitting from the rake.
Crochet around the outer edge of all single collars, using a single
stitch.
SWEATER NO. 3.
This sleeveless slipover sweater is made just like the boy’s slipover
sweater described in Chapter 8, but the measurements given
in Figs. 47 and 48 are used.
{65}
Quantity of Yarn Required.
Four-fold yarn—for crown—about 2¼ ounces.
For bands—about 1¼ ounces.
The cap may be made of one color, or the crown and bands may
be different. (Figs. 15 and 52.)
Rake.
No. 4 (⁵⁄₁₆ inch—¹⁰⁄₁₆ inch) (Fig. 1.)
Stitches.
Double stitch (See Chapter 2.)
DIRECTIONS.
To Knit Crown of Cap (Fig. 53.)
1. Cast stitches on 60 nails, 30 in each row, leaving the same
number of empty nails at both ends of the rake.
2. Knit with double stitch, adding two nails at the end of each
row until 84 nails are in use.
3. Knit 12 inches.
4. Cast stitches off two nails at the end of each row of knitting
until there are again only 60 nails in use, 30 in each row.
5. Cast knitting from the rake.
1. Cast stitches on 84 nails, 42 in each row.
2. Knit double stitch for 3¾ inches.
3. Cast knitting from the rake.
4. Knit second band in the same way.
To Sew Crown and Bands Together.
1. Gather end A B of the crown, Fig. 53, and sew it to the
middle of one of the long sides of a band. Gather the other end of
the crown in the same way, and sew it to the other band.
2. Continue the sewing of the bands around the edge of the
crown until the bands just meet on the side or overlap about ¼
inch.
3. Turn the bands up and fasten them to the crown on the
sides to keep them in place.
4. Make very small pompoms, not more than 1 inch across, of
the same color yarn as the crown, and fasten them to the bands{66}
where they come together on the side of the cap. Put some crocheted
loops of yarn between as shown in Fig. 52.
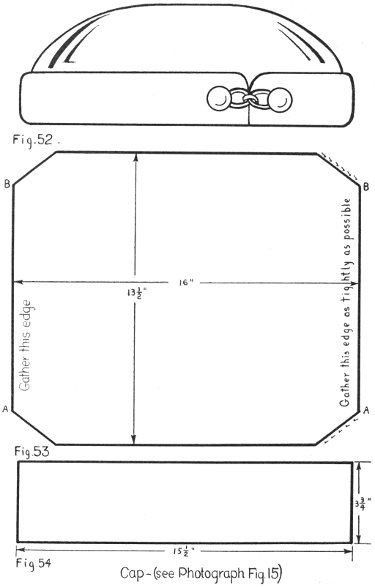
Cap—(see Photograph Fig. 15)
Fig. 52
Fig. 53
Fig. 54
5. If the cap is too loose around the head, tighten the bands by
running a double strand of yarn through the knitting just where
the crown is sewed to the bands.
{67}
STOCKING CAP
2 to 10 yrs.
Fig. 55
Fig. 56
Fig. 57
{68}
Quantity of Yarn Required.
2 to 3 ounces. Select two colors.
Rake.
Round rakes.
Fig. 2—makes a very closely knitted cap, 2 to 4 years.
Fig. 3—Size 1—makes a very good cap, 2 to 4 years.
Size 2—makes cap for 5 years and over.
For the larger sizes the yarn is not held as tightly as for the
smaller sizes.
Stitches.
See Chapter 3 on winding round rakes.
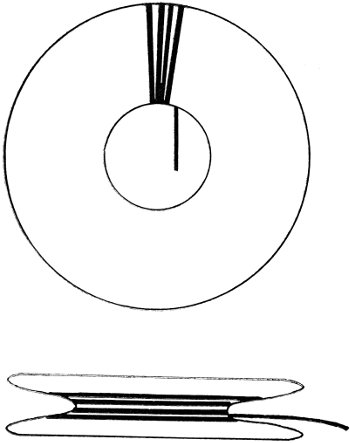
Fig. 58. Circle and Shuttle.
{69}
DIRECTIONS.
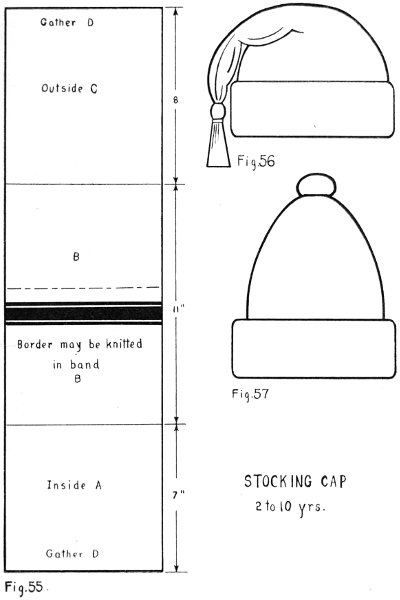
1. Cast stitches on rake as described in Chapter 3, using the
color of yarn chosen for the crown of the cap.
2. Knit 7 inches.
3. Change to the other color of yarn and knit 11 inches for the
rolled band.
4. Change to the first color of yarn again and knit 8 inches.
5. Cast knitting from the rake as described in section 5 of
Chapter 4.
6. Gather each end and fold so that section A, Fig. 55, comes
inside of section C.
7. Fasten gathered ends together.
8. Roll band once to make the cap with tassel, Fig. 56, and
twice to make the style shown in Fig. 57.
Pompom.
To make a pompom for the cap cut the circle and shuttle, shown
in Fig. 58, out of cardboard.
1. Fill the shuttle with yarn the color of the band, and wind
the cardboard circle until it is well covered.
2. With a darning needle, run a length of yarn along the inside
circle and under the yarn. Tie as tightly as possible.
3. Cut the yarn very carefully along the outer edge of the
circle.
4. Wrap the bunch of yarn in the center once or twice and
fasten before drawing it through the hole in the circle.
5. Trim down to the desired size.
The stocking cap, Fig. 56, can be made to hang longer on the
side of the head by adding a few more rows of knitting to sections
A and C, Fig. 55.
[Transcriber’s note—the following changes have been made to this text:
Page 41: yelllow to yellow—“Light yellow-green.”]
End of Project Gutenberg's Rake Knitting Patterns, by Bertha Thompson

*** END OF THIS PROJECT GUTENBERG EBOOK RAKE KNITTING PATTERNS ***

***** This file should be named 59440-h.htm or 59440-h.zip *****
This and all associated files of various formats will be found in:
        http://www.gutenberg.org/5/9/4/4/59440/

Produced by Susan Skinner, Tim Lindell and the Online
Distributed Proofreading Team at http://www.pgdp.net (This
file was produced from images generously made available
by The Internet Archive/American Libraries.)


Updated editions will replace the previous one--the old editions
will be renamed.

Creating the works from public domain print editions means that no
one owns a United States copyright in these works, so the Foundation
(and you!) can copy and distribute it in the United States without
permission and without paying copyright royalties.  Special rules,
set forth in the General Terms of Use part of this license, apply to
copying and distributing Project Gutenberg-tm electronic works to
protect the PROJECT GUTENBERG-tm concept and trademark.  Project
Gutenberg is a registered trademark, and may not be used if you
charge for the eBooks, unless you receive specific permission.  If you
do not charge anything for copies of this eBook, complying with the
rules is very easy.  You may use this eBook for nearly any purpose
such as creation of derivative works, reports, performances and
research.  They may be modified and printed and given away--you may do
practically ANYTHING with public domain eBooks.  Redistribution is
subject to the trademark license, especially commercial
redistribution.


*** START: FULL LICENSE ***

THE FULL PROJECT GUTENBERG LICENSE
PLEASE READ THIS BEFORE YOU DISTRIBUTE OR USE THIS WORK

To protect the Project Gutenberg-tm mission of promoting the free
distribution of electronic works, by using or distributing this work
(or any other work associated in any way with the phrase "Project
Gutenberg"), you agree to comply with all the terms of the Full Project
Gutenberg-tm License (available with this file or online at
http://gutenberg.org/license).


Section 1.  General Terms of Use and Redistributing Project Gutenberg-tm
electronic works

1.A.  By reading or using any part of this Project Gutenberg-tm
electronic work, you indicate that you have read, understand, agree to
and accept all the terms of this license and intellectual property
(trademark/copyright) agreement.  If you do not agree to abide by all
the terms of this agreement, you must cease using and return or destroy
all copies of Project Gutenberg-tm electronic works in your possession.
If you paid a fee for obtaining a copy of or access to a Project
Gutenberg-tm electronic work and you do not agree to be bound by the
terms of this agreement, you may obtain a refund from the person or
entity to whom you paid the fee as set forth in paragraph 1.E.8.

1.B.  "Project Gutenberg" is a registered trademark.  It may only be
used on or associated in any way with an electronic work by people who
agree to be bound by the terms of this agreement.  There are a few
things that you can do with most Project Gutenberg-tm electronic works
even without complying with the full terms of this agreement.  See
paragraph 1.C below.  There are a lot of things you can do with Project
Gutenberg-tm electronic works if you follow the terms of this agreement
and help preserve free future access to Project Gutenberg-tm electronic
works.  See paragraph 1.E below.

1.C.  The Project Gutenberg Literary Archive Foundation ("the Foundation"
or PGLAF), owns a compilation copyright in the collection of Project
Gutenberg-tm electronic works.  Nearly all the individual works in the
collection are in the public domain in the United States.  If an
individual work is in the public domain in the United States and you are
located in the United States, we do not claim a right to prevent you from
copying, distributing, performing, displaying or creating derivative
works based on the work as long as all references to Project Gutenberg
are removed.  Of course, we hope that you will support the Project
Gutenberg-tm mission of promoting free access to electronic works by
freely sharing Project Gutenberg-tm works in compliance with the terms of
this agreement for keeping the Project Gutenberg-tm name associated with
the work.  You can easily comply with the terms of this agreement by
keeping this work in the same format with its attached full Project
Gutenberg-tm License when you share it without charge with others.

1.D.  The copyright laws of the place where you are located also govern
what you can do with this work.  Copyright laws in most countries are in
a constant state of change.  If you are outside the United States, check
the laws of your country in addition to the terms of this agreement
before downloading, copying, displaying, performing, distributing or
creating derivative works based on this work or any other Project
Gutenberg-tm work.  The Foundation makes no representations concerning
the copyright status of any work in any country outside the United
States.

1.E.  Unless you have removed all references to Project Gutenberg:

1.E.1.  The following sentence, with active links to, or other immediate
access to, the full Project Gutenberg-tm License must appear prominently
whenever any copy of a Project Gutenberg-tm work (any work on which the
phrase "Project Gutenberg" appears, or with which the phrase "Project
Gutenberg" is associated) is accessed, displayed, performed, viewed,
copied or distributed:

This eBook is for the use of anyone anywhere at no cost and with
almost no restrictions whatsoever.  You may copy it, give it away or
re-use it under the terms of the Project Gutenberg License included
with this eBook or online at www.gutenberg.org/license

1.E.2.  If an individual Project Gutenberg-tm electronic work is derived
from the public domain (does not contain a notice indicating that it is
posted with permission of the copyright holder), the work can be copied
and distributed to anyone in the United States without paying any fees
or charges.  If you are redistributing or providing access to a work
with the phrase "Project Gutenberg" associated with or appearing on the
work, you must comply either with the requirements of paragraphs 1.E.1
through 1.E.7 or obtain permission for the use of the work and the
Project Gutenberg-tm trademark as set forth in paragraphs 1.E.8 or
1.E.9.

1.E.3.  If an individual Project Gutenberg-tm electronic work is posted
with the permission of the copyright holder, your use and distribution
must comply with both paragraphs 1.E.1 through 1.E.7 and any additional
terms imposed by the copyright holder.  Additional terms will be linked
to the Project Gutenberg-tm License for all works posted with the
permission of the copyright holder found at the beginning of this work.

1.E.4.  Do not unlink or detach or remove the full Project Gutenberg-tm
License terms from this work, or any files containing a part of this
work or any other work associated with Project Gutenberg-tm.

1.E.5.  Do not copy, display, perform, distribute or redistribute this
electronic work, or any part of this electronic work, without
prominently displaying the sentence set forth in paragraph 1.E.1 with
active links or immediate access to the full terms of the Project
Gutenberg-tm License.

1.E.6.  You may convert to and distribute this work in any binary,
compressed, marked up, nonproprietary or proprietary form, including any
word processing or hypertext form.  However, if you provide access to or
distribute copies of a Project Gutenberg-tm work in a format other than
"Plain Vanilla ASCII" or other format used in the official version
posted on the official Project Gutenberg-tm web site (www.gutenberg.org),
you must, at no additional cost, fee or expense to the user, provide a
copy, a means of exporting a copy, or a means of obtaining a copy upon
request, of the work in its original "Plain Vanilla ASCII" or other
form.  Any alternate format must include the full Project Gutenberg-tm
License as specified in paragraph 1.E.1.

1.E.7.  Do not charge a fee for access to, viewing, displaying,
performing, copying or distributing any Project Gutenberg-tm works
unless you comply with paragraph 1.E.8 or 1.E.9.

1.E.8.  You may charge a reasonable fee for copies of or providing
access to or distributing Project Gutenberg-tm electronic works provided
that

- You pay a royalty fee of 20% of the gross profits you derive from
     the use of Project Gutenberg-tm works calculated using the method
     you already use to calculate your applicable taxes.  The fee is
     owed to the owner of the Project Gutenberg-tm trademark, but he
     has agreed to donate royalties under this paragraph to the
     Project Gutenberg Literary Archive Foundation.  Royalty payments
     must be paid within 60 days following each date on which you
     prepare (or are legally required to prepare) your periodic tax
     returns.  Royalty payments should be clearly marked as such and
     sent to the Project Gutenberg Literary Archive Foundation at the
     address specified in Section 4, "Information about donations to
     the Project Gutenberg Literary Archive Foundation."

- You provide a full refund of any money paid by a user who notifies
     you in writing (or by e-mail) within 30 days of receipt that s/he
     does not agree to the terms of the full Project Gutenberg-tm
     License.  You must require such a user to return or
     destroy all copies of the works possessed in a physical medium
     and discontinue all use of and all access to other copies of
     Project Gutenberg-tm works.

- You provide, in accordance with paragraph 1.F.3, a full refund of any
     money paid for a work or a replacement copy, if a defect in the
     electronic work is discovered and reported to you within 90 days
     of receipt of the work.

- You comply with all other terms of this agreement for free
     distribution of Project Gutenberg-tm works.

1.E.9.  If you wish to charge a fee or distribute a Project Gutenberg-tm
electronic work or group of works on different terms than are set
forth in this agreement, you must obtain permission in writing from
both the Project Gutenberg Literary Archive Foundation and Michael
Hart, the owner of the Project Gutenberg-tm trademark.  Contact the
Foundation as set forth in Section 3 below.

1.F.

1.F.1.  Project Gutenberg volunteers and employees expend considerable
effort to identify, do copyright research on, transcribe and proofread
public domain works in creating the Project Gutenberg-tm
collection.  Despite these efforts, Project Gutenberg-tm electronic
works, and the medium on which they may be stored, may contain
"Defects," such as, but not limited to, incomplete, inaccurate or
corrupt data, transcription errors, a copyright or other intellectual
property infringement, a defective or damaged disk or other medium, a
computer virus, or computer codes that damage or cannot be read by
your equipment.

1.F.2.  LIMITED WARRANTY, DISCLAIMER OF DAMAGES - Except for the "Right
of Replacement or Refund" described in paragraph 1.F.3, the Project
Gutenberg Literary Archive Foundation, the owner of the Project
Gutenberg-tm trademark, and any other party distributing a Project
Gutenberg-tm electronic work under this agreement, disclaim all
liability to you for damages, costs and expenses, including legal
fees.  YOU AGREE THAT YOU HAVE NO REMEDIES FOR NEGLIGENCE, STRICT
LIABILITY, BREACH OF WARRANTY OR BREACH OF CONTRACT EXCEPT THOSE
PROVIDED IN PARAGRAPH 1.F.3.  YOU AGREE THAT THE FOUNDATION, THE
TRADEMARK OWNER, AND ANY DISTRIBUTOR UNDER THIS AGREEMENT WILL NOT BE
LIABLE TO YOU FOR ACTUAL, DIRECT, INDIRECT, CONSEQUENTIAL, PUNITIVE OR
INCIDENTAL DAMAGES EVEN IF YOU GIVE NOTICE OF THE POSSIBILITY OF SUCH
DAMAGE.

1.F.3.  LIMITED RIGHT OF REPLACEMENT OR REFUND - If you discover a
defect in this electronic work within 90 days of receiving it, you can
receive a refund of the money (if any) you paid for it by sending a
written explanation to the person you received the work from.  If you
received the work on a physical medium, you must return the medium with
your written explanation.  The person or entity that provided you with
the defective work may elect to provide a replacement copy in lieu of a
refund.  If you received the work electronically, the person or entity
providing it to you may choose to give you a second opportunity to
receive the work electronically in lieu of a refund.  If the second copy
is also defective, you may demand a refund in writing without further
opportunities to fix the problem.

1.F.4.  Except for the limited right of replacement or refund set forth
in paragraph 1.F.3, this work is provided to you 'AS-IS' WITH NO OTHER
WARRANTIES OF ANY KIND, EXPRESS OR IMPLIED, INCLUDING BUT NOT LIMITED TO
WARRANTIES OF MERCHANTABILITY OR FITNESS FOR ANY PURPOSE.

1.F.5.  Some states do not allow disclaimers of certain implied
warranties or the exclusion or limitation of certain types of damages.
If any disclaimer or limitation set forth in this agreement violates the
law of the state applicable to this agreement, the agreement shall be
interpreted to make the maximum disclaimer or limitation permitted by
the applicable state law.  The invalidity or unenforceability of any
provision of this agreement shall not void the remaining provisions.

1.F.6.  INDEMNITY - You agree to indemnify and hold the Foundation, the
trademark owner, any agent or employee of the Foundation, anyone
providing copies of Project Gutenberg-tm electronic works in accordance
with this agreement, and any volunteers associated with the production,
promotion and distribution of Project Gutenberg-tm electronic works,
harmless from all liability, costs and expenses, including legal fees,
that arise directly or indirectly from any of the following which you do
or cause to occur: (a) distribution of this or any Project Gutenberg-tm
work, (b) alteration, modification, or additions or deletions to any
Project Gutenberg-tm work, and (c) any Defect you cause.


Section  2.  Information about the Mission of Project Gutenberg-tm

Project Gutenberg-tm is synonymous with the free distribution of
electronic works in formats readable by the widest variety of computers
including obsolete, old, middle-aged and new computers.  It exists
because of the efforts of hundreds of volunteers and donations from
people in all walks of life.

Volunteers and financial support to provide volunteers with the
assistance they need, are critical to reaching Project Gutenberg-tm's
goals and ensuring that the Project Gutenberg-tm collection will
remain freely available for generations to come.  In 2001, the Project
Gutenberg Literary Archive Foundation was created to provide a secure
and permanent future for Project Gutenberg-tm and future generations.
To learn more about the Project Gutenberg Literary Archive Foundation
and how your efforts and donations can help, see Sections 3 and 4
and the Foundation web page at http://www.pglaf.org.


Section 3.  Information about the Project Gutenberg Literary Archive
Foundation

The Project Gutenberg Literary Archive Foundation is a non profit
501(c)(3) educational corporation organized under the laws of the
state of Mississippi and granted tax exempt status by the Internal
Revenue Service.  The Foundation's EIN or federal tax identification
number is 64-6221541.  Its 501(c)(3) letter is posted at
http://pglaf.org/fundraising.  Contributions to the Project Gutenberg
Literary Archive Foundation are tax deductible to the full extent
permitted by U.S. federal laws and your state's laws.

The Foundation's principal office is located at 4557 Melan Dr. S.
Fairbanks, AK, 99712., but its volunteers and employees are scattered
throughout numerous locations.  Its business office is located at
809 North 1500 West, Salt Lake City, UT 84116, (801) 596-1887, email
business@pglaf.org.  Email contact links and up to date contact
information can be found at the Foundation's web site and official
page at http://pglaf.org

For additional contact information:
     Dr. Gregory B. Newby
     Chief Executive and Director
     gbnewby@pglaf.org


Section 4.  Information about Donations to the Project Gutenberg
Literary Archive Foundation

Project Gutenberg-tm depends upon and cannot survive without wide
spread public support and donations to carry out its mission of
increasing the number of public domain and licensed works that can be
freely distributed in machine readable form accessible by the widest
array of equipment including outdated equipment.  Many small donations
($1 to $5,000) are particularly important to maintaining tax exempt
status with the IRS.

The Foundation is committed to complying with the laws regulating
charities and charitable donations in all 50 states of the United
States.  Compliance requirements are not uniform and it takes a
considerable effort, much paperwork and many fees to meet and keep up
with these requirements.  We do not solicit donations in locations
where we have not received written confirmation of compliance.  To
SEND DONATIONS or determine the status of compliance for any
particular state visit http://pglaf.org

While we cannot and do not solicit contributions from states where we
have not met the solicitation requirements, we know of no prohibition
against accepting unsolicited donations from donors in such states who
approach us with offers to donate.

International donations are gratefully accepted, but we cannot make
any statements concerning tax treatment of donations received from
outside the United States.  U.S. laws alone swamp our small staff.

Please check the Project Gutenberg Web pages for current donation
methods and addresses.  Donations are accepted in a number of other
ways including checks, online payments and credit card donations.
To donate, please visit: http://pglaf.org/donate


Section 5.  General Information About Project Gutenberg-tm electronic
works.

Professor Michael S. Hart is the originator of the Project Gutenberg-tm
concept of a library of electronic works that could be freely shared
with anyone.  For thirty years, he produced and distributed Project
Gutenberg-tm eBooks with only a loose network of volunteer support.


Project Gutenberg-tm eBooks are often created from several printed
editions, all of which are confirmed as Public Domain in the U.S.
unless a copyright notice is included.  Thus, we do not necessarily
keep eBooks in compliance with any particular paper edition.


Most people start at our Web site which has the main PG search facility:

     http://www.gutenberg.org

This Web site includes information about Project Gutenberg-tm,
including how to make donations to the Project Gutenberg Literary
Archive Foundation, how to help produce our new eBooks, and how to
subscribe to our email newsletter to hear about new eBooks.
