
Title: Screw-Thread Cutting by the Master-Screw Method since 1480
Author: Edwin A. Battison
Release date: March 24, 2010 [eBook #31756]
Most recently updated: January 6, 2021
Language: English
Other information and formats: www.gutenberg.org/ebooks/31756
Credits: Produced by Colin Bell, Joseph Cooper, Louise Pattison and
the Online Distributed Proofreading Team at
https://www.pgdp.net
Transcriber’s Notes:
This is Paper 37 from the Smithsonian Institution United States National Museum Bulletin 240, comprising Papers 34-44, which will also be available as a complete e-book.
The front material, introduction and relevant index entries from the Bulletin are included in each single-paper e-book.
Corrections to typographical errors are underlined like this. Mouse over to view the original text.

SMITHSONIAN PRESS
MUSEUM OF HISTORY AND TECHNOLOGY
Contributions
From the
Museum
of History and
Technology
Papers 34-44
On Science and Technology
SMITHSONIAN INSTITUTION · WASHINGTON, D.C. 1966
Publications of the United States National Museum
The scholarly and scientific publications of the United States National Museum include two series, Proceedings of the United States National Museum and United States National Museum Bulletin.
In these series, the Museum publishes original articles and monographs dealing with the collections and work of its constituent museums—The Museum of Natural History and the Museum of History and Technology—setting forth newly acquired facts in the fields of anthropology, biology, history, geology, and technology. Copies of each publication are distributed to libraries, to cultural and scientific organizations, and to specialists and others interested in the different subjects.
The Proceedings, begun in 1878, are intended for the publication, in separate form, of shorter papers from the Museum of Natural History. These are gathered in volumes, octavo in size, with the publication date of each paper recorded in the table of contents of the volume.
In the Bulletin series, the first of which was issued in 1875, appear longer, separate publications consisting of monographs (occasionally in several parts) and volumes in which are collected works on related subjects. Bulletins are either octavo or quarto in size, depending on the needs of the presentation. Since 1902 papers relating to the botanical collections of the Museum of Natural History have been published in the Bulletin series under the heading Contributions from the United States National Herbarium, and since 1959, in Bulletins titled “Contributions from the Museum of History and Technology,” have been gathered shorter papers relating to the collections and research of that Museum.
The present collection of Contributions, Papers 34-44, comprises Bulletin 240. Each of these papers has been previously published in separate form. The year of publication is shown on the last page of each paper.
Frank A. Taylor
Director, United States National Museum
Edwin A. Battison
Edwin A. Battison
Among the earliest known examples of screw-thread cutting machines are the screw-cutting lathe of 1483, known only in pictures and drawings, and an instrument of the traverse-spindle variety for threading metal, now in the Smithsonian Institution, dating from the late 17th or early 18th century. The author shows clearly their evolution from something quite specialized to the present-day tool. He has traced the patents for these instruments through the early 1930’s and from this research we see the part played by such devices in the development of the machine-tool industry.
The Author: Edwin A. Battison is associate curator of mechanical and civil engineering in the Smithsonian Institution’s Museum of History and Technology.
Directness and simplicity characterize pioneer machine tools because they were intended to accomplish some quite specialized task and the need for versatility was not apparent. History does not reveal the earliest forms of any primitive machines nor does it reveal much about the various early stages in evolution toward more complex types. At best we have discovered and dated certain developments as existing in particular areas. Whether these forms were new at the time they were first found or how widely dispersed such forms may have been is unknown. Surviving evidence is in the form of pictures or drawings, such as the little-known screw-cutting lathe of 1483 (fig. 1) shown in Das mittelalterliche Hausbuch.
This lathe shows that its builder had a keen perception of the necessary elements, reduced to bare essentials, required to accomplish the object. Present are the coordinate slides often credited to Henry Maudslay. His slides are not, of course, associated with the spindle; neither is there any natural law which compels them to guide the tool exactly parallel with the axis of revolution. In this sense the screw-cutting lathe in the Hausbuch is superior because it is in harmony with natural law and can generate a true cylinder, whereas Maudslay’s lathe can only transfer to the work whatever accuracy is built into it.
In principle this machine shown in the Hausbuch is very advanced as we see when we follow the design[Pg 107] through to the present time. The artist, whose drawings give us our only knowledge of the machine, himself was obviously not very familiar with the details of its function. Reference to figure 1 shows that the threads on the lead screw and on the work, wind in opposite directions. This must be an error in delineation since the two are closely coupled together without any intervening mechanism so that the only possible result on the work must be a thread winding in the same direction as on the original screw. The work also is shown threaded for its entire length; this cannot be accomplished with any one location of the cross-slide. We are left with the question of whether this slide was used in two locations or whether the artist, possibly working from notes or an earlier rough sketch, failed to show an unthreaded portion on one end or the other of the work.
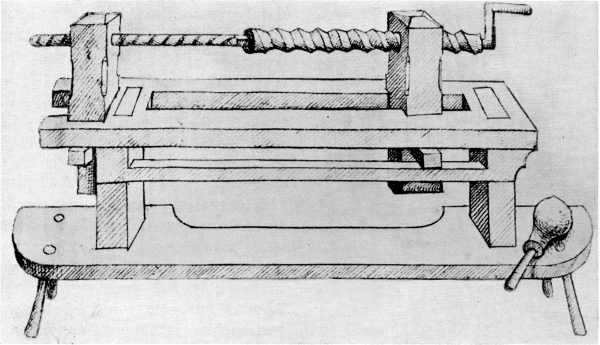
Figure 1.—Earliest representation found of a master-screw type of thread-cutting machine. From the inconsistencies, such as right- and left-hand threads on master and work, it appears that the artist had scant insight into actual function. From plate 62 of Das mittelalterliche Hausbuch, nach dem Originale im Besitze des Fürsten von Waldburg-Wolfegg-Waldsee, im Auftrage des Deutschen Vereins für Kunstwissenschaft, herausgegeben von Helmuth Th. Bossert und Willy F. Storck (Leipzig: E. A. Seemann, 1912).
Of at least equal importance with the lead screw and work and their relationship to each other is the tool-support with its screw-adjusted cross-slide (fig. 2). Just how this was attached to the frame of the machine so that it placed the tool at a suitable radius is again a questionable point. The very well-developed cutting tool is sharpened to a thin, keen edge totally unsuited for cutting metal but ideal for use on a softer, fibrous substance: undoubtedly wood, in this instance. Unfortunately, the angle at which the artist chose to show us this cutter is not a view from which it is possible to judge whether or not the tool has been made to conform to the helix angle of the thread to be cut. This cross-slide, in conjunction with the traversing work spindle, gives us a machine having two coordinate slides yielding the same effect as the slide rest usually attributed to Henry Maudslay at the end of the 18th century. Actually, an illustration of coordinate slides independent of the spindle had been published as early as 1569 by Besson[1] and knowledge of them widely disseminated by his popular work on mechanics. These slides are shown as part of a screw-cutting machine with a questionably adequate connection, by means of cords, between the master screw and the work.
It was the author’s pleasure recently to obtain for the Smithsonian Institution and identify a small, nicely made, brass instrument which had been in two collections in this country and one collection in Germany as an unidentified locksmith’s tool (fig. 3).[Pg 108] This proved to be an instrument of the traverse-spindle variety for threading metal. Fortunately, all essential details were present including a cutter (A in figure 4); this instrument was identified by the signature “Manuel Wetschgi, Augspurg.” The Wetschgis were a well-known family of gunsmiths and mechanics in Augsburg through several generations. Two bore the given name Emanuel: the earlier was born in 1678 and died in 1728. He was quite celebrated in his field of rifle making and became chief of artillery to the Landgrave of Hesse-Kassel shortly before his death in his 51st year. Little is known of the later Emanuel Wetschgi except that he was at Augsburg in 1740. Tentative attribution of the instrument has been made to the earlier Emanuel, chiefly on the basis of his recognized position as an outstanding craftsman.
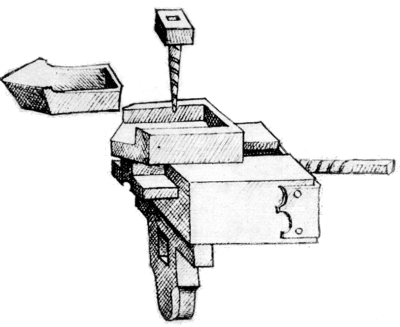
Figure 2.—Cross-slide for the thread-cutting lathe of Das mittelalterliche Hausbuch, shown in figure 1. It is remarkable not only for its early date, but also for its high state of development with a crossfeed screw which had not become universally accepted 300 years later. The cutter, shown out of its socket, is obviously sharpened for use on wood.
In several respects this little machine differs from its predecessor of the Hausbuch, as might be expected when allowance is made for the generations of craftsmen who undoubtedly worked with such tools over the roughly 200 years of time separating them. Another factor to consider when comparing these two machines is that one was used on metal, the other probably only on wood. Therefore, it is not surprising to find on the later machine an outboard or “tailstock” support for the work. The spindle of this support has to travel in unison with the work-driving spindle so that it is not an unexpected discovery to find that it is spring-loaded. Figure 5 shows how this spring may be adjusted to accommodate various lengths of work by moving the attachment screw to various holes in both the spring and in the frame. Also visible in the same illustration is a rectangular projection at the other end of the spring which engages a mating hole in the “tailstock” spindle to prevent its rotation.
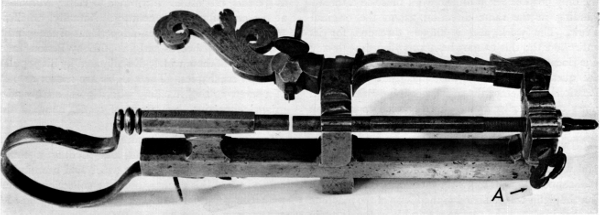
Figure 3.—Small thread-cutting lathe which was made to be held in a vise during use. It was found as shown here, with only the operating crank missing. The overall length is approximately 12 inches, depending on the adjustment of parts. (Smithsonian photo 46525B.)
Figure 6 shows the traversing spindle and nut removed from the machine. Provision has been[Pg 109] made for doing this so easily that there is every reason to believe that, originally, there were various different spindle and nut units which could be interchangeably used in the machine. Additional evidence tending to support this concept exists in the cutting tool (fig. 4), which must have been intended for serious work as it has been carefully fitted in its unsymmetrical socket. The cutting blade of this tool, which works with a scraping rather than a true cutting action, is too wide to form a properly proportioned thread when used with the existing lead screw. This may well indicate that the tool was made for use with a lead of coarser pitch, now lost.
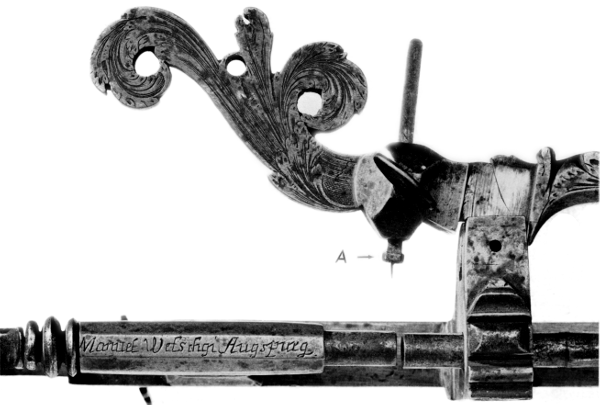
Figure 4.—The working area of figure 3, showing the tool and signature. (Smithsonian photo 46525A.)
Perhaps the most startling feature of this machine when compared with the machine of the Hausbuch, is the absence of a cross-slide for adjusting the tool. Possibly this can be explained by the blunt scraping edge on the tool. In actual use, recently, to cut a sample screw, using a tool similar to the one found in the machine (fig. 7), it was found advantageous to be free of a cross-slide and thus be able to feed the tool into the work by feel rather than by rule, as would be done with a slide rest. In this way, it was possible to thread steel without tearing, as the cutting pressure could readily be felt and the tool could release itself from too heavy a cut. Size on several screws could be repeated by setting the tool to produce the desired diameter when its supporting arm came to rest against the frame of the machine. The screws used in the machine itself were apparently made in just such a way. They were not cut with a die as the thread blends very gradually into the body of the screw without the characteristic marks left by the cutting edges of a die. Threads cut with a single-point tool controlled by a cross-slide usually end even more abruptly than those cut by a die, while it would be quite simple with a machine of the nature we are considering to bring the thread to a gentle tapering end as seen in figure 8 (another view of the screw A in fig. 3) by gradually releasing the pressure[Pg 110] necessary to keep the tool cutting as the end of the thread was approached.
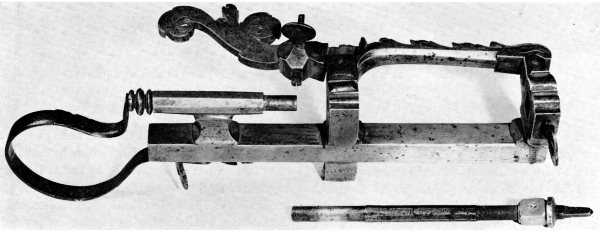
Figure 5.—Spring for keeping the follower spindle against the work, showing the method and range of adjustment. Note the rectangular projection to engage a mating socket in the spindle, to prevent spindle rotation. (Smithsonian photo 46525.)
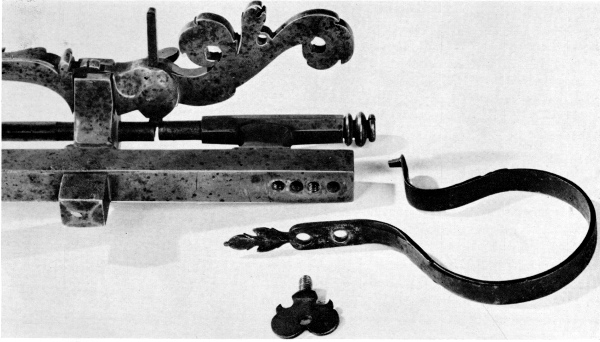
Figure 6.—Work spindle and its nut removed from the machine to illustrate how easily another spindle and nut of different pitch could be substituted. (Smithsonian photo 46525C.)
That machines of this general type having the lead screw on the axis of the work were competitive with other methods and other types of machines over a long period of time may be seen from figures 9 and 10. The machine, left front in figure 9 and in more intimate detail in figure 10, can be seen to differ little from that shown in Das mittelalterliche Hausbuch of 1483. The double work-support is, of course, a great improvement, while the tool-support is regressive since it lacks a feed screw.
The development of engineering theory, coupled with the rising needs of industry, particularly with the advent of the Industrial Revolution, brought about accelerated development of screw-cutting lathes through the combination of screw-cutting machines with simple lathes as seen in figure 9 and in detail in figure 11.[Pg 111] One important advance shown here is driving the machine by means of a cord or band so that any means of rotary power could be applied, not just hand or foot power. Of greater interest and technical importance to this study is the provision, seen to better advantage in figure 11, for readily changing from one master lead screw to another. This had already been achieved in the Manuel Wetschgi machine, as far as versatility is concerned, although not in quite such a convenient way.
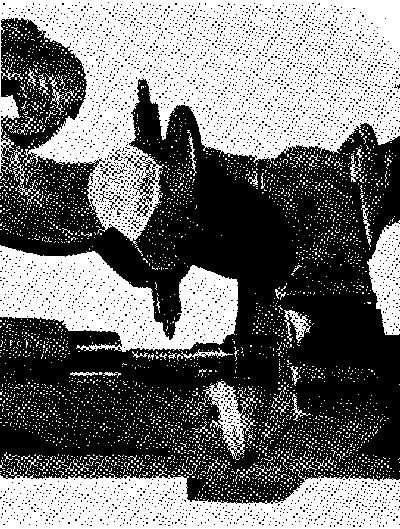
Figure 7.—Thread of modern form recently cut, using the old screw and nut but with a new tool. The material threaded is carbon-steel drill rod. (Smithsonian photo 49276A.)
Figure 12, the headstock of another and more advanced lathe than shown in figures 9 and 11 but of the same type, shows “keys” (D), each of which is a partial nut of different pitch to engage with a thread of mating pitch. The dotted lines in figure 13 show the engaged and disengaged positions of one of these keys, and figure 14 shows the spindle with the various leads, C. At D is a grooved collar to be engaged by the narrow key shown in operating position at the left in figure 12 for the purpose of controlling the endwise movement of the spindle when used for ordinary turning instead of thread-cutting. In return for greater convenience and freedom from the expense of the many separate spindles, as typified by the Wetschgi machine, a sacrifice has been made in the length of the thread which can be cut without interruption.
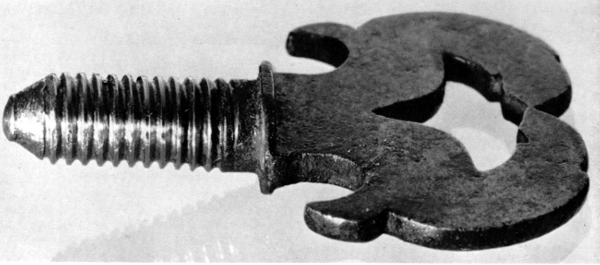
Figure 8.—Binding screw seen at A in figure 3, showing the long smooth fadeout of the thread below the shoulder. (Smithsonian photo 49276.)
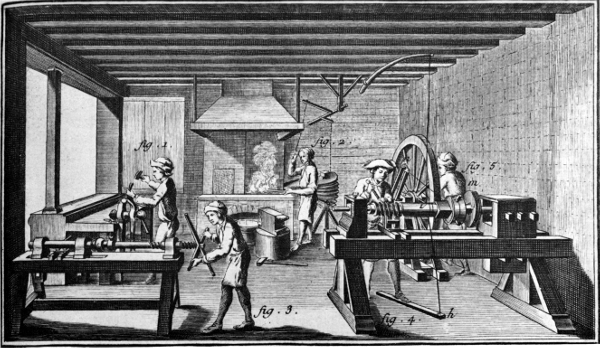
Figure 9.—Making screws in France in the third quarter of the 18th century. From L’Encyclopédie, ou dictionnaire raisonné des sciences, des arts et des métiers ... receuil de planches sur les sciences, les arts libéraux, et les arts méchaniques, avec leur explication (Paris: 1762-1772), vol. 9, plate 1.
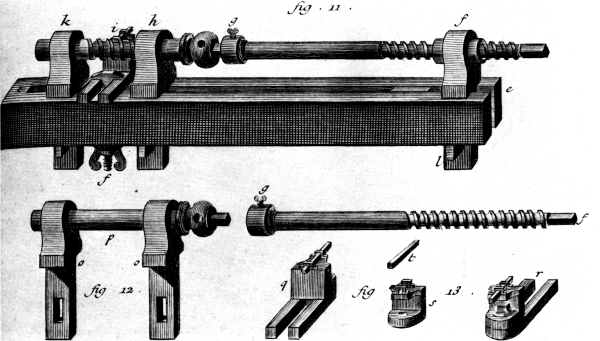
Figure 10.—Details of the machine in the left foreground of figure 9, showing the crude tool-support without screw adjustment. From L’Encyclopédie, vol. 9, plate 2.
[Pg 113]This reduction in the length that could conveniently be threaded was no great drawback on many classes of work. This can be realized from figure 16 which shows a traverse-spindle lathe headstock typical of the mid-19th century. During the years intervening between the machines of figures 12 and 16, the general design was greatly improved by removing the lead screws from the center of the spindle. This made possible a shorter, much stiffer spindle and supported both ends of the spindle in one frame or headstock rather than in separate pieces attached to the bed. The screws were now mounted outside of the spindle-bearings, one at a time, while the mating nuts were cut partially into the circumference of a disk which could be turned to bring any particular nut into working position as required. With this arrangement, a wide variety of leads either right or left hand could be provided and additional leads could be fitted at any future time. Screw-cutting lathes of this design were popular for a very long time with instrument makers and opticians who had little need to cut screws of great length.
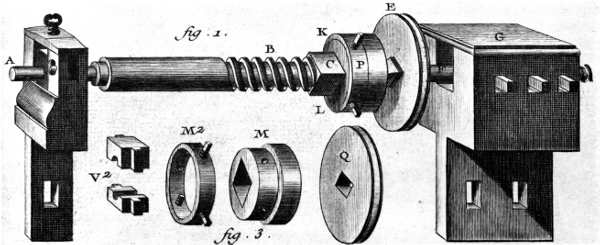
Figure 11.—Details of the threading lathe seen in the right foreground of figure 9 showing the method of drive and support for the work. From L’Encyclopédie, vol. 9, plate 1.
The demands of expanding industry for greater versatility in the production of engineering elements late in the 18th century set the stage for the evolution of more complex machines tending to place the threaded spindle lathes in eclipse. Maudslay’s lathe of 1797-1800 (fig. 15) appeared at this time when industry was receptive to rapid innovation. Unfortunately, the gearing which once existed to connect the headstock spindle with the lead screw has long been lost. At this time it is quite difficult to say with certainty whether the original gear set offered a variety of ratios, as was true of slightly later Maudslay lathes, or a fixed ratio. The plausibility of the fixed ratio theory is supported by the very convenient means, seen in figure 15, for removing the lead screw in preparation for substitution of one of another pitch. All that is required is to back off its supporting center at the tailstock end and withdraw the screw from its split nut[2] and from the driving clutch near the headstock. This split nut also would have to be changed to one of a pitch corresponding to that of the screw. While more expensive than a solid nut, it neatly circumvents the need (and saves the time involved) to reverse the screw in order to get the tool back to the point of beginning preliminary to taking another cut. David Wilkinson’s lathe of 1798 (fig. 17) which was developed in Rhode Island at the same time shows the same method of mounting and driving the master screw. At least in the United States, this method of changing the lead screw instead of using change gears remained popular for many years. Examples of this changeable screw feature are to be found in the lathes constructed for the pump factory of W. & B. Douglas Company, Middletown, Connecticut,[3] in the 1830’s. Middletown, at that time one of the leading metal-working centers in one of the chief industrial States, had been for many years[Pg 114] the site of the Simeon North arms factory which rivaled Whitney’s. In this atmosphere, it is reasonable to expect that machinery constructed by local mechanics, as was the custom in those days, would reflect the most accepted refinements in machine design.
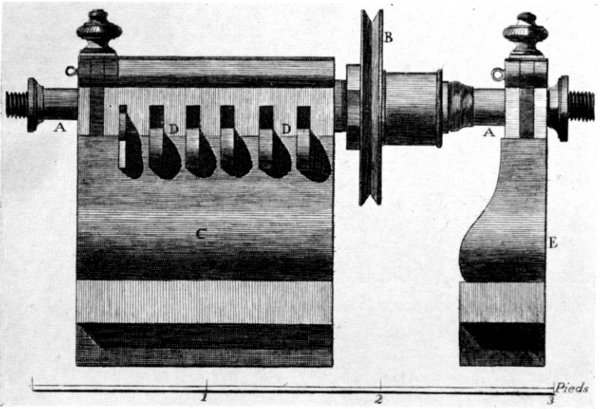
Figure 12.—Well-developed example of lathe headstock having several leads on the spindle and provision for mounting the work or a work-holding chuck on the spindle. Adapted from L’Encyclopédie, vol. 10, plate 13.
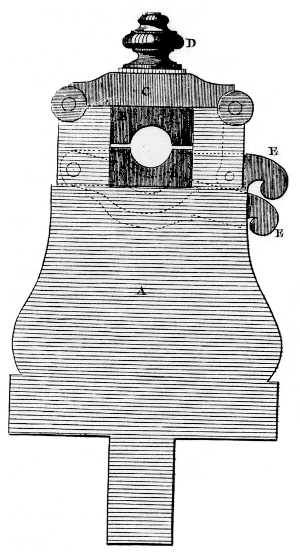
Figure 13.—End view of the headstock seen in figure 12, showing the keys or half nuts which engage the threaded spindle, in engaged and disengaged positions. From L’Encyclopédie, vol. 10, plate 13.

Figure 14.—Spindle of figures 12 and 13, showing the several leads and the many-sided seat for the driving pulley. Note the scale of feet. From L’Encyclopédie, vol. 10, plate 16.
Roughly twenty years later, Joseph Nason of New York patented[4] the commercially very important “Fox” brassworker’s lathe (fig. 18). While this does have a ratio in the pair of gears connecting the work spindle and master screw, it is clear from the patent that various pitches are to be obtained by changing screws, not by changing gears. The patent sums it up as follows:
A nut upon the end of the stud ... is unscrewed when the guide screw is to be removed or changed. The two wheels ... should have in their number of teeth a common multiple. They are seldom or never removed and their diameters are made dissimilar only for the purpose of giving to the guide screw a slower rate of motion than that of the mandrel whereby it may be made of coarser pitch than that of the screw to be cut and its wear materially lessened.
The introduction of gearing between the spindle and the lead screw, for whatever purpose, could not help but introduce variable factors caused by inaccuracies in the gears themselves and in their mounting. These were of little consequence for common work, particularly when coupled to a screw which, itself, was of questionable accuracy. The increasing refinements demanded in scientific instruments and in machine tools themselves after they had reached a relatively stable form dictated that attention be dedicated to improved accuracy of the threaded components.[Pg 115]
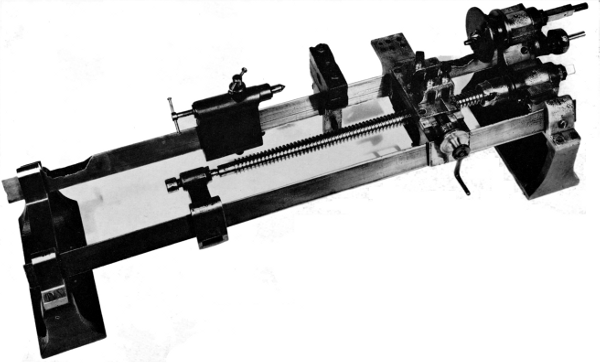
Figure 15.—Maudslay’s well-known screw-cutting lathe of 1797-1800, showing the method of mounting and driving changeable master screws. (Photo courtesy of The Science Museum, London.)
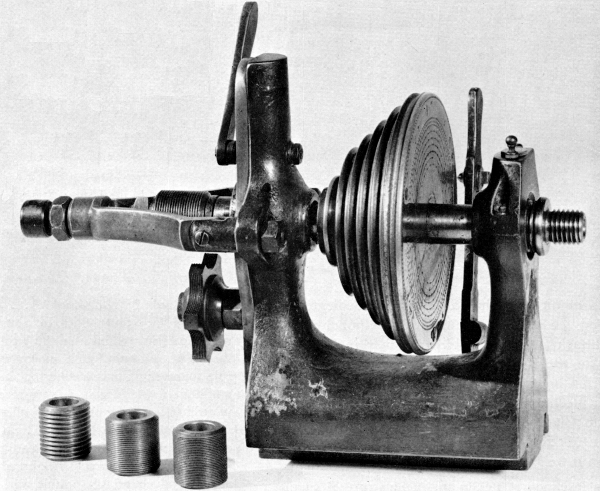
Figure 16.—Headstock of a German instrument-maker’s lathe, typical of the mid-19th century, showing the traverse spindle, interchangeable lead screws, and semicircumferential nut containing several leads. The nut may be brought into engagement by the lever at top rear of the headstock. This releases the end thrust control on the spindle simultaneously with engagement of the nut. (Smithsonian photo 49839.)
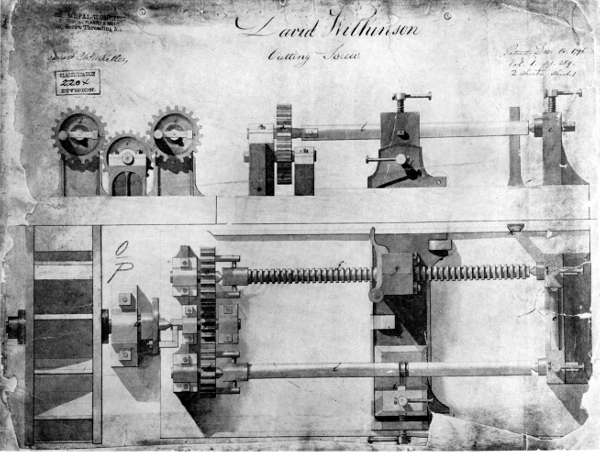
Figure 17.—David Wilkinson’s screw-cutting lathe, patented in the United States in 1798. Note the ready facility with which the lead screw may be exchanged for another and the same means of supporting and driving as in figure 15. (U.S. National Archives photo.)
An attack on this problem, which interestingly reverts to the fundamental principle of motion derived from a master screw without the intervention of other mechanism (fig. 19), is covered by a patent[5] issued to Charles Vander Woerd, one-time superintendent of the Waltham Watch Company. The problem is well stated in the patent:
This invention relates to the manufacture of leading screws to be used for purposes requiring the highest attainable degree of correctness in the cutting of the screw-threads of said screw ... as, for example, in machines for ruling lines in glass plates to produce refraction [sic] gratings for the resolution of the lines of the solar spectrum, such machines being required to rule many thousands of lines on an inch of space by a marking device which is reciprocated over the glass plate and is fed by the action of a leading screw after the formation of each line. Great difficulty has been experienced in constructing a leading screw for this and other purposes, in which the thread is so nearly correct as to produce no perceptible variation in the microscopic spaces between the ruled lines or gratings.... Various causes prevent the formation of a thread on the rod or blank, which is absolutely uniform and accurate from end to end of the rod. Among other causes are the variations of temperature from time to time, the[Pg 117] imperfections of the operating leading screw, the springing of the leading screw and of the rod that is being threaded, and other unavoidable causes, all of which, although apparently trivial and producing only slight variations in the thread at different parts of the rod or blank, are of sufficient moment to be seriously considered when a screw of absolute accuracy is desired.
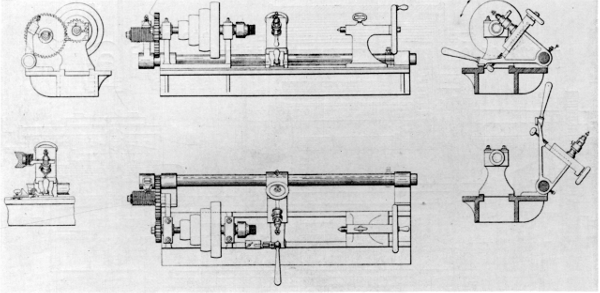
Figure 18.—Nason’s lathe, patented in 1854, showing a master lead screw driven at less than work speed so that the master could be of a coarser and more durable pitch than the work. U.S. patent 10383.
It is interesting to note in figure 19 that Vander Woerd’s machine, to avoid the problems outlined in his patent, has returned to a starkly simple design. We are not told, however, how he originated this master screw which is used to produce the accurately threaded work pieces. Later generations, in the search for ever-greater accuracy, also returned to the fundamental simplicity of a master screw as we shall see when we consider the refinements in mechanism necessary to the extended development of the automobile and the airplane.
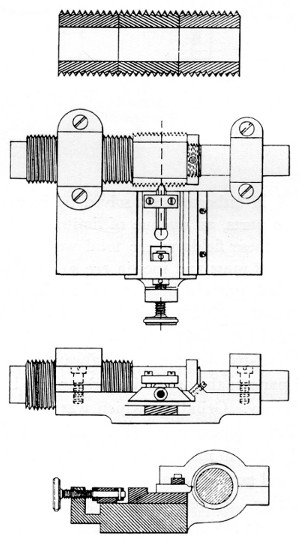
Figure 19.—Vander Woerd’s patent, seen here, covered the combination of a master screw, toolslide and work in a rigid frame to be supported and driven by outside means of no required precision. U.S. patent 293930 dated February 1884.
As the power and speed of automobiles and aircraft increased, critical parts became more highly stressed. Gears and threaded parts were particularly troublesome details of the mechanism because of the stresses concentrated in them, and, in the case of gears, because of the internal and external stresses originating in minute deviations from the ideal of tooth form and spacing. The problems were not entirely[Pg 118] new but had hitherto been solved by increasing the size of the parts, an avenue of limited utility to designers in these fields where total weight as well as the effects of mass and inertia are so important. By making these parts of heat-treated steel, the strength could be made suitable while the size and mass of the parts were kept within bounds. The necessary processes of heat-treating were not always applicable to finished parts as they sometimes destroyed both finish and accuracy. Grinding, which was well developed for the simple plane, cylindrical, and conical surfaces so widely used in mechanisms, had to be extended to threads and gears so that they could be finished after heat-treating. Sometimes the gear teeth themselves were ground; for other applications it was sufficient to improve the accuracy of the gear cutters.
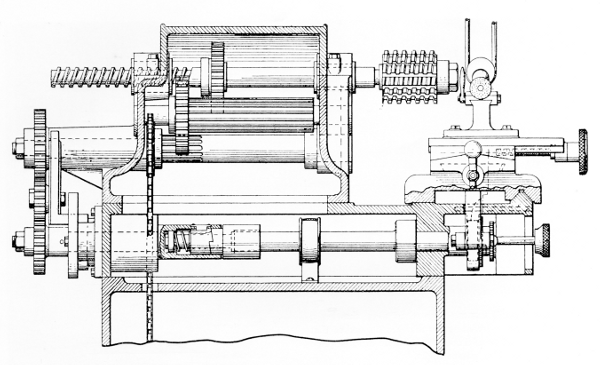
Figure 20.—A hob-grinding machine patented in 1932 and incorporating the master-screw principle. Carl G. Olson’s U.S. patent 1874592.
Attempts to produce gear hobs free of the imperfections and distortions introduced by heat treatment led to another return to the use of the master lead screw. Figure 20 illustrates a machine having this feature which was patented in 1932 by Carl G. Olson.[6] In speaking of the spindle-driving mechanism disclosed in earlier patents, the patent goes on to say:
This driving mechanism includes an integral spindle 20, one extremity thereof being designed for supporting a hob 22 and the other extremity thereof being formed so as to present a lead screw 24. The spindle 20 is mounted between a bearing 26 and a bearing 28, the latter bearing providing a nut in which the lead screw 24 rotates.... From the description thus far given it will be apparent that the rotation of the lead screw 24 within the bearing or nut 28 will cause the hob to be moved axially, the lead of the screw 24 being equal to the lead of the thread in the hob.
Claim 8 which concludes the descriptive portion of the patent states in part:
In a hob grinding machine of the class described, a rotary work supporting spindle, means for effecting[Pg 119] longitudinal movement of the spindle, a tool holder for supporting a grinding wheel in operative position with respect to the work supported by the spindle during the rotary and longitudinal movement thereof, ...
Even before this patent was applied for, another patent was pending for the purpose of modifying the pitch of the lead screw without the use of change gears in spite of the wide acceptance of such gear mechanisms for over a hundred years.
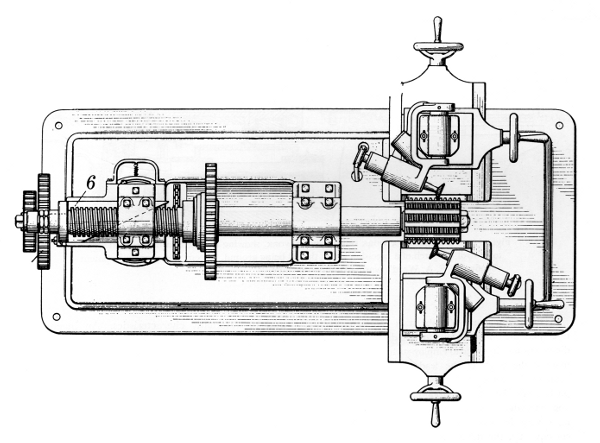
Figure 21.—A hob-grinding machine of 1933, showing use of the master screw with a modifier but without change gears. Carl G. Olson’s U.S. patent 1901926.
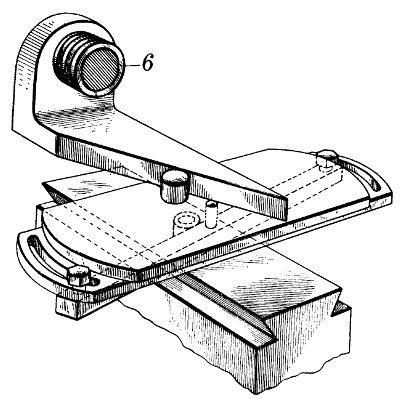
Figure 22.—A sine-bar device to modify the effective lead of a master lead screw without introducing a complex mechanism which would be both difficult to make and to operate within the required close limits. Carl G. Olson’s (1933) U.S. patent 1901926.
Figure 21 shows a plan view[7] of the machine, and figure 22 a detailed view of the sine-bar mechanism actuated by the master screw, 6, to modify the effective pitch of the lead screw in accordance with the realities of practice as stated in the preamble of the patent:
This invention relates to material working machines, and particularly to machines such as hob grinders and the like, wherein the work is reciprocated through the agency of a lead screw.[Pg 120]
In the manufacture of hobs it is common practice to employ the same machine for grinding hobs of varied diameters, and in order to employ such a machine in this manner the pitch of the lead screw, thereof, which actuates the work carrier, must conform to the axial pitch of the hob to be ground. This will be readily apparent when it is understood that the helix angles of hobs vary in accordance with their diameters and, consequently, the difference between the normal pitch and the axial pitch correspondingly varies. While the requirement for the normal pitch may be the same for hobs of different diameters, it is necessary to change the axial pitch in accordance with a change in the hob diameter, and this axial pitch of the hob is equal to the pitch of the lead screw which actuates the work carrier in grinding machines heretofore used. Hence, in order to adapt such machines to cover a wide range of leads, it is necessary to provide a large number of interchangeable lead screws and obviously this represents a large investment, and the interchanging of these screws requires the expenditure of considerable time in setting up the machine for each job.
Thread-grinding machines were being designed concurrent with the development of hob-grinding machines. Many were entirely concerned with features peculiar to the problems of wheel-dressing and to automatic characteristics. An invention to embody the use of a master screw and concerned with the precision grinding of worm threads, for use in gearing, was patented by Frederick A. Ward in this era.[8] That part of the invention pertaining to the use of a master screw, “a rotary work holder mounted on said carriage and provided with a driving spindle, an exchangeable master screw and stationary nut detachably secured to said spindle and head, ...” is shown in figure 23.
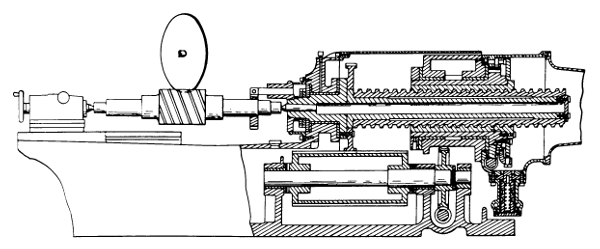
Figure 23.—Details of a work spindle with work, showing the use of a master lead screw to control the pitch of a precision worm thread being ground. From the 1933 U.S. patent 1899654, of F. A. Ward’s worm-grinding machine.
Machines embodying the principle of the master lead screw are found in constant use by industry at the present time for specialized application. Whenever technological changes again reopen the topic of thread-cutting to a new degree of accuracy or call for a reevaluation of popular methods for any other reason, we may expect to see another resurgence of the master-screw method, for no other design eliminates so many variables or rests on such firm and fundamental natural principles as the machine of Das mittelalterliche Hausbuch of 1483, the earliest such machine now known.
[1] Jacques Besson, Des instruments mathématiques, et méchaniques, servants à l’intelligence de plusieurs choses difficiles, & nécessaires à toutes républiques, 1st ed. (Orleans, 1569). [Also available in later editions in French, German, and Spanish.]
[2] J. Foster Petree, introduction, Henry Maudslay, 1771-1831, and Maudslay Sons and Field, Ltd. (London: The Maudslay Society, 1949).
[3] American Machinist (September 28, 1916), vol. 45, no. 13, pp. 529-531.
[4] U.S. patent 10383 issued to Joseph Nason of New York, January 3, 1854.
[5] U.S. patent 293930 issued to Charles Vander Woerd of Waltham, Massachusetts, February 19, 1884.
[6] U.S. patent 1874592, filed June 8, 1929, issued to C. G. Olson of Chicago, Illinois, August 30, 1932, and assigned to the Illinois Tool Works, also of Chicago.
[7] U.S. patent 1901926, filed February 16, 1928, issued to C. G. Olson of Chicago, Illinois, March 21, 1933, and assigned to the Illinois Tool Works, also of Chicago.
[8] U.S. patent 1899654, filed August 31, 1931, issued to F. A. Ward of Detroit, Michigan, February 28, 1933, and assigned to the Gear Grinding Company of Detroit, Michigan.
U.S. GOVERNMENT PRINTING OFFICE: 1964
For sale by the Superintendent of Documents, U.S. Government Printing Office
Washington, D.C. 20402—Price 20 cents
Besson, Jacques, 107
Douglas, W. & B., Company, 113
Nason, Joseph, 114
North, Simeon, arms factory, 114
Olson, Carl G., 118
Vander Woerd, Charles, 116, 117
Ward, Frederick A., 120
Wetschgi, Emanuel, 108
Whitney arms factory, 114
Wilkinson, David, 113