Title: War-Chess, or the Game of Battle
Author: of New York Charles Richardson
Release date: December 17, 2020 [eBook #64061]
Most recently updated: October 18, 2024
Language: English
Other information and formats: www.gutenberg.org/ebooks/64061
Credits: Produced by deaurider, David E. Brown, and the Online
Distributed Proofreading Team at https://www.pgdp.net (This
file was produced from images generously made available
by The Internet Archive)

INVENTED BY
COLONEL CHARLES RICHARDSON,

NEW YORK:
C. B. RICHARDSON, PUBLISHER,
540 BROADWAY.
1866.
Entered according to Act of Congress, in the year 1866,
By CHARLES B. RICHARDSON,
In the Clerk’s Office of the District Court of the United States for the
Southern District of New York.
The Game of Battle represents two antagonistic armies, one of which, the Attacking (or Invading) Army, is composed of four figures, each representing a regiment of Light Infantry; five figures, each representing a regiment of Infantry of the Line; two figures, each representing a regiment of Cavalry; two figures, each representing a battery of Artillery; and one figure (a wagon), representing the “Supply Train,” in which it is to be supposed is carried all of the subsistence, ordnance stores, etc., necessary for the maintenance and effectiveness of the army.
The object of the Attacking Army will be to capture the Citadel.
[4]The other army, called the Defending Army, is composed of four figures, each representing a regiment of Light Infantry; five figures, each representing a regiment of Infantry of the Line; two figures, each representing a regiment of Cavalry; two figures, each representing a battery of Artillery; and one figure, the Citadel, representing a city in which are arms, ammunition, foundries, subsistence supplies, and all kinds of government property, which it is of vital importance to hold.
The object, therefore, of the Defending Army will be to secure the Citadel against capture.
Light Infantry moves one, two, or three squares, at the discretion of the player, directly forward, right or left obliquely, and one or two squares in any other direction, and can[A] take Light Infantry, Infantry of the Line, Cavalry, and Artillery.
Infantry of the Line moves one or two squares in any direction, at the discretion of the player, and takes Light Infantry, Infantry of the Line, Cavalry, and Artillery.
Cavalry moves one, two, or three squares, at the discretion of the player, in any direction, and takes Light[6] Infantry, Infantry of the Line, Cavalry, and Artillery.
Artillery moves one, two, or three squares, at the discretion of the player, diagonally, and can[B] take Artillery, but cannot take Light Infantry, Infantry of the Line, or Cavalry, though it can check them; that is, neither of those figures can come within the range of the Artillery, except when protected by Artillery of its side; in which case Light Infantry, Infantry of the Line, Cavalry, or Artillery, can move on the first square next to the Artillery of their side; but Light Infantry, Infantry of the Line, or Cavalry, cannot occupy the second or third square; nor can either of the last-named figures occupy the first square next to the Artillery of their side, if it is also the first square next to the Artillery of the other side. Artillery can be placed there, but of course could be taken by the Artillery of the other side. See Plate 2, Figure 1.
[7]Artillery does not cover (or command) the second or third square from it when a figure intervenes. See Plate 2, Figure 2.
When a piece of artillery bears on a figure of the other side that is not on the first square next to the Artillery of its side, if Cavalry, Light Infantry, or Infantry of the Line, it must move out of range of Artillery. See Plate 2, Figure 3.
Artillery cannot be moved leaving a figure of Cavalry, Light Infantry, or Infantry of the Line, of its side, in range of Artillery of the opposite side. See Plate 2, Figure 4.
Artillery cannot take the Citadel; but when placed so as to command it, the defending party must bring some figure to the defence, and take or drive off the Artillery of the attacking party before moving otherwise.
Artillery cannot take the Wagon; but when a piece of Artillery of the defending side is placed so as to bring the Wagon within its range, if the attacking party cannot[8] take that piece of Artillery, then the Wagon must be moved out of its range.
The Wagon cannot occupy the second or third square from its Artillery, if that square is in range of the Artillery of the defending side; nor can it occupy the first square next to the Artillery of its side, if it is also the first square next to the Artillery of the defending side.
Should all of the figures of a side be taken except the Artillery, that side loses the game, as Artillery cannot take the Citadel or Wagon.
Light Infantry, Infantry of the Line, or Cavalry, can take the Citadel or Wagon.
The capture of the Citadel or Wagon will decide the game.
ILLUSTRATING THE POWER OF THE FIGURES IN THE
GAME, AS COMPARED WITH THAT OF TROOPS IN THE
FIELD.
The inventor has endeavored to give to the figures of his game a relative power which would, as nearly as practicable, accord with that of the arms represented.
It will be observed that the Infantry of the Line moves one or two squares in any direction, and can take either Infantry, Cavalry, or Artillery; while the Cavalry can move one, two, or three squares, in any direction, and can take either Cavalry, Infantry, or Artillery. We know that in a country comparatively level, such as the board represents, and presenting no obstacle except the river, Infantry or Cavalry can move in any direction, and under some circumstances either of those arms is good against the other. It is, of[10] course, necessary that there should be some distinction in the moves of the different figures; and as Cavalry can move more rapidly than Infantry, it has power to move three squares, while the Infantry of the Line moves but two.
Perhaps it will be said by some that the Cavalry has the advantage of the Infantry; but on placing a piece of Cavalry and a piece of Infantry on the board, by cautious playing, it will be found almost impossible to capture the Infantry with the single piece of Cavalry.
In the field, a regiment of Infantry, attacked by a regiment of Cavalry, might easily escape altogether, or may repulse and capture the regiment of Cavalry. The reverse may happen, and the Cavalry, well handled, may defeat and capture the regiment of Infantry.
The Light Infantry moves one, two, or three squares, directly forward, right or left obliquely, and one or two squares in any other direction. The object of this is, chiefly, that there shall be a distinguishing power between it and the Infantry of the Line.
[11]Light Infantry in the field does, or should, have the advantage in moving more rapidly; besides, it often has arms of a longer range, and can be used more successfully when a sudden and rapid movement is necessary.
The Artillery moves diagonally, and has a range of three squares on the diagonals. It cannot move perpendicularly or laterally, therefore has no power in those directions.
The Artillery can attain any position on the board, but cannot always reach it directly, as does the Infantry and Cavalry, but, in many instances, must make a detour to the right or left.
This distinguishing move is proper, inasmuch as a carriage cannot always follow the course of a man or horse, yet it may reach any point that they can in a country such as is represented by the board.
“Infantry or Cavalry cannot move in range of Artillery of the opposing side, except when protected by Artillery of their side,” etc. Artillery in the field may occupy a position, several approaches to which it may so[12] thoroughly command that it would be impracticable for Infantry or Cavalry to take it, unassisted by Artillery, by either of those approaches. Artillery would have to be brought up in order to operate on the first-named Artillery, or some other line of attack must be sought.
In the game, when one piece of Artillery is not protected by another, there are four other points at which it may be assailed, namely, the angles of the square. But when one piece of Artillery is supported by another, neither can be taken by Cavalry or Infantry without the aid of their Artillery.[C]
If a battery in the field occupied a position commanding thoroughly all of the approaches to it, and another battery of the same side was placed a short distance behind it, say in easy range, and commanded the first battery, it would be very difficult for Cavalry or Infantry to take the first-mentioned battery; and if they succeeded[13] in taking it, they could not easily, if at all, hold it while under the fire of the supporting battery.
It may appear that the Artillery in the game has too much power; but it must be remembered that a piece of Artillery of one side can always take a piece of Artillery of the other side that is placed in its range.
It often occurs in the field that one battery is brought up close under the fire of another, to dislodge it; and if both are well served, one must soon give way. See Plate 4, Figure 1.
The Wagon,[D] representing the Supply Train, moves diagonally, like the Artillery, but only one or two squares at a time; for it should not move so rapidly, therefore it does not move so far.
The player should be careful to guard the Wagon, for if it is captured he loses the game.
An invading army entering a country where supplies cannot be procured, must necessarily carry them with[14] him; and should his train be captured, with a good army in his front, he would be in great danger of destruction.
The attacking party should first determine upon a plan of attack. Then proceed to arrange his figures in proper order for the accomplishment of his plan. He should guard his lines, by throwing forward Light Infantry and Cavalry; but will endeavor to avoid an engagement until his order of attack is formed.
Unless to secure a very decided advantage, when once put in operation his first plan should not be abandoned. The time lost in arranging a new plan may be taken advantage of by the defending party, who might assume the offensive and win the game.
The defending party, at the opening of the game, should throw forward Light Infantry and Cavalry, to guard against any rapid movement to take the Citadel, that may be attempted by the attacking party with[16] Cavalry and Light Infantry. This will also give him time and space for moving up and arranging his figures in proper order for defence.
In advancing the Cavalry and Light Infantry, great caution should be observed in placing the figures on the squares most desirable for checking the advance of the attacking party, while at the same time they are not endangered.
No figure should be lost, if it can be avoided, at this stage of the game; and no figure of the attacking party, except Artillery, should be taken at the risk of the loss of one of the defending party. Indeed, the defending side should continue to remain strictly on the defence till a good opportunity is offered for an attack; as, for instance, when the figures of the attacking party are scattered, and not in supporting distance of each other.
It is, however, best not to cross the river until the attacking side is weakened by a considerable loss.
Early in the game, an opportunity is seldom offered by a good player, where it is safe for the defending[17] party to cross the river with a single figure; and it is only when the attacking party has been weakened by the loss of three or four figures, that two or three figures can be spared from the defence.
When such advance is determined upon, be always careful to leave the Citadel as securely guarded as possible.
If the attacking party be an expert player, he will avoid an engagement until he has arranged his figures in order for a grand attack.
If it is discovered that he is thus engaged, every good opportunity to annoy him, and prevent the formation of his plan, should be taken advantage of by manœuvres, feints, and sometimes real attacks, particularly at his Artillery: and his Artillery should be taken, if possible, even if it involve the loss of one or two figures of the defending party; for by the loss of one piece of his Artillery he will be more crippled than by the loss of almost any two other figures.
The game requires the constant attention of the[18] players. Often the slightest mistake leads to defeat; therefore be careful that every move is for a purpose.[E]
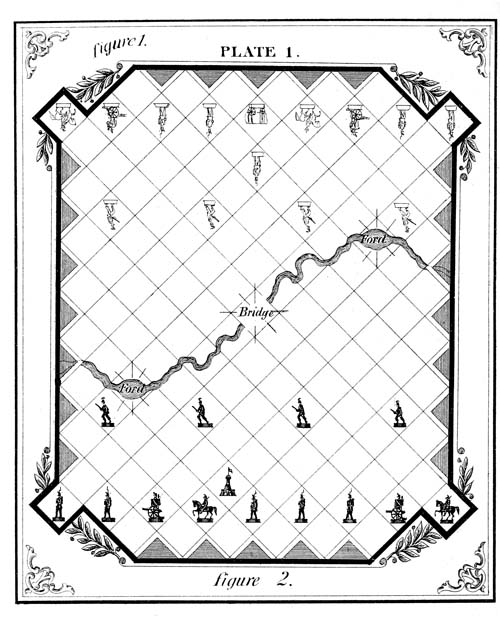
PLATE 1.
The board has one hundred and thirty-nine (139) squares that can be occupied. It represents a comparatively level field, traversed by a river impassable except at the fords and bridge.
In crossing the fords and bridge the figures move one, two, or three squares, according to their power, as elsewhere on the board. The short black lines indicate the entrances to the fords and bridge.
A figure cannot take, or check, another across the river, except at the fords and bridge. For example, a figure on square 39 cannot take, or check, a figure on square 54; nor can a figure on square 55 take, or check, a figure on square 40 or 48. (Squares are numbered in Plate 4.)
ARRANGEMENT OF THE FIGURES ON COMMENCING THE GAME.
On the defending side, Cavalry occupies the first square on the right of the line of nine squares. Artillery, the second. Infantry of the Line, third, fourth, and fifth. Cavalry, sixth. Artillery, seventh. Infantry of the Line, eighth and ninth. The Citadel, fifth square from the right of the first line of eight squares. Light Infantry, first, third, fifth, and seventh squares of the second row of seven squares.
The figures of the attacking side are arranged like those of the defence, except that the Wagon is placed on the fifth square of the line of nine squares, and a piece of Infantry of the Line on the first square immediately in front of it.
Figure 1.—When two pieces of Artillery, of opposite sides, are thus placed, no figure, except Artillery, can occupy the squares one or two. If Artillery is placed on either square, it can be taken by the Artillery of the other side.
Figure 2.—The figure on square nine cannot now move on square seven, because “a figure cannot occupy the second or third square from its Artillery, if that square is in range of the Artillery of the other side.” But if the figure on square eight moves to square six, then the figure on square nine could occupy square seven, for that square will not then be covered by the Artillery on square five.
Should the figure on square eight be placed on square four, then the Artillery on squares three and five do not protect each other; and in that case the Cavalry on square ten could take either of them: or the figure on square nine could take the Artillery on square five, and if it were taken by the figure that was on square eight, now on square four, then the Artillery on square three could be taken by the Cavalry on square ten.
Figure 3.—In this case, if the Artillery on square fourteen is moved to square fifteen, then the figures on squares sixteen and seventeen would be in range of that piece, and must move (one at a time, of course); or after one is moved, the Artillery on square eighteen may be brought up on the next square to the remaining figure. For example, if the figure on square sixteen be moved out of range, then the Artillery on square eighteen could be moved to square nineteen, to the support of the figure on square seventeen. If either of the squares sixteen or seventeen should be occupied by Artillery, of course that figure could take the Artillery moved to square fifteen.
Figure 4.—White figures representing the attacking party, and the black figures the defending party.
The attacking party having the move, suppose the figure of Cavalry on square twenty is moved to square twenty-one or twenty-two, then the Artillery on square twenty-five is in danger of capture when the attacking party has another move. Now the Artillery on square twenty-five cannot move, leaving the figure on square twenty-four in range of the Artillery on square twenty-three. If the player desires to save his Artillery on square twenty-five, he might move the figure or square twenty-four to square twenty-six, in order to protect his Artillery from capture by the Cavalry moved to twenty-one or twenty-two; and if that piece were taken by the Cavalry, he would then have an opportunity to move his Artillery away.

PLATE 2.
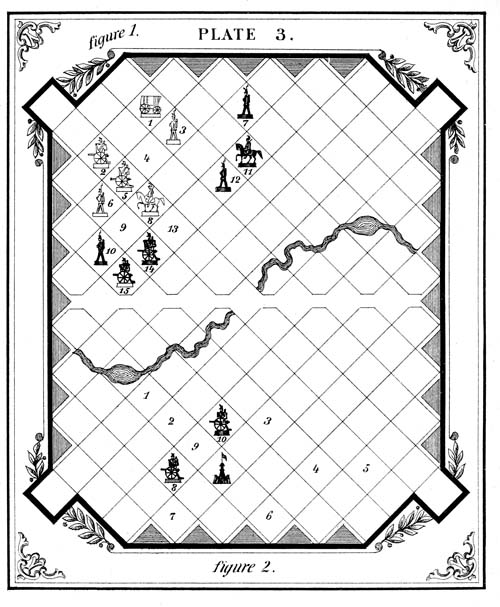
PLATE 3.
Figure 1.—Shows how the Wagon may be taken.
Suppose the attacking party, having been repulsed with considerable loss, is driven back from the river, pursued by the defending party, and the figures of the two sides occupy the squares indicated in this plate—the white figures representing the invading army, and the black figures the defending army.
The defending party having the move, suppose the Artillery on square fourteen is moved to square thirteen. Then the Cavalry on square eight must move, as “no figure, except Artillery, can occupy the first square next to the Artillery of its side, if it is also the first square next to the Artillery of the other side.” If the Cavalry on square eight is moved to square four, then the Artillery now on square thirteen can take the Artillery on square five, and could be taken by the Cavalry moved to square four, or the Infantry on square six, or the Artillery on square two. Suppose it (the Artillery of defending side having taken the Artillery on square five) is taken by the Cavalry now occupying square four; then the Cavalry on square eleven could take the Artillery on square two, and if it (the Cavalry of defending side, moved to square two) is taken by the Cavalry of attacking party now on square five, or the Infantry on square six, then the Infantry of defending party, on square seven, could take the Wagon on square one.
There are many other combinations for the capture of the Wagon.
Figure 2.—Shows how the Citadel may be taken.
Light Infantry, Infantry of the Line, or Cavalry of the attacking side, can take the Citadel when it is within their range, if no figure intervenes. For example, if the Artillery of the defending side is placed as indicated in this figure (on squares eight and ten), a figure of Cavalry or Light Infantry of the attacking party, on square one, or a figure of Cavalry, Infantry of the Line, or Light Infantry, being on square two, three, four, six, or seven, or a figure of Cavalry on square five, could take the Citadel, if the attacking side had the move. But suppose the defending party had the move, and a figure of Cavalry or Infantry occupied square one or two, and either piece of Artillery was placed on square nine; then the figure on square one or two could not take the Citadel, but must move out of range of the Artillery. If the Artillery on square ten is moved to square nine, then the figure of the attacking side on square two could occupy square three, and the next move could take the Citadel; or if the Artillery on square eight were moved to square nine, then the figure on square two could move to square seven, and on its next move could take the Citadel; for though the Citadel would be in range of the Artillery on square nine, that would not prevent its capture. A city may be very well defended on one side, and yet might be easily taken at another point.
Of course, the Cavalry and Infantry should co-operate with the Artillery in defending the Citadel; and the player should endeavor to prevent the attacking party from occupying any square from which it could be taken.
Figure 1.—If the Artillery on square 21 is moved to square 22, the Artillery on square 26 can take it, or move out of range. If the Artillery on square 26 takes the Artillery moved to square 22, then it could be taken by the Cavalry on square 20, or the Artillery on square 23. If it, on the other hand, moves to square 27, it could be taken by the Artillery on square 23; and if it is moved to square 24, 25, or 31, it could be taken by the figure on square 30. But if it is not moved at all, then the Artillery moved to square 22 could take it its next move.
Figure 2.—Shows how the figures of the game can be moved.
“Cavalry can be moved one, two, or three squares, in any direction, at the discretion of the player,” provided the way is not obstructed by another figure. For instance, the Cavalry on square 15 could not be moved to square 12, because the figure on square 13 intervenes. Nor, if the cavalry is moved to square 37, could it afterwards be moved to square 35 or 34, while a figure occupied square 36. If the Cavalry on square 15 is moved to square 37, it could afterwards be moved to square 29, 21, or 12, or to 22 or 6, or to 30, 23, or 15, or to 38, or to 45 or 53, or to 52, 65, or 76, or to 44, 51, or 57, etc.
“Light Infantry moves one, two, or three squares, directly forward, right or left obliquely, and one or two squares in any other direction, at the discretion of the player.” Now, if a piece of Light Infantry occupies square 36, it could be moved directly forward to square 51, 64, or 75; left obliquely to square 43, 50, or 56; right obliquely, to square 44, 52, or 59; to the left, to square 35 or 34; obliquely to the left and rear, to square 28 or 20; to the rear, to square 21 or 5; obliquely to the right and rear, to square 29 or 22; and to the right, to square 37 or 38.
“Infantry of the Line moves one or two squares, at the discretion of the player, in any direction.” If a piece of Infantry of the Line were on square 13, it could be moved either to square 29, 44, 21, 28, 12, 5, 6, 14, 22, or 30, etc.
“Artillery moves diagonally, one, two, or three squares at a time, at the discretion of the player.” A figure of Artillery being on square 9, could be moved to square 1, 2, 17, 24, 31, 18, 26, or 34. If it were moved to square 31, it could then be moved to square 39, 47, or 55, or back to 24, 17, or 9, etc. If a piece of Artillery occupied square 51, no figure of the opposite party, except Artillery, could be placed on square 58, 65, 73, 57, 63, 70, 43, 35, 27, 44, 37, or 30, unless that square were next to the Artillery of the other side. See rules of the game relative to Artillery, page 6.
“The Wagon can be moved one or two squares at a time, at the discretion of the player.” The Wagon being on square 11, could be moved to square 3, 4, 20, 28, 19, or 26, etc.

PLATE 4.
[A] When a piece is taken it is removed from the board, and the piece by which it is taken is placed on the square which was occupied by the captured piece.
[B] Whenever a piece of Artillery of one side is placed in range of a piece of Artillery of the other side, the first piece can be taken by the second. See Plate 4, Figure 1.
[C] The necessity of the co-operation of two or all of the different arms represented, and in many instances their dependence on the support of each other, is demonstrated in many real battles.
[D] The Wagon is captured in the same manner as other figures are; it cannot be taken while under cover of a piece of Artillery of its side.
[E] Success sometimes rewards a bold operator, in this game as well as in war, who, ignoring all accepted theorems, ventures upon a hazardous enterprise.
TRANSCRIBER’S NOTES:
Obvious typographical errors have been corrected.
The cover image for this eBook was created by the transcriber and is entered into the public domain.