
Title: Marine bayonet training
Author: United States. Marine Corps
Release date: January 22, 2025 [eBook #75177]
Language: English
Original publication: Washington: USMC, 1965
Credits: Bob Taylor, Brian Coe and the Online Distributed Proofreading Team at https://www.pgdp.net (This file was produced from images generously made available by The Internet Archive)

[Pg 1]
DEPARTMENT OF THE NAVY
HEADQUARTERS UNITED STATES MARINE CORPS
WASHINGTON, D.C. 20380
25 March 1965
1. PURPOSE
FMFM 1-1, MARINE BAYONET TRAINING, is one of a series of Fleet Marine Force Manuals covering the tactics and techniques to be employed in operations and training by the operating forces of the Marine Corps. It is made available to other Services for information and use as desired. The purposes of FMFM 1-1 are:
a. To introduce and describe the method of bayonet fighting employed by the Marine Corps.
b. To describe positions and movements used by the bayonet fighter, and to treat his actions individually and as a member of a group, both on the offense and the defense.
c. To set forth a program for bayonet training.
[Pg 2]
2. SCOPE
Beginning with a brief history of bayonet fighting and the evolution to the present technique employed by the Marine Corps, individual and group attack and defense are described. Training techniques, use of the pugil stick, and construction of an assault course are included.
3. SUPERSESSION
This publication supersedes NAVMC 1135-AO3, BAYONET FIGHTING, dated 22 March 1957, copies of which may be destroyed without report.
4. CHANGES
Recommendations for improvements to this manual are invited. Comments and recommended changes should be forwarded to the Coordinator, Marine Corps Landing Force Development Activities, Marine Corps Schools, Quantico, Virginia 22134.
5. CERTIFICATION
Reviewed and approved this date.

L. F. CHAPMAN, JR.
Lieutenant General, U.S. Marine Corps
Chief of Staff
[Pg 3]
DISTRIBUTION:
| 2035/6025/6200/6300/6500/6800/7215/ | (2) |
| 7506/7525-01 | (2) |
| 7255/7352/7508/7600 (less 7636)/7857 | (3) |
| 2010/2088/3510/4000 (less 4125)/5000 | (5) |
| (less 5537-09 and 5612)/6600 | (5) |
| 7373/7800-03,-04,-05/8145 | (5) |
| 1025/3000/3520/3530/6900/6903/6905/ | (10) |
| 6910/6965/7000-48 | (10) |
| 7530 (less 7539)/7800-14,-15/7950/ | (10) |
| 7970/8506/8511-02 | (10) |
| 2020/2060/3540/7380/7539 | (15) |
| 2030/3550/4125/5612/7636/7800-01, | (20) |
| -02,-06,-09 | (20) |
| 2100 | (25) |
| 7230-01 | (30) |
| 7385/7391/7800-11 | (50) |
| 3700 | (75) |
| 7800-12,-13 | (100) |
| 5537-09 | (150) |
| 7315 | (200) |
| 7230-04 | (4200) |
| 7000-02 | (50) |
[Pg i]
| SECTION 1: INTRODUCTION | ||
| Paragraph | Page | |
| General | 101 | 1 |
| Principles of Bayonet Fighting | 102 | 10 |
SECTION 2: POSITION AND MOVEMENTS |
||
General |
201 | 13 |
| The Guard Position | 202 | 14 |
| Change of Direction | 203 | 18 |
| Foot Movements | 204 | 18 |
SECTION 3: INDIVIDUAL ATTACK |
||
General |
301 | 23 |
| The Slash | 302 | 23 |
| The Vertical Butt Stroke | 303 | 27 |
| The Smash | 304 | 31 |
| The Horizontal Butt Stroke | 305 | 34 |
| The Jab | 306 | 38[Pg ii] |
SECTION 4: INDIVIDUAL DEFENSE |
||
General |
401 | 43 |
| Parry Right | 402 | 43 |
| Parry Left | 403 | 44 |
| Block Against Slash | 404 | 46 |
| Block Against Vertical Butt Stroke | 405 | 48 |
SECTION 5: COMBINATION MOVEMENTS |
||
General |
501 | 51 |
| List of Movements | 502 | 52 |
SECTION 6: GROUP ATTACK AND DEFENSE |
||
General |
601 | 53 |
| Group Attack | 602 | 53 |
| Group Defense | 603 | 54 |
SECTION 7: TRAINING |
||
General |
701 | 59 |
| Demonstration and Application of the Basic Fundamentals | 702 | 60 |
| The Assault Course | 703 | 62 |
| The Pugil Stick | 704 | 73 |
INDEX |
83 |
[Pg 1]
a. Evolution of the Bayonet.—The bayonet is the infantry weapon which has changed the least during the development and refinement of weapons of war during the last three hundred years. There are several suggested origins of the bayonet. Some sources suggest that it derives from the Baioniers, crossbowmen of the middle ages, who carried a large knife or dagger to supplement their crossbows. Other sources credit the smugglers of Basque with using a bayonet-type weapon as a last ditch defense. Most English literature sources give the credit to Seigneur Marecal de Puysegur who, in 1647, at Ypres, France, ordered his troops to insert their daggers into the muzzles of their muskets after firing. De Puysegur and his unit were from Bayonne, France, a town known for dagger manufacture, hence the term bayonet.
(1) Early infantry commanders employed a warrior known as a pikeman, armed with a knife attached to the end of a quarterstaff, to defend the musketeers from an enemy charge while the musket was reloaded. Reloading was a time consuming operation and the musketeer was[Pg 2] vulnerable during the time his weapon was empty. The pikeman stationed himself in front of the musketeer and warded off any enemy assault with his pike until the musketeer was again ready to fire. De Puysegur’s development thus enabled the musketeer to assume both functions of the “medieval fire team.” This so called plug bayonet was used for a period of forty to fifty years. It consisted of a long dagger with a tapered shaft which was inserted into the muzzle of the musket. The taper was necessary since muzzle diameters were not standardized. The plug bayonet fitted snugly into the muzzle of the musket and was difficult to remove. This was necessary in order to prevent it being withdrawn by the enemy. The musket could not be fired with the bayonet inserted, a significant disadvantage. The plug bayonet lost favor when it contributed to the defeat of the English at the hands of the Scots at Killiecrankie, Scotland, in 1689. The English were ordered to fix bayonets after firing a volley at the Scots. The British commander then discovered that his troops were further from the Scots than he had originally thought. He ordered bayonets detached and muskets reloaded. Before loading could be accomplished the Scots closed with the English and thoroughly routed them. The English commander, Hugh MacKay, having noted the disadvantages of the plug bayonet, developed a modification which came to be known as the ring bayonet. The ring bayonet was similar to the plug bayonet, but the tapered shaft was inserted between two rings fastened to the[Pg 3] muzzle, allowing the musket to be fired with the bayonet attached. There is some evidence that a similar device was being used in France ten years prior to the engagement at Killiecrankie, indicating that the ring bayonet was not an English invention.
(2) The ring bayonet still left much to be desired. The lack of standardization made a secure fit difficult, and the rings had a tendency to stretch out of shape with use, rendering the bayonet useless. This led to the next development of a new bayonet, known as the socket bayonet. The socket bayonet was introduced in the early 1690’s. The lower part of the bayonet was shaped like an elbow, leaving the blade well out of the line of fire and seating the bayonet firmly on the barrel. Again, lack of standardization made it impossible to produce a single model which would fit even a small number of the weapons of one unit. Also, a sudden tug by an enemy would dislodge the bayonet from the barrel. These difficulties led to further advancements in bayonet design, in an attempt to find a rapidly attachable bayonet which could be held securely to the barrel. One development made the bayonet part of the musket itself. This was accomplished by splitting the socket sleeve of the ring lengthwise permitting a wider opening which could be hammered closed to obtain a snug fit. Experiments with slots, rings, catches, clasps, springs, and other assorted devices were made in an attempt to develop a more satisfactory bayonet.
[Pg 4]
(3) The bayonet as we know it today has its origins at the beginning of the 19th century. Late in the 18th century a major bayonet modification appeared, the sword bayonet. This has been the prototype for most bayonets since that date. The now familiar knife blade bayonet came into general use about the same time as the introduction of the magazine rifle, just prior to the Civil War. There were a variety of shapes and sizes ranging from the sword-like, 24-inch blade down to the dagger-type, 10-inch blade. Typically, there were a variety of short-lived variations and multiuse bayonets. There were saw-toothed blades for use by engineer troops, saber-edged blades for use by the cavalry, spade-shaped blades to help the infantryman dig in, and bolo-knife blades for cutting through the jungles. In addition, there was a ramrod/cleaning rod blade consisting of a long cleaning rod, sharpened to a point at one end and folding under the barrel like the old fashioned cleaning rod. None of these modifications were adopted for long. At this point the rifleman had an instrument with which he could protect himself as he reloaded his weapon. It served to protect him and better his morale when rain had soaked his powder or wind had blown the powder from his pan. He could now defend himself against the sabre slashes of the cavalry or a charge by the infantry.
b. Development of Bayonet Fighting Techniques.—The bayonet was developed to protect[Pg 5] the musketeer while he reloaded his weapon, a defensive mission. The tactics employed were an individual or unit matter; there was no published doctrine for bayonet fighting. However, as weapons improved and rapid fire, longer range weapons were developed, the troops were more widely dispersed on the battlefield. The percentage of time spent in close combat with the enemy was reduced. As a result, the use of the bayonet, a close combat weapon, was also reduced. There is little said about the use of the bayonet in the American Civil War and Spanish-American War.
(1) The development of the machinegun and refinements in artillery reversed the trend toward battlefield mobility and World War I was a static conflict in which trench warfare was employed. There were great concentrations of troops, sometimes in close proximity to one another. The bayonet was extremely important in trench fighting, and the experience gained in World War I led to the publication of the first manuals on bayonet fighting doctrine. The bayonet was depicted as an offensive weapon, used in assaulting enemy troops in trenches. Many of the principles appearing in these manuals are still valid today. Early doctrine pictured the bayonet as essential for successful culmination of the attack. Artillery fire was capable of demolishing enemy trenches, but this was undesirable since the trenches would have to be redug to defend against the inevitable counterattack. Therefore the only way to drive the enemy from his trenches[Pg 6] without destroying the trench and burying him was through the bayonet assault. The doctrine set forth in these manuals regarding attitude, standardization of movements, and practice for bayonet fighting was as follows:
(a) The bayonet fighter was given a firm knowledge of the underlying principles of bayonet combat. The bayonet was regarded as an individual weapon and each bayonet fighter was taught in such a manner as to take advantage of his own physical characteristics. No attempt was made to set down prescribed standards as to the position of feet or hands on the weapon. Each bayonet fighter was left free to choose positions and movements most natural to him.
(b) Instructors corrected individual errors, but took advantage of any particular skill possessed by any individual. Instructors tried to develop to the fullest degree the proficiency of the individual, consistent with his physique and degree of development, but guarded against attempting to make a precise parade or calisthenic drill of bayonet training.
(c) Assumption of a vicious, aggressive attitude was the “spirit of the bayonet.” An actual bayonet fight was depicted as lasting only a few seconds during which time the bayonet fighter was to kill his opponent or be killed himself. The necessity for aggressive action was as obvious then as it is today. The enemy was to[Pg 7] be forced on the defensive; the battle was won if this was achieved. The attack consisted of a succession of thrusts, cuts, feints, and butt strokes delivered in succession and without pause, so as not to allow the opponent to recover.
(d) The employment of teamwork in the bayonet assault was emphasized. The assaulting troops remained on line. An individual who got too far ahead and was killed before assistance could arrive was not contributing to a successful assault. Similarly, an individual who remained behind was useless in the assault.
(2) The individual attack movements described in early manuals closely resemble those taught and employed today. Today’s system is somewhat simpler and facilitates better balance of the bayonet fighter and control of the weapon. Training consisted of individual familiarization with the movements, the use of dummies, thrusting rings, and practice in assaulting enemy trenches with troops on line. The latter category received more emphasis. Dummies were placed in trenches and attacked by bayonet fighters. The system of bayonet fighting taught to American fighting men during World War II closely resembled that employed during World War I. The basics of this system were established in 1905 and changed very little through the conduct of World Wars I and II. Bayonets were employed during World War I principally in the assault of enemy trenches, while, in World War II, their[Pg 8] employment was extended to include seizure of key enemy held terrain objectives.
(3) The bayonet fighting system currently taught and employed by the Marine Corps was developed by Doctor Armond H. Seidler, professor in the Department of Physical Education at the University of Illinois. Dr. Seidler was a bayonet instructor in the U.S. Army during World War II when the Biddle system was taught. He felt the movements of the old system were awkward and difficult to execute, and often caused the bayonet fighter to lose his balance. If the bayonet fighter failed to disable his opponent with the first blow he was then frequently left at the enemy’s mercy. Dr. Seidler was convinced that the movements of the Biddle system were unnatural and this would result in their being discarded in an actual bayonet fight, and the bayonet fighter resorting to a disorganized attack on his enemy. Under the Seidler system the guard position remains the basic position. All movements begin from the guard position and each movement consists of an attack and a recovery. The recovery is a return to the guard position. In the execution of a movement, the two phases follow without deliberate pause. This makes the entire movement a uniformly smooth action. The attack may be continued without returning to the guard position, either by repeating the same movement or utilizing another followup movement. Followup movements are designed so that a blocked initial[Pg 9] movement sets the opponent up for the delivery of another killing blow without the bayonet fighter having to return to the guard position and without loss of balance.
c. The Importance of the Bayonet.—The importance of the bayonet cannot be measured by the frequency of its use or the number of casualties for which it accounts. It is indispensable because of the confidence it breeds in the individual fighting man, and the willingness instilled in him to close with the enemy and destroy him. Closing with and destroying the enemy is the mission of the infantry, and the major importance of the bayonet is that it allows the individual Marine to accomplish this mission under a wide variety of conditions. The bayonet is always loaded and always operative.
(1) The importance of assuming the offense as a principle of war cannot be questioned. The bayonet is a symbol of the offense; of aggressiveness. It gives the infantryman courage and confidence, provided he is properly trained in its use. It gives individual infantrymen a more offensive attitude, and better enables them to accomplish their mission in the final assault. It gives them a means of personal protection, contributing to their security and safety. In addition to its offensive roles, the bayonet can serve as a last ditch protective measure.
(2) In situations where friendly and enemy troops are mingled in hand-to-hand combat, rifle[Pg 10] fire may hit friendly personnel. However, the bayonet is more selective and kills only the person into which it is thrust. As long as the infantry closes with the enemy this capability remains important. In situations of reduced visibility the presence of the bayonet may discourage premature firing and the tragedy which can result from it. For a discussion of the employment of bayonets in the control of riots and civil disturbances, see FMFM 6-4, Marine Rifle Company/Platoon.
(3) When stealth is required the bayonet is irreplaceable. It is flexible, capable of being fixed to the end of the rifle or held as a knife, silent and deadly. It gives the riflemen two capacities, bullets and blade. Bayonet drill is an excellent physical conditioner. The bayonet assault course is strenuous exercise and develops a combination of fitness and skill that contributes to the creation of total military fitness.
The bayonet fighter should be aggressive, ruthless, savage, and vicious. Herein lies the key to success with the bayonet. He must never pause in his attack until he has killed his enemy. He must follow each vicious attack with another, remembering that if he does not kill his opponent, his opponent will kill him. Hesitation, delay, and excess maneuvering may result in death. The primary aim of the bayonet fighter is to get his[Pg 11] blade into the enemy. All defensive moves, butt strokes, and footwork drive towards this end. They are actions taken to enable the bayonet fighter to sink his blade, for it is the blade that kills. He aims for the vital areas of the enemy. The throat is the best target, but the belly and chest are also vulnerable. When the enemy seeks to protect one vital area, he attacks another. He hacks, cuts, and slashes the face, arms, and hands in order to get to the vital areas. He makes maximum use of the rifle butt to open up vital areas. He delivers the butt strokes hard and close in, then kills with the blade. If the opponent gives no opening, he makes one by parrying his weapon. If required, the bayonet fighter protects himself through blocks and parries. The rifle and bayonet make a good shield. The best defense is not to allow the opponent to take the offensive. The successful bayonet fighter strikes the first blow and follows up with the kill. Training and practice are the only way to attain proper form, accuracy, agility, and speed with the rifle and feet. Practice and training in these traits lead to coordination, balance, speed, and endurance. The bayonet fighter must continue to practice these movements until they become second nature, and his attack as natural as running.
[Pg 13]
a. The basic starting and recovery position in bayonet fighting is the guard position. From this position all movements can originate. This includes movements to attack an enemy, which will be covered in section 3; movements to change direction; and movements of the feet. These movements are natural, instinctive, and easy to teach and execute. They bear a close resemblance to the established athletic skill of boxing. Although the hands are held in a relatively fixed position, the arm and foot movements, feinting, speed, and balance are markedly similar. In this system, the rifle and bayonet are used as a club or quarterstaff, as well as a spear. There is no sportsmanship in bayonet fighting. The opponent must be destroyed, not merely defeated.
b. Descriptions of movements will state approximate distances. These distances may be adjusted to suit the individual. All movements described are for a right-handed bayonet fighter.
c. The rifle and bayonet in the hands of a trained Marine become a deadly combination of spear, sword, club, and shield.
[Pg 14]
a. General.—As in boxing the basic position of the bayonet fighter is the GUARD position. The bayonet fighter in this position is relaxed and alert. The initial attack movement begins from this position. Each movement consists of an attack and a recovery. The recovery is in fact a return to the guard position. In executing a movement the phases follow each other without a deliberate pause, thus making the entire movement a uniformly smooth action. The attack may be continued without returning to the guard position by repeating the same movement or utilizing another movement. In the guard position the bayonet fighter is ready to move into the attack to ward off his enemy. Figures 1 and 2 illustrate front and side views of a bayonet fighter in the guard position.
b. Position of the Feet.—The feet are spread apart about shoulder width. The left foot is about 6 inches forward of the right, in line with the right instep.

Figure 1.—Guard Position—Front View.
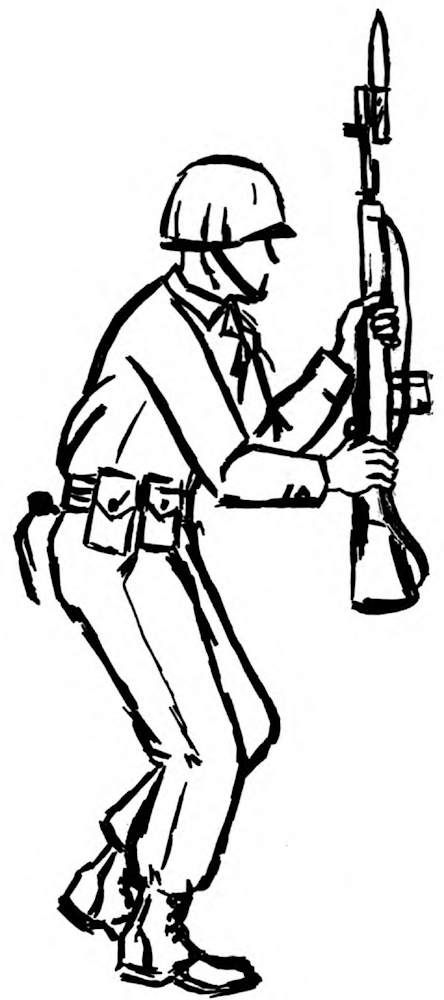
Figure 2.—Guard Position—Side View.
c. Position of the Body.—The body is held erect or bent slightly forward from the hips, if this is more comfortable. The knees are slightly bent, and the weight is evenly balanced on the balls of both feet. The right elbow is slightly forward of the right hip in a relaxed, natural position and the right forearm is held approximately parallel to the deck depending on [Pg 17]the size of the individual. The head is held high permitting continuous eye contact with the opponent. The opponent’s facial expression, especially the eyes, may give the bayonet fighter warning of his intentions, but the bayonet fighter must also keep the opponent’s feet and hands in view through peripheral vision.
d. Position of the Hands.—The hands grip the rifle firmly, but not tensely. The left hand grasps the rifle just below the upper sling swivel, under the sling. The right hand holds the small of the stock behind the trigger guard.
e. Position of the Rifle.—The rifle is held so it bisects the angle made by the neck and the left shoulder. It is held a sufficient distance from the chest to contribute to the balance of the bayonet fighter, usually 10 to 15 inches. The right arm is bent slightly providing a firm, solid position. The extended position of the arms protects the bayonet fighter’s body against an attacker’s blows and permits ready parry movements. In the guard position the rifle is held as in port arms, except that the sling and cutting edge of the blade face the opponent.
f. The Growl.—A yell or growl can be effective prior to an attack to temporarily stun the opponent and cause him to freeze momentarily. This yell or growl should be a short, loud, vicious noise, executed in much the same manner[Pg 18] as a tiger growls just before he pounces on his victim. The yell or growl adds a feeling of aggressiveness, self-confidence, and force to each attack movement.
a. General.—The whirl is used to face an opponent not positioned directly to the bayonet fighter’s front. Whirl movements are executed by pivoting on the foot of the side to which the change of direction is to be made. The rifle and bayonet are held in the guard position during the execution of the whirl.
b. Execution of the Whirl.—It is possible to whirl 180° to the right or left, pivoting on the foot closest to the opponent. It is not necessary to whirl the entire 180° if stopping short of that distance permits the bayonet fighter to face his opponent.
a. General.—Proper foot movements must be utilized in order to enable the bayonet fighter to maintain balance and maneuverability of his body at all times, and thus retain the capability of delivering effective attack movements. The feet are picked up and set down with a slight stomp in the shuffle. They are not slid along the ground. On the battlefield there are numerous obstacles to trip the bayonet fighter who slides[Pg 19] his feet. One foot is kept on the deck at all times. Never bring the feet together as this results in vulnerability to the slightest attack or push. The shuffle is used to the front or either side.
b. Shuffle Right.—To shuffle right, step to the right about 15 inches with the right foot, and follow with the left foot. To move to the right front, execute a partial whirl to the right and then shuffle forward in the desired direction. Figure 3 illustrates steps involved in the shuffle right movement.
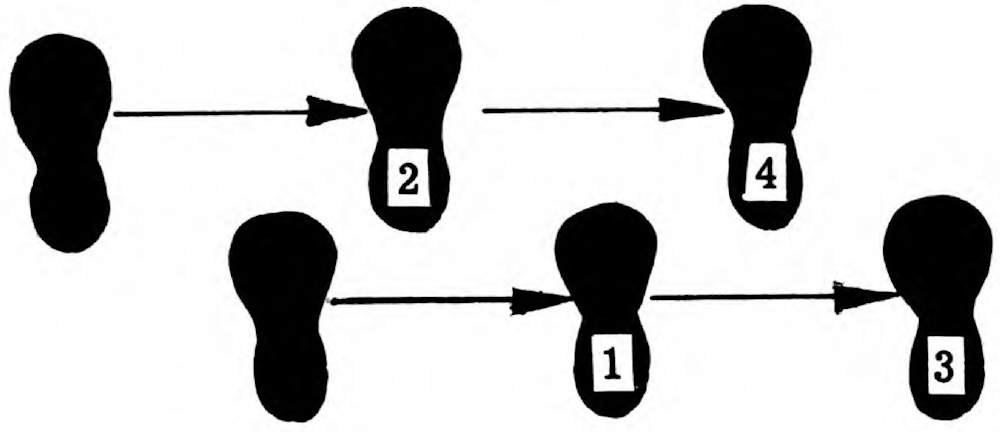
Figure 3.—Shuffle Right.
c. Shuffle Left.—To shuffle left, follow the same procedure for shuffle right, except move the left foot to the left and follow with the right. To move to the left front execute a partial whirl to the left and then shuffle forward in the desired[Pg 20] direction. See figure 4 for an illustration of the shuffle left movement.
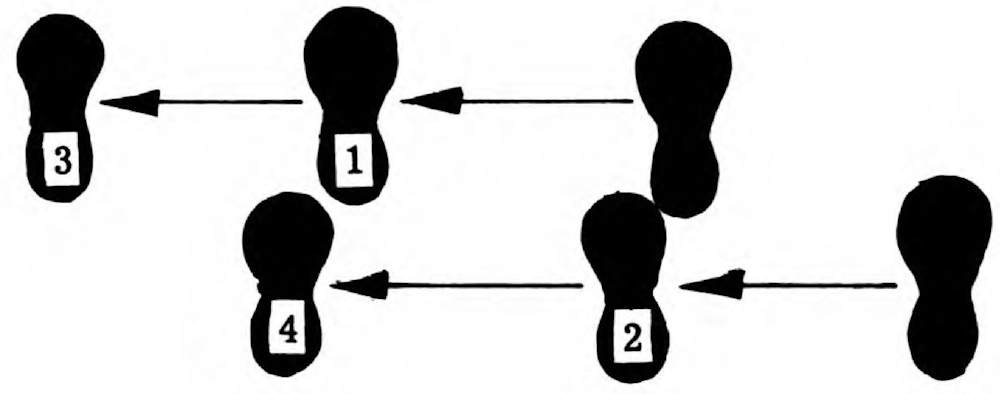
Figure 4.—Shuffle Left.
d. Shuffle Forward.—To shuffle forward, step about 15 inches forward with the left foot and follow with the right foot to assume the guard position. See figure 5 for an illustration of the shuffle forward.
[Pg 21]

Figure 5.—Shuffle Forward.
[Pg 23]
There are five basic attack movements; the slash (to include the horizontal slash), vertical butt stroke, smash, horizontal butt stroke, and jab. The movements described for hands, feet, and body are done simultaneously, both in the attack and during recovery to the guard position.
a. Execution.—The slash is executed in the following manner:
(1) Assume the guard position.
(2) Step forward about 15 inches with the left foot, keeping the right foot in place as a base. (See fig. 6.)
(3) Hold the right hand in place, extending the left arm almost fully, while pulling back on the butt with the right arm. Swing the edge of the bayonet forward and down in a slashing arc aimed at the opponent’s neck area.
[Pg 24]
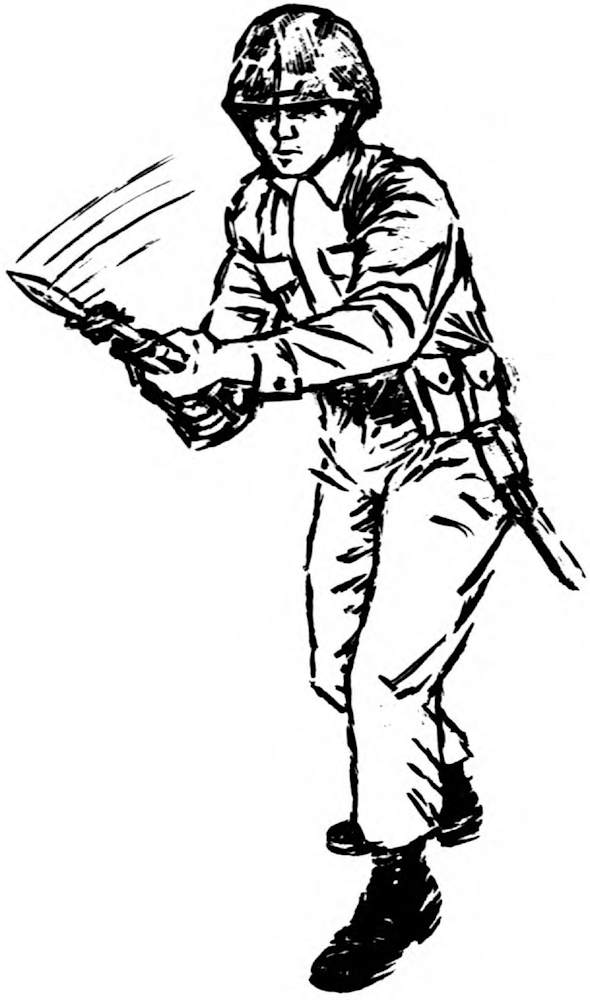
Figure 6.—Slash-Step Forward.
[Pg 25]
(4) The step forward and the extension of the left arm are performed simultaneously. The forward step adds force to the slashing movement.
(5) At full extension of the arms, when delivery of the blow is complete, the bayonet should be flat. The left arm is extended, and the right forearm is held along the stock of the rifle, approximately waist high. (See fig. 7.)
b. Horizontal Slash.—There is a variation to this movement known as the horizontal slash. The difference is that the bayonet fighter steps forward with the left foot and rotates his body to the right by pivoting on the right foot. At the same time bring the rifle and bayonet to a relatively horizontal position in front of the body. Simultaneously, the right arm is pulled across the body and a hooking action is executed with the left arm. This slash is directed on a horizontal plane at the opponent’s head, neck or side.
c. Recovery to the Guard Position
(1) Bend the left arm, pivoting the rifle in the right hand.
(2) Take a step forward with the right foot.
(3) Rotate the body slightly to the front.
[Pg 26]
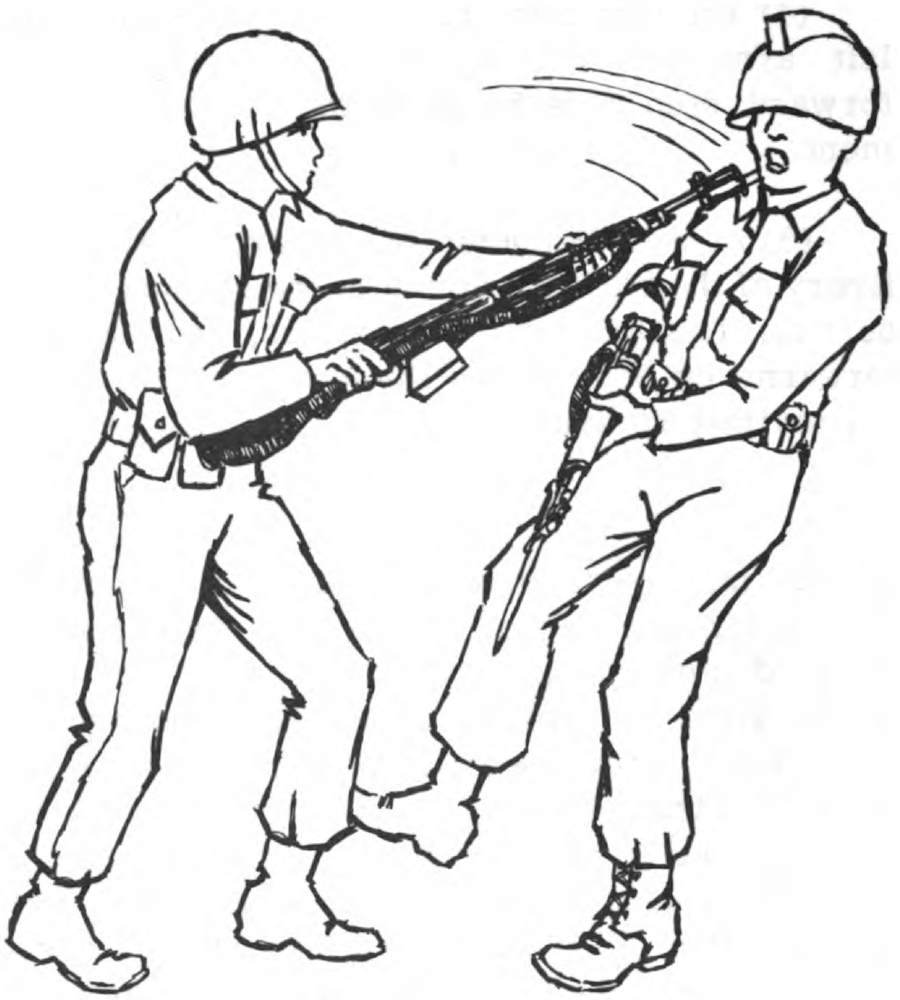
Figure 7.—Slash-Delivery.
[Pg 27]
a. Execution.—The vertical butt stroke is executed in the following manner:
(1) Assume the guard position.
(2) Step forward with the right foot about 15 inches. (See fig. 8.)
(3) Using the left hand as a pivot for the rifle, drive the right hand forward and upward in an uppercut type motion. Aim the butt of the rifle at the groin. If the opponent bends to avoid being hit in the groin, his midsection and chin will protrude. In this event, carry the stroke upward until contact is made with his midsection or chin along the centerline of his body.
(4) Execute the step and uppercut motion at the same time to add force to the blow. (See figs. 9 and 10.)
b. Recovery to the Guard Position.
(1) Pull the right hand back and down until the right elbow is again slightly forward of the right hip in a relaxed, natural position.
(2) Step forward with the left foot and assume the guard position.
[Pg 28]
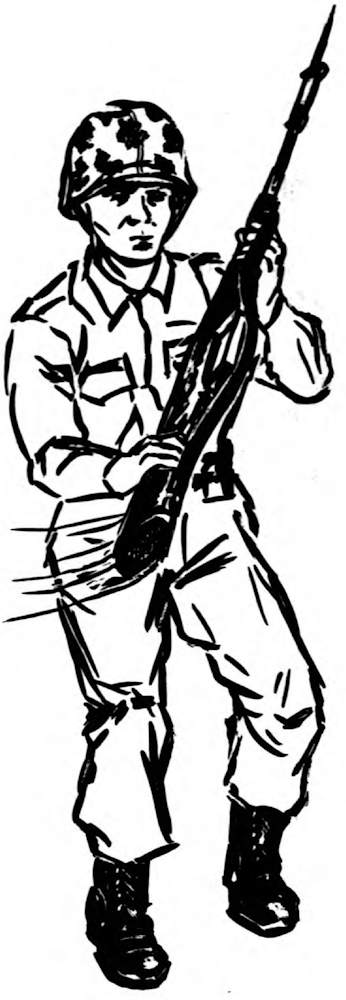
Figure 8.—Vertical Butt Stroke-Step Forward.
[Pg 29]
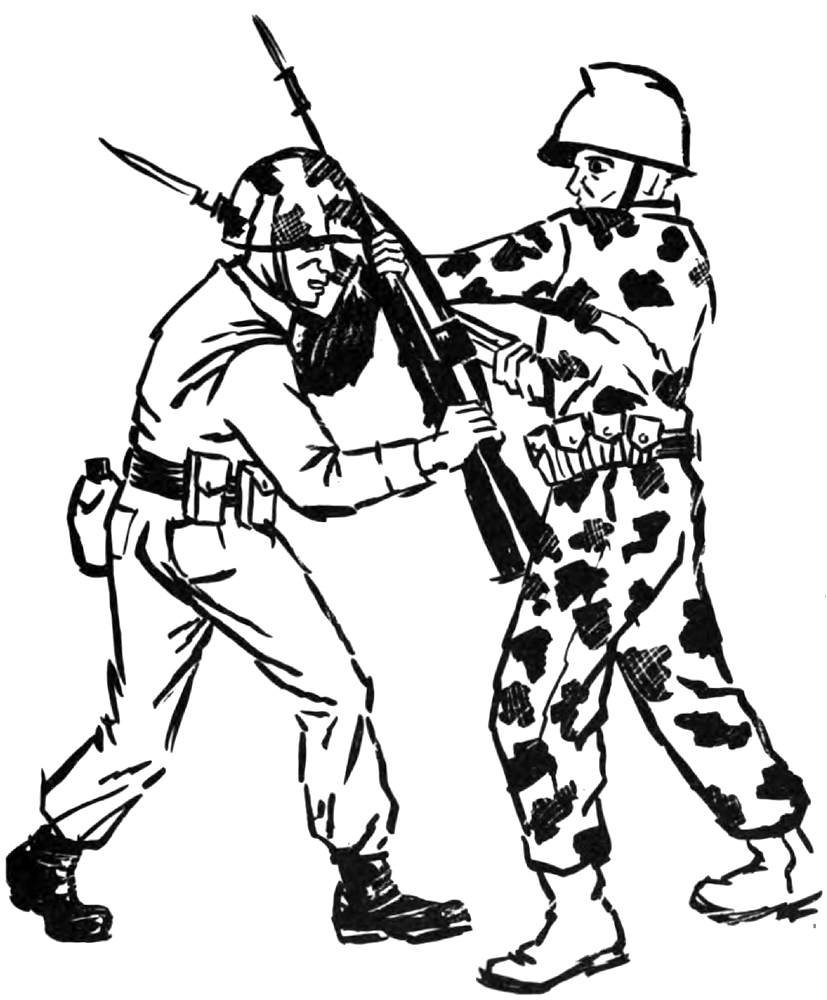
Figure 9.—Vertical Butt Stroke to the Groin.
[Pg 30]
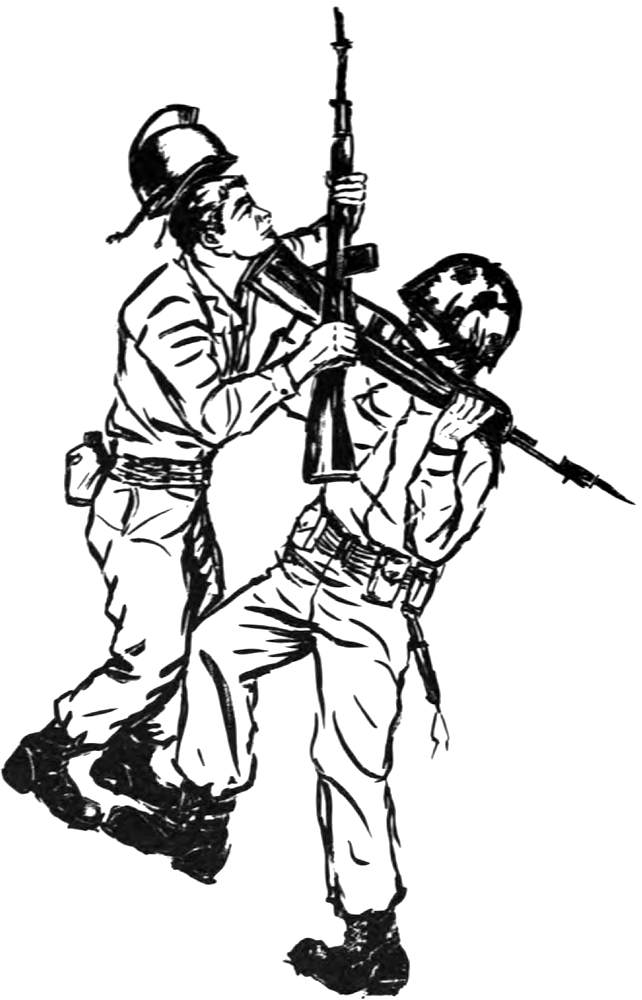
Figure 10.—Vertical Butt Stroke to the Chin.
[Pg 31]
a. Execution.—The smash, frequently used as a followup to the vertical or horizontal butt stroke, is executed as follows:
(1) Assume the guard position.
(2) Draw the left arm back to the neck area. The rifle is held with sling up. The rifle is now over the left shoulder, parallel to the deck. (See fig. 11.)
(3) Step toward the opponent about 15 inches with the right foot, slamming the rifle butt into the opponent’s face by extending the arms about 6 inches toward the target, the rifle remains parallel to the deck. (See fig. 12.)
(4) Follow with the left foot after the blow has been struck. If further extension of the arms is necessary, the bayonet fighter should shuffle forward and again execute the smash.
b. Recovery to the Guard Position.—Step forward with the left foot about 15 inches, assuming the guard position.
[Pg 32]
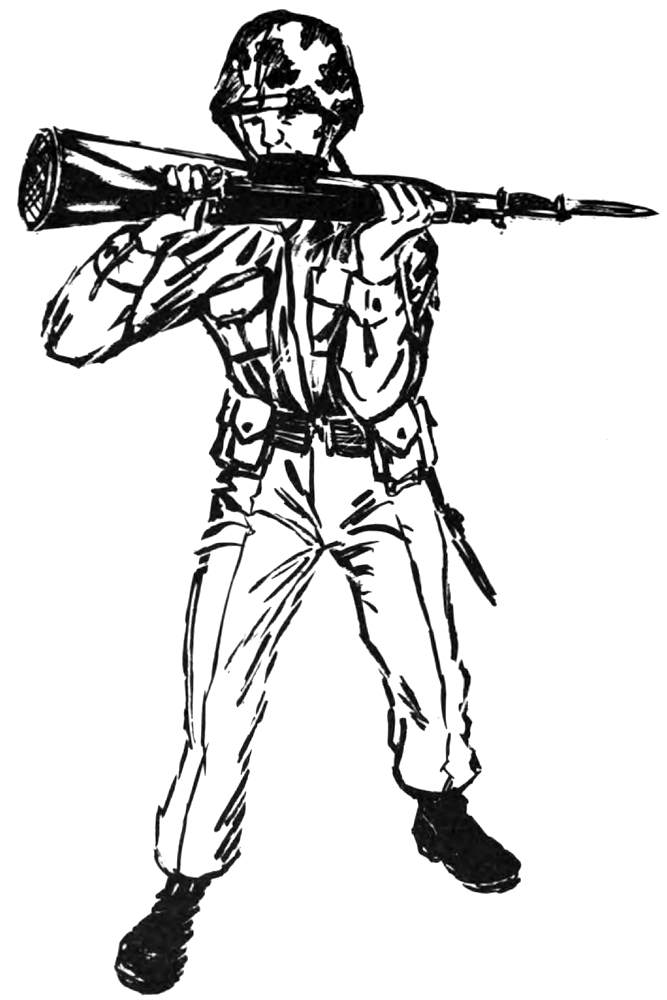
Figure 11.—Smash-Step Forward.
[Pg 33]
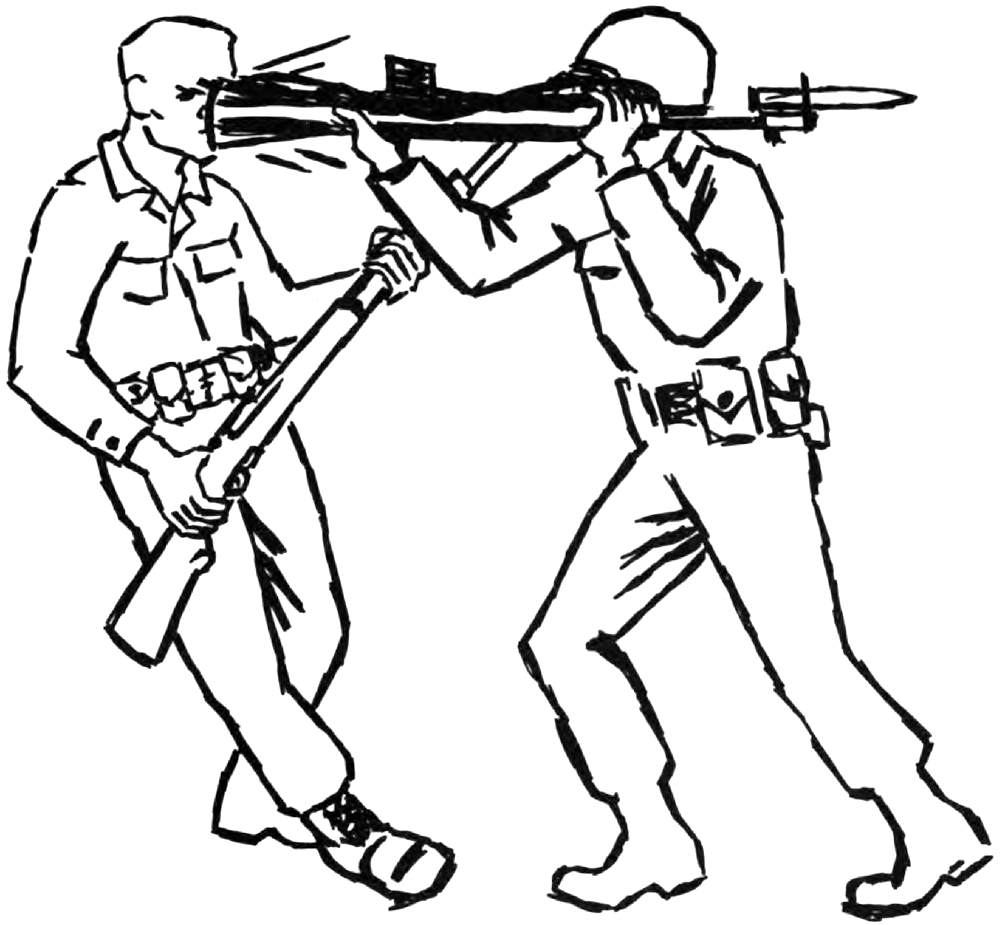
Figure 12.—Smash-Delivery.
[Pg 34]
a. Execution.—The horizontal butt stroke is executed as follows:
(1) Assume the guard position.
(2) Step forward approximately 20 inches forward with the right foot, using the left foot as a pivot point. (See fig. 13.)
(3) Simultaneously, bring the rifle butt across in a horizontal arc, using the left hand as a pivot point. The right arm is almost completely extended. This is a fast hooking action.
(4) During delivery the rifle is held flat on its side so the toe of the rifle and the sling are pointed toward the target. If the rifle is not held flat, it is possible that the stock will be broken by the force of an aggressive butt stroke. (See figs. 14 and 15.)
(5) Aim the toe of the butt plate at the opponent’s head, neck, or side.
(6) The step, pivot, and blow should all occur simultaneously in order to add force to the blow.
b. Recovery to the Guard Position.
(1) Step forward with the left foot.
(2) Bend the right arm, lowering the right hand to assume the guard position.
[Pg 35]
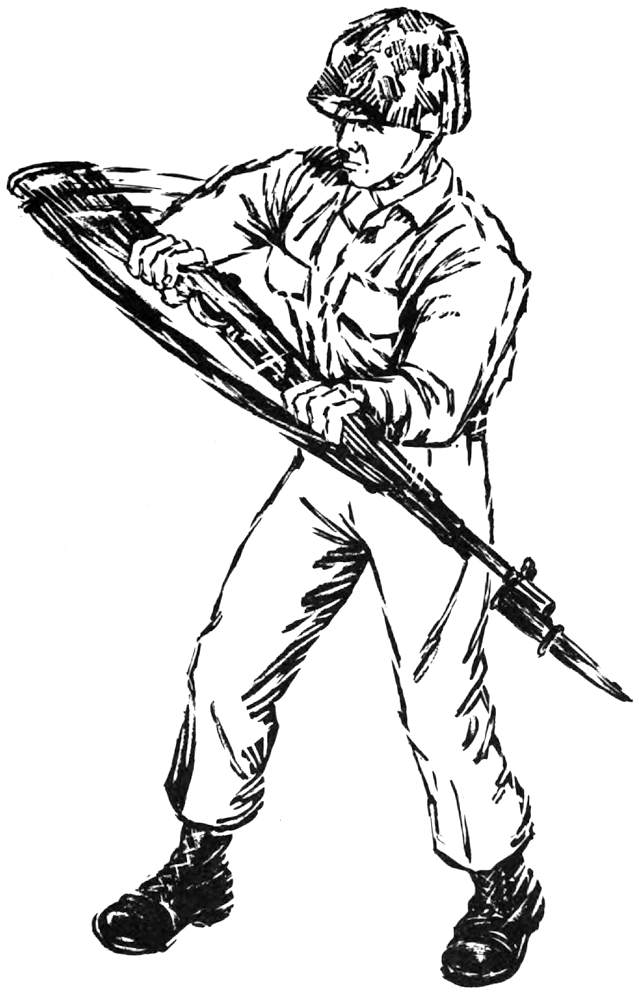
Figure 13.—Horizontal Butt Stroke.
[Pg 36]
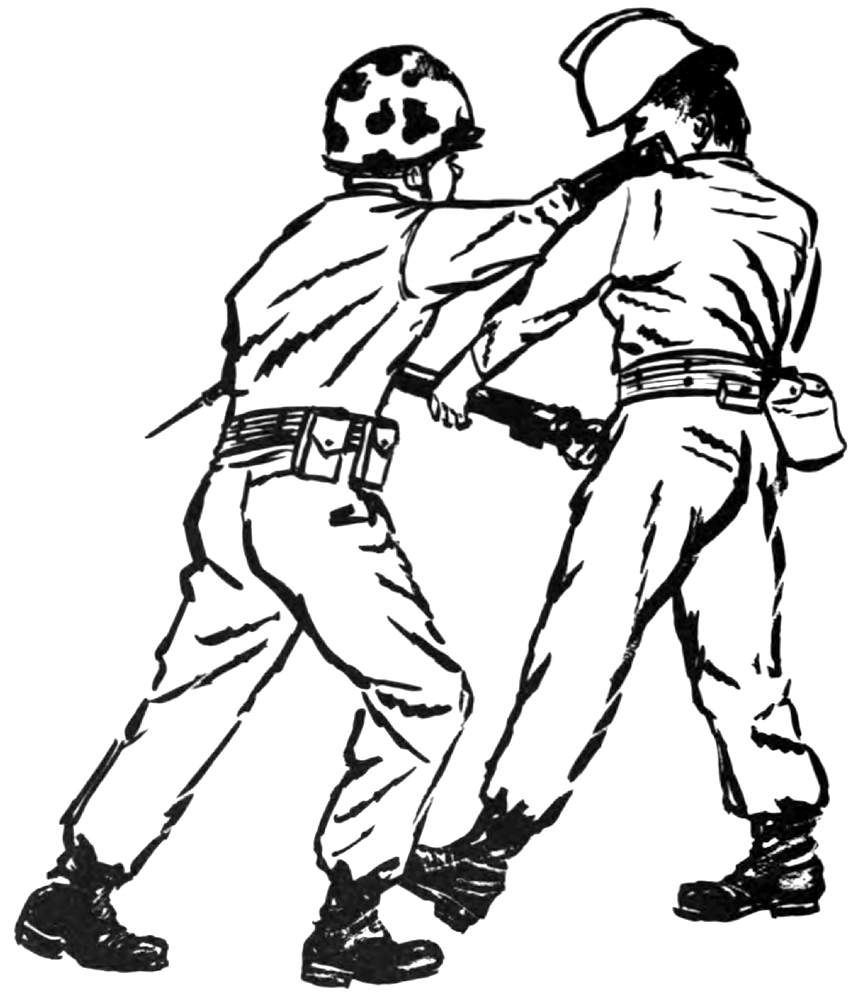
Figure 14.—Horizontal Butt Stroke—Delivery to the Head.
[Pg 37]
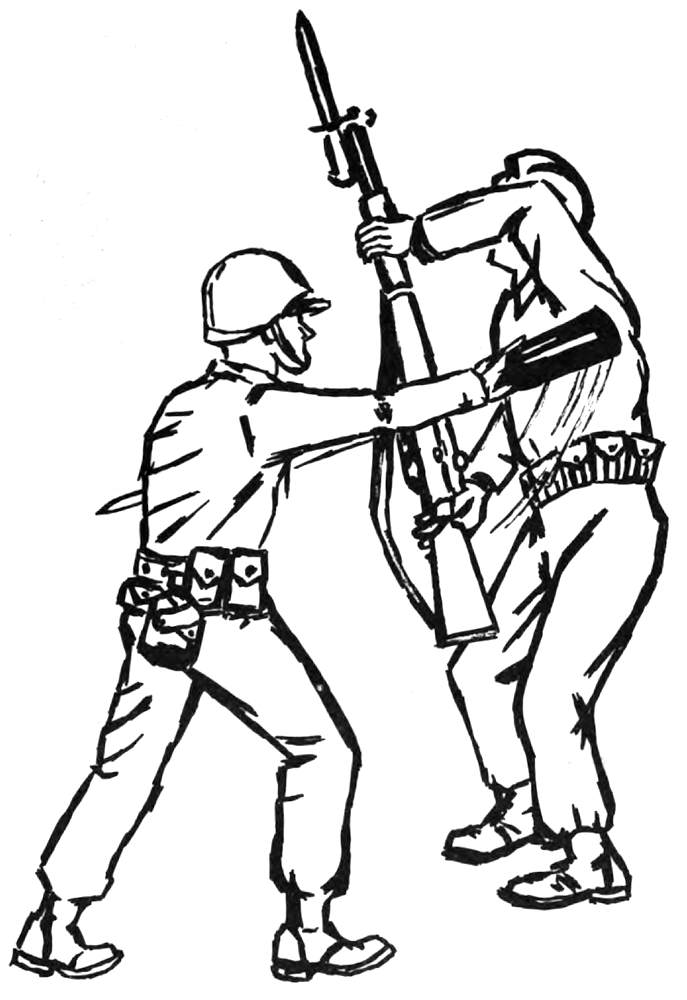
Figure 15.—Horizontal Butt Stroke—Delivery to the Side.
[Pg 38]
a. Execution.—The jab is executed as follows:
(1) Assume the guard position.
(2) Move the left hand downward diagonally across the body, extending the left arm fully. At this point the blade of the bayonet should be flat, pointed toward the opponent. At the same time, pull the small of the stock to the rear with the right hand until the cone of the stock is opposite the hip bone and the right forearm is resting along the flat of the stock with the sling turned out. (See fig. 16.)
(3) Aim the blade at the opponents midsection from the stomach to the throat.
(4) Step forward about 15 inches with the left foot, pushing forward with the shoulders, and thrusting the blade into the opponent. (See figs. 17 and 18.)
b. Recovery to the Guard Position.
(1) Withdraw the blade and bring the right hand down and forward while bringing the left hand back.
(2) Step forward with the right foot and assume the guard position.
[Pg 39]
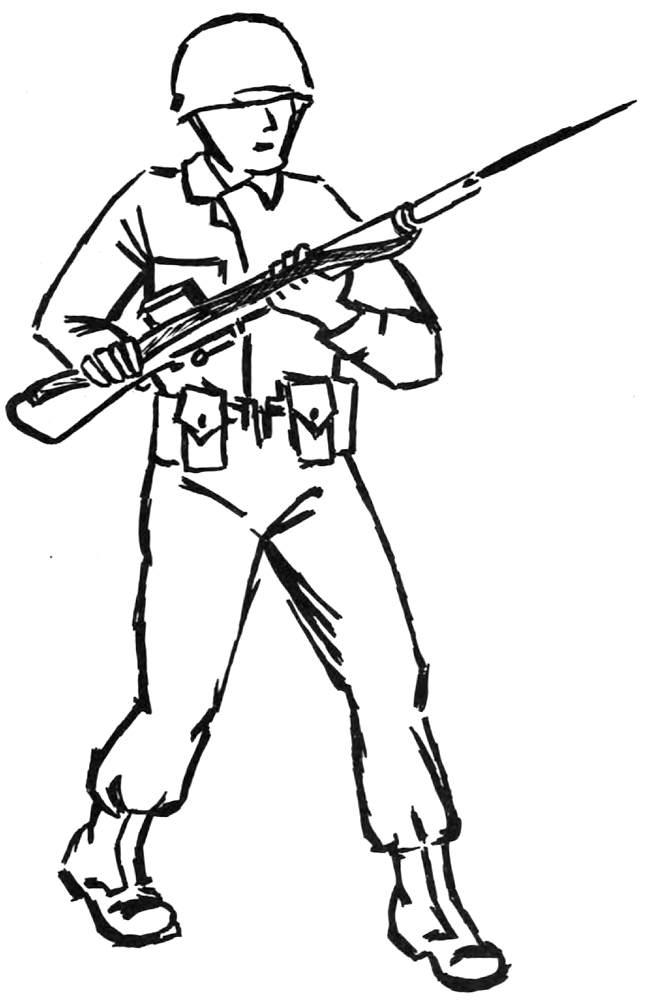
Figure 16.—Jab Step Forward.
[Pg 40]
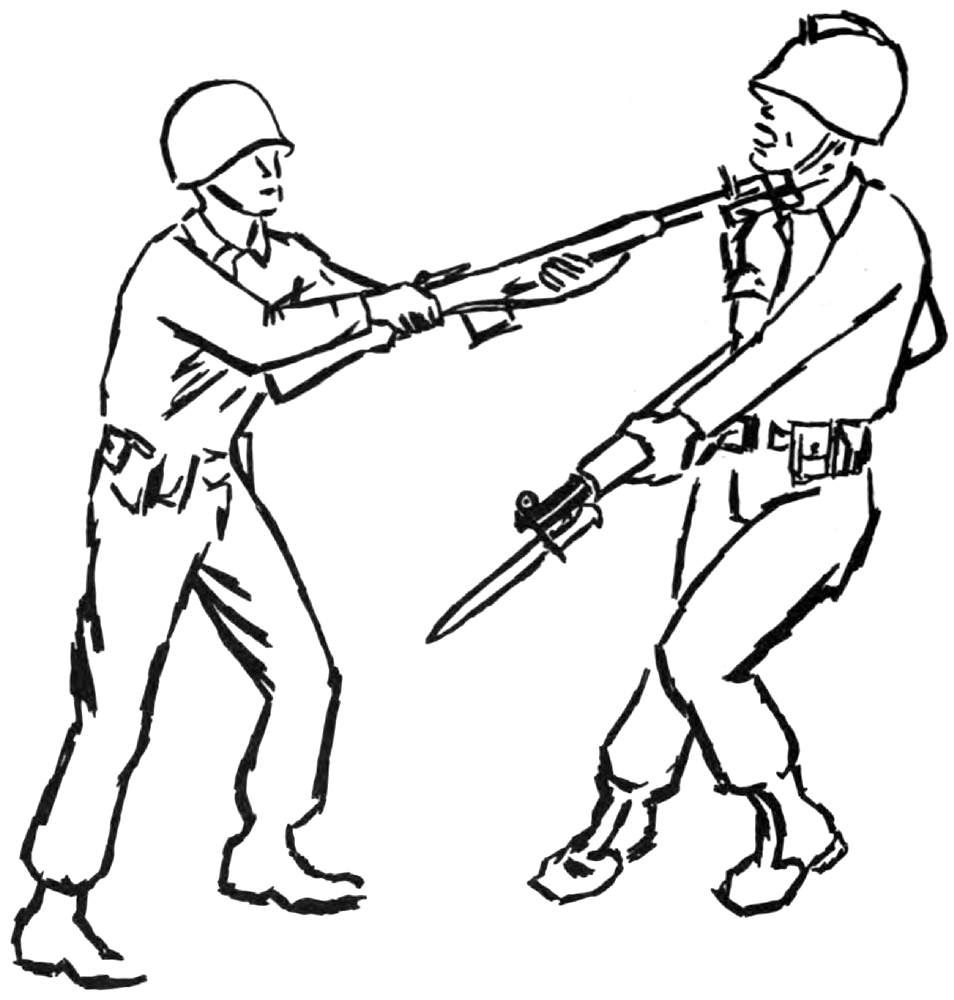
Figure 17.—Jab to the Throat.
[Pg 41]
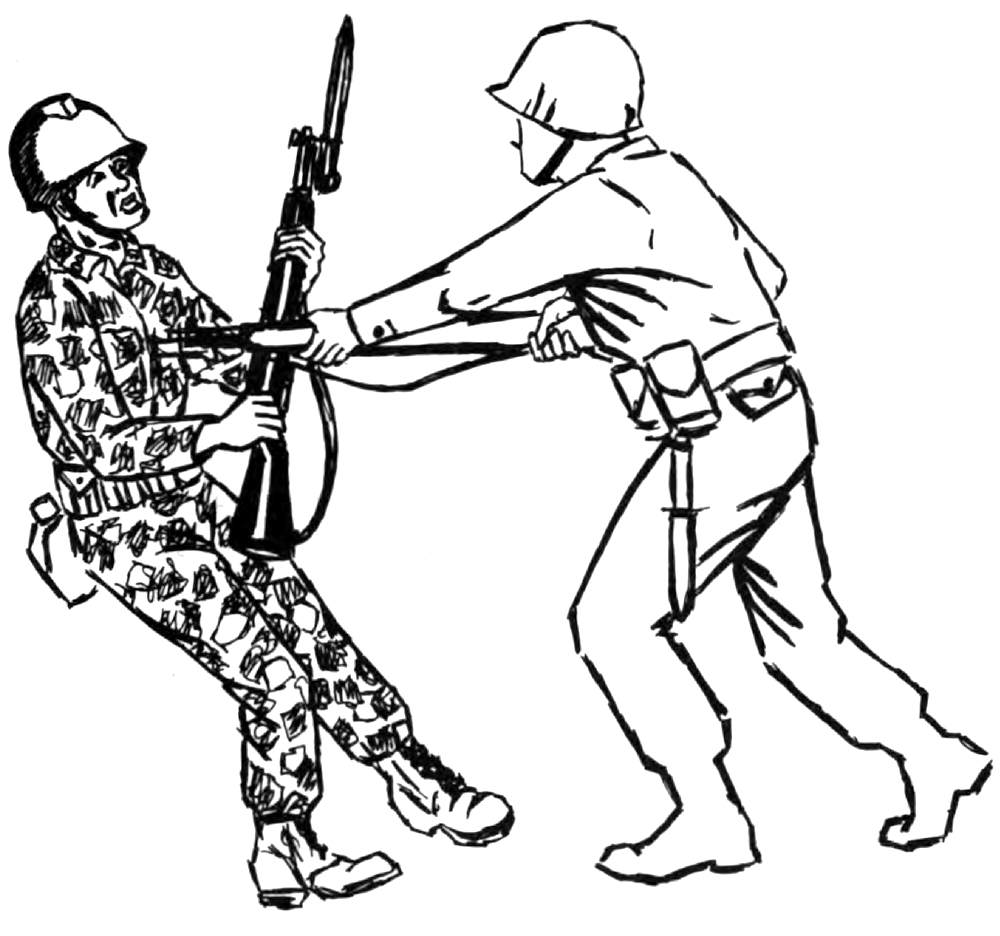
Figure 18.—Jab to the Midsection.
[Pg 43]
At times the bayonet fighter may lose the initiative and the opponent may move into the attack. Some defensive measures are therefore necessary for protection and in order to permit the bayonet fighter to regain the initiative. The basic defensive moves are the block and parry. The parry is effective against the jab, while the block is used against the slash and the vertical butt stroke. Timing, speed, and judgment are key factors in handling defensive moves. The parry is done either to the right or left, depending on the position of the incoming blade. If the opponent’s blade comes in above the bayonet fighter’s piece, the parry should be to the right. If it comes in below the bayonet fighter’s piece, the parry should be to the left.
a. Execution
(1) If the opponent’s blade is thrust toward the bayonet fighter in a position above the piece of the bayonet fighter, the parry will be to the right.
[Pg 44]
(2) From the guard position, step forward about 7 inches with the left foot, keeping the right foot as a base.
(3) Extend the left arm outward, to the right and down, engaging the opponent’s weapon and forcing it to the right and down. This is done by pulling the right hand back along the right hip. Ideally, the opponent’s weapon is engaged at the balance of the bayonet fighter’s weapon. The operating handle is pointed toward the deck after the opponent’s weapon is engaged. (See fig. 19.)
b. Move into the Attack and Recovery.
(1) Move directly into the attack rather than returning to the guard position.
(2) Deliver a jab, or step forward with the right foot and deliver a vertical butt stroke.
(3) Recover to the guard position as prescribed in section 3.
a. Execution.
(1) If the opponent’s blade is thrust toward the bayonet fighter in a position below the piece of the bayonet fighter, the parry will be to the left.
[Pg 45]
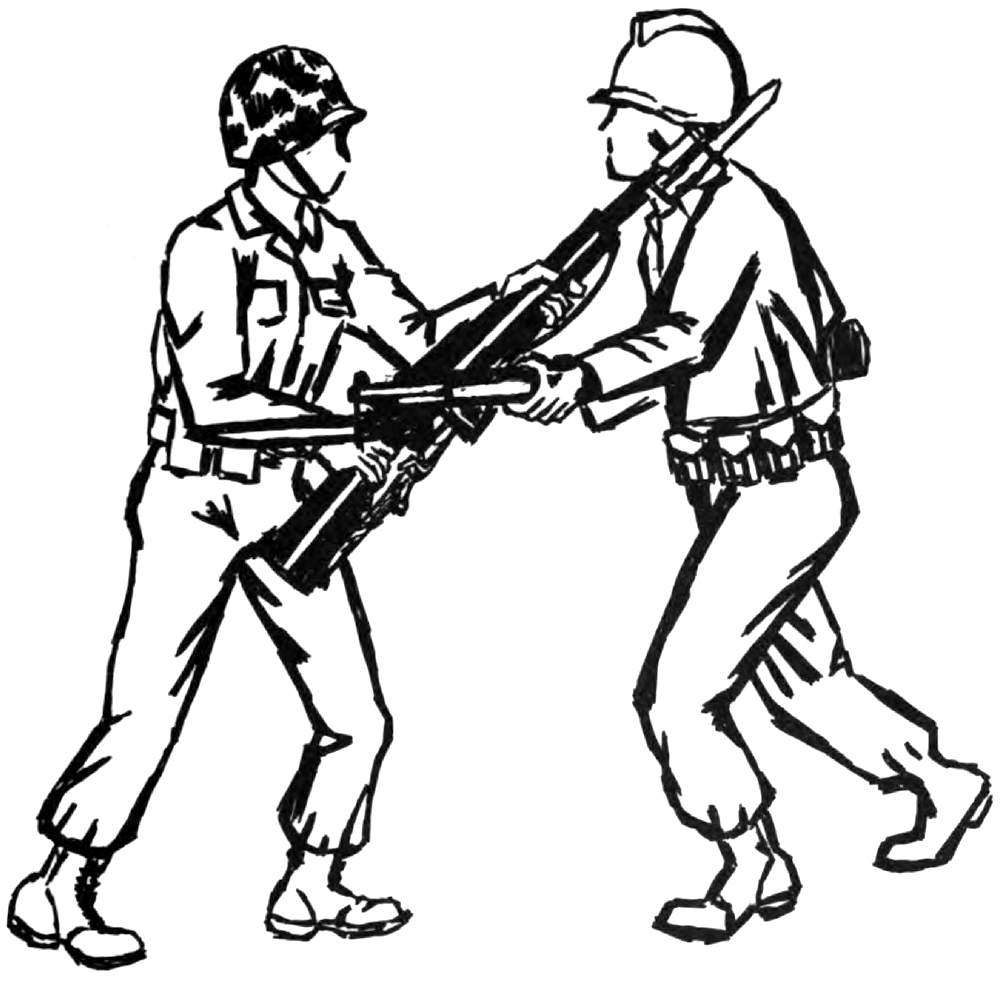
Figure 19.—Parry Right.
[Pg 46]
(2) From the guard position, step forward about 7 inches with the left foot, using the right foot as a base. Bring the rifle to a vertical position with the right forearm nearly parallel to the deck.
(3) Snap the left hand forward to the left and down engaging the opponent’s weapon anywhere between the back of the bayonet and the balance of the bayonet fighter’s piece. The rifle will be nearly horizontal with the operating handle up and the sling pointing toward the opponent. (See fig. 20.)
b. Move into the Attack and Recovery.
(1) After the parry left, a slash can be delivered by stepping forward with the left foot. A horizontal or vertical butt stroke can be delivered by stepping forward with the right foot.
(2) Recover to the guard position as prescribed in section 3.
a. Execution.
(1) From the guard position, thrust the rifle out and up. The weapon stays in the same general position as in the guard position, but the arms are now nearly at full extension.
(2) Push the balance of the rifle into the opponent’s rifle. (See fig. 21.)
[Pg 47]
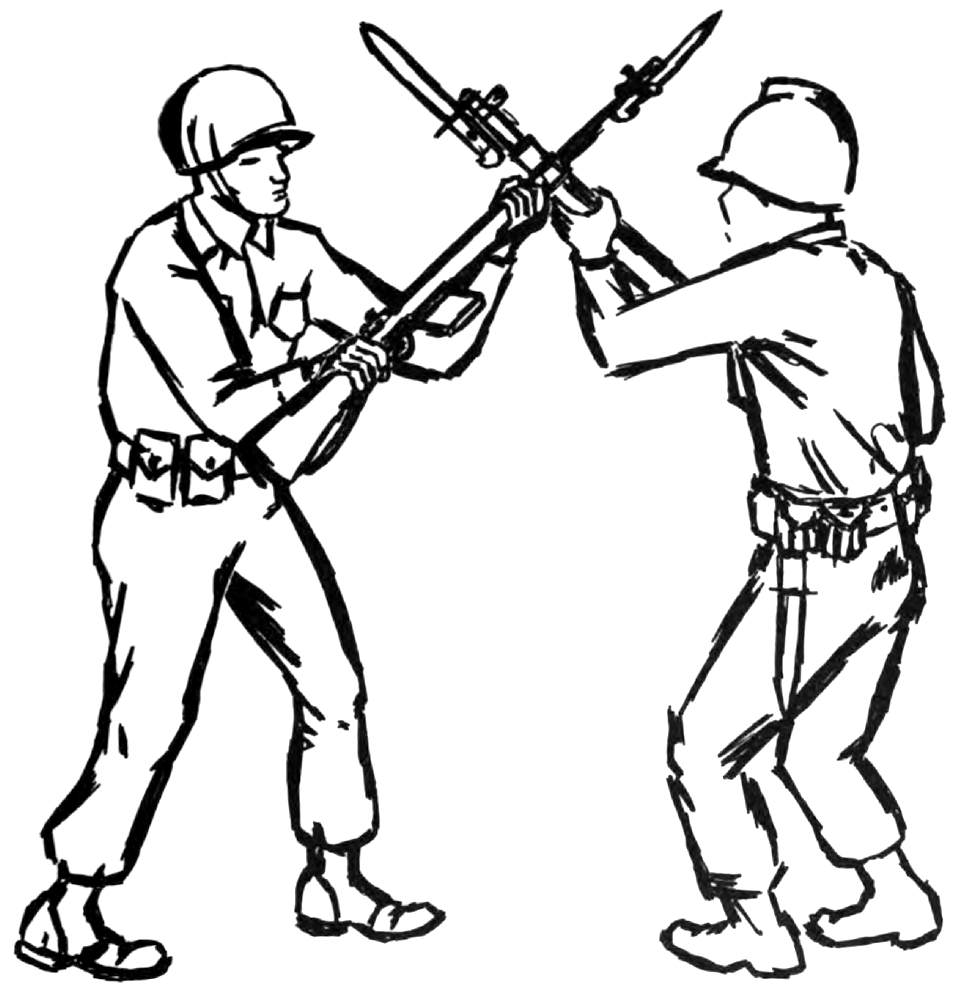
Figure 20.—Parry Left.
[Pg 48]
b. Move Into the Attack and Recovery.
(1) After the opponent’s slash is blocked he is overextended and off balance.
(2) Counter with a slash or horizontal butt stroke.
(3) Recover to the guard position in the same manner as outlined in section 3.
a. Execution
(1) From the guard position, extend the arms out and down.
(2) The rifle is now nearly horizontal to the deck, and the arms fully extended.
(3) Engage the opponent’s stock near the balance of the rifle. (See fig. 22.)
b. Move into the Attack and Recovery
(1) Counter with a horizontal slash or horizontal butt stroke.
(2) Recover to the guard position in the same manner prescribed in section 3.
[Pg 49]
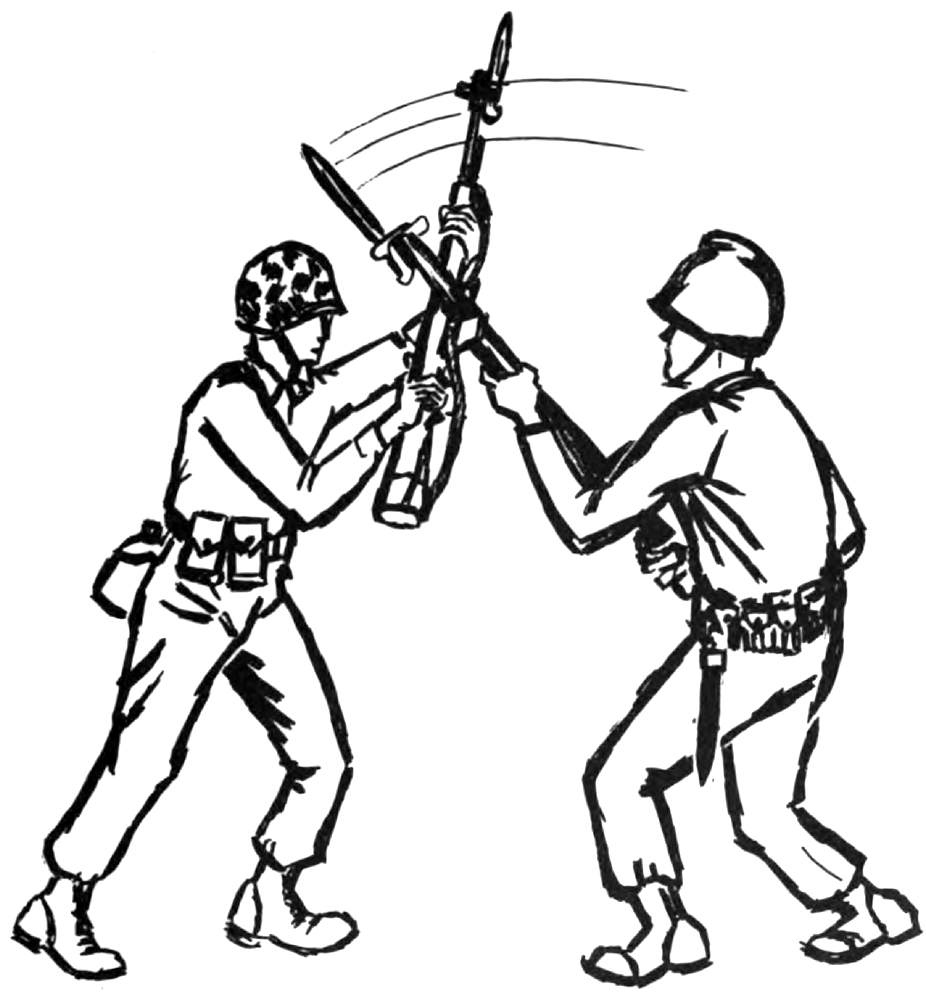
Figure 21.—Block Slash.
[Pg 50]
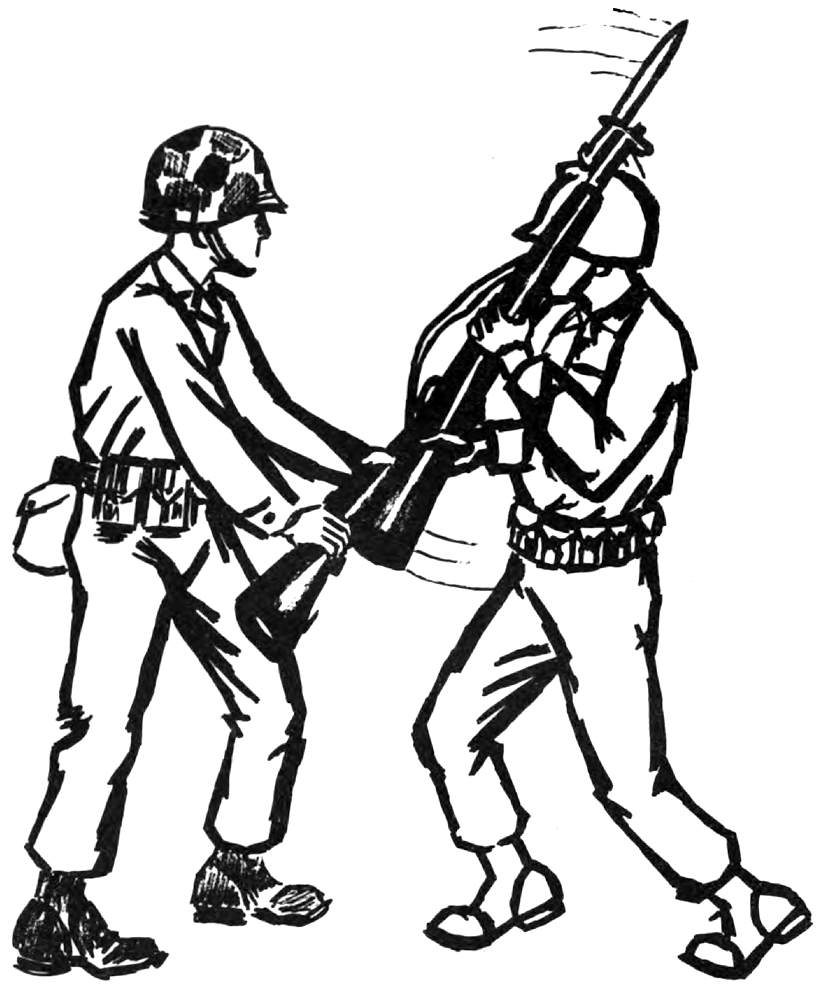
Figure 22.—Block Vertical Butt Stroke.
[Pg 51]
Followup movements are attack movements which naturally and harmoniously follow other attack movements. The followup movement is executed from the completed position of the previous movement, rather than after recovery to the guard position. To ensure a successful attack a bayonet fighter follows each movement with another attack movement until he has killed his opponent. All attack movements are designed so that the attacker is in position to deliver another attack movement should his initial attack not be successful. For example, if the attacker delivers a slash which is blocked, he is in excellent position to followup with a vertical butt stroke. Ideally, the followup movement is executed in the same plane as the previous movement, and it is in keeping with this principle that the followup movements listed in the following paragraph are designed. The most important principle is to follow the initial attack with another offensive action so that the initiative is not lost. The key principle here is aggressiveness rather than a memorized technique. Aggressiveness is the real spirit of the followup attack. Show no mercy, for the enemy will show none.
[Pg 52]
The below listed combinations allow the best transition from one attack movement to another with the least amount of wasted motion. This enables the bayonet fighter to stay on the attack without having to return to the guard position after an unsuccessful initial attack, thus risking loss of the initiative.
a. Guard, slash, vertical butt stroke or horizontal butt stroke, recover to guard position.
b. Guard, parry left, vertical butt stroke or horizontal butt stroke, smash, slash, recover to guard position.
c. Guard, jab, vertical butt stroke, smash, slash, recover to guard position.
d. Guard, parry right, jab, recover to guard position.
e. Guard, block slash, vertical butt stroke, smash, recover to guard position.
f. Guard, block vertical butt stroke, slash or jab, horizontal butt stroke, recover to guard position.
g. Guard, block vertical butt stroke, horizontal slash, vertical butt stroke, smash, recover to guard position.
[Pg 53]
a. All the individuals in group actions employ the same individual movements previously described.
b. Teamwork is important in any endeavor, and especially in fighting. The bayonet fighting team can use a few simple tactics to take advantage of superior numbers before the enemy reinforces his position. Teamwork can also be used to overcome a numerical advantage favoring the enemy.
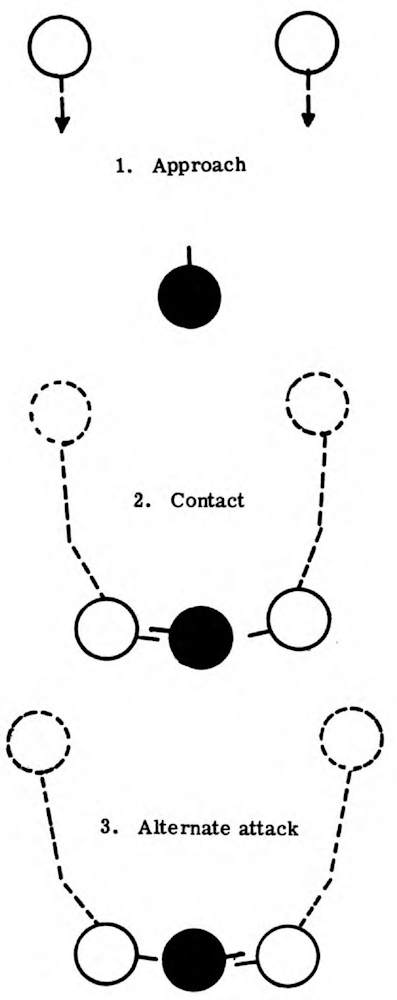
a. Two Against One.—Two Marines approach a single enemy. Unable to anticipate his actions they advance directly forward but neither converges on him. As the range closes, the enemy will turn his attention toward one of the two. This Marine advances quickly toward the enemy and engages him. The other Marine advances quickly toward the enemy’s exposed flank and kills him. Should the enemy turn to guard his exposed flank he exposes the other flank, and can be killed by the Marine who first attacked him. In such a coordinated attack the Marine who makes the kill is usually the one attacking the exposed[Pg 54] flank. The approach, attack, and kill are made in a very few seconds. The importance of speed and aggressive action is obvious. (See fig. 23.)
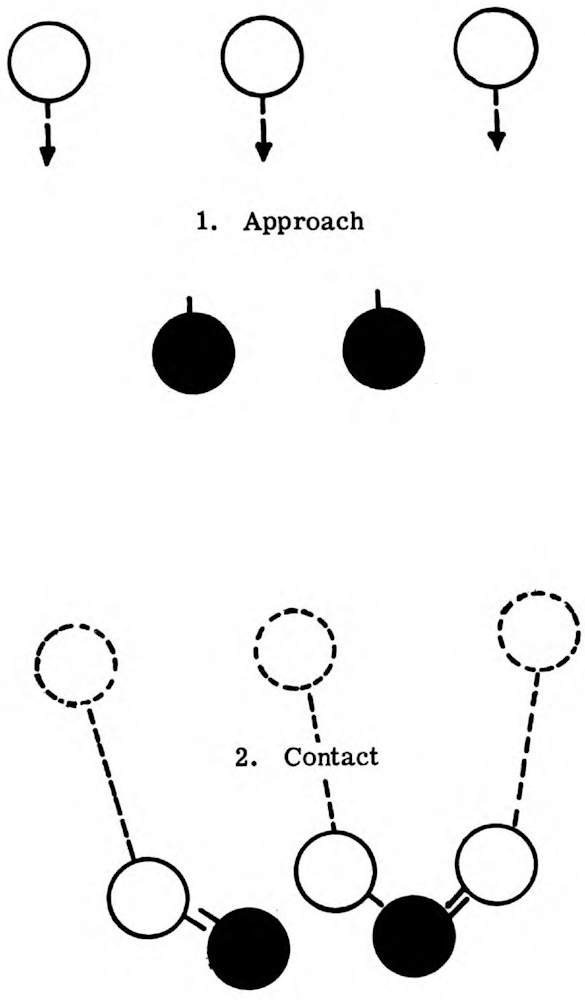
b. Three Against Two.—Three Marines approach two opponents. The Marines advance directly forward awaiting the enemy’s reaction. Two Marines will be engaged. The third then moves swiftly to the exposed flank of one of the enemy, usually the nearest to his position. As soon as one enemy is killed, the other is attacked swiftly from his exposed flank by the Marine who can reach him first. Should either enemy being attacked on the exposed flank turn to defend that flank, he is swiftly killed by the Marine who was originally making the frontal attack. (See fig. 24).
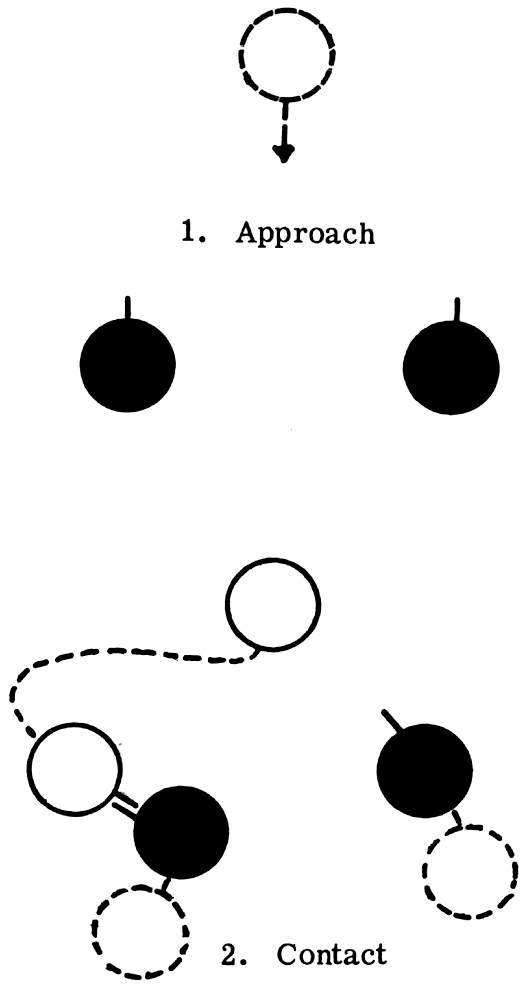
a. One Against Two.—When one Marine is engaged by two enemy opponents, he immediately dashes to the outboard flank of the nearest enemy. Should he allow himself to be caught between the two, he will be easily killed. He always keeps an enemy between himself and the other enemy so they can be engaged and killed one at a time. A savage attack and quick disposal of one enemy, before the second can move to the aid of the first, turns the tide. (See fig. 25.)
[Pg 55]
1. Approach
2. Contact
3. Alternate attack
Figure 23.—Two Against One.
[Pg 56]
1. Approach
2. Contact
Figure 24.—Three Against Two.
[Pg 57]
1. Approach
2. Contact
Figure 25.—One Against Two.
[Pg 58]
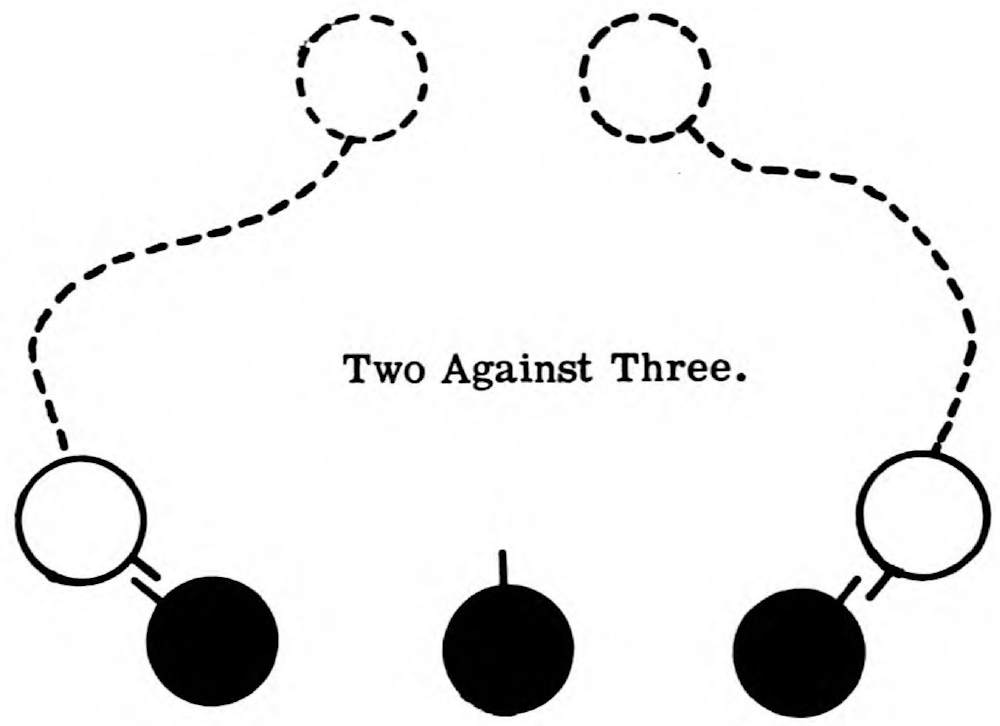
b. Two Against Three.—When two Marines are engaged by three enemy, both move to the outboard flanks of the enemy, leaving one enemy in the middle. Each Marine savagely attacks and disposes of his adversary before the enemy in the middle can act to help one of his companions. Once one Marine has defeated his opponent he turns on the lone enemy in the middle. Again, victory will go the side which acts swiftly and aggressively. (See fig. 26.)
Two Against Three.
Figure 26.—Two Against Three.
[Pg 59]
a. In addition to introducing the student to the offensive and defensive movements of bayonet fighting, the initial stages of training should emphasize the development of speed, form, balance, timing, coordination, and a vicious, aggressive attitude, all important in bayonet fighting. The instructor works to develop a genuine determination in his students; i.e., to gain the initiative from the beginning and move in to kill the opponent. Each student yells and growls as he executes his practice moves to get into the proper habit. This gives the student the self-confidence and enthusiasm he needs. The instructor tries to make the yell spontaneous, if possible, but if students fail to perform properly, they are encouraged until they do so.
b. Future training rekindles the spirit of aggressiveness. Variety is employed in training to avoid boredom and useless repetition. The use of training aids such as the pugil stick and bayonet assault course provide this variety, and are also extremely valuable as training vehicles. Bayonet training should be as vigorous as possible in order to contribute to the physical[Pg 60] condition of the student. It should be emphasized that bayonet fighting is not for the soft and paunchy.
a. The recommended sequence for demonstration and application of the basic fundamentals of bayonet fighting is as follows:
(1) Guard position and footwork.
(2) Attack movements.
(3) Defensive movements.
(4) Combined movements.
(5) Group attack and defense.
b. Each position and movement is explained in detail and demonstrated by the primary instructor. Fundamentals and footwork, as well as attack and defensive movements, are covered slowly and thoroughly.
c. After a thorough explanation and demonstration, the students move slowly through everything covered in subparagraph a, above, in slow motion, by the numbers, until they are thoroughly familiar with what they have been taught. Speed is increased as the students become more[Pg 61] familiar with the movements until they are being conducted at full speed. Timing, enthusiasm, and an aggressive spirit are maintained.
d. The whole sequence should be completed for one group of movements before the next is taught. For example, the student should be thoroughly familiar with the positions and footwork, and have mastered them at the normal rate, before he is introduced to the attack movements.
e. After individual movements have been mastered, combinations and followup movements are taught. These movements are then practiced by the students until they become second nature. The most effective movement to follow another is influenced by the opponent’s reaction. These movements are stressed and practiced until they become automatic. The bayonet fighter cannot stop to consider his next move. It is necessary that the student be able to deliver a forceful, aggressive series of attack movements, accompanied by proper footwork, without hesitation or indecision.
f. Practice of the attack and defensive movements against another student at half speed facilitates correction of errors. The two students correct one another, and secondary instructors move among the students, assisting with corrections.
[Pg 62]
g. Throughout training the student should be relaxed to avoid rigidity. The weapons should be held firmly, but not tensely. All phases of bayonet fighting are practiced until they are executed instinctively. The student should be able to strike at openings without thinking, and remain in the attack until he has killed his opponent.
a. Purpose.—The bayonet assault course is constructed in order to achieve the following objectives:
(1) To familiarize the student with situations simulating those with which he might be confronted in an actual combat situation.
(2) To aid in developing the student’s speed, strength, and endurance.
(3) To challenge the determination and will power of the student. These qualities are extremely important.
(4) To provide a means for obtaining good bayonet fighting habits.
(5) To develop skill in bayonet fighting and make the various movements instinctive and second nature.
[Pg 63]
b. Obstacles.—The model assault course presented in this publication consists of ten obstacles. They are offered as examples of what can be used. The number and type of obstacles included in any given course depend on the ingenuity of the builders and local conditions. These obstacles are attacked with a mockup rifle which should resemble the M-14 rifle in weight and dimensions.
(1) Obstacle number 1 represents an enemy in the guard position. The student executes a parry right, steps forward, and executes a jab. (See fig. 27.)
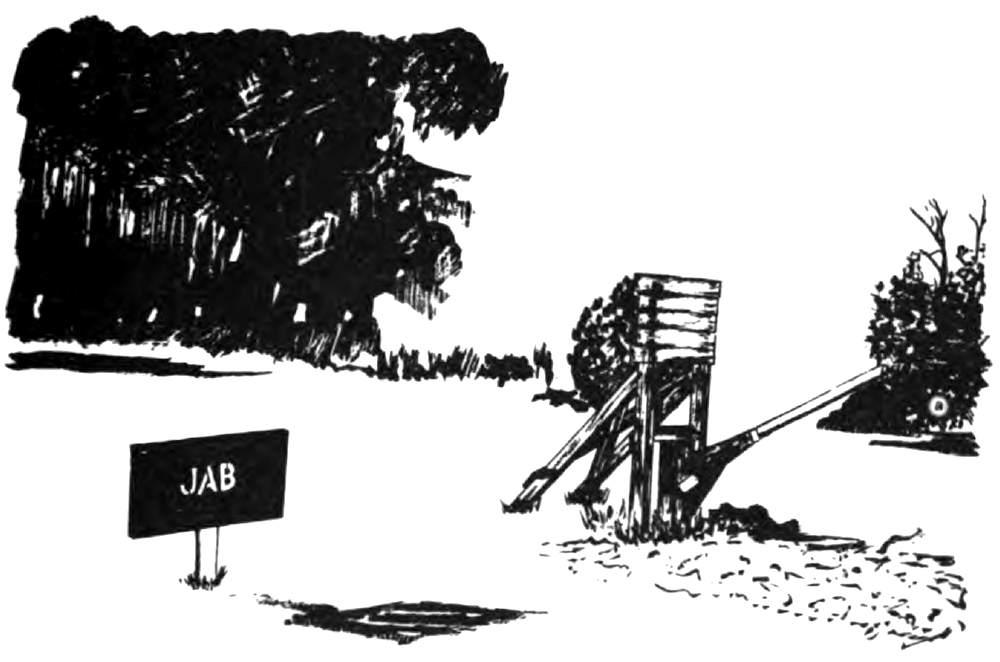
Figure 27.—Obstacle 1.
[Pg 64]
(2) Obstacle number 2 represents an enemy in the guard position. The student executes a parry right, steps forward and executes a vertical butt stroke. (See fig. 28.)
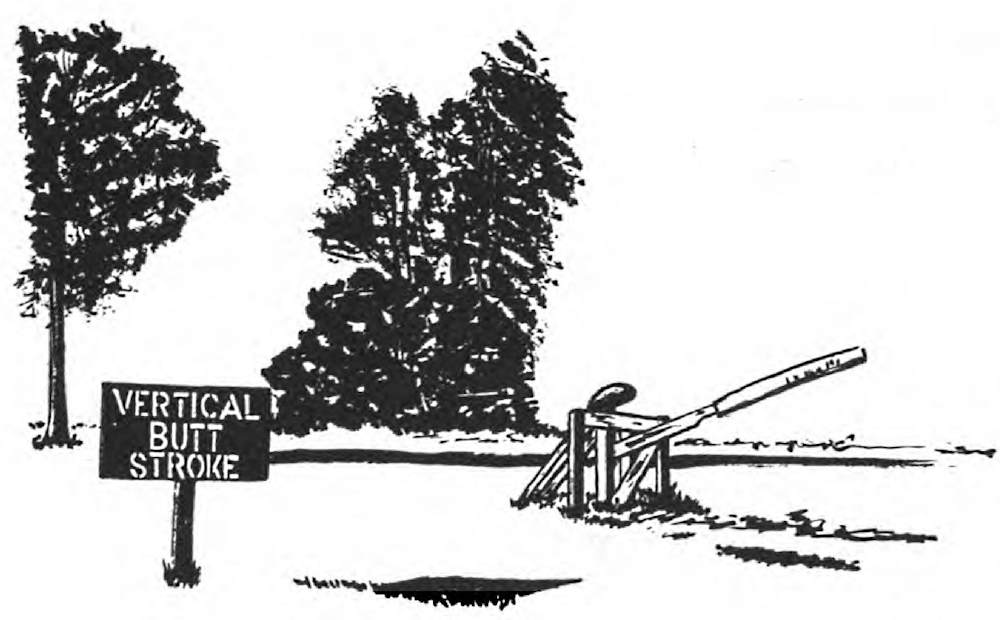
Figure 28.—Obstacle 2.
(3) Obstacle number 3 represents an opponent in a position best suited for attack by the smash. The student steps forward and delivers the smash. (See fig. 29.)
[Pg 65]
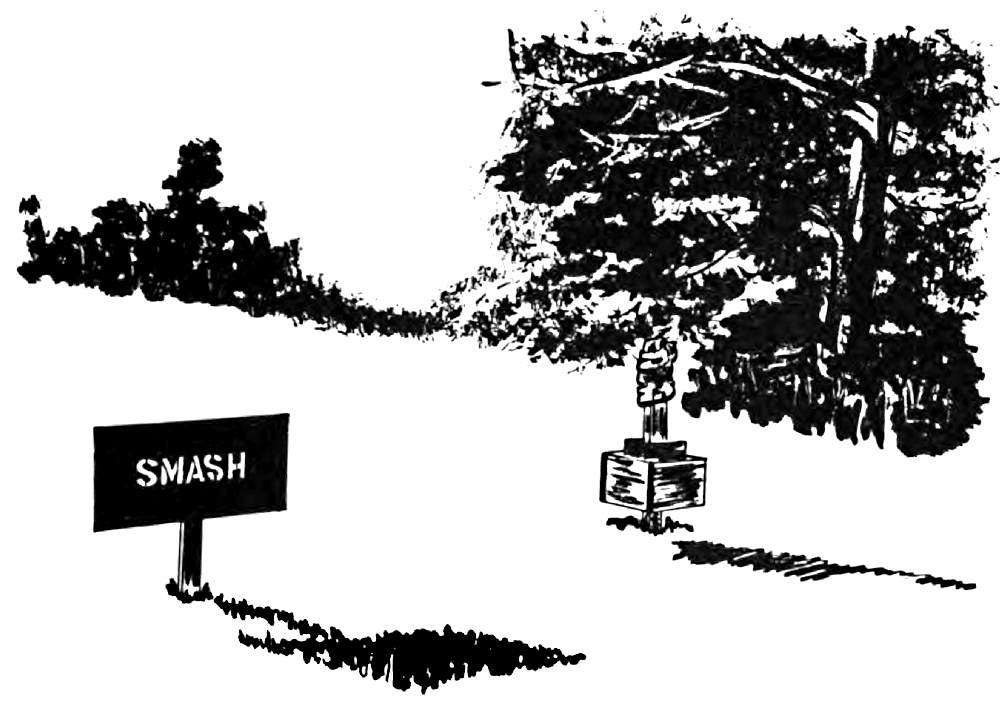
Figure 29.—Obstacle 3.
(4) Obstacle number 4 is a target for a vertical butt stroke. (See fig. 30.)
(5) Obstacle number 5 represents an opponent running toward the bayonet fighter. The student executes a jab so that the blade penetrates the center of the obstacle. The instructor emphasizes the importance of withdrawing the blade before moving on. (See fig. 31.)
[Pg 66]
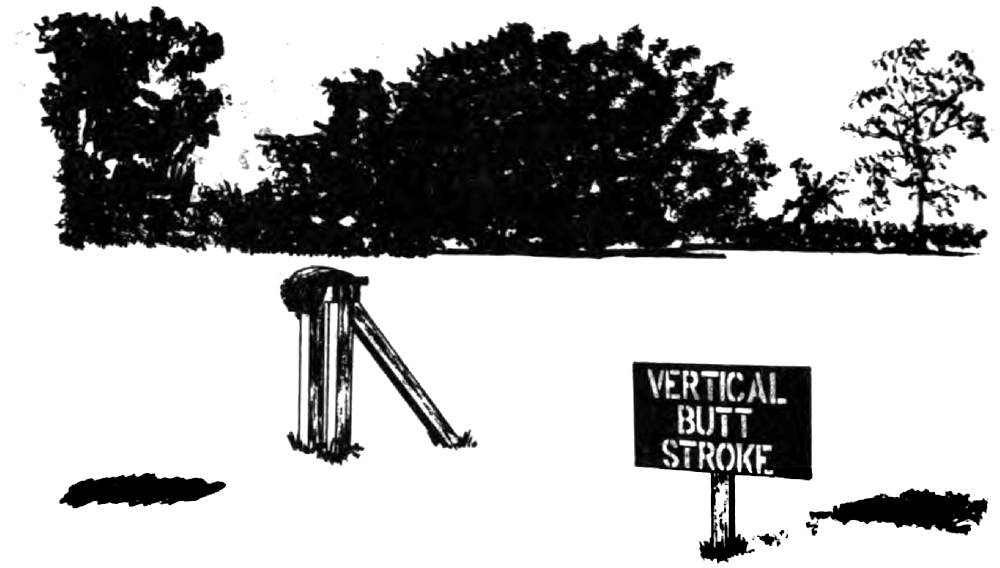
Figure 30.—Obstacle 4.
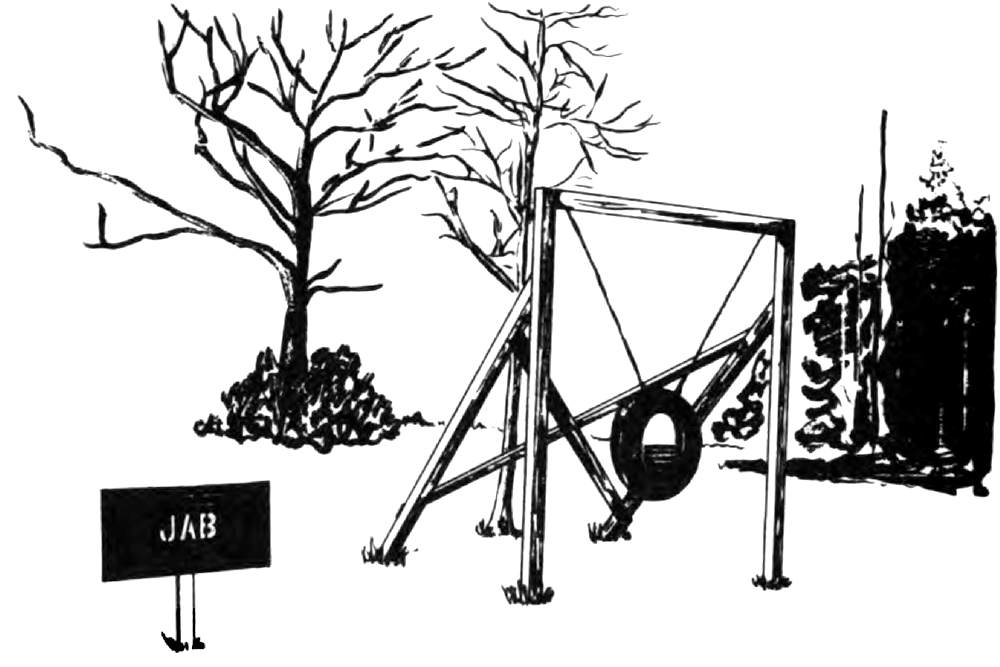
Figure 31.—Obstacle 5.
[Pg 67]
(6) Obstacle number 6 is a target for a smash. (See fig. 32.)
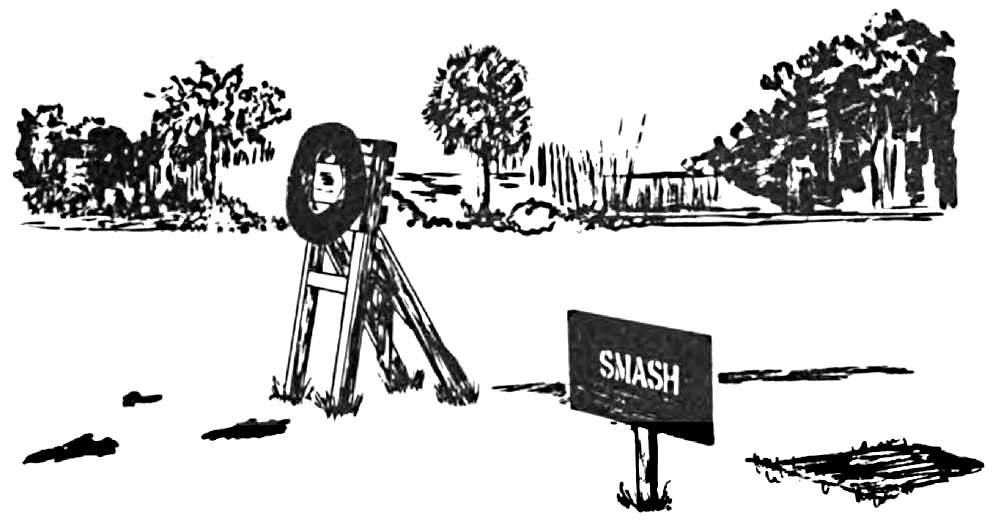
Figure 32.—Obstacle 6.
(7) Obstacle number 7 represents an enemy’s head and shoulders protruding from a foxhole. The student slashes at the tire portion of the obstacle. (See fig. 33.)
(8) Obstacle number 8 is a target for a horizontal butt stroke. The student executes the horizontal butt stroke, hitting the bag on top of the post. (See fig. 34.)
[Pg 68]
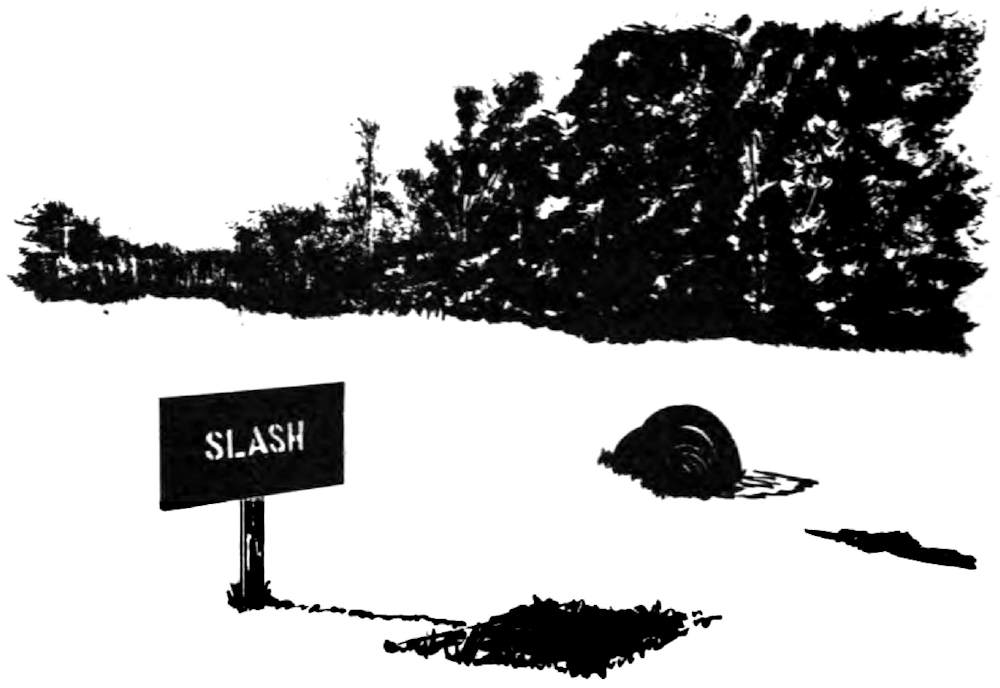
Figure 33.—Obstacle 7.
(9) Obstacle number 9 represents an enemy behind an embankment. The student charges over the embankment, turns to face the enemy, executes a jab, then withdraws. (See fig. 35.)
(10) Obstacle number 10 is a training aid which can be used in connection with either basic or advanced bayonet drill. It is inexpensive and versatile. The trainee has his choice of methods of attack and can utilize all accepted bayonet movements against this obstacle. [Pg 70]It can be used to introduce a “free” movement within an established course, depending on the individuals speed or position, or to constitute an entire course, utilizing assistant instructors to call different methods of attack in order to vary the trainees approach to the aid. (See fig. 36.)
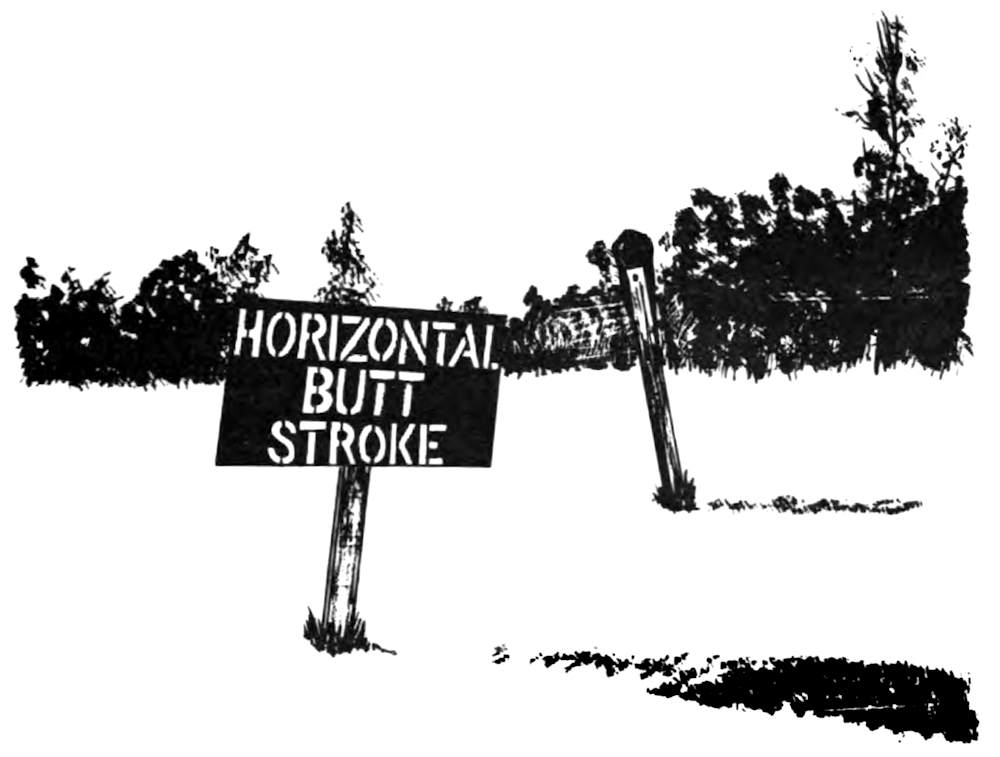
Figure 34.—Obstacle 8.
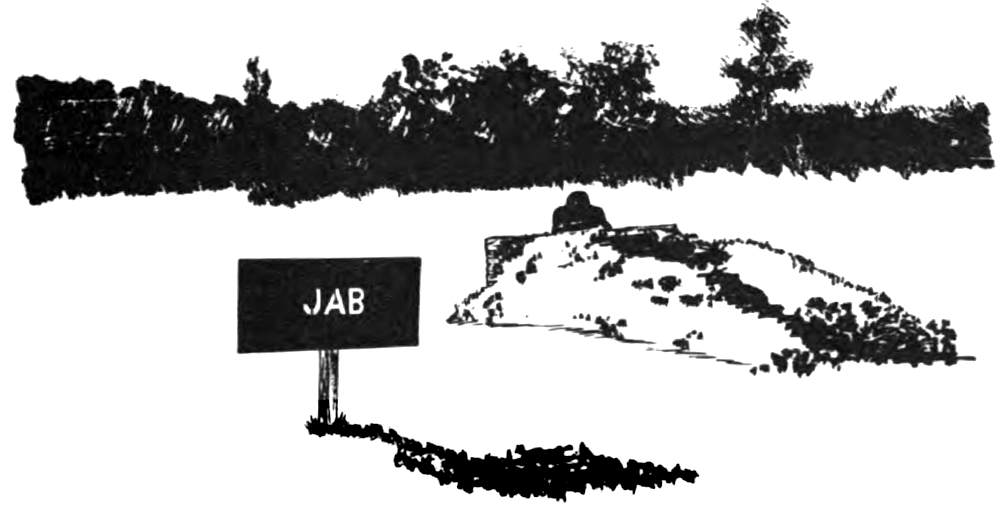
Figure 35.—Obstacle 9.
c. Construction.—The ten obstacles are constructed from readily available materials. They consist mostly of old auto tires, canvas, and 2 by 4 inches and 4 by 4 inches lumber. Obstacles 1, 2, and 10 have moving wooden arms which are not difficult to construct. The obstacles should be set far enough apart to allow maneuvering between them. The assault course can be laid out in any available terrain, and should be at least 200 to 300 meters in length. Rugged terrain provides excellent physical conditioning facilities. Natural obstacles such as streams, ridges, thick foliage, etc., can be used to make the course more difficult. Artificial obstacles such as wire entanglements, log walks, hurdles, and fences can also be added.
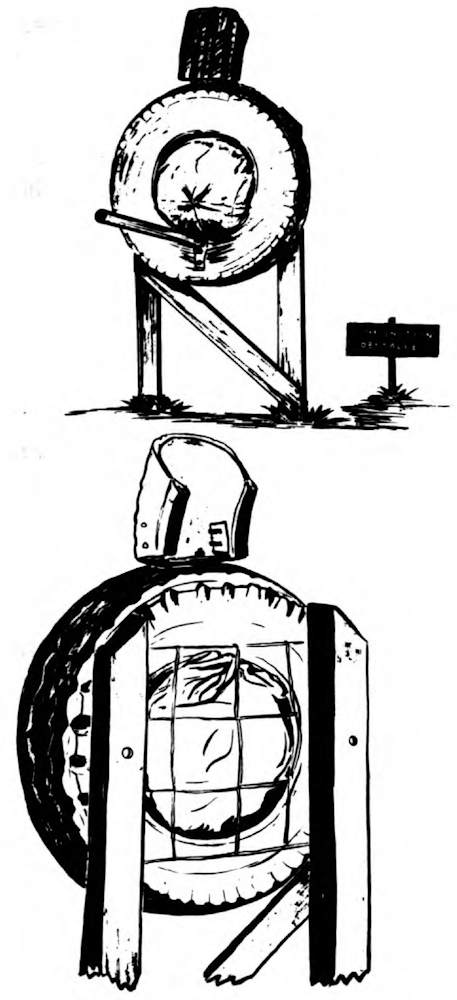
Figure 36.—Obstacle 10 (Combination Obstacle).
d. Safety Precautions.—Students should first run the assault course at a moderate pace, and increase their speed as their technique and physical condition improve. The instructor ensures that discipline and control are maintained. The instructor and his assistants station themselves along the course to observe the method of [Pg 72]attack and make necessary corrections. In addition, the following safety precautions should be observed:
(1) Ensure that the bayonet is securely attached to the weapon before beginning the assault course.
(2) Caution personnel to remain in the line of obstacles. Serious injury can result if personnel are permitted to zigzag through the course.
(3) Do not permit personnel to attack the first obstacle until preceding personnel have reached the third obstacle.
(4) When the last obstacle is completed, personnel should be directed to return by specific routes to the designated marshalling area, remaining at least 5 yards away from the closest obstacle.
e. Demonstration and Application.—The first phase of the assault course training includes a demonstration of the technique of attacking each obstacle by the instructor. The instructor then runs the entire course employing the correct movements on each obstacle. The students then practice their movements on the individual obstacles. When the students have gained sufficient proficiency they move through the entire assault course.
[Pg 73]
a. General.—The execution of the movements of bayonet fighting in response to a verbal command from instructors are kept to a minimum. This type of training is necessary to teach the movements, but once they have been learned the student must automatically execute them in response to the movements of his opponent. There is no substitute for practical application when learning a skill. Actual bayonet fighting is not practical because of the hazards involved. However, bouts employing the pugil stick bear a close resemblance to actual bayonet fights, and can be employed without serious injury to either contestant. The student sees for himself the importance of assuming the attack immediately, as well as the importance of aggressiveness and ferocity. He sees which combinations of blows are successful, and learns to understand the result of his making a mistake in an actual bayonet fight. Here he learns the meaning of the term “kill or be killed.”
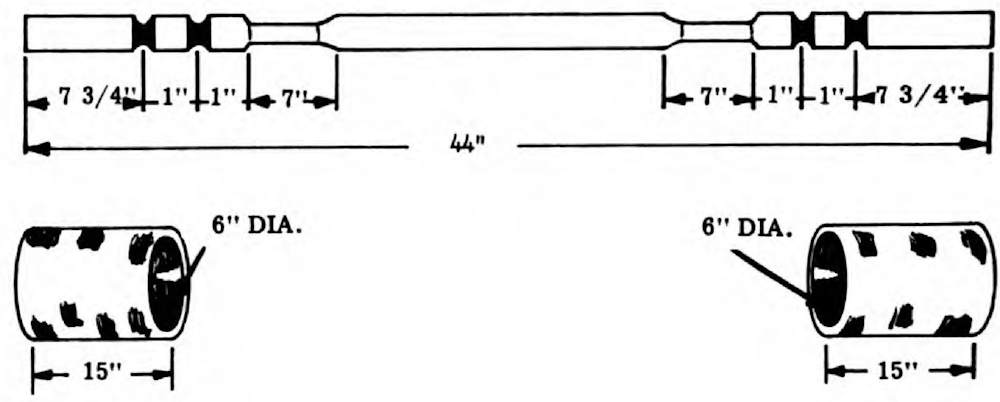
Figure 37.—The Pugil Stick Material.
b. Construction.—See figure 37.
(1) Materials for construction of the pugil stick include the following:
(a) An octagonal stick 1¾ inches in diameter and 44 inches long.
[Pg 74]
(b) Two canvas bags 10 inches long, one 6 inches in diameter and one 8 inches in diameter.
(c) Chopped foam rubber and cotton padding.
(d) A roll of foam rubber 15 inches wide.
(e) Tape, wire, and tacks.
(2) Method of Construction.
(a) Cut grooves ½-inch deep in the stick as shown in the diagram (see fig. 37). Taper the stick at the hand grips to approximately 1¼ inches in diameter.
[Pg 75]
(b) Fill the bags with chopped foam rubber and cotton.
(c) Wire and tack the bags to the end of the stick. Tighten the wire into the grooves at the end of the stick. The stick should extend 6 inches into the bag, leaving 4 inches of overlap and making the total length of the pugil stick 52 inches, the length of the M-14 rifle with bayonet.
(d) Cover the wire and tacks with tape.
(e) Wrap foam rubber around the center of the stick, leaving only the 6 to 8 inches of tapered hand grip exposed. Secure the foam rubber padding with tape.
(3) Size of Pugil Stick.—The pugil stick should be approximately the same length and weight as the M-14 rifle with bayonet attached. This enables the bayonet fighter to train with a weapon which closely approximates the weapon he uses in an actual combat situation.
c. Safety Equipment and Precautions
(1) Whenever engaged in a pugil stick bout, the student should be equipped with the following:
(a) A football helmet with full bird cage face mask.
[Pg 76]
(b) Lacrosse gloves.
(c) Protective cup athletic supporter.
(2) Instructors in charge of pugil stick bouts see that proper bayonet fighting procedures are followed by students engaged in bouts. The proper bayonet fighting grip is employed at all times. The pugil stick is not used as a baseball bat. In no instance do the hands leave the pugil stick. Neither throwing or swinging is allowed. Pugil stick fighters refrain from hitting their opponent with the center portion of the pugil stick.
(3) Instructors ensure that protective equipment is properly secured before the bout begins. Bouts will be stopped whenever one participant becomes completely defenseless, after a telling blow has been struck, when equipment becomes loosened or knocked off, or when the pugil stick is being used improperly. Students are instructed to stop all action when the whistle is blown.
d. Regulations for Bouts
(1) Students are normally paired off so that opponents are of approximately equal height and weight.
(2) Each bout is officiated by an instructor with a whistle.
[Pg 77]
(3) Contests continue until one contestant has scored a killing blow. A killing blow is one delivered solidly to the head, neck, groin, or midsection with the blade end of the pugil stick; and to the head, groin, or neck with the butt end of the stick. If a killing blow is struck in the first few seconds of the bout, for training purposes the bout may be continued for a prescribed period of time. The winner will be the individual who struck the most killing blows in the time allotted. Time limits may be set by the instructor, taking into consideration the physical condition of the students and the time available.
(4) Instructors periodically remind students that basic attack movements and combinations are most effective. Instructors also continually emphasize aggressiveness. They ensure that all trainees yell and growl while engaged in a bout.
(5) Short bouts, with rapid changing of equipment, retains enthusiasm and interest.
(6) Bouts begin with both contestants in the guard position and about 5 yards apart. (See figs. 38 and 39.)
(7) No score occurs if a student removes either hand from the weapon to throw or swing at his opponent. (See fig. 40.)
[Pg 78]
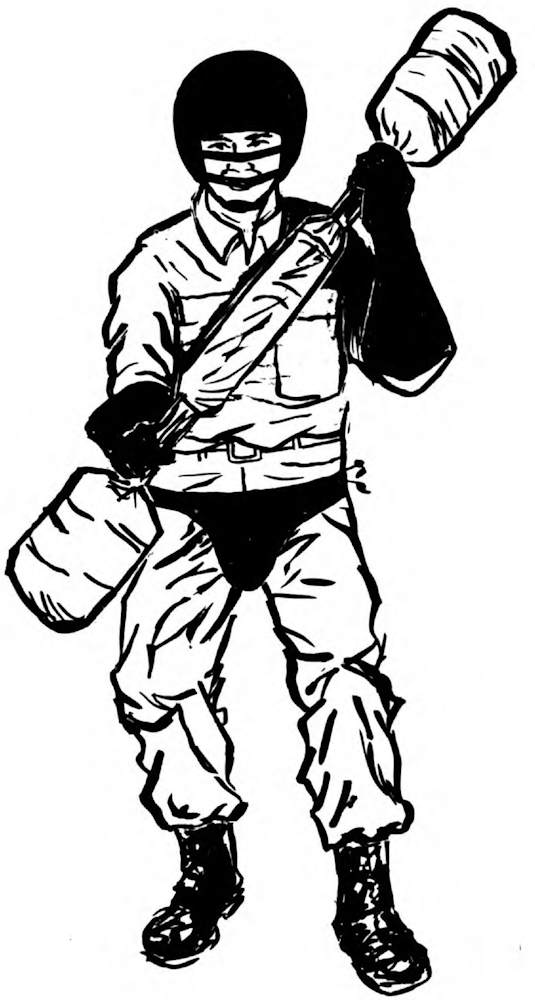
Figure 38.—On Guard With Pugil Stick.
[Pg 79]
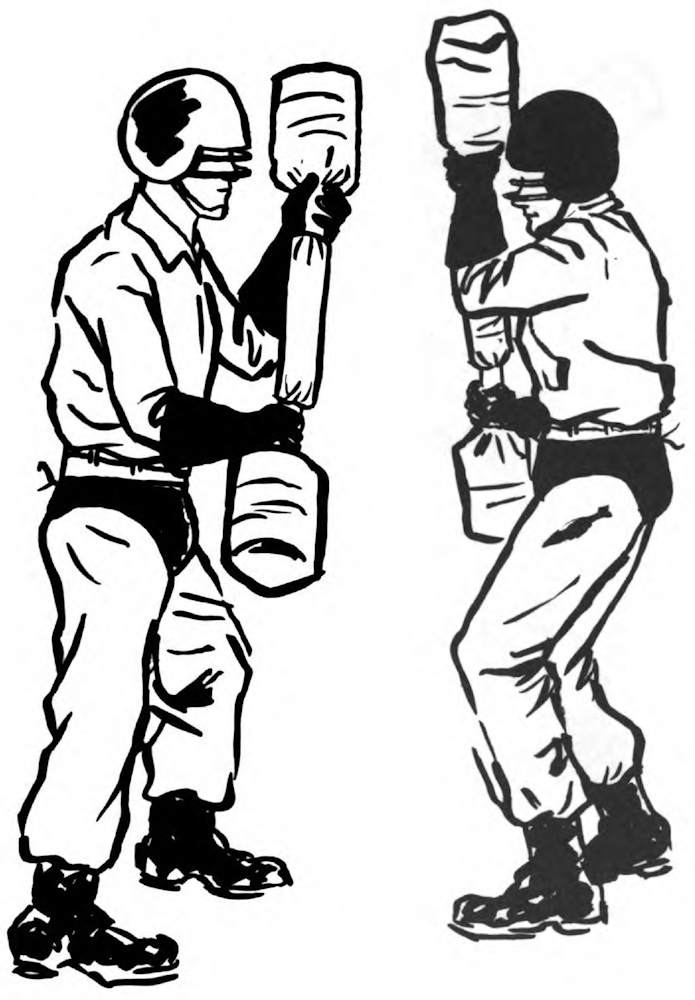
Figure 39.—Square Off With Pugil Stick.
[Pg 80]
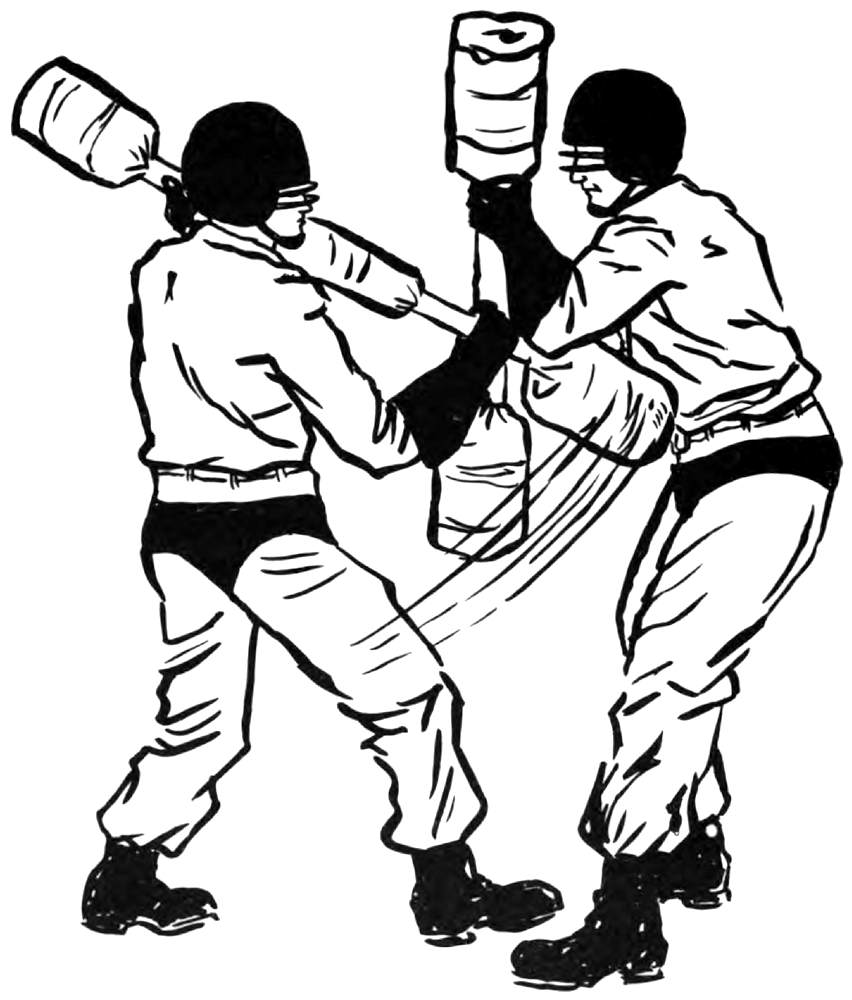
Figure 40.—Vertical Butt Stroke With Pugil Stick.
[Pg 81]
(8) A round-robin type elimination is effective in getting all students into bouts, and emphasizing the importance of aggressive action in winning. The winners of each bout are allowed to fight again after a brief rest, until they are defeated. This provides one winner in the end, with appropriate personal recognition.
e. Demonstration and Application.—All movements, offensive, defensive, and combinations are demonstrated with the pugil stick. The student is then given the opportunity to go through the movements with the pugil stick in slow motion, and then at normal speed. After gaining proficiency in all movements the students are given an opportunity to practice what they have learned against a target. An artificial stationary target offering resistance further develops timing and coordination. Heavy bags, similar to the type used by boxers in training, can be used effectively to train bayonet fighters. (See fig. 41.) After the student has attacked the dummies, allowing him the sensation of attacking a solid target, and practicing the attack movements, he is then ready for bouts against other students.
[Pg 82]
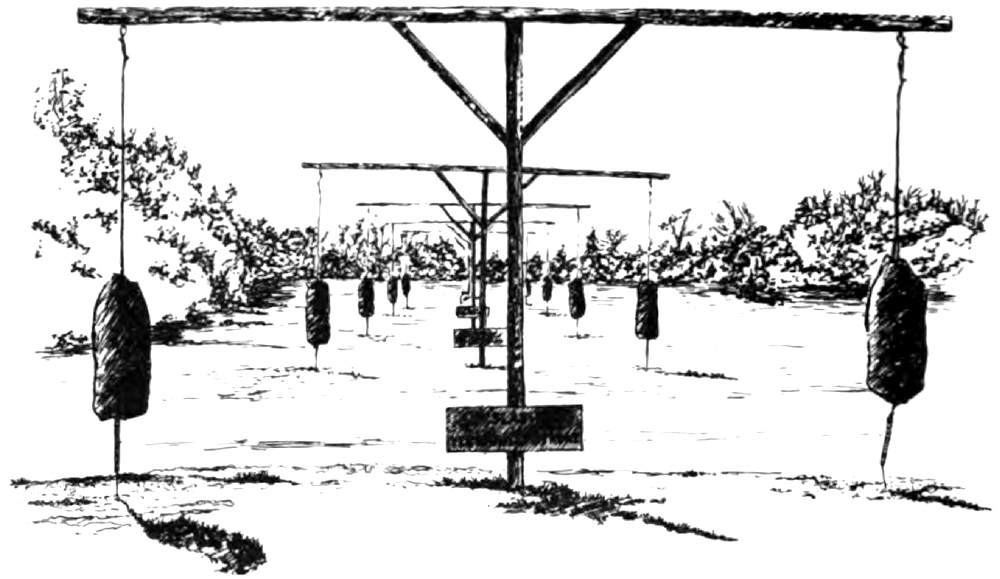
Figure 41.—Stationary Targets for Pugil Stick Training.
[Pg 83]
| Paragraph | Page | |
A |
||
| Assault course | 703 | 62 |
| Construction | 703c | 70 |
| Demonstration and application | 703e | 72 |
| Obstacles | 703b | 63 |
| figs. 27-36 | 63-71 | |
| Purpose | 703a | 62 |
| Safety precautions | 703d | 70 |
| Attack, group | 602 | 53 |
| Three against two | 602b | 54 |
| Two against one | 602a | 53 |
B |
||
| Bayonet: | ||
| Evolution of | 101a | 1 |
| Importance | 101c | 9 |
| Bayonet fighting techniques: | ||
| Change of direction | 203 | 18 |
| Combination movements | 501 | 51 |
| Development of | 101b | 4 |
| [Pg 84]Foot movements | 204 | 18 |
| Group attack | 602 | 53 |
| Group defense | 603 | 54 |
| Guard position | 202 | 14 |
| Individual attack | 301 | 23 |
| Individual defense | 401 | 43 |
| Principles of | 102 | 10 |
| Biddle system | 101b(3) | 8 |
| Blocks: | ||
| Against slash | 404 | 46 |
| fig. 21 | 49 | |
| Against vertical butt stroke. | 405 | 48 |
| fig. 22 | 50 | |
C |
||
| Change of direction | 203 | 18 |
| General | 203a | 18 |
| Whirl, execution of | 203b | 18 |
| Combination movements | 501 | 5 |
| Combination obstacle | fig. 36 | 71 |
| Construction of obstacles | 703c | 70 |
| Construction of pugil stick | 704b | 73 |
| Course, assault | 703 | 62 |
D |
||
| Defense, group | 603 | 54 |
| One against two | 603a | 54 |
| Two against three | 603b | 54 |
| [Pg 85]Direction, change of | 203 | 18 |
E |
||
| Evolution of the bayonet | 101a | 1 |
F |
||
| Foot movements | 204 | 18 |
| General | 204a | 18 |
| Shuffle forward | 204d | 20 |
| fig. 5 | 21 | |
| Shuffle left | 204c | 19 |
| fig. 4 | 20 | |
| Shuffle right | 204b | 19 |
| fig. 3 | 19 | |
G |
||
| Group attack | 602 | 53 |
| Two against one | 602a | 53 |
| fig. 23 | 55 | |
| Three against two | 602b | 54 |
| fig. 24 | 56 | |
| Group defense | 603 | 54 |
| One against two | 603a | 54 |
| fig. 25 | 57 | |
| Two against three | 603b | 54 |
| fig. 26 | 58 | |
| [Pg 86]Growl | 202f | 17 |
| Guard position | 202a | 14 |
| figs. 1 & 2 | 15 & 16 | |
| Position of body | 202c | 14 |
| Position of feet | 202b | 14 |
| Position of hands | 202d | 17 |
| Position of rifle | 202e | 17 |
H |
||
| Horizontal butt stroke | 305 | 34 |
| Execution | figs. 13-15 | 35-37 |
| Obstacle | fig. 34 | 69 |
| Recovery to guard position | 305b | 34 |
| Horizontal slash | 302b | 25 |
I |
||
| Importance of bayonet | 101c | 9 |
| Individual attack | 301 | 23 |
| Horizontal butt stroke | 305 | 34 |
| figs. 13-15 | 35-37 | |
| Horizontal slash | 302b | 25 |
| Jab | 306 | 38 |
| figs. 16-18 | 39-41 | |
| Slash | 302 | 23 |
| figs. 6 & 7 | 24 & 26 | |
| Smash | 304 | 31 |
| figs. 11 & 12 | 32 & 33 | |
| Vertical butt stroke | 303 | 27 |
| [Pg 87] | figs. 8-10 | 28-30 |
| Individual defense | 401 | 43 |
| Block against slash | fig. 21 | 49 |
| Block against vertical butt stroke | 405 | 48 |
| fig. 22 | 50 | |
| Parry left | 403 | 44 |
| fig. 20 | 47 | |
| Parry right | 402 | 43 |
| fig. 19 | 45 | |
J |
||
| Jab | 306 | 38 |
| Execution | figs. 16-18 | 39-41 |
| Obstacles | fig. 27 | 63 |
| fig. 31 | 66 | |
| fig. 35 | 69 | |
| Recovery to guard position | 306b | 38 |
M |
||
| Movements: | ||
| Combination | 501 | 51 |
| Foot | 204 | 18 |
| General | 204a | 18 |
| [Pg 88]Individual attack | 301 | 23 |
O |
||
| Obstacles | 703b | 63 |
| figs. 27-36 | 63-71 | |
| Construction of | 703c | 70 |
P |
||
| Parry left | 403 | 44 |
| fig. 20 | 47 | |
| Parry right | 402 | 43 |
| fig. 19 | 45 | |
| Pugil stick | 704 | 73 |
| Construction | 704b | 73 |
| fig. 37 | 74 | |
| Employment | figs. 38-40 | 78-80 |
| Regulations for bouts | 704d | 76 |
| Safety equipment and precautions | 704c | 75 |
S |
||
| Seidler, Dr. Armond H. | 101b(3) | 8 |
| Slash | 302 | 23 |
| Execution | 302a | 23 |
| figs. 6 & 7 | 24 & 26 | |
| Obstacle | fig. 30 | 66 |
| [Pg 89]Recovery to guard position | 302c | 25 |
| Smash | 304 | 31 |
| Execution | figs. 11 & 12 | 32 & 33 |
| Obstacles | fig. 29 | 65 |
| fig. 32 | 67 | |
| Recovery to guard position | 304b | 31 |
T |
||
| Training | 701 | 59 |
| Assault course | 703 | 62 |
| Demonstration and application, basic principles | 702 | 60 |
| General | 701 | 59 |
| Pugil stick | 704 | 73 |
V |
||
| Vertical butt stroke | 303 | 27 |
| Execution | figs. 8-10 | 28-30 |
| Obstacles | fig. 28 | 64 |
| fig. 30 | 66 | |
| Recovery to guard position | 303b | 27 |
For sale by the Superintendent of Documents, U.S. Government Printing Office
Washington, D.C., 20402 - Price 35 cents