

MACHINERY’S REFERENCE SERIES
EACH NUMBER IS ONE UNIT IN A COMPLETE LIBRARY OF
MACHINE DESIGN AND SHOP PRACTICE REVISED AND
REPUBLISHED FROM MACHINERY
NUMBER 57
Second Edition
| Principles of Metal Spinning, by C. Tuells | 3 |
| Tools and Methods Used in Metal Spinning, by William A. Painter | 15 |
Copyright, 1912, The Industrial Press, Publishers of Machinery
49-55 Lafayette Street, New York City
Metal spinning, that process of sheet metal goods manufacturing which deals with the forming of sheet metal into circular shapes of great variety by means of the lathe, forms and hand-tools, is full of kinks and schemes peculiar to itself. It is the purpose of this treatise to give a description of spinning in general, and to outline some of the methods and tools used in spinning for rapid production.
The products of metal spinning are used in a great many lines of manufacture. Examples of this work are chandelier parts, cooking utensils, silver and brittania hollow-ware, automobile lamps, cane-heads and many other sheet metal specialties. Brass, copper, zinc, aluminum, iron, soft steel, and, in fact nearly all metals yield readily to the spinner’s skill. At best spinning is physically hard work, and the softer the stock, the easier and quicker the spinner can transform it into the required product.
There are but two practical ways of forming pieces of sheet metal into hollow circular articles: by dies and by spinning. By far the cheapest and best method of producing quantities of this class of work is by the use of dies, but there are many cases where it is impractical or impossible to follow this course. Dies are expensive and there is constant danger of breakage, whereas spinning forms are easily and cheaply made and are almost never damaged by use beyond a reasonable amount of wear. Thus it will be seen that when the production is small, it does not pay to make costly dies. Again, the styles or designs of many articles that are spun are constantly being changed; if made by dies each change would necessitate a new die, while in spinning merely a new wooden form is required—and sometimes the old form can be altered, costing practically nothing. Still other advantages of spinning are that in working soft steel, a much cheaper grade may be spun than can be drawn with dies; beads may be rolled at the edges of shells at little expense; experimental pieces may be made quickly, and, added to these features comes the fact that very difficult work that cannot possibly be made with dies can be spun with comparative ease. It must not be construed from the above that spinning is to be preferred to die work in all or even in the majority of cases, because, on the contrary, die work is a more economical method of manufacture, and should always be used when possible on production work. The cases already cited are merely given to point out some of the instances in which, for economical reasons, spinning is to be preferred to die work.
The principal tool used in the operation of spinning is the spinning lathe, shown in Fig. 1. While in many respects this machine is similar to any other lathe, it is built without back-gears, carriage or lead-screw, is very rigid in construction, and, on the whole, very much resembles a speed lathe. Like other lathes, the spinning lathe is fitted with a cone pulley (preferably of wood, because of its lightness and gripping qualities), allowing the use of four or five different speeds. Speed is an important factor in spinning. Arbitrary rules for spinning speeds cannot be given, as the thicker the stock the slower must be the speed; thus while ¹/₃₂-inch iron can be readily spun at 600 revolutions, ¹/₁₆-inch iron would necessitate reducing the speed to 400 revolutions per minute. Zinc spins best at from 1,000 to 1,400 revolutions; copper works well at 800 to 1,000; brass and aluminum require practically the same speed, from 800 to 1,200; while the comparatively slow speed of 300 to 600 revolutions is effective on iron and soft steel. Brittania and silver spin best at speeds from 800 to 1,000 revolutions.
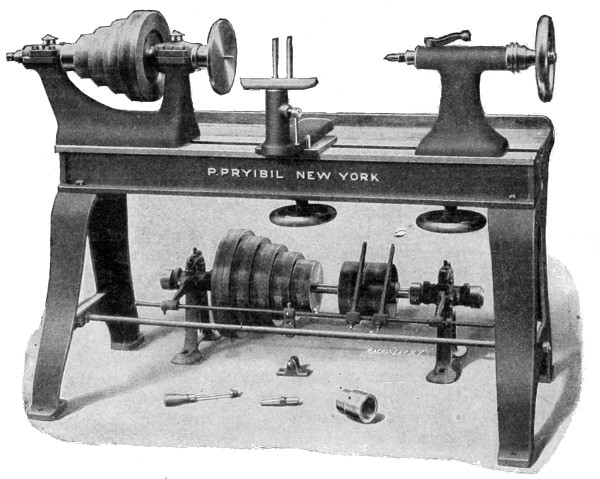
Fig. 1 Spinning Lathe
One of the essential parts of the spinning lathe is the T-rest. The base of this rest is movable on the ways of the lathe, and it has at the side nearest the operator, a stud about four inches in diameter and six inches high, through which is swiveled the T-rest proper.[5] As the illustration shows, provision is made for raising and lowering the rest, and the entire rest may be clamped in any desired position by means of the hand-wheel shown beneath the ways. The rest proper consists of an arm, 12 to 15 inches long, similar to a wood turner’s rest, and through the face of this arm are from twelve to sixteen closely spaced ⅜-inch holes. These holes are to receive the pin against which the hand tools are held while spinning. The pin is three inches long and of ¾-inch steel, turned down on one end to loosely fit the holes in the rest.
Another important part of the spinning lathe is the tail-center. This center is sometimes the ordinary dead center that is in general machine shop use, but nearly all spinners use the revolving center, shown in Fig. 2. The revolving center is ¾ inch diameter (without taper) and about six inches long, and is fitted into the socket in which it runs; this socket is, in turn, fitted to the taper hole in the tailstock. At the bottom of the hole in the socket are two steel buttons, hardened and ground convex on their faces. These buttons act as ball bearings and reduce friction to a minimum.

Fig. 2. Revolving Center
The shape of a shell made by spinning is dependent on the form or chuck upon which the metal is spun. Forms are used for plain spinning where the shape of the shell will permit of its being readily taken from the form after the spinning has been completed; but when the shape of the shell is such that it will not “draw,” as the molders say, it becomes necessary to employ sectional chucks, similar to the[6] one shown in Fig. 3. Generally speaking, spinning forms are made of kiln dried maple. After being bored and threaded to fit the lathe spindle, the spinner turns the maple block to agree with a templet shaped in outline to the sample shell. When no sample is furnished, the templet must be laid out from a sketch or drawing; in either case proper allowance is made for the thickness of the stock. When large quantities of shells are to be spun, all alike, the form is sometimes made of lignum vitæ. Another method is to turn the maple form small enough so that one shell may be spun and cemented to it and then this metal-cased form is used to spin the balance of the shells. For continuous spinning, forms are made of cast iron or steel, which of course makes a most satisfactory surface to spin on and gives indefinite service.
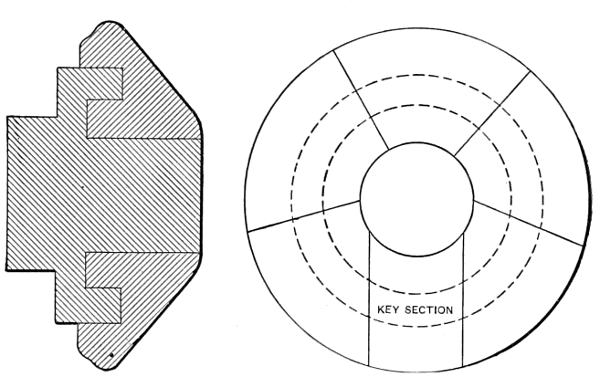
Fig. 3. Sectional Spinning Chuck
A sectional or “split” chuck, as it is sometimes called, is, as the name implies, a spinning chuck or form which may be taken apart in sections after the shell has been spun over it. As before stated, this class of spinning chuck is only used when the finished shell could not be removed from an ordinary form after spinning. After a shell has been spun over a sectional chuck, the shell and the sections of the chuck are together pulled lengthwise from the core of the chuck. Then, starting with the key section, it is an easy matter to remove each section from the inside of the shell. As the sections are removed, they are replaced upon the core, slipped under the retaining flange and the chuck is ready for spinning a new shell. The whole operation of removing and replacing the sections of a chuck takes less time than it does to tell it, and, as the sections are of different sizes, it is easy to replace them in the proper order. Like other forms, sectional chucks are made of wood or metal, according to the requirements of the job. The core and retaining ring are first made from one piece and then the sections are turned in a continuous ring and split with a fine saw. In some cases it is necessary to add a small piece to the last section to make up for the stock lost in splitting the sections.
Another kind of sectional chuck, known to the trade as a “plug” (shown in Fig. 5) is used extensively in some shops in cases where the shell must have projections or shoulders at both ends, and no bottom to the shell is required. In making the plug, which is always in two parts, the first half is turned to take the shell from one end to the center of the smallest diameter. Into the end of this part is bored a hole to which is fitted the end of the second part, which is afterwards turned to fit the shell. Over this two-part plug the shell is spun; then the bottom of the shell is cut out and the first half of the plug removed, thus allowing the shell to be withdrawn. The first part is then replaced and the plug is ready for use again. Fig. 4 shows a method of spinning difficult shells that ordinarily would require a sectional chuck. The shell shown at the left of Fig. 4 is first spun as far as the bulged part on an ordinary form that ends at this point. Then after annealing, it is replaced on the form and while another operator holds the wooden arm, supported with a pin in the T-rest, the spinner forms the metal around the bulge-shaped end of the arm. The arm, being stationary on the inside of the shell, acts as a continuation of the spinning form, and by this method as good a shell is obtained as could be spun with a sectional chuck.
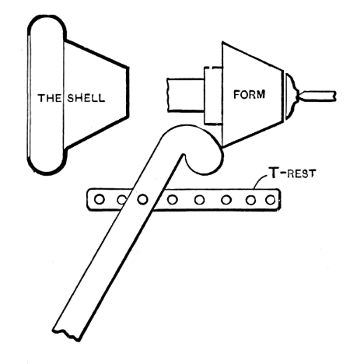
Fig. 4. Quick Method of Spinning Difficult Shell Without Sectional Chuck
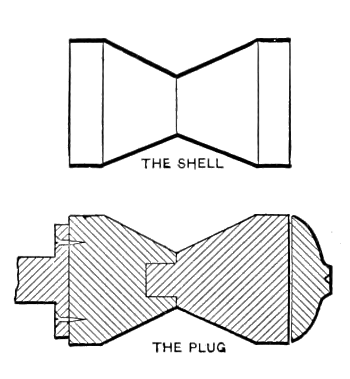
Fig. 5. Spinning on Plugs
For spinning operations upon tubing or press-drawn tubes, steel arbors are generally used. Tubing may be readily spun upon an arbor and it can be reduced or expanded to comply with the shape of shell required much more quickly than the shell could be spun from the blank.
For holding the sheet metal blank to the spinning form, a block of wood known as the follower, is used (see Fig. 6). Followers are made to suit the shape of the work with which they are to be employed, always being made with the largest possible bearing on the work; thus a shell with a flat bottom twelve inches in diameter would be turned with the aid of a follower having an 11¾-inch face, while a shell with a 4-inch face would take a follower with a 3⅞-inch face. All shells do not have flat bottoms, consequently, in spinning such as do not, it becomes necessary to employ hollow followers. Hollow followers have their bearing surfaces turned out to fit the ends of the[8] forms with which they are to be used. In practice, the blank is held against the end of the spherical form with a small flat follower until enough of the shell has been spun to admit of the hollow follower being used. All followers are made with a large center hole in one end to receive the revolving tail-center.
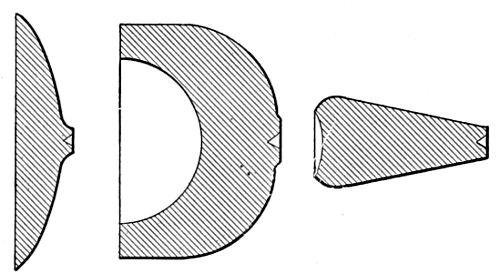
Fig. 6. Three Types of Followers
In starting to spin a difficult shell it sometimes happens that the[9] necessarily small follower will not hold the blank. To prevent this slipping, the face of the follower is covered with emery cloth. Often, however, on rough work, the spinner will not stop to face the follower, but will make a large shallow dent at the center of the blank; the extra pressure required to force the metal against the form will usually overcome the slipping tendency.

Fig. 7. Specimens of Metal Spinning
Hand tools, in great variety, form the principal asset of the spinner’s kit. Spinning tools are made of tool steel forged to the required shapes, and are hardened and polished on the working end. The round steel from which they are made varies from ½ inch to 1½ inch in diameter, according to the class of work upon which they are to be used. The length of a spinning tool is about 2 feet, and it is fitted into a wooden handle 2 inches diameter and 18 inches long, making the total length of the handled tool about 3 feet, as shown in Fig. 8. As the spinner holds this handle under the right armpit, he secures a great leverage upon the work and is better able to supply the physical power required to bring the metal to the desired shape.

Figs. 8 and 9. Spinning Tool and Swivel Cutter
The commonest and by far the most useful of the spinning tools is the combination “point and ball” which together with a number of other tools, is shown in Fig. 11. This tool is used in doing the bulk of the spinning operations—for starting the work and bringing it approximately to the shape of the form. Its range of usefulness is large on account of the many different shapes that may be utilized by merely turning the tool in a different direction. Next in importance comes the flat or smoothing tool which, as the name implies, is for smoothing the shell and finishing any rough surfaces left by the point and ball tool. The fishtail tool, so named from its shape, is used principally in flaring the end of a shell from the inside, “spinning on air,” as it is sometimes termed. This tool is used to good advantage in any place where it is necessary to stretch the metal to any extent, and its thin rounding edge proves useful in setting the metal into corners and narrow grooves. Other tools are the ball tool which is adapted to finishing curves; the hook tool, used on inside work; and the beading tool which is needed in rolling over a bead at the edge of a shell when extra strength or a better finish is desired.
When much beading of one kind is being done, a large heavy pair of round-nose pliers (Fig. 10) with the jaws bent around in a curve and sprung apart enough to allow for the thickness of the metal proves to be a handy tool. After the edge of the shell has been flared out to start the bead, the pliers are opened enough to admit the metal and then closed and the stock guided around to form the bead as far[10] as possible. In this way the larger part of a bead is rapidly formed, one jaw of the pliers acting as a spinning tool and the other corresponding to the back-stick. During this operation, the pliers are, of course, supported by being held against the T-rest.

Fig. 10. Spinners’ Pliers
Closely allied with these spinning tools are two other tools (also shown in Fig. 11) known as the diamond point and the skimmer. The diamond point is for trimming the edges of the shell during the spinning operation and for cutting out centers or other parts of the work. The skimmer is for cleaning up the surface of a shell, removing a small amount of metal in doing so, the amount depending upon the skill the spinner used in the spinning proper.
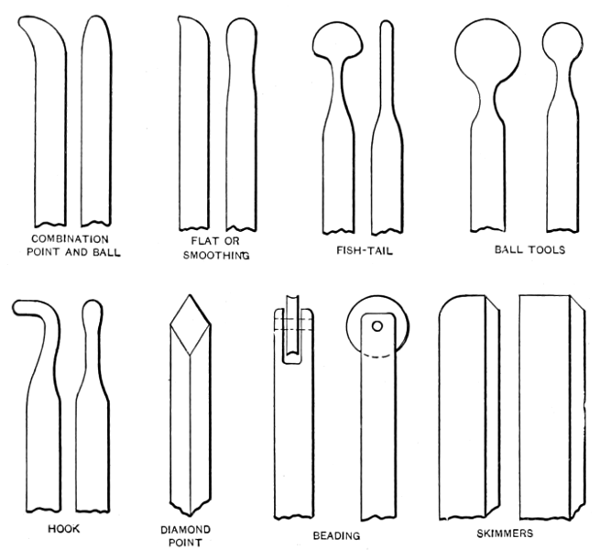
Fig. 11. Hand Tools of Various Forms used in Spinning
When the bottoms are to be cut from a large number of shells and it is necessary that they be cut exactly alike, a tool known as a swivel cutter is used. This tool (see Fig. 9) is simply an iron bar with a cutter on one end, which swivels near the center around a pin in the T-rest; thus by a slight movement of the arm the cutter is brought up to the work, cutting a piece from the shell of exactly the same size each time.
In order to make clear the successive steps in spinning, let us briefly consider the making of a copper head-light reflector, and the way the work is handled when a few hundred pieces are to be made.
By trial spinning, the size of the blank required for one of the reflectors is determined, and with the square shears the copper sheets[11] are cut into pieces an eighth of an inch larger each way. These squares are then taken to the circular shears and cut to round shapes ready for the spinning lathe. The spinning form, of kiln-dried maple, is screwed to the spindle and the belt thrown to that step of the cone pulley which will bring the speed nearest to 1,200 revolutions. From the stock-room a follower is selected whose face will nearly cover the bottom of the form. It is now “up to” the spinner. Holding a blank and also the follower against the end of the form, he runs the tail-center up to the center in the follower just hard enough to hold the blank in place. Then, starting the lathe, he centers the blank by lightly pressing against its edge a hard wood stick. As soon as it “lines up” he runs the center up a little harder and clamps it in place. Some spinners will “hop in” a blank with the lathe running, but this is dangerous practice and sometimes the blank will go sailing across the room. Often this happens in truing up the blank and for this reason it is considered advisable to have a wire grating at the further side of the lathe to prevent serious accidents; for a sheet metal blank is a dangerous missile traveling at the high rate of speed which is imparted to it by the lathe.
With a piece of beeswax (soap is sometimes used for economical reasons) the spinner lightly rubs the rapidly revolving blank and then adjusts the pin in the T-rest to a point near enough to the blank to obtain a good leverage with the spinning tool. Holding the handle of his point and ball tool under his right armpit and using the tool as a lever and the pin on the rest as a fulcrum, he slowly forces the metal disk back in the direction of the body of the form, never allowing the tool to rest in one spot, but constantly working it in and out, applying the pressure on the way out to the edge of the disk and letting up as he comes back for a new stroke. In the meantime his left hand is busy holding a short piece of hard wood (called the back-stick), firmly against the reverse side of the metal at a constantly changing point opposite the tool. The object of the back-stick is to keep the stock from wrinkling as it is stretched toward the edge of the disk. Wrinkles cause the metal to crack at the edges and for this reason they must be kept from the stock as much as possible.
After a few strokes of the spinning tool have been taken, the shell will appear about as shown at B, Fig. 12, and at this point it is necessary to trim the shell at the edges with the diamond-point tool. Trimming is required because spinning stretches the stock and the resulting uneven edge will cause splits in the metal if it is not trimmed occasionally. As a carpenter is known by his chips, so a spinner is known by the way his work stretches. While the even pressure of a good spinner will stretch the stock very little, the uneven pressure of the inexperienced man will lead him into all sorts of trouble on account of the way the stock will “go.” In either case the metal always stretches least in the direction in which the sheet stock was originally rolled, consequently giving the edge a slight oval shape. In trimming zinc, the spinner holds a “swab” of cloth just above the diamond point,[12] to prevent the chips from flying into his face and eyes—or those of his neighbors. With other metals the swab is unnecessary.
The reflector is now taking shape. With each successive stroke the spinner sets a little more of the metal against the form. Not only does spinning stretch the metal, but it hardens it as well; therefore, at the stage C it becomes necessary to anneal the partially completed reflector, which is done by heating it to a low red in a gas furnace. In running through a lot of shells, the common practice is to spin them all as far as possible without annealing, and after annealing the whole lot, to complete the spinning.
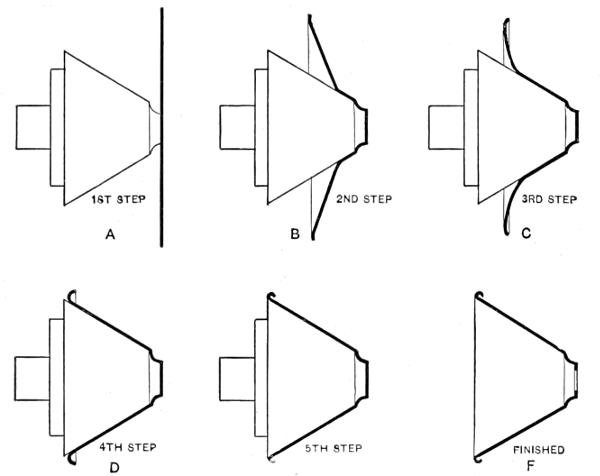
Fig. 12. Successive Steps in Spinning a Reflector
After replacing the shell upon the form, it is trimmed and worked further along the form, gradually assuming the appearance shown at D. At this time, the spinner goes back to the small radius at the front end of the shell and with a ball tool he closes the annealed metal hard down against the form, for the spinning has tended to pull the stock slightly from the form at this point. The body of the reflector is now practically completed and the spinner directs his attention to rolling the bead at the outside edge. Slowly he begins to roll the edge of the shell back, using his hook tool to complete the bead as far as possible and exercising care to keep the back-stick firmly against the metal so as to keep the wrinkles out. Now, with the diamond point, he gives the edges a final trim, and with the beading tool closes down the bead snugly against the rest of the shell, as shown at E. Lastly, the swivel cutter is placed in the proper hole of the T-rest and a turn of the tool cuts out the center to the exact size, and the reflector is completed. If any burrs or rough places remain they are easily removed at this time with the skimmer or diamond point, and a little emery cloth gives the shell a finished appearance.
Referring to the illustration Fig. 7, A, B and C represent the three most important stages of spinning a shell like that shown at C. Annealing is necessary between steps A and B. D is a shell spun upon a form of the plug variety, and E and F are two views of a shell spun after the method shown in Fig. 4, F being the completed shell. G illustrates a very difficult shell to spin, on account of the small follower that must be used; the length of the small diameter also adds to the difficulty. H shows a shell that must be spun upon a sectional chuck, while I is a plain easy job of ornamental spinning. The ball shown at J was spun from one piece of aluminum and it is more of a curiosity than a specimen of practical spinning. It was first spun over a form that would leave one-half of the ball complete and the stock for the other half straight out like a short tube. Next a wooden split chuck was made, hollowed out to receive the finished end of the ball and the open end was gradually spun down and in until the ball was complete with but a ¹/₁₆-inch hole at the end. This hole was plugged and the hollow ball was done.
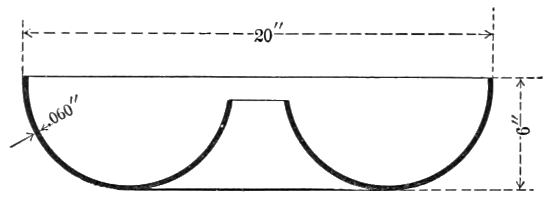
Fig. 13. An Interesting Example of Metal Spinning
As another example of metal spinning, assume the shape shown in Fig. 13. The shell is to be 20 inches in diameter, 6 inches deep, and 0.060 inch thick. The metal to be used is zinc. This is an interesting metal spinning job, and not a particularly difficult one. The shell can be best spun with the aid of two spinning forms, such as are illustrated in Figs. 14 and 15. These forms should be made of kiln-dried maple if there are comparatively few shells to be spun. If there are many, the forms should be made of cast iron. Fig. 14 shows the first form to be used, which conforms to the outside of the shell as far as the centers of the spherical ring. Beyond these points, the form is straight. The blank to be spun is placed as indicated by the dotted lines, and follower No. 1 is used to hold the work against the form. The chief trouble will be met in properly starting the shell, because of the small follower that must be employed. However, follower No. 2 may be substituted after working the metal back against the form a few inches, and as this gives a better grip on the shell, there will be no further danger of slipping. After spinning the zinc shell to the shape of the first form (Fig. 14) it will probably have to be annealed, but this can only be determined by trial. In annealing zinc, the flame should not be allowed to touch the metal. The half completed shell is then put on form No. 2 shown in Fig. 15. It is an easy matter to spin the metal round to complete the arc. The dotted line shows the position of the shell before starting the last part of the spinning. Of course, it will be understood[14] that the shell must be trimmed several times during the spinning, and if the trimming is frequently done, a well-shaped shell should result. For spinning on form No. 2, follower No. 3 must be used. Either beeswax or soap should be frequently rubbed over the work while spinning. If it is necessary to cut out the center, it can be done before removing the shell from the last form by simply removing the follower and using a diamond point tool, or in large product work the swivel cutter will work well. The shell will cling to the form without the follower. The spinning speed should be from 800 to 1,000 R. P. M.
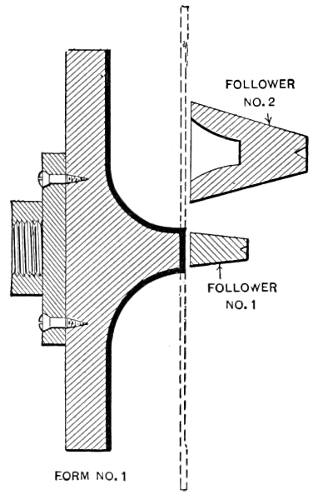
Fig. 14
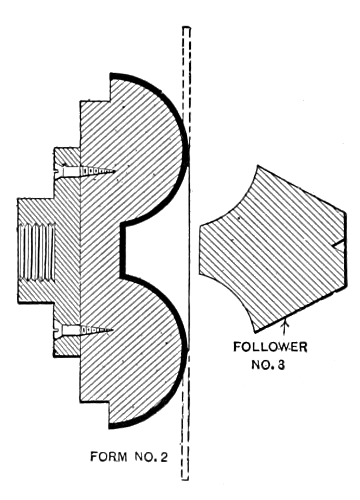
Fig. 15
While the operation of spinning is a comparatively simple one to describe, it is not easily learned, and to-day good all-around spinners are hard to find. The limits of accuracy are not as closely defined as in straight machine work, but there are times when good fits are absolutely necessary, as in cases where two shells must slip snugly together. In this chapter we have taken up only the plain every-day kind of spinning, and were we to follow its work in the gold and silversmith’s trade, we would see it evolve into a fine art. In order to insure really good work coming from the spinning lathe, there is a wide range of knowledge that the spinner must have. That knowledge may be brought together and summed up by a single word—judgment.
The principal object of this chapter is to describe in detail the various operations of spinning metal so that a tool-maker or machinist who has not access to a metal spinner, will be able to make his own tools, rig up an engine or speed lathe, and make the simple forms or models that are required in experimental work. To do this intelligently, it is necessary to follow in detail every step in metal spinning from the circular blank to annealing, pickling, dipping, burnishing, etc., and also to know how to make the simpler forms of spinning tools, what lubricants to use on the different kinds of metals, what material to make the spinning chuck of, and how far the metal can be worked before annealing.
Spinning metal into complicated and elaborate shapes, is an art fully as difficult as any craft, and the man is truly an artist that can make artistic and graceful outlines in metal, especially when only a few pieces are required and the cost will not allow of making special chucks to do the work on and with no outline chucks to govern his design, the forms being made by skill and manipulation of tools alone. Such skill is far superior to that of the Russian metal worker, who, instead of making a vase or ornament of one piece, cuts up several sections and soft solders them together, after covering them with crude “gingerbread” work to disguise his poor metal work.
The amateur can imitate the Russian work, but never the work of the skilled spinner. There are several grades of spinners, most of them never attaining the skill of the model-maker or the facility for handling the different metals. A man that has had several years of experience spinning brass or copper would not be able to spin britannia or white metal without stretching it to a very uneven thickness. As brass or copper is harder than the other metals mentioned, they resist the tool more and require more pressure in forming, and if the operator used the same pressure on the softer metals, he would stretch or distort them, so that they would be perhaps one-quarter of the original thickness at angles and corners where the strain in spinning would be greatest, which would ruin the articles. The best test for skill in ordinary spinning, is to take a long difficult shape, after being finished, and saw it in two lengthwise, and if the variation in thickness is less than 25 per cent of the original gage, it is good practice. Some spinners can keep within 10 per cent of the gage on ordinary work, but they are scarce.
The spinning trade in this country is mostly followed by foreigners, Germans and Swedes being the best. The American that has intelligence[16] and skill enough to be a first-class spinner, will generally look around for something easier about the time that he has the trade acquired. It is an occupation that cannot be followed up in old age, as it is too strenuous, the operator being on his feet constantly, and having to use his head as well as his muscles.
For common plain shapes, a patternmaker’s faceplate, with a tapered center screw, is sufficient for holding the wood chuck. The hole in the wood should be the same taper as the screw, thus giving an even grip on the thread. If a straight hole only is used, and it is not reamed out before screwing to the plate, it will only have a bearing on one or two threads, and if the chuck is taken off and replaced on the faceplate, it will not run true. Care should also be taken to face off the end of the chuck flat, or to slightly recess it, so that it will screw up evenly against the faceplate, as a high center will cause it to rock and run out of true.
In large chucks (over five inches) it is best to have three or four wood screws, besides the center screw. The holes for these can be spaced off accurately on a circle in the iron faceplate, and drilled and countersunk. It is best to have twice as many holes as screws; that is, if four screws are used there should be eight holes, so that if the chuck has to be replaced at any time and the wood has shrunk, it can be turned one-eighth of a revolution further than the original chucking.
Where a chuck has to be used several times, it is better practice to cut a thread in the wood and screw the chuck directly to the spindle of a lathe, not using the faceplate. This thread can be chased with a regular chasing tool, where the operator has the skill, or if not, the wood can be bored out and a special wood tap used. Such a tap has no flutes and it is bored hollow, there being a wall about ³/₁₆ inch thick. One tooth does all the cutting, that is the one at the end of the thread. The chips go into the hollow part of the tap. The end of the tap for about ¼ inch should have the same diameter as the hole before threading to act as guide for the cutting tooth.
It is essential that a chuck should run very true and be balanced perfectly, as the high speed at which it runs will cause it to vibrate and run out of true, causing the finished metal to show chatter marks. The best wood for chucks is hard maple, and it should be selected for its even grain and absence of checks and cracks. It is best to paint the ends with paraffine or red lead, or to immerse the chucks in some vegetable oil after turning. Cottonseed oil is very good for this purpose, but care should be taken not to soak the chucks too long.
For a man not skilled in spinning, it is better to use metal chucks than wood, for if there are many shells of a kind, the operator is liable to bear too hard on the tool, thus compressing the chuck and making the last shells smaller than the first. Corners and angles not well supported might also be knocked off. The writer prefers cold[17] rolled steel for chucks up to 6 inches in diameter and cast iron for the larger ones, but where good steel castings can be obtained, a good chuck can be made by turning roughly to shape a wood pattern, allowing enough for shrinkage and finishing, and hollowing out the back to lighten it. When the chuck is finished all over in the lathe, it should balance much better than a cast iron one, as there are not the chances of having blow holes in the iron, thus throwing the chuck out of balance.
The distance that metal can be drawn without annealing, can only be learned by experience. A flat blank rotated in the lathe, being soft, will offer little resistance and it can be gradually drawn down by a tool held under the chuck and against the blank. This tool is pushed from the center outward and forward at the same time, and every time it passes over the blank or disk the metal becomes harder by friction, and the change of formation and the resistance at the point of the tool greater. This can be felt as the tool is under the operator’s arm. When the spring of the metal is such that the tool does not gain any, but only hardens the metal, the shell should be taken off and annealed. If the metal has been under a severe strain, it should be hammered on the horn of an anvil or any metal piece that will support the inside. The hammer should be a wood or rawhide mallet, but never metal, the object being to put dents or flutes in the metal to relieve the strain when heating for annealing; if this is not done the shell will crack.
After annealing the shell it should be pickled to clean the oxide or scale from the surface; otherwise the metal will be pitted. When the scale is crowded into the metal and when it will not finish smooth after spinning to shape, the metal can be finished by skimming or shaving the outer surface which cuts out all tool marks; it can then be finished with medium emery cloth or the shell can be bright dipped, and be run over with a burnishing tool before buffing. Burnishing can be done on the spinning chuck, but the speed should be higher than for spinning; this requires some skill for a good job, and it can be done only on metal chucks.
Annealing is best accomplished in a wood or gas oven, where a forge fire is used. The metal should never touch the coke or other fuel, but it should be held in the flame above the fire. Where only part annealing is required, the shell can be immersed in water, the part to be annealed being exposed above the water, and a blowpipe used on it. The remainder of the shell will then be hard. This way of annealing is sometimes necessary on a special shapes.
Brass should be heated to a cherry red, and held at that point for a few minutes, in a muffle furnace. If an open furnace is used, just bring the metal to a cherry red and then dip it in water; this method is better than when waiting for it to cool, the action being just the opposite to that on steel. Brass such as the common yellow brass is not suitable for spinning, there being but 55 per cent copper and 45 per cent zinc. There are two grades of brass suitable for spinning. These[18] are known as “spinning and drawing,” having 60 per cent copper and 40 per cent zinc, and “extra spinning and drawing” having 67 per cent copper and 33 per cent zinc. There is also a better grade known as “low brass” having from 75 to 80 per cent copper; it has the color of bronze and is only used on very deep and difficult spinning.
The scale, after annealing, should be pickled off in an acid bath (described further on in this chapter), and the part thoroughly washed in running water. Brass, German silver and the harder metals should be hammered before annealing; it is not necessary to hammer zinc, copper, aluminum, etc.
A pyrometer in an annealing furnace would be an advantage where quantities of the softer metals such as zinc, aluminum, etc., are being heated. Copper is annealed the same as brass and is also pickled. Zinc is coated with oil before being put in the oven, and when the oil turns brown, which occurs when the temperature is about 350 degrees, the metal is ready to take out; it should then be plunged in water to shed the scale, but not pickled. The melting point of zinc is 780 degrees F. Aluminum can be annealed the same as zinc, as the melting point is 1,140 degrees F.
Steel should be annealed by heating to a cherry red and then allowing it to cool slowly; it should be scaled in a special pickle, thoroughly washed, and then put back in the fire long enough to evaporate every particle of acid that may have remained from the pickling operation. Any acid remaining on the steel will neutralize any lubricant that is applied when spinning. Annealing should be avoided wherever possible. Open hearth steel only should be used. It should be free from scale and preferably cold rolled. Bessemer steel is not suitable, except for very shallow spinnings. Tin plate made from open hearth steel can be spun about one-half as deep as its diameter where the shape is not too irregular. German silver is difficult to spin, especially when it contains over 15 per cent nickel; it has to be hammered before annealing, the same as brass, to avoid cracks.
Common yellow soap cut up in strips about ½ inch or ¾ inch square is a good lubricant for spinning most metals. It should be applied evenly to the disk or blank while it is revolving, by holding the soap in the hand and drawing it across the surface. Beeswax is the best for spinning steel, but it is expensive. Lard oil mixed with white lead is a fair substitute. Either mutton or beef tallow applied with a cloth swab is very good on most all metals; also vaseline and graphite mixed to a paste and applied the same as tallow.
The different metals are malleable, ductile and tenacious in the following order; white metal or britannia, aluminum, zinc, copper, low brass, high brass, German silver, steel, tin plate. White metal does not harden in spinning, but it requires special skill in handling, or the metal will be of very uneven gage. The best metal for an amateur to start on is copper, as it is both tenacious and ductile, and will stand much abuse in the fire and on the lathe. One of the peculiar properties of zinc is that it has a grain or texture, and when spinning, the two sides that go through the rolls lengthwise will be longer than the sides that have the cross grain, requiring the shell to be trimmed off quite a distance to even the edge.
To show the possibilities of working the different metals, and their relative spinning values, a number of articles made from different materials are illustrated herewith.
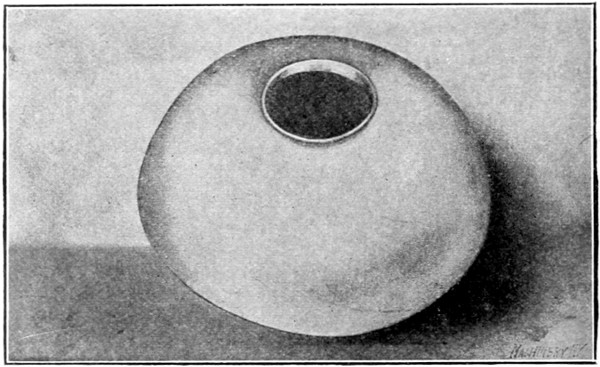
Fig. 16. Zinc Lamp Shade Spun in One Operation without Annealing
A zinc lamp shade is shown in Fig. 16 that is 14¼ inches in diameter and 4¾ inches deep. This shade was spun in one operation, without annealing, from a flat circular blank. All zinc should be warmed before spinning, either over a gas burner at the lathe or in hot soap water, and the chuck also should be heated, as otherwise the blank will soon chill, if spun on a cold metal chuck, as the chuck absorbs the heat long before the operation is finished. Of course this does[20] not apply to wooden chucks. The chuck may be heated by using the burner shown in Fig. 17, which is located around the spindle of the lathe. The size of the burner should, of course, be in proportion to that of the chuck used. The burner illustrated is 8 inches in diameter. It has several small holes drilled for the gas on the side facing the chuck. The heat of the chuck is regulated by varying the supply of gas to the burner. The blank is heated before it is put on the chuck and the friction of the spinning tool helps to keep it warm until it comes in contact with the chuck. The metal retains its heat until the job is finished, and this sometimes saves an annealing operation.
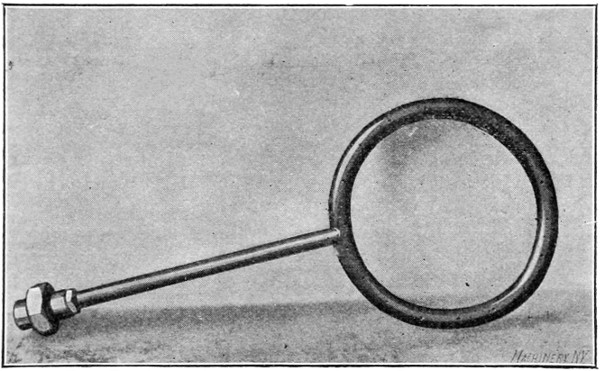
Fig. 17. Gas Burner for Heating Spinning Chuck
In Fig. 18 is shown an example of aluminum spinning. The article illustrated is a cuspidor having a top 7¾ inches in diameter, a neck with a 4-inch flare, a diameter at the top of 9½ inches, and a height of 6½ inches. This shell was spun without annealing, which shows the extreme ductility of aluminum. The copper shell shown in Fig. 19, has a maximum diameter of 7 inches, and a depth of 8 inches; it was spun with four annealings. A German silver reflector, which is 10 inches in diameter at the largest end and 5 inches deep, is shown in Fig. 20. The spinning of such a reflector, when made from this material, is quite difficult. An open hearth cold-rolled steel shell with[21] a maximum diameter of 3 inches and a depth of 4 inches is shown in Fig. 21. This shell was spun without annealing, which shows that the grade of steel used is well adapted for this work.
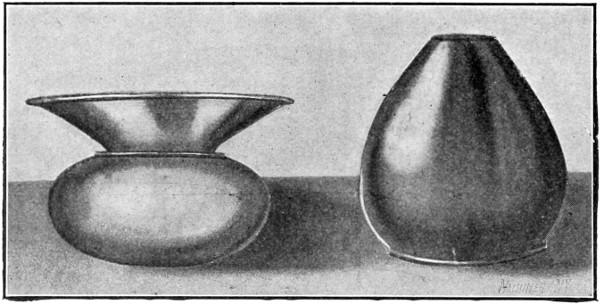
Figs. 18 and 19. Examples of Aluminum and Copper Spinning
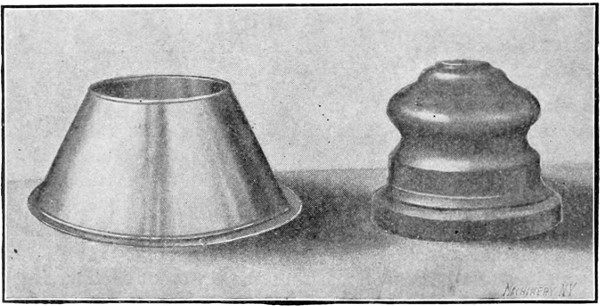
Fig. 20. German Silver Reflector
Fig. 21. Open Hearth Cold-rolled Steel Shell
In Fig. 22 two finished brass shells are shown to the right, and also the number of operations required to change the form of the metal. The upper shell is 6 inches long and 3½ inches in diameter at the large end, while the lower one is 7¼ inches long by 3¾ inches in diameter. It was necessary to anneal these shells between each operation, the upper shell being annealed four times and the lower one three times. These pieces were made in quantities sufficient to warrant the making of chucks for each operation, which enabled them to be spun with less skill than would be required if a finishing chuck only were made. When a single finishing chuck is used, the various operations in spinning a shell of this kind would be left to the judgment of the spinner, who would decide the limit of the stretch of metal between the operations before annealing.
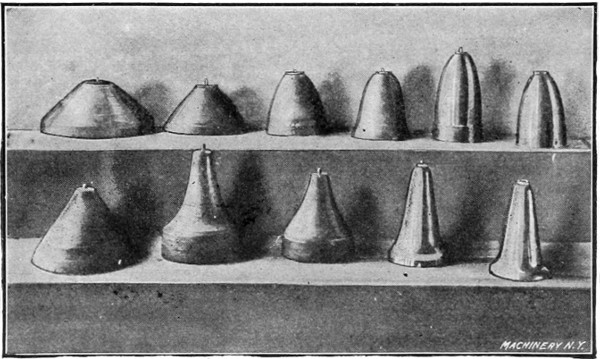
Fig. 22. Various Steps in Spinning the Two Brass Shells at the Right
A brass shell that is made in five operations and with four annealings is shown in Fig. 23. The finishing chuck used is a split or key chuck on which it is necessary to cut out the end of the shell in order[22] to withdraw the key after the shell is spun. This shell, which is shown finished to the right, is 5½ inches long. It is spun smooth on a machine steel chuck, and is not skimmed, but gone over with a planishing tool at the last operation. The two pieces shown in Fig. 22 were also finished in this way.
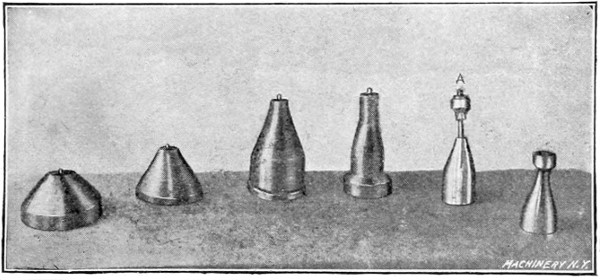
Fig. 23. Another Brass Spinning Operation; the Chuck used is shown at A
Fig. 24 shows a brass shell, which is a good example of “air spinning,” so called because the finishing or second operation on part of the shape is done in the air, thus avoiding the use of a sectional or split chuck. The shell shown is about 5½ inches in diameter. The first or breaking-down chuck is shown at A. The neck or small part of the piece, and also a portion of the spherical surface, is formed by the spinning tool without any support from the chuck. After the shell is spun or broken down on chuck A, it is annealed and pickled. It is then put back on chuck A and planished or hardened on the part that is to retain its present shape. The work is then placed on the chuck B and the soft part is manipulated by the tool until it conforms to[23] the shape shown to the right. While this soft part of the metal is being formed, the part which was previously hardened retains its shape.
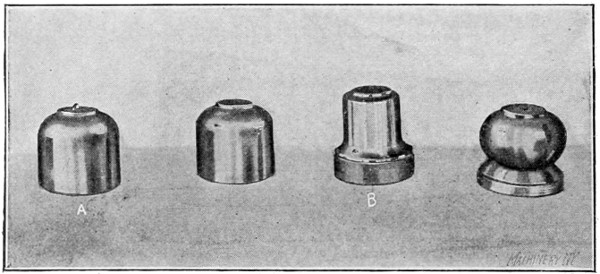
Fig. 24. An Example of “Air Spinning” and the Chucks used
A miscellaneous collection of spinning chucks is shown in Fig. 25. As will be seen, the larger ones are machined out in the back to lighten them, and also to give them an even balance. The larger of those illustrated measure about 9½ inches in diameter, and they are made of cast iron, while the smaller chucks shown in this view are of machine steel. The chuck marked A is a key chuck. Another collection of spinning chucks of various shapes is shown in Fig. 26. Those in the upper row are all key or split chucks, and the keys are shown withdrawn from the sockets. All these chucks, up to 6 inches in diameter, are made of machine steel; those seen in the lower row are shapes which are comparatively easy to spin.
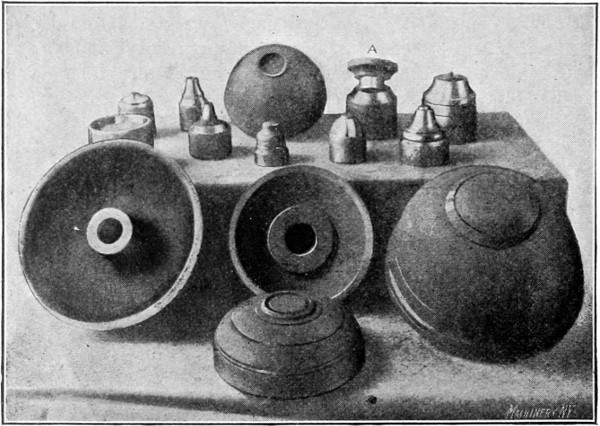
Fig. 25. Miscellaneous Collection of Spinning Chucks
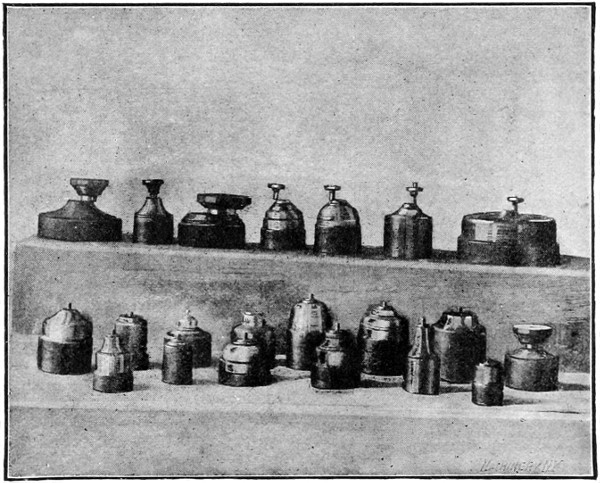
Fig. 26. Another Group of Spinning Chucks. Those in the Upper Row are of the Split or Key Type
A collection of hard maple chucks is shown in Fig. 27, some of which represent shapes that are difficult to spin. The chuck A is 15 inches long, and the maximum diameter of B is 12½ inches. These figures will serve to give an idea of the proportions of the other chucks. All of the chucks shown have threads cut in them and they are screwed directly to the spindle of the lathe, the faceplate being dispensed with. Some of the larger wooden chucks used measure approximately 5 feet in diameter. A chuck of this size is built up of sections which are glued together.
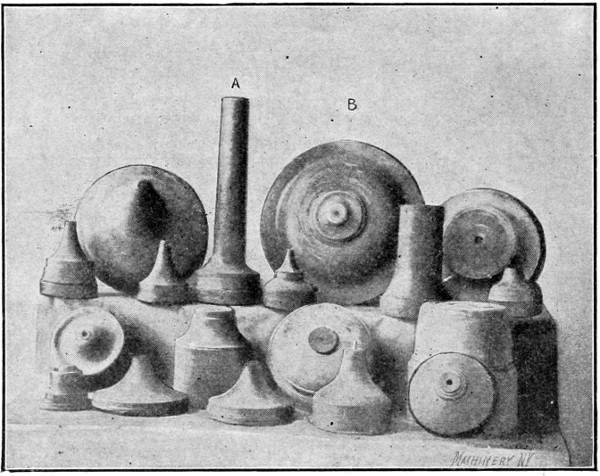
Fig. 27. Various Forms of Spinning Chucks made from Hard Maple
A number of bronze sectional split chucks are shown in Fig. 28. When spinning over a sectional chuck, it is first necessary to break[24] down the shell as far as is practicable on a solid chuck. Care should be taken, however, to leave sufficient clearance so that the work may be withdrawn. The shell is then annealed, after which it is put on the sectional chuck and the under cut or small end is spun down to the chuck surface. When the entire surface of the shell is spun down to a bearing, the shell is planished or skimmed to a smooth surface; the open edge is also trimmed even and the shell is polished with emery cloth.
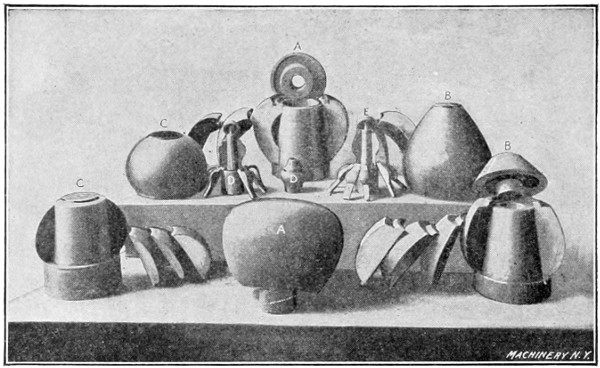
Fig. 28. A Group of Bronze Sectional Chucks
A large bronze chuck of seven sections, one of which is a key section, is shown at A. The largest diameter of this chuck is 10 inches. It has a cast iron center hub and a steel cap at the top for holding the sections in place. This cap, when in place in the retaining groove[25] shown, is flush with the top of the chuck. Another large chuck having five sections and one key section is shown at B. The retaining cap in this case is of a different form. The lower parts of the sections of all these chucks fit in a groove at the bottom of the hub. A chuck of five sections that is without a binding cap, is shown at C. This is not a good design as the hub or center is too straight, and all of the grip or drive is from the bottom groove, which is not sufficient. The shape shown at D is more difficult to spin than any of the others, as it is smaller at the opening in proportion to its size. This chuck also requires more sections in order that it may be withdrawn from the shell after the latter is spun. The chuck E is intended for a small shell that is also difficult to spin. The drive pins which prevent the segments of the chuck E from turning may be seen projecting from its base. The centering pins at the outer end of chucks D and E and the binding caps may also be seen. The chuck A, because of its size, is hollowed out to reduce the weight. All of these chucks were made for hard service, and they have been used in spinning thousands of shells.
Another group of sectional chucks is shown in Fig. 29. They are mostly made from hard maple. The sections of chuck A are planed and fitted together and thin pieces of paper are glued to these sections before they are glued collectively for turning. By using the paper between the joints, the sections may be easily separated after they are turned to the proper size and form. If the different sections were glued without paper between them, the joint formed would be so good that the separation of the sections could not be controlled, and parts from opposite sections would be torn away. The use of the paper, however, between the glued joints, controls the separation of the sections. The chuck shown at D is also made with the paper between the sections. Chucks B and E are turned from the solid, care being taken to have the grain of the wood lengthwise. After they are turned to the required form, they are split into sections with a sharp[26] chisel. Before doing this, the key-section should first be laid out. There should be as few sections as possible, the number being just sufficient to enable the withdrawing of the chuck from the shell after the latter is spun to shape. This method of making a chuck, while quicker than the other, is not good practice, except for small work.
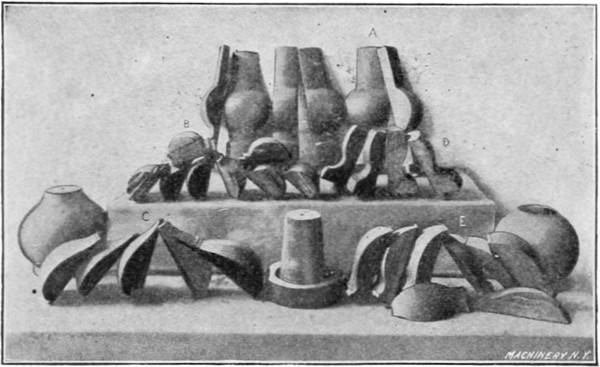
Fig. 29. Sectional Chucks made from Wood
A lignum vitæ chuck is shown at A in Fig. 30; this was made with paper between the sections. The key-section is shown on top. This wood, while being more durable than hard maple, costs sixteen cents a pound in the rough and, counting the waste material, is not any cheaper than bronze, and is less durable. The hard maple chucks B and C were turned from the solid, after which the sections were split. The segments shown in the center of the illustration did not split evenly, owing to a winding or twisting grain.
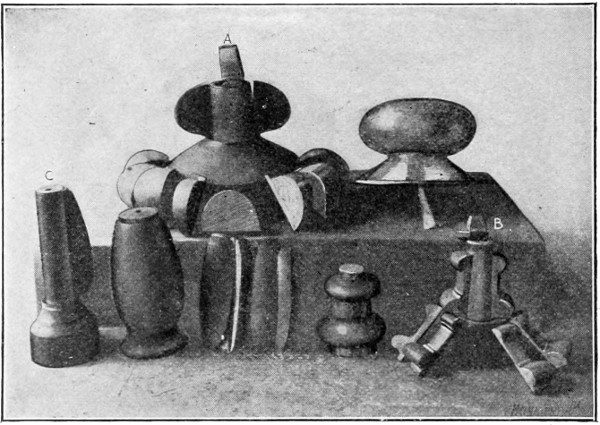
Fig. 30. Other Examples of Wooden Sectional Chucks
The construction of a sectional spinning chuck is shown in Fig. 31. This illustration also shows the proper proportion for the central hub and its taper. This hub should never be straight, but should have from 5 to 7½ degrees taper on the central part. There should also be a taper of 1½ degree on the other binding surfaces as indicated. These parts are made tapering so that the shell can be released from the lathe after spinning, without hammering or driving; when straight surfaces are used the work has to be pried off, and it is also harder to set up the sections for the next shell. Another disadvantage is that with straight fittings the wear cannot be taken up. An end cap or binder should be used wherever possible as it steadies the chuck. A drive pin should also be used and the hole for it drilled in the largest section; this is important, as it gives the sections a more positive drive. If they slip they will soon wear themselves loose and leave openings at the joints.
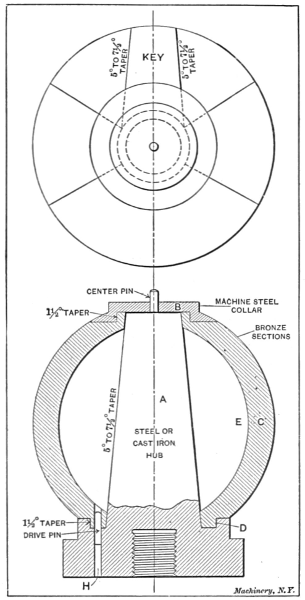
Fig. 31. Elevation and Plan showing Construction of Sectional Chuck
The plan view shows the method of laying out the various sections. The key should be laid out first. One key is enough for the particular[27] form of chuck illustrated, but it is often necessary to use two key sections when the shell opening is small.
When a sectional chuck is to be made, it is important to decide first on the size of the central hub A, the number of sections C, and also the design of the cap or binder B. This cap must not exceed in size the opening in the finished shell, as it would be impossible to remove it after the chuck sections were taken out. After the size of the hub A has been decided upon, a wooden form should be turned that is a duplicate of A, except that a spherical surface E should be added. This spherical part should be slightly smaller than the inner diameter of the bronze sections in order to allow for machining them. In turning this wooden pattern on which the plaster patterns for the sections are to be formed, the shoulder D should be omitted, as a removable metal ring will take its place.
When the wooden hub is ready, two metal partitions or templets of the same outline as the chuck, though about one-half inch larger than its total diameter, for shrinkage and finishing, are fastened to the hub in the correct position for making a plaster pattern for the key section. These patterns should have extension ends so that the sections when cast may be held by them while they are being turned. The templets should be banked around with a wad of clay, and they should also be coated on the inside with sperm oil to keep the plaster from sticking. There should be two brads driven in the hub for each section of plaster to hold the sections in place while they are being turned. After the plaster for the key section has hardened, the templets should be located one on each side of the key section, so[28] that the two adjacent sections may be made. In this way all the sections are finished. After about forty-eight hours the plaster will be hard enough to turn in the lathe with a hand tool. The form should be roughly outlined and plenty of stock left for shrinkage, as bronze shrinks considerably. Before taking the sections off the wooden frame, the metal band D should be removed to allow the sections to be separated. This should not be done, however, until they are numbered, so that they can be again placed in their proper positions. After the sections are cast, they should be surfaced on a disk grinder, or finished with a file, care being taken to remove as little metal as possible. Each section is next tinned on both contact faces, and then all are assembled and sweated or soldered together by a blow-pipe. It is sometimes necessary to put a couple of strong metal bands around the sections to hold them firmly in place when soldering and also to support them during the turning operation.
The central hub A should be machined first; then the assembled outside shell should be machined to fit the hub A, both on the taper part and at the point D. While the segments are being bored and faced, they are held by the extension ends (not shown) which were provided for this purpose. This outer shell should also be machined all over the inside so that it will be in balance. It is then taken out of the chuck and a hole is drilled in the largest section for drive pin H. The hub A is then caught in the lathe chuck with the assembled sections on it, and a seat is turned for the cap B. After this is done the binder bands can be removed, but not before. The chuck can be finished with a hand tool and file after the roughing cut is taken. After the sections are removed from the hub and numbered at the[29] bottom or inner ends, they can be separated by heating them. If the joints are properly fitted there will be only a thin film of solder, which can be wiped off when hot.
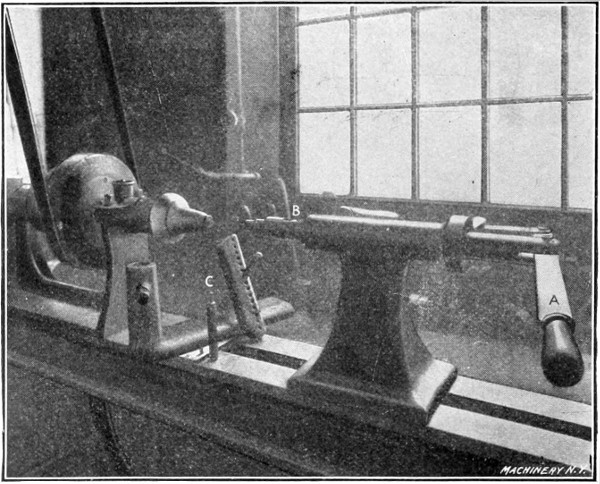
Fig. 32. A Modern Spinning Lathe
A twenty-four-inch metal spinning lathe that is rigged up in a modern way, is shown in Fig. 32. The hand wheel of the tailstock has been discarded for the lever A, which is more rapid and can be manipulated without stopping the lathe. This lathe has a roller bearing for the center B which is a practical improvement over types previously used. The pin C, which is used in the rest as a fulcrum for the spinning tools, is also an improvement, being larger than those ordinarily used. It is ¾ inch in diameter, 6 inches long, and it has a reduced end for the holes in the rest, ⅜ inch in diameter by 1 inch long. This pin is large enough so that the spinner can conveniently hold it with his left hand when necessary, and it can also be rapidly changed to different holes. The pins ordinarily used, because of their small size, do not have these advantages. The speed of a spinning lathe having a five-step cone should be about 2,250 to 2,300 revolutions per minute with the belt on the smallest step, and from 600 to 700 revolutions per minute with the belt on the largest step. The fastest speed given is suitable for all work under 5 inches in diameter, and the slowest for work within the capacity of the lathe. On large shells it is sometimes necessary to change from one speed to another as the work progresses. Figs. 33 and 34 show the spinner at work, and illustrate how the tool should be held, and also the proper position of the left hand.
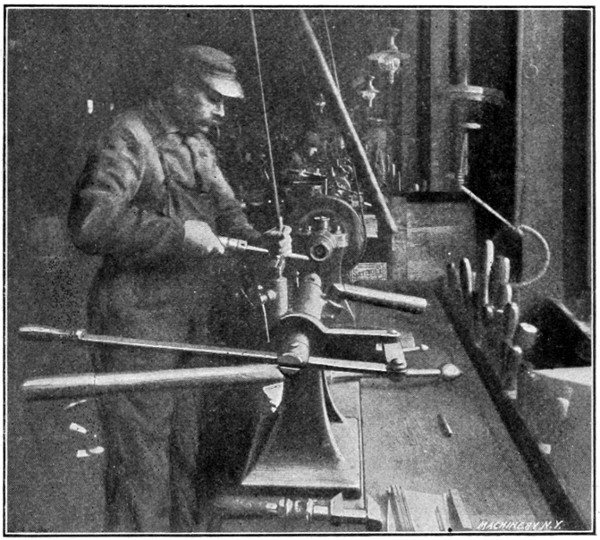
Fig. 33. View showing how the Tool is held when Spinning
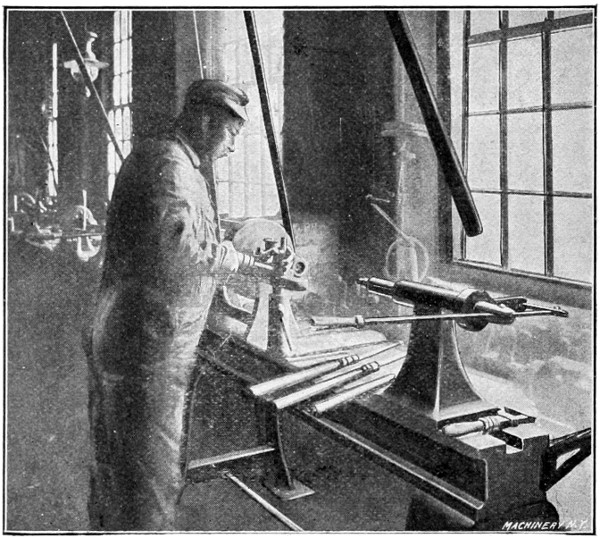
Fig. 34. Another View showing the Position of the Spinner and the Way the Tool is held when forming the Metal
Fig. 35 shows a spinning-lathe tailstock, which has been changed from the hand-wheel-and-screw type to one having a lever and a roller bearing. The spindle A which is withdrawn from the lever and turned one-quarter of a revolution to give a better view of the rollers, is made from 1¾-inch cold rolled steel. The rollers against which the center bears do not project beyond the spindle, so that the latter can be withdrawn through the tailstock. This eliminates the excessive overhang caused by ball bearings and other centers. When the center projects too far, the tailstock cannot be set close to the work owing to the necessity of withdrawing the center when removing the spun part. The application of this principle to a spinning lathe is original and the type of center illustrated was used only after all other kinds had failed, including all the types of ball bearings and revolving pins. The best forms of ball bearing centers do not last over a year, if in constant use, and they will not always revolve on small work. Two other spindles are shown in this engraving, which were taken from other lathes in order to show different views of the parts. The cylindrical pieces B are the hardened friction rollers which belong in the slot of the spindle F, and C is the hardened pin upon which they revolve. The hardened center D has a threaded end on which the back-centers E of different lengths and shapes are screwed. The friction rollers should always be in a vertical position, and care should be taken to have them exactly central with the spindle.
[See Transcriber’s Note at the end of this book.]
and also gives the principal dimensions of a roller bearing for a 1¾-inch spindle. A is a hardened steel bushing, which is driven into the machine steel spindle. The parts B are the hardened steel rollers which travel in opposite directions. These rollers have a small amount of friction, and this is distributed over a large area. A spindle revolving at 2,300 revolutions per minute will not cause these rollers to rotate very rapidly, while a ball bearing with balls traveling in a channel 1½ inch or 2 inches in diameter would be traveling at the same speed as the driving spindle. They also wear out rapidly as the end strain is very great, it being necessary to force the center against the metal with considerable pressure to keep it from slipping. C is the hardened pin upon which the rollers revolve, and D is the hardened spindle on which the various back-centers are screwed. The collar E should either be flattened for a wrench, or a ⁵/₁₆-inch hole, in which a wire can be inserted, should be drilled through the spindle, so that[32] it can be kept from rotating when screwing on the back-centers. Some spinners prefer the spindle loose, so that it can be withdrawn when changing the centers, while others prefer one with considerable lateral motion, but not enough to permit of withdrawal. By inserting a screw-point in the recess F, the center has considerable lateral motion, but not enough to allow it to be withdrawn. This recess is useful in that it helps to distribute the oil. All parts should be hardened and drawn to a light straw color; they should also be ground or lapped to a true fit after hardening. Back-centers of this construction have been in use for over three years in one establishment, and it has not been necessary to replace a single part.
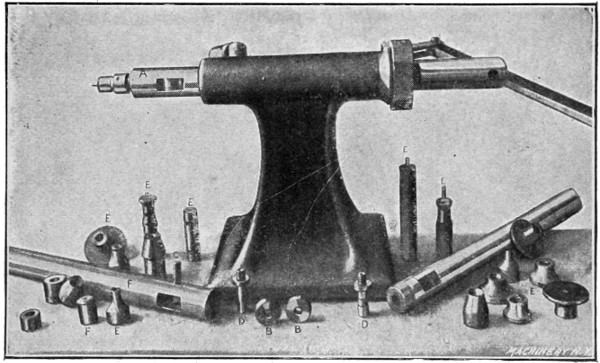
Fig. 35. Detailed View of a Spinning-lathe Tailstock
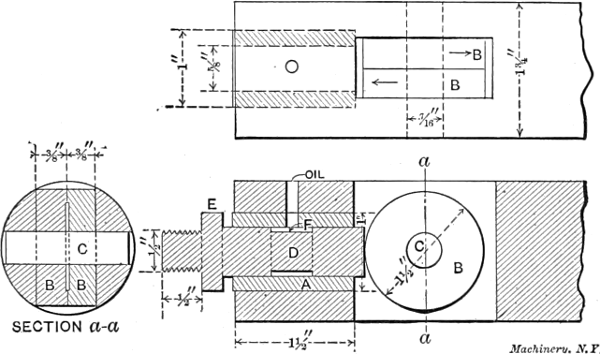
Fig. 36. Sectional View showing the Back-center and its Double Roller Bearing
Fig. 37 shows an attachment which is used to roll any bead or form. This tool, when in use, is inserted in the tailstock spindle in place of the regular center. It is adjustable for any diameter. The roll illustrated is for making a sharp turn, but rounds and other forms are used. The shell being spun by this tool should be held on a hollow chuck. The roll is set at a point where the metal is to be turned over, and by its use the curve may be governed and made uniform with less skill than when the work is done by “air spinning.” In addition, the spinning may be done in less time. This attachment, for some shapes, makes the use of sectional chucks unnecessary.
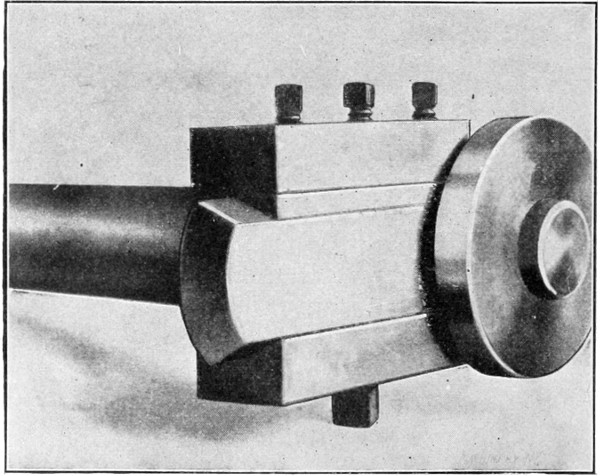
Fig. 37. Attachment used for Rolling Sharp Turns and Beads
Fig. 38 shows several spinning tools, the heads of which were turned in the lathe instead of being forged. This method of making spinning tools is believed to be original. The spinners prefer them to the tools which are forged in one piece, because the heads which are screwed to the shanks are made of the best quality of steel, such[33] as the high-speed or self-hardening steel. The shapes are also better and the surfaces more true. The heads of these tools are all threaded with standard ¼-inch, ⅜-inch and ½-inch pipe taps, according to the size. Obviously, a spinner can have as many different shaped heads as may be required of each of the sizes given, and only one handle. The tapering threads in these heads insure that they will always screw on the shanks tightly no matter how often they may be replaced. The ¼-inch size takes a ½-inch cold rolled holder; the ⅜-inch, a ⅝-inch holder, and the ½-inch, a ¾-inch holder. These will be found large enough for the heaviest work. The egg-shaped tool A is a good form for roughing or breaking down, as it has plenty of clearance on the heel, and a blunt point that will not tear the metal. This tool is shown in four sizes. The ball or spherical tool B is a good one to use on curves and large sweeps. The tool C is elliptic, and is slightly different from A, as it has a blunter point. One of these[34] heads is shown at D screwed onto a reducer by which it is held in the lathe chuck while being turned. These heads or points can also be turned while on the handle by using a steady rest.
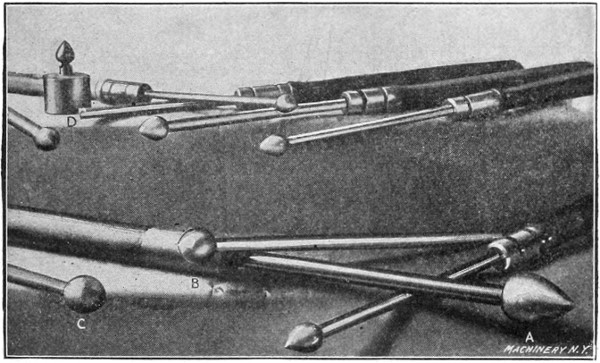
Fig. 38. Metal Spinning Tools with High-speed Steel Removable Heads
A group of trimmers, skimmers and edgers is shown in Fig. 39. Three skimmers of the built-up type are illustrated, the shanks being of machine steel and the blades being riveted to the holders. These[35] blades are made of either high-speed or regular steel. Skimmers which are forged in the regular way from one piece of steel, are shown at B. A number of edgers C, which are made of high-speed or self-hardening steel, are also illustrated. These tools are used without handles until they are worn down short, after which tangs are forged on their ends and they are used in handles. Edgers are utilized on all kinds of work for trimming the ends of the shells. The skimmer is seldom used on metal chucks, but mostly in connection with wooden chucks, where the metal cannot be smoothed down with a planisher. The skimmer is run over the metal lightly, taking a thin shaving and smoothing the uneven surfaces. It requires considerable skill to use this tool without wasting the metal. The surface of the work is finished with emery cloth after skimming.
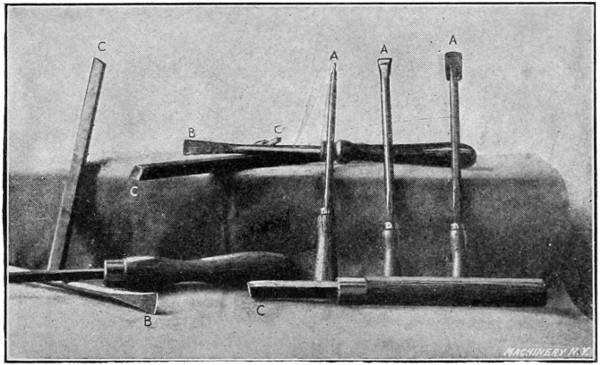
Fig. 39. Tools used for Trimming and Skimming Spun Work
Figs. 40 and 41 show a number of spinning tools of various shapes. The letters A indicate the breaking-down or round-nosed tools of different sizes. This type of tool, which is finished smooth and has a blunt point, is used for forming corners and sharp angles, and it is the tool most commonly used by spinners. The planishers and burnishers B are used on all convex surfaces and for finishing on metal chucks where there is to be no skimming done. The tools C are known as hook or poker tools, and they are used to turn up beads or curves from the inside of the shell. The holders having rollers are used for turning over beads, the metal first being trimmed and turned to a vertical position. The other shapes shown are irregular tools for special work and they are not in daily use.
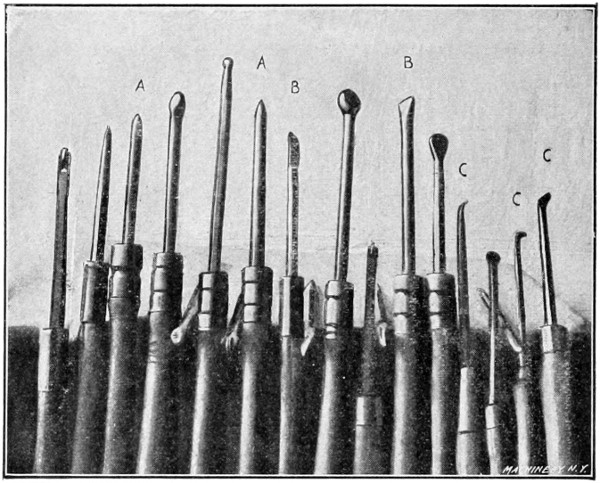
Fig. 40. A Group of Spinning Tools of Various Shapes
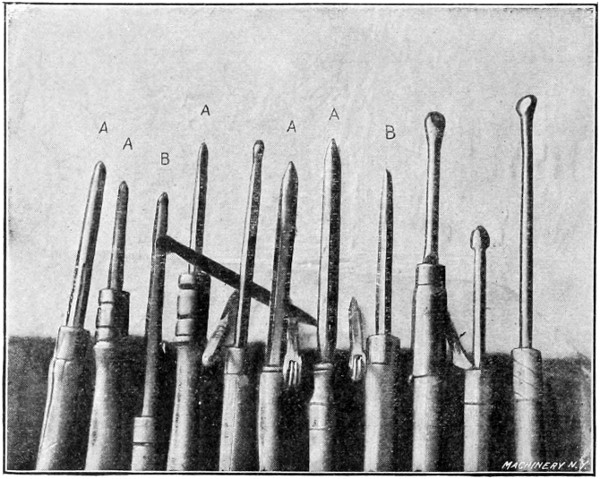
Fig. 41. Another Group of Spinning Tools
Two pairs of spinners’ pliers for turning over the edge of the metal when making large curves are shown in Fig. 42. The wedge-shaped[36] pieces shown in this illustration are used when breaking down or roughing shells to give a bearing to the metal in order to prevent it from wrinkling or buckling when changing its formation. These pieces are made of hard wood with the exception of the one to the right, which is of steel. When one of these pieces is in use it is held in the left hand at a point directly opposite the spinning tool, the metal being between the two. Wood is preferable in most cases, as it does not harden the metal blank.
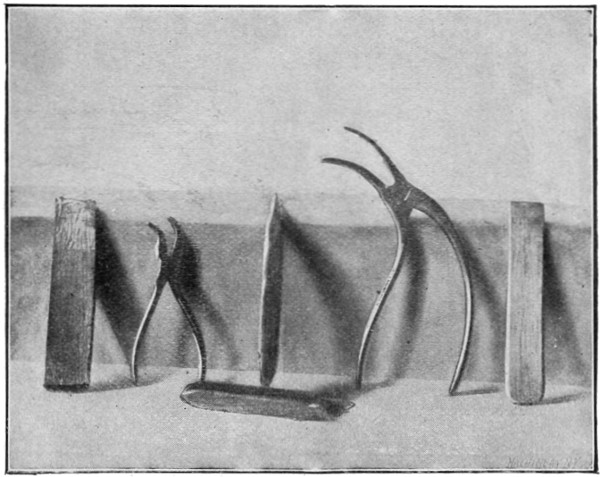
Fig. 42. Spinners’ Pliers which are used for turning the Edge of the Metal when making a Large Bend
The tools shown in Fig. 43 are used in spinning steel. The round tools are of drawn brass, and they can be used where the steel tools cannot, for while a steel tool is perfection on brass, a brass tool is the only thing on steel. It wears out, however, much more rapidly than one of steel. The rolls shown in the center are used for breaking down steel shells. These tools are hardened and have hardened roller bearings. The handles are made of one-inch iron pipe, which is filled with lead to give weight and strength.
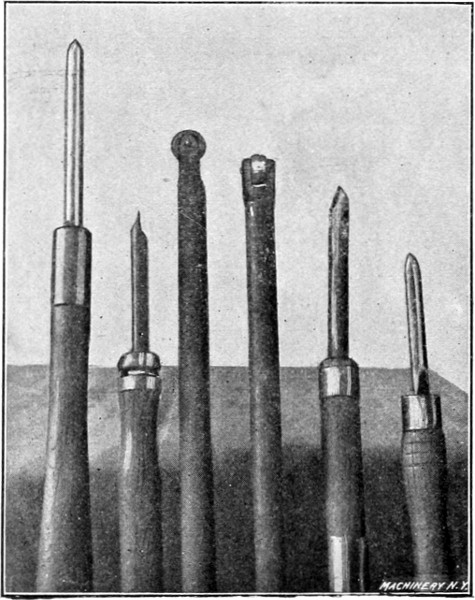
Fig. 43. Some Spinning Tools used in Working Steel
Hard wood tools that are used for breaking down large thin copper blanks ranging from 2 to 5 feet in diameter are shown in Fig. 44. These tools are also used where the surface that the tool will cover without hardening the metal is important. Blanks which are broken down with these tools are finished with the regular types.
The handles of spinning tools vary in diameter from 1¼ to 1¾ inch, and in length from 16 inches to 20 inches. The tools should[37] project from the handles from 9 to 18 inches, and the total length of the tool and handle should average from 30 to 34 inches.
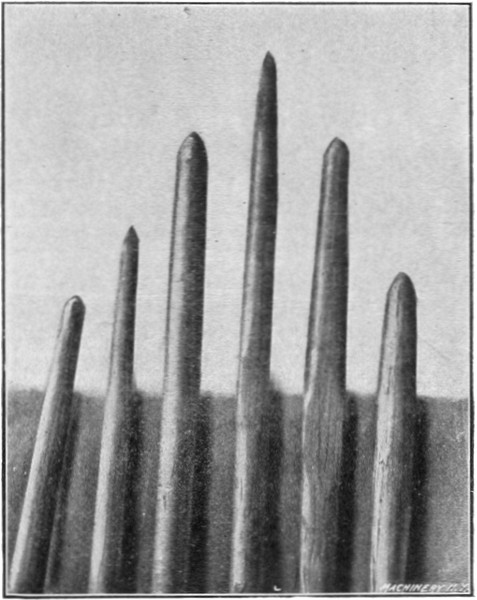
Fig. 44. Wooden Tools which are used on Large Thin Copper Blanks
A group of wood working tools is shown in Fig. 45. These tools are of the type commonly used by spinners for turning the various shapes of wooden spinning chucks. As the tools illustrated are the kind regularly used for wood turning by patternmakers and other wood-workers generally, they will need no description.
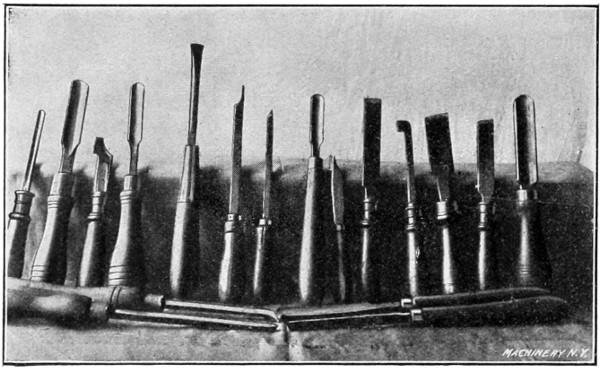
Fig. 45. Wood-turning Tools which are used in turning Spinning Chucks
Brass, copper, and German silver should be pickled after annealing in order to get the scale or oxide from the surface. There are furnaces that anneal without scaling by excluding the air when heating, but they are not in general use. A pickling bath may be made by using one part of oil of vitriol (sulphuric acid) and five parts of water. The shells can be put in hot, or the bath can be heated by a coil of lead or copper pipe running through it. Steam in no case should enter the bath, as the iron in the feed pipe will spoil the pickle. Any basket or box that may be used to hold the shells in the pickle should not contain any iron. If a box is used it should be held together with copper nails. The pickle can be used cold, but it will take a little longer time to remove the scale. As soon as the scale is free, which will be in about half an hour, the shells should be removed or washed thoroughly in running water. The shells should be allowed to dry before the next operation, which is that of spinning. A lead-lined[38] wooden tank or an earthen jar may be used for holding the pickle. The pickle which is used for steel should be about half as strong as that employed for brass. After the work is in this pickle, the latter should be brought to the boiling point, after which the pieces should be taken out and washed. They are then replaced in the fire for a short time to evaporate any acid that may remain after washing.
Finished brass articles may be given different shades by dipping them in a solution consisting of one part aqua fortis (nitric acid) and two parts oil of vitriol. This solution should stand seven or eight hours to cool after mixing, and be kept in a crock immersed in a water bath.
Any intelligent man engaged in mechanical work can acquire a well-rounded mechanical education by using as a guide in his studies the outline of the course in mechanical subjects given below. The course is laid out so as to make it possible for a man of little or no education to go ahead, beginning wherever he finds that his needs begin. The course is made up of units so that it may be followed either from beginning to end; or the reader may choose any specific subject which may be of especial importance to him.
Preliminary Course in Arithmetic
Jig Sheets 1A to 5A:—Whole Numbers: Addition, Subtraction, Multiplication, Division, and Factoring.
Jig Sheets 6A to 15A:—Common Fractions and Decimal Fractions.
Shop Calculations
Reference Series No. 18. Shop Arithmetic for the Machinist.
Reference Series No. 52. Advanced Shop Arithmetic for the Machinist.
Reference Series No. 53. Use of Logarithmic Tables.
Reference Series Nos. 54 and 55. Solution of Triangles.
Data Sheet Series No. 16. Mathematical Tables. A book for general reference.
Drafting-room Practice
Reference Series No. 2. Drafting-room Practice.
Reference Series No. 8. Working Drawings and Drafting-room Kinks.
Reference Series No. 33. Systems and Practice of the Drafting-room.
General Shop Practice
Reference Series No. 10. Examples of Machine Shop Practice.
Reference Series No. 7. Lathe and Planer Tools.
Reference Series No. 25. Deep Hole Drilling.
Reference Series No. 38. Grinding and Grinding Machines.
Reference Series No. 48. Files and Filing.
Reference Series No. 32. Screw Thread Cutting.
Data Sheet Series No. 1. Screw Threads. Tables relating to all the standard systems.
Data Sheet Series No. 2. Screws, Bolts and Nuts. Tables of standards.
Data Sheet Series Nos. 10 and 11. Machine Tool Operation. Tables relating to the operation of lathes, screw machines, milling machines, etc.
Reference Series Nos. 50 and 51. Principles and Practice of Assembling Machine Tools.
Reference Series No. 57. Metal Spinning.
Jigs and Fixtures
Reference Series Nos. 41, 42 and 43. Jigs and Fixtures.
Reference Series No. 3. Drill Jigs.
Reference Series No. 4. Milling Fixtures.
Punch and Die Work
Reference Series No. 6. Punch and Die Work.
Reference Series No. 13. Blanking Dies.
Reference Series No. 26. Modern Punch and Die Construction.
Tool Making
Reference Series No. 64. Gage Making and Lapping.
Reference Series No. 21. Measuring Tools.
Reference Series No. 31. Screw Thread Tools and Gages.
Data Sheet Series No. 3. Taps and Threading Dies.
Data Sheet Series No. 4. Reamers, Sockets, Drills, and Milling Cutters.
Hardening and Tempering
Reference Series No. 46. Hardening and Tempering.
Reference Series No. 63. Heat Treatment of Steel.
Blacksmith Shop Practice and Drop Forging
Reference Series No. 44. Machine Blacksmithing.
Reference Series No. 61. Blacksmith Shop Practice.
Reference Series No. 45. Drop Forging.
Automobile Construction
Reference Series No. 59. Machines, Tools and Methods of Automobile Manufacture.
Reference Series No. 60. Construction and Manufacture of Automobiles.
Theoretical Mechanics
Reference Series No. 5. First Principles of Theoretical Mechanics.
Reference Series No. 19. Use of Formulas in Mechanics.
Gearing
Reference Series No. 15. Spur Gearing.
Reference Series No. 37. Bevel Gearing.
Reference Series No. 1. Worm Gearing.
Reference Series No. 20. Spiral Gearing.
Data Sheet Series No. 5. Spur Gearing. General reference book containing tables and formulas.
Data Sheet Series No. 6. Bevel, Spiral and Worm Gearing. General reference book containing tables and formulas.
General Machine Design
Reference Series No. 9. Designing and Cutting Cams.
Reference Series No. 11. Bearings.
Reference Series No. 56. Ball Bearings.
Reference Series No. 58. Helical and Elliptic Springs.
Reference Series No. 17. Strength of Cylinders.
Reference Series No. 22. Calculations of Elements of Machine Design.
Reference Series No. 24. Examples of Calculating Designs.
Reference Series No. 40. Flywheels.
Data Sheet Series No. 7. Shafting, Keys and Keyways.
Data Sheet Series No. 8. Bearings, Couplings, Clutches, Crane Chain and Hooks.
Data Sheet Series No. 9. Springs, Slides and Machine Details.
Data Sheet Series No. 19. Belt, Rope and Chain Drives.
Machine Tool Design
Reference Series No. 14. Details of Machine Tool Design.
Reference Series No. 16. Machine Tool Drives.
Crane Design
Reference Series No. 23. Theory of Crane Design.
Reference Series No. 47. Design of Electric Overhead Cranes.
Reference Series No. 49. Girders for Electric Overhead Cranes.
Steam and Gas Engine Design
Reference Series Nos. 67 to 72, inclusive. Steam Boilers, Engines, Turbines and Accessories.
Data Sheet Series No. 15. Heat, Steam, Steam and Gas Engines.
Data Sheet Series No. 13. Boilers and Chimneys.
Reference Series No. 65. Formulas and Constants for Gas Engine Design.
Special Course in Locomotive Design
Reference Series No. 27. Boilers, Cylinders, Throttle Valve, Piston and Piston Rod.
Reference Series No. 28. Theory and Design of Stephenson and Walschaert’s Valve Motion.
Reference Series No. 29. Smokebox, Frames and Driving Machinery.
Reference Series No. 30. Springs, Trucks, Cab and Tender.
Data Sheet Series No. 14. Locomotive and Railway Data.
Dynamos and Motors
Reference Series No. 34. Care and Repair of Dynamos and Motors.
Data Sheet Series No. 20. Wiring Diagrams, Heating and Ventilation, and Miscellaneous Tables.
Reference Series Nos. 73 to 78, inclusive. Principles and Applications of Electricity.
Heating and Ventilation
Reference Series No. 39. Fans, Ventilation and Heating.
Reference Series No. 66. Heating and Ventilating Shops and Offices.
Data Sheet Series No. 20. Wiring Diagrams, Heating and Ventilation, and Miscellaneous Tables.
Iron and Steel
Reference Series No. 36. Iron and Steel.
Reference Series No. 62. Testing the Hardness and Durability of Metals.
General Reference Books
Reference Series No. 35. Tables and Formulas for Shop and Drafting-room.
Data Sheet Series No. 12. Pipe and Pipe Fittings.
Data Sheet Series No. 17. Mechanics and Strength of Materials.
Data Sheet Series No. 18. Beam Formulas and Structural Design.
Data Sheet Series No. 20. Wiring Diagrams, Heating and Ventilation and Miscellaneous Tables.
This treatise is one unit in a comprehensive Series of Reference books originated by Machinery, and including an indefinite number of compact units, each covering one subject thoroughly. The whole series comprises a complete working library of mechanical literature. The price of each book is 25 cents (one shilling) delivered anywhere in the world.
LIST OF REFERENCE BOOKS
No. 1. Worm Gearing.—Calculating Dimensions; Hobs; Location of Pitch Circle; Self-Locking Worm Gearing, etc.
No. 2. Drafting-Room Practice.—Systems; Tracing, Lettering and Mounting.
No. 3. Drill Jigs.—Principles of Drill Jigs; Jig Plates; Examples of Jigs.
No. 4. Milling Fixtures.—Principles of Fixtures; Examples of Design.
No. 5. First Principles of Theoretical Mechanics.
No. 6. Punch and Die Work.—Principles of Punch and Die Work; Making and Using Dies; Die and Punch Design.
No. 7. Lathe and Planer Tools.—Cutting Tools; Boring Tools; Shape of Standard Shop Tools; Forming Tools.
No. 8. Working Drawings and Drafting-Room Kinks.
No. 9. Designing and Cutting Cams.—Drafting of Cams; Cam Curves; Cam Design and Cam Cutting.
No. 10. Examples of Machine Shop Practice.—Cutting Bevel Gears; Making a Worm-Gear; Spindle Construction.
No. 11. Bearings.—Design of Bearings; Causes of Hot Bearings; Alloys for Bearings; Friction and Lubrication.
No. 12. Out of print.
No. 13. Blanking Dies.—Making Blanking Dies; Blanking and Piercing Dies; Split Dies; Novel Ideas in Die Making.
No. 14. Details of Machine Tool Design.—Cone Pulleys and Belts; Strength of Countershafts; Tumbler Gear Design; Faults of Iron Castings.
No. 15. Spur Gearing.—Dimensions; Design; Strength; Durability.
No. 16. Machine Tool Drives.—Speeds and Feeds; Single Pulley Drives; Drives for High Speed Cutting Tools.
No. 17. Strength of Cylinders.—Formulas, Charts, and Diagrams.
No. 18. Shop Arithmetic for the Machinist.—Tapers; Change Gears; Cutting Speeds; Feeds; Indexing; Gearing for Cutting Spirals; Angles.
No. 19. Use of Formulas in Mechanics.—With numerous applications.
No. 20. Spiral Gearing.—Rules, Formulas, and Diagrams, etc.
No. 21. Measuring Tools.—History of Standard Measurements; Calipers; Compasses; Micrometer Tools; Protractors.
No. 22. Calculation of Elements of Machine Design.—Factor of Safety; Strength of Bolts; Riveted Joints; Keys and Keyways; Toggle-joints.
No. 23. Theory of Crane Design.—Jib Cranes; Shafts, Gears, and Bearings; Force to Move Crane Trolleys; Pillar Cranes.
No. 24. Examples of Calculating Designs.—Charts in Designing; Punch and Riveter Frames; Shear Frames; Billet and Bar Passes; etc.
No. 25. Deep Hole Drilling.—Methods of Drilling; Construction of Drills.
No. 26. Modern Punch and Die Construction.—Construction and Use of Sub-press Dies; Modern Blanking Die Construction; Drawing and Forming Dies.
No. 27. Locomotive Design, Part I.—Boilers, Cylinders, Pipes and Pistons.
No. 28. Locomotive Design, Part II.—Stephenson and Walschaerts Valve Motions; Theory, Calculation and Design.
No. 29. Locomotive Design, Part III.—Smokebox; Exhaust Pipe; Frames; Cross-heads; Guide Bars; Connecting-rods; Crank-pins; Axles; Driving-wheels.
No. 30. Locomotive Design, Part IV.—Springs, Trucks, Cab and Tender.
No. 31. Screw Thread Tools and Gages.
No. 32. Screw Thread Cutting.—Lathe Change Gears; Thread Tools; Kinks.
No. 33. Systems and Practice of the Drafting-Room.
No. 34. Care and Repair of Dynamos and Motors.
No. 35. Tables and Formulas for Shop and Drafting-Room.—The Use of Formulas; Solution of Triangles; Strength of Materials; Gearing; Screw Threads; Tap Drills; Drill Sizes; Tapers; Keys, etc.
No. 36. Iron and Steel.—Principles of Manufacture and Treatment.
No. 37. Bevel Gearing.—Rules and Formulas; Examples of Calculation; Tooth Outlines; Strength and Durability; Design; Methods of Cutting Teeth.
No. 38. Out of print. See No. 98.
No. 39. Fans, Ventilation and Heating.—Fans; Heaters; Shop Heating.
No. 40. Fly-Wheels.—Their Purpose, Calculation and Design.
No. 41. Jigs and Fixtures, Part I.—Principles of Design; Drill Jig Bushings; Locating Points; Clamping Devices.
No. 42. Jigs and Fixtures, Part II.—Open and Closed Drill Jigs.
No. 43. Jigs and Fixtures, Part III.—Boring and Milling Fixtures.
No. 44. Machine Blacksmithing.—Systems, Tools and Machines used.
No. 45. Drop Forging.—Lay-out of Plant; Methods of Drop Forging; Dies.
No. 46. Hardening and Tempering.—Hardening Plants; Treating High-Speed Steel; Hardening Gages.
No. 47. Electric Overhead Cranes.—Design and Calculation.
No. 48. Files and Filing.—Types of Files; Using and Making Files.
No. 49. Girders for Electric Overhead Cranes.
No. 50. Principles and Practice of Assembling Machine Tools, Part I.
No. 51. Principles and Practice of Assembling Machine Tools, Part II.
No. 52. Advanced Shop Arithmetic for the Machinist.
No. 53. Use of Logarithms and Logarithmic Tables.
No. 54. Solution of Triangles, Part I.—Methods, Rules and Examples.
No. 55. Solution of Triangles, Part II.—Tables of Natural Functions.
No. 56. Ball Bearings.—Principles of Design and Construction.
No. 57. Metal Spinning.—Machines, Tools and Methods Used.
No. 58. Helical and Elliptic Springs.—Calculation and Design.
No. 59. Machines, Tools and Methods of Automobile Manufacture.
No. 60. Construction and Manufacture of Automobiles.
No. 61. Blacksmith Shop Practice.—Model Blacksmith Shop; Welding; Forging of Hooks and Chains; Miscellaneous.
No. 62. Hardness and Durability Testing of Metals.
No. 63. Heat Treatment of Steel.—Hardening, Tempering, Case-Hardening.
No. 64. Gage Making and Lapping.
No. 65. Formulas and Constants for Gas Engine Design.
No. 66. Heating and Ventilation of Shops and Offices.
No. 67. Boilers.
No. 68. Boiler Furnaces and Chimneys.
No. 69. Feed Water Appliances.
No. 70. Steam Engines.
No. 71. Steam Turbines.
No. 72. Pumps, Condensers, Steam and Water Piping.
No. 73. Principles and Applications of Electricity, Part I.—Static Electricity; Electrical Measurements; Batteries.
No. 74. Principles and Applications of Electricity, Part II.—Magnetism; Electro-Magnetism; Electro-Plating.
No. 75. Principles and Applications of Electricity, Part III.—Dynamos; Motors; Electric Railways.
No. 76. Principles and Applications of Electricity, Part IV.—Electric Lighting.
No. 77. Principles and Applications of Electricity, Part V.—Telegraph and Telephone.
No. 78. Principles and Applications of Electricity, Part VI.—Transmission of Power.
No. 79. Locomotive Building, Part I.—Main and Side Rods.
No. 80. Locomotive Building, Part II.—Wheels; Axles; Driving Boxes.
No. 81. Locomotive Building, Part III.—Cylinders and Frames.
No. 82. Locomotive Building, Part IV.—Valve Motion.
No. 83. Locomotive Building, Part V.—Boiler Shop Practice.
No. 84. Locomotive Building, Part VI.—Erecting.
No. 85. Mechanical Drawing, Part I.—Instruments; Materials; Geometrical Problems.
No. 86. Mechanical Drawing, Part II.—Projection.
No. 87. Mechanical Drawing, Part III.—Machine Details.
No. 88. Mechanical Drawing, Part IV.—Machine Details.
No. 89. The Theory of Shrinkage and Forced Fits.
No. 90. Railway Repair Shop Practice.
No. 91. Operation of Machine Tools.—The Lathe, Part I.
No. 92. Operation of Machine Tools.—The Lathe, Part II.
No. 93. Operation of Machine Tools.—Planer, Shaper, Slotter.
No. 94. Operation of Machine Tools.—Drilling Machines.
No. 95. Operation of Machine Tools.—Boring Machines.
No. 96. Operation of Machine Tools.—Milling Machines, Part I.
No. 97. Operation of Machine Tools.—Milling Machines, Part II.
No. 98. Operation of Machine Tools.—Grinding Machines.
No. 99. Automatic Screw Machine Practice, Part I.—Operation of the Brown & Sharpe Automatic Screw Machine.
No. 100. Automatic Screw Machine Practice, Part II.—Designing and Cutting Cams for the Automatic Screw Machine.
No. 101. Automatic Screw Machine Practice, Part III.—Circular Forming and Cut-off Tools.
No. 102. Automatic Screw Machine Practice, Part IV.—External Cutting Tools.
No. 103. Automatic Screw Machine Practice, Part V.—Internal Cutting Tools.
No. 104. Automatic Screw Machine Practice, Part VI.—Threading Operations.
No. 105. Automatic Screw Machine Practice, Part VII.—Knurling Operations.
No. 106. Automatic Screw Machine Practice, Part VIII.—Cross Drilling, Burring and Slotting Operations.
ADDITIONAL TITLES WILL BE ANNOUNCED IN MACHINERY FROM TIME TO TIME
MACHINERY’S DATA SHEET SERIES
Machinery’s Data Sheet Books include the well-known series of Data Sheets originated by Machinery, and issued monthly as supplements to the publication; of these Data Sheets over 500 have been published, and 6,000,000 copies sold. Revised and greatly amplified, they are now presented in book form, kindred subjects being grouped together. The purchaser may secure either the books on those subjects in which he is specially interested, or, if he pleases, the whole set at one time. The price of each book is 25 cents (one shilling) delivered anywhere in the world.
CONTENT OF DATA SHEET BOOKS
No. 1. Screw Threads.—United States, Whitworth, Sharp V- and British Association Standard Threads; Briggs Pipe Thread; Oil Well Casing Gages; Fire Hose Connections; Acme Thread; Worm Threads; Metric Threads; Machine, Wood, and Lag Screw Threads; Carriage Bolt Threads, etc.
No. 2. Screws, Bolts and Nuts.—Fillister-head, Square-head, Headless, Collar-head and Hexagon-head Screws; Standard and Special Nuts; T-nuts, T-bolts and Washers; Thumb Screws and Nuts; A. L. A. M. Standard Screws and Nuts; Machine Screw Heads; Wood Screws; Tap Drills; Lock Nuts; Eye-bolts, etc.
No. 3. Taps and Dies.—Hand, Machine, Tapper and Machine Screw Taps; Taper Die Taps; Sellers Hobs; Screw Machine Taps; Straight and Taper Boiler Taps; Stay-bolt, Washout, and Patch-bolt Taps; Pipe Taps and Hobs; Solid Square, Round Adjustable and Spring Screw Threading Dies.
No. 4. Reamers, Sockets, Drills and Milling Cutters.—Hand Reamers; Shell Reamers and Arbors; Pipe Reamers; Taper Pins and Reamers; Brown & Sharpe, Morse and Jarno Taper Sockets and Reamers; Drills; Wire Gages; Milling Cutters; Setting Angles for Milling Teeth in End Mills and Angular Cutters, etc.
No. 5. Spur Gearing.—Diametral and Circular Pitch; Dimensions of Spur Gears; Tables of Pitch Diameters; Odontograph Tables; Rolling Mill Gearing; Strength of Spur Gears; Horsepower Transmitted by Cast-iron and Rawhide Pinions; Design of Spur Gears; Weight of Cast-iron Gears; Epicyclic Gearing.
No. 6. Bevel, Spiral and Worm Gearing.—Rules and Formulas for Bevel Gears; Strength of Bevel Gears; Design of Bevel Gears; Rules and Formulas for Spiral Gearing; Tables Facilitating Calculations; Diagram for Cutters for Spiral Gears; Rules and Formulas for Worm Gearing, etc.
No. 7. Shafting, Keys and Keyways.—Horsepower of Shafting; Diagrams and Tables for the Strength of Shafting; Forcing, Driving, Shrinking and Running Fits; Woodruff Keys; United States Navy Standard Keys; Gib Keys; Milling Keyways; Duplex Keys.
No. 8. Bearings, Couplings, Clutches, Crane Chain and Hooks.—Pillow Blocks; Babbitted Bearings; Ball and Roller Bearings; Clamp Couplings; Plate Couplings; Flange Couplings; Tooth Clutches; Crab Couplings; Cone Clutches; Universal Joints; Crane Chain; Chain Friction; Crane Hooks; Drum Scores.
No. 9. Springs, Slides and Machine Details.—Formulas and Tables for Spring Calculations; Machine Slides; Machine Handles and Levers; Collars; Hand Wheels; Pins and Cotters; Turn-buckles, etc.
No. 10. Motor Drive, Speeds and Feeds, Change Gearing, and Boring Bars.—Power required for Machine Tools; Cutting Speeds and Feeds for Carbon and High-speed Steel; Screw Machine Speeds and Feeds; Heat Treatment of High-speed Steel Tools; Taper Turning; Change Gearing for the Lathe; Boring Bars and Tools etc.
No. 11. Milling Machine Indexing, Clamping Devices and Planer Jacks.—Tables for Milling Machine Indexing; Change Gears for Milling Spirals; Angles for setting Indexing Head when Milling Clutches; Jig Clamping Devices; Straps and Clamps; Planer Jacks.
No. 12. Pipe and Pipe Fittings.—Pipe Threads and Gages; Cast-iron Fittings; Bronze Fittings; Pipe Flanges; Pipe Bends; Pipe Clamps and Hangers; Dimensions of Pipe for Various Services, etc.
No. 13. Boilers and Chimneys.—Flue Spacing and Bracing for Boilers; Strength of Boiler Joints; Riveting; Boiler Setting; Chimneys.
No. 14. Locomotive and Railway Data.—Locomotive Boilers; Bearing Pressures for Locomotive Journals; Locomotive Classifications; Rail Sections; Frogs, Switches and Cross-overs; Tires; Tractive Force; Inertia of Trains; Brake Levers; Brake Rods, etc.
No. 15. Steam and Gas Engines.—Saturated Steam; Steam Pipe Sizes; Steam Engine Design; Volume of Cylinders; Stuffing Boxes; Setting Corliss Engine Valve Gears; Condenser and Air Pump Data; Horsepower of Gasoline Engines; Automobile Engine Crankshafts, etc.
No. 16. Mathematical Tables.—Squares of Mixed Numbers; Functions of Fractions; Circumference and Diameters of Circles; Tables for Spacing off Circles; Solution of Triangles; Formulas for Solving Regular Polygons; Geometrical Progression, etc.
No. 17. Mechanics and Strength of Materials.—Work; Energy; Centrifugal Force; Center of Gravity; Motion; Friction; Pendulum; Falling Bodies; Strength of Materials; Strength of Flat Plates; Ratio of Outside and Inside Radii of Thick Cylinders, etc.
No. 18. Beam Formulas and Structural Design.—Beam Formulas; Sectional Moduli of Structural Shapes; Beam Charts; Net Areas of Structural Angles; Rivet Spacing; Splices for Channels and I-beams; Stresses in Roof Trusses, etc.
No. 19. Belt, Rope and Chain Drives.—Dimensions of Pulleys; Weights of Pulleys; Horsepower of Belting; Belt Velocity; Angular Belt Drives; Horsepower transmitted by Ropes; Sheaves for Rope Drive; Bending Stresses in Wire Ropes; Sprockets for Link Chains; Formulas and Tables for Various Classes of Driving Chain.
No. 20. Wiring Diagrams, Heating and Ventilation, and Miscellaneous Tables.—Typical Motor Wiring Diagrams; Resistance of Round Copper Wire; Rubber Covered Cables; Current Densities for Various Contacts and Materials; Centrifugal Fan and Blower Capacities; Hot Water Main Capacities; Miscellaneous Tables: Decimal Equivalents, Metric Conversion Tables, Weights and Specific Gravity of Metals, Weights of Fillets, Drafting-room Conventions, etc.
Machinery, the monthly mechanical journal, originator of the Reference and Data Sheet Series, is published in four editions—the Shop Edition, $1.00 a year; the Engineering Edition, $2.00 a year; the Railway Edition, $2.00 a year, and the Foreign Edition, $3.00 a year.
The Industrial Press, Publishers of Machinery,
49-55 Lafayette Street, New York City, U. S. A.
[1] Machinery, December, 1909.
[2] Machinery, March and April, 1910.
Transcriber’s Notes:
A span of text between pages 30 and 31 is missing in the original of this book.
The page of advertisements preceding the title page has been moved to the end of this book.
Variations in spelling and hyphenation remain as in the original unless noted below.
Original scans of this book can be found here.