Model Flying Machines
This ebook is for the use of anyone anywhere in the United States and most other parts of the world at no cost and with almost no restrictions whatsoever. You may copy it, give it away or re-use it under the terms of the Project Gutenberg License included with this ebook or online at https://www.gutenberg.org/license. If you are not located in the United States, you'll have to check the laws of the country where you are located before using this ebook.
Title: Model Flying Machines
Author: Alfred Powell Morgan
Release Date: January 14, 2021 [EBook #64296]
Language: English
Character set encoding: UTF-8
*** START OF THIS PROJECT GUTENBERG EBOOK MODEL FLYING MACHINES ***
Produced by James Simmons.
This file was produced from page images at Google Books.
Transcriber's Note
This book was transcribed from scans of the original found at Google Books. There was no book cover image, so I made one by enlarging a black and white picture of the book from an advertisement found in another Cole & Morgan title and tried to make it look presentable, including adding color. The author uses a variant spelling of the word "fuselage" which I have left as is.

Model Flying Machines
HOW TO BUILD AND FLY
THEM
BY
A. P. MORGAN
NEWARK, N. J.
COLE & MORGAN
1913
COPYRIGHT, 1913
By
COLE & MORGAN
INTRODUCTION.
The construction of model aeroplanes is essentially simple and for those wishing to experiment it is an ideal method of gaining practical knowledge of the new science of aeronautics.
Aside from the utilitarian standpoint, there is another aspect hardly second or less important. A well balanced little machine which will leave the hand and soar away under its own power is a source of fascination and delight not only to its maker, but to the spectators of the flight as well.
This little volume has been planned to present the material it contains in such a manner that it will aid the judgment of the experimenter and assist him in developing his own ideas. To make it of immediate value to the novice a number of detailed plans for building various machines have been included. For the greater part these machines have been designed rather to fly greater distances than to appear like some man carrying prototype.
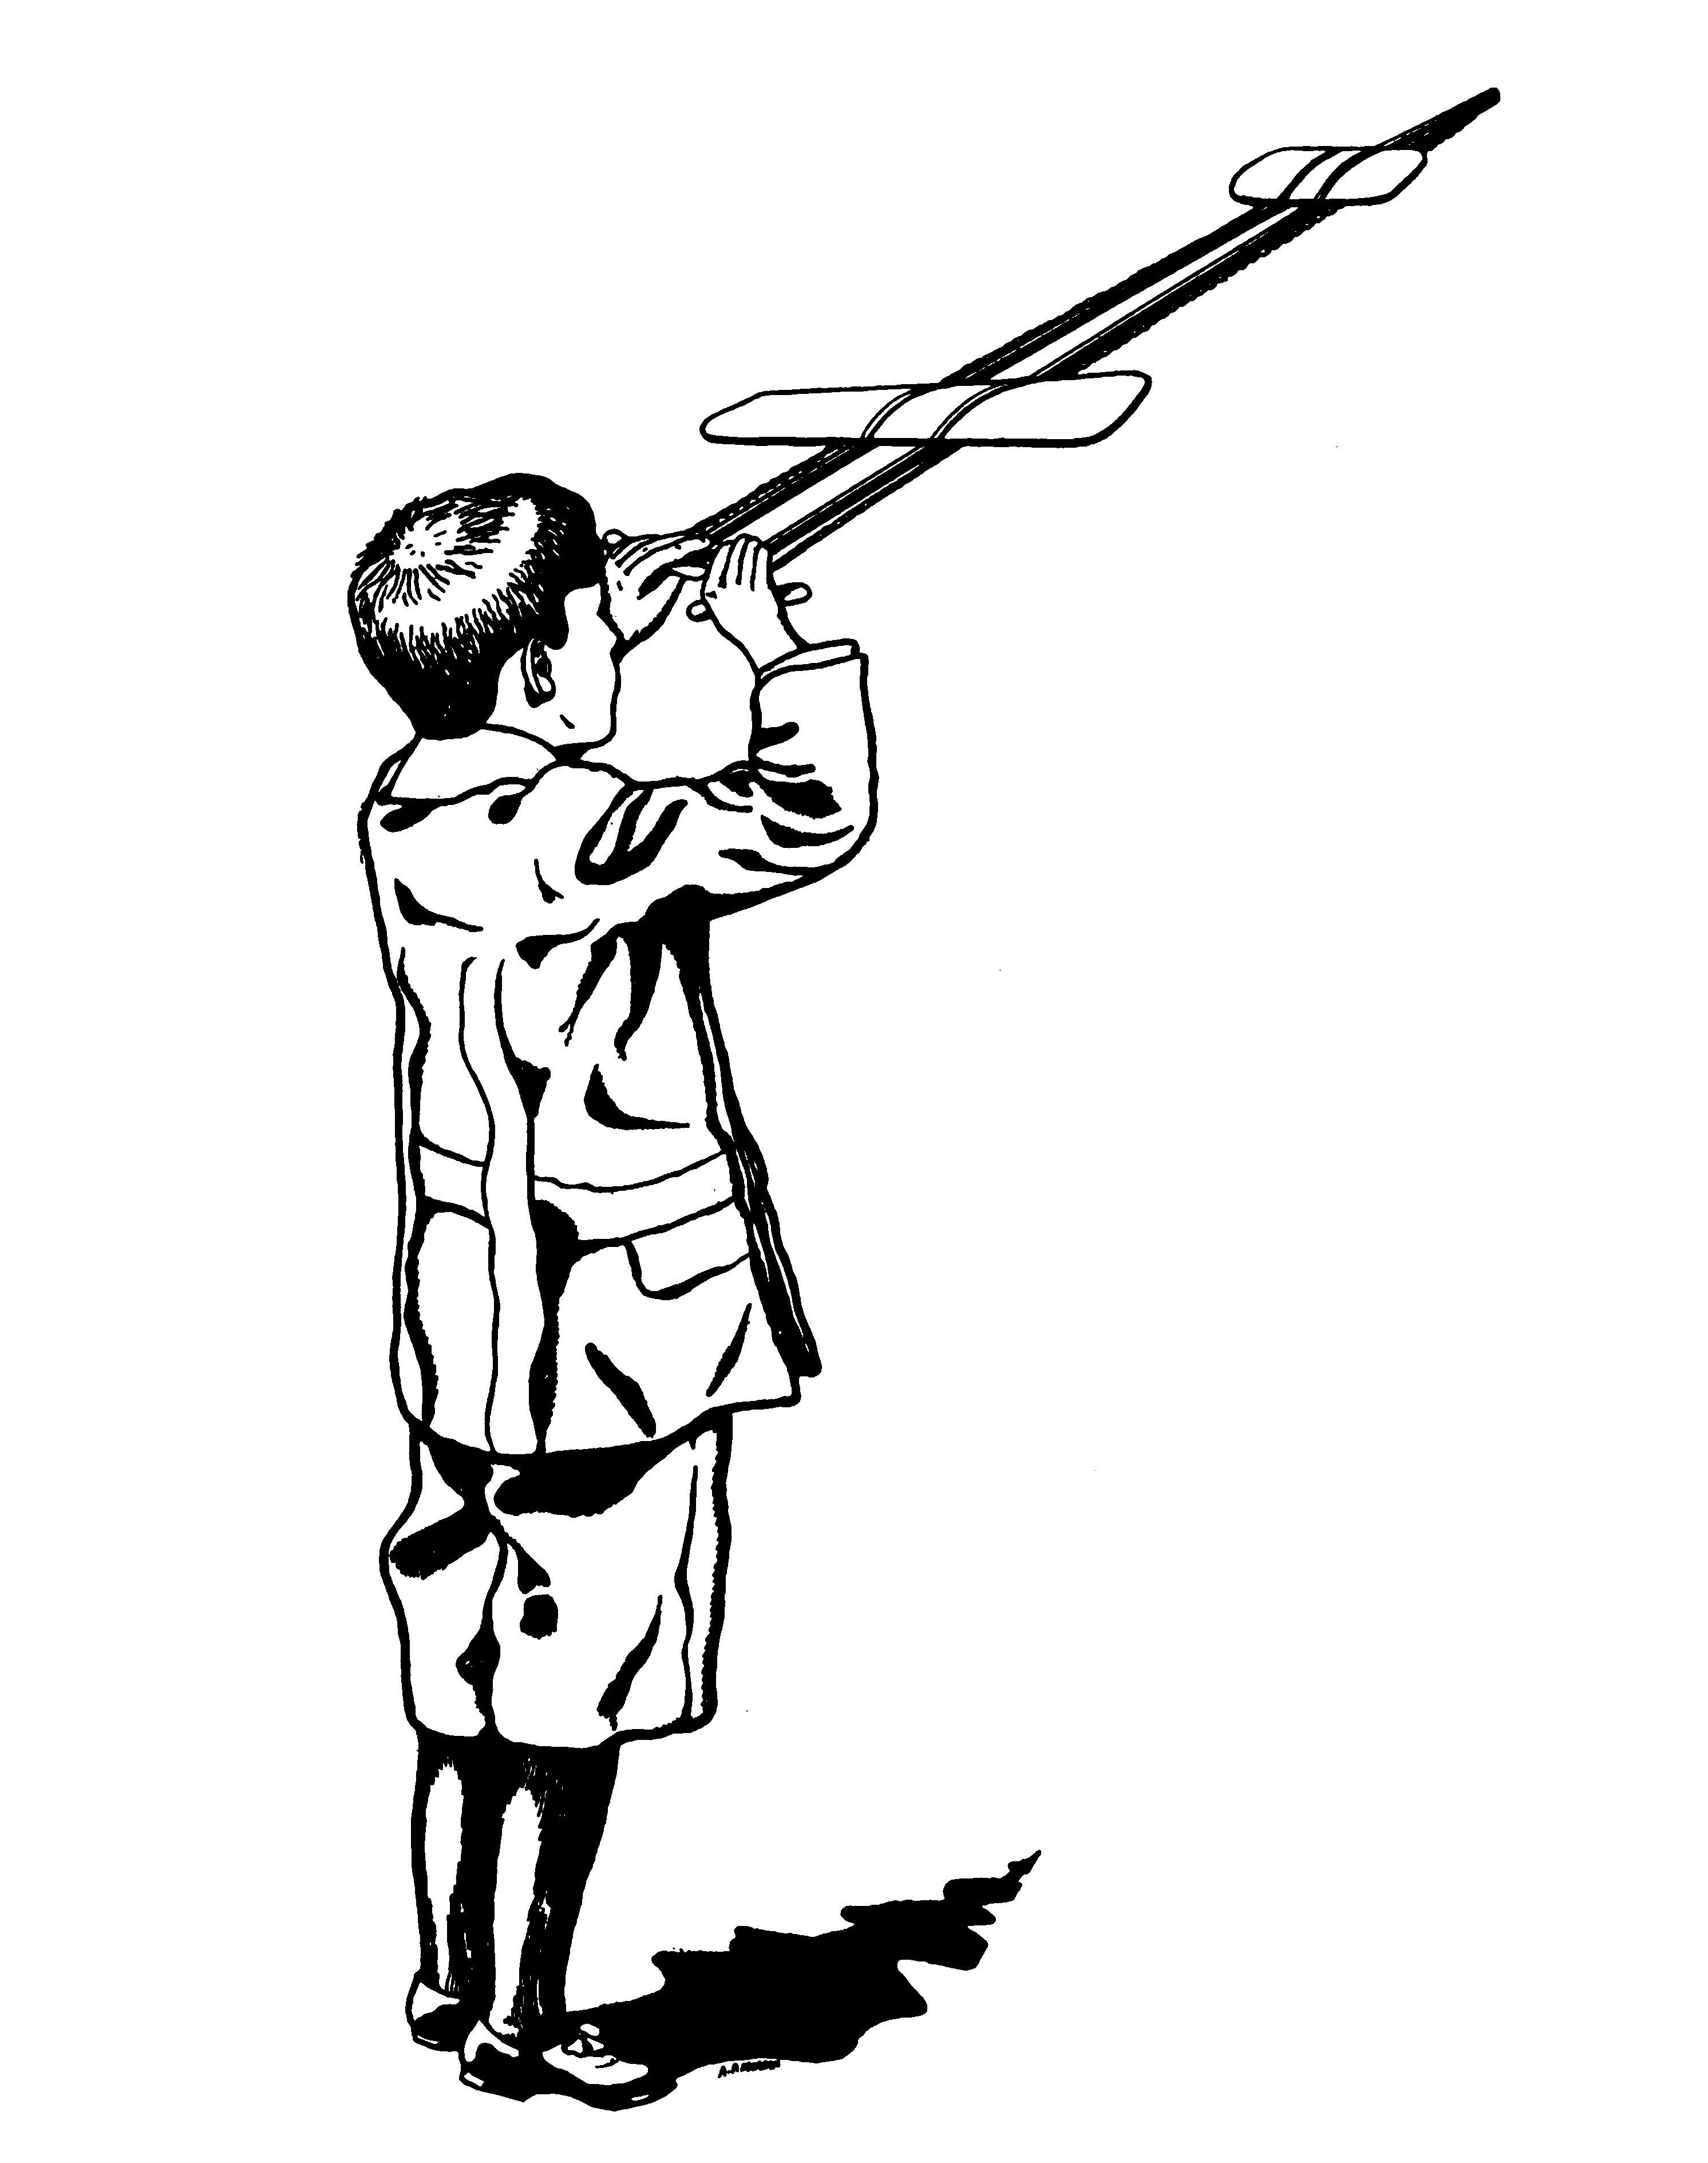
- PLATE I. Launching a Model Aeroplane.
- FIG. 1. Diagram showing a kite held in the air by the action of a wind. The dotted lines and arrow heads represent the direction and force of the wind.
- FIG. 2. Diagram representing a typical monoplane. The only remaining requisition is that the aeroplane may be guided at will, caused to rise or fall or be steered to the right and left. The devices used to accomplish this are two rudders called respectively the "elevator" and the "steering rudder." The "elevator" takes the form of a small surface carried either in front or behind the main supporting surfaces and enables the machine to take an upward, a horizontal or downward course accordingly as it is adjusted. It acts as a rudder to steer the aeroplane up or down or to hold it to its course in exactly the same manner that a ship's rudder steers it to the right or left. When it is desired to direct the aeroplane upwards, the front edge of the elevator is raised so as to set it at a greater angle with the horizontal. If the aeroplane's course is required to be downward, the front edge of the elevator is lowered.
- FIG 3. Diagram showing the makeup of a biplane (Wright).
- FIG. 4. Two methods of controlling the lateral stability of an aeroplane.
- FIG. 5. The disturbance created in the air by a square object. The arrow points in the direction of motion. The space in the rear of the object is the scene of violent eddy.
- FIG. 6. The disturbance caused by a triangular body moving through the atmosphere.
- Plate II.
- FIG. 7. Showing the disturbance created by a small spar on the back of a plane.
- FIG. 8. Diagram illustrating the ichthyoid shape and how smoothly it slips through the air without creating an eddy.
- FIG. 9. Of the three shapes shown above, the round one will slip through the air with the least disturbance and resistance. A bar of wood like (A), 2 inches square, showed a "drift" of 5.16 lbs. when placed in a breeze blowing 49 miles per hour. Turning it as shown by (B) changed the "drift" to 5.47 lbs. A round bar, 2 inches in diameter, like (C) showed 2.97 lbs. "drift" under the same conditions.
- FIG. 10. The figures given above each shape show the "drift" in lbs. of wooden bars of those shapes when placed in a wind blowing 40 miles an hour. The bars experimented with had a depth of 9 inches in the direction of the arrows and were 2 inches wide.
- FIG. 11. Flat and dihedral planes.
- FIG. 12. The action of the air upon a curved and a flat plane. We have seen that by the effects of the resistance of the air, an aeroplane may be sustained in the atmosphere. We must now see in what manner we can use these effects to the greatest advantage.
- FIG. 13. Section of a built-up plane showing how a rib is made. When made small, they offer greater "drift" or head resistance than a single curved surface plane and cannot because of the delicate structure necessary to make them light, withstand hard knocks. They have the further disadvantage of being from a constructional standpoint very hard to make smooth and rigid.
- PLATE III.
- FIG. 14. How ribs may be joined to the long members.
- FIG. 15. Form for bending the planes.
- FIG. 16. A good method of building a wooden plane.
- FIG. 17. Various shapes a plane may take.
- FIG. 18. An edgewise view of several planes showing the different ways they may be bent to secure stability.
- FIG. 19. The various ways two planes may be combined to secure stability or form a biplane.
- FIG. 20. Fins.
- FIG. 21. A simple "motor base" or fusellage.
- FIG. 22. Paper Tube Fusellage. Part of the tube is cutaway to show the rubber skein inside.
- FIG. 23. Two methods of gearing a propeller.
- FIG. 24.
- FIG. 25.
- FIG. 26. Method of laying out a screw propeller, that is, determining the angle of the blades at different points.
- FIG. 27. A propeller of the truly helical type delivers a cylinder of air in which all parts move at the same speed as at A. A propeller having blades of the same angle throughout their length throws the air as in B in which the centre of the cylinder moves more slowly than the outside.
- FIG. 28. Templets for testing and carving a propeller.
- FIG. 29. A simple method of forming a propeller from sheet metal.
- FIG. 30. A built-up metal propeller made of aluminum.
- FIG. 31. Metal Propeller.
- FIG. 32. Method of carving a propeller of the truly helical type.
- FIG. 33. Methods of fastening propellers to shaft.
- FIG. 34. Method of forming sockets for joining struts, etc., by cutting from sheet metal.
- FIG. 35. Bent wood propellers and the methods of fastening them to the shaft.
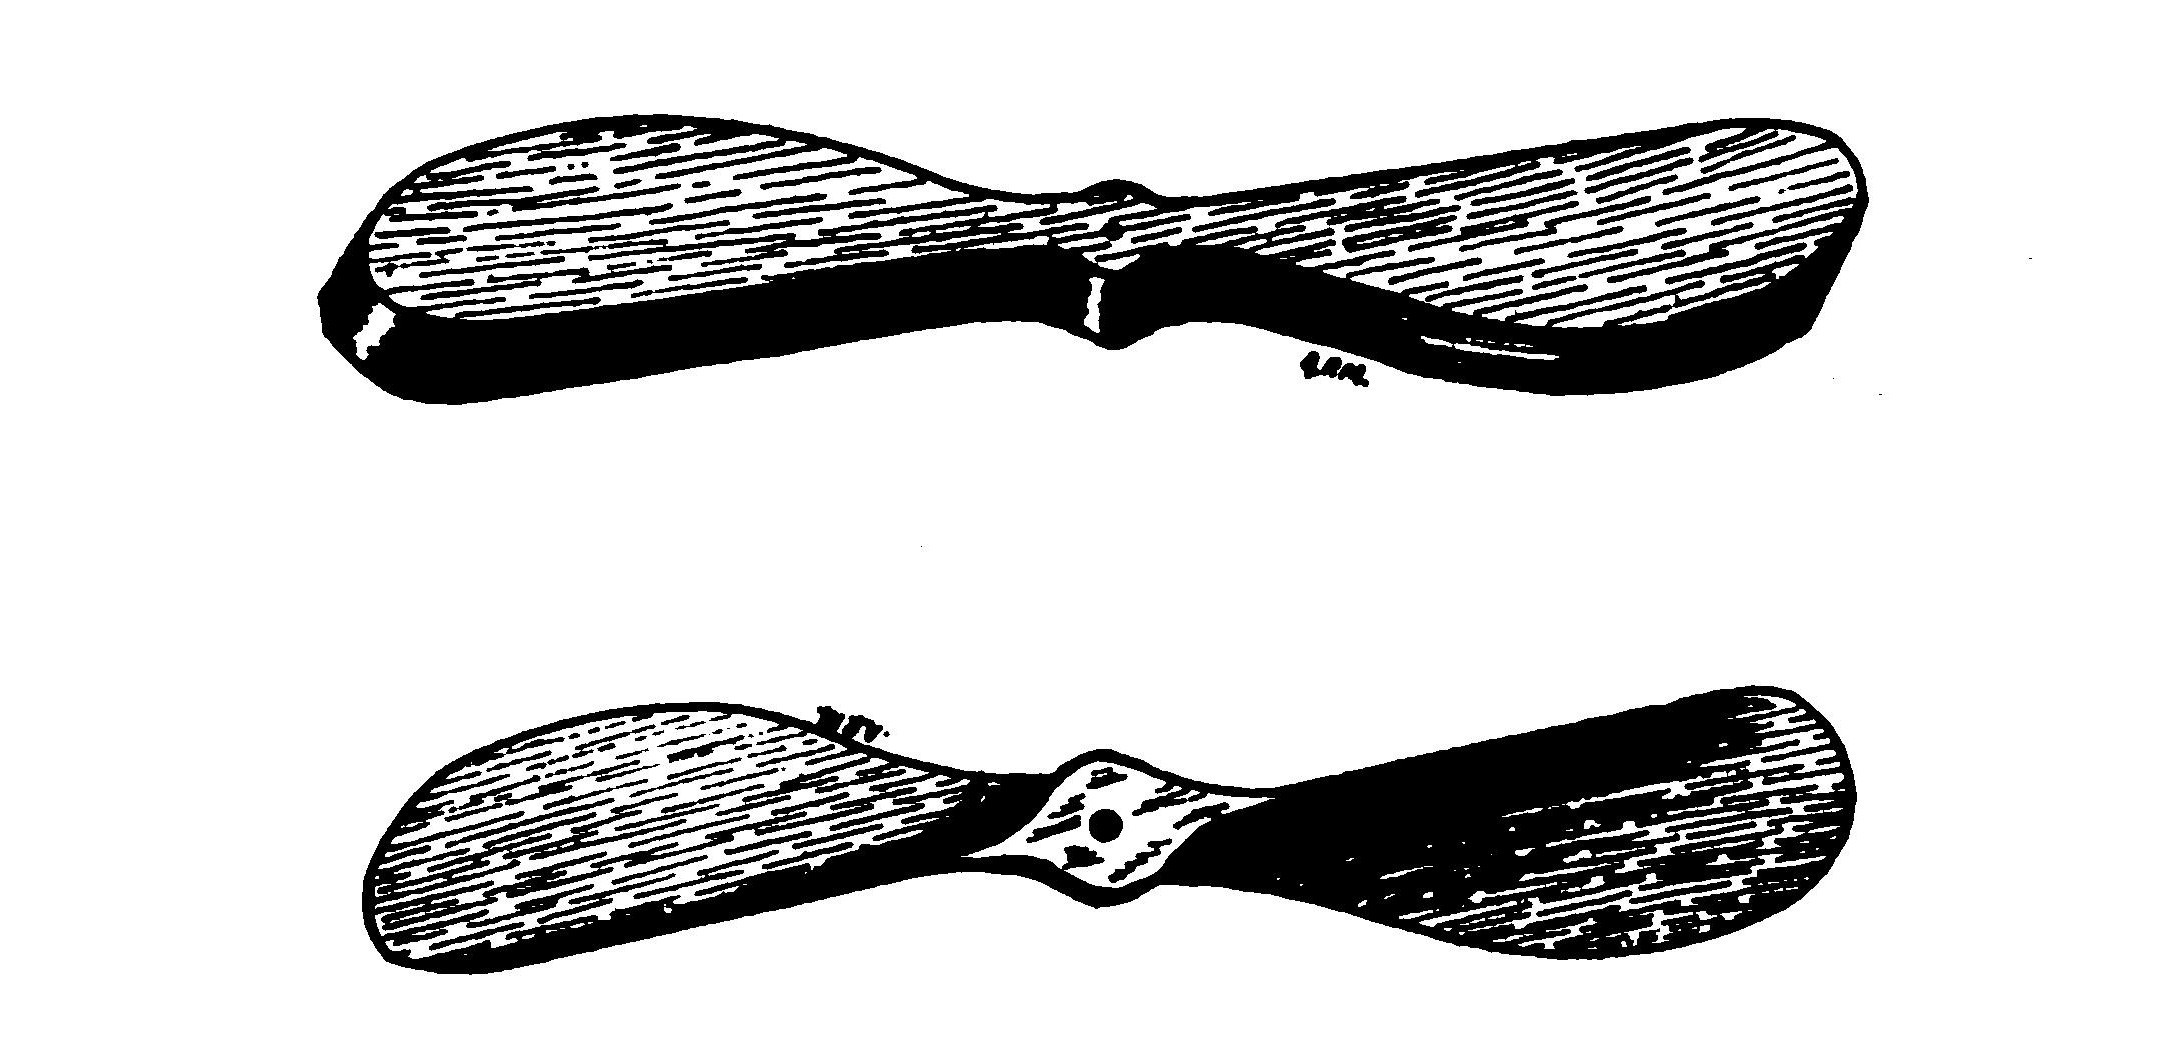
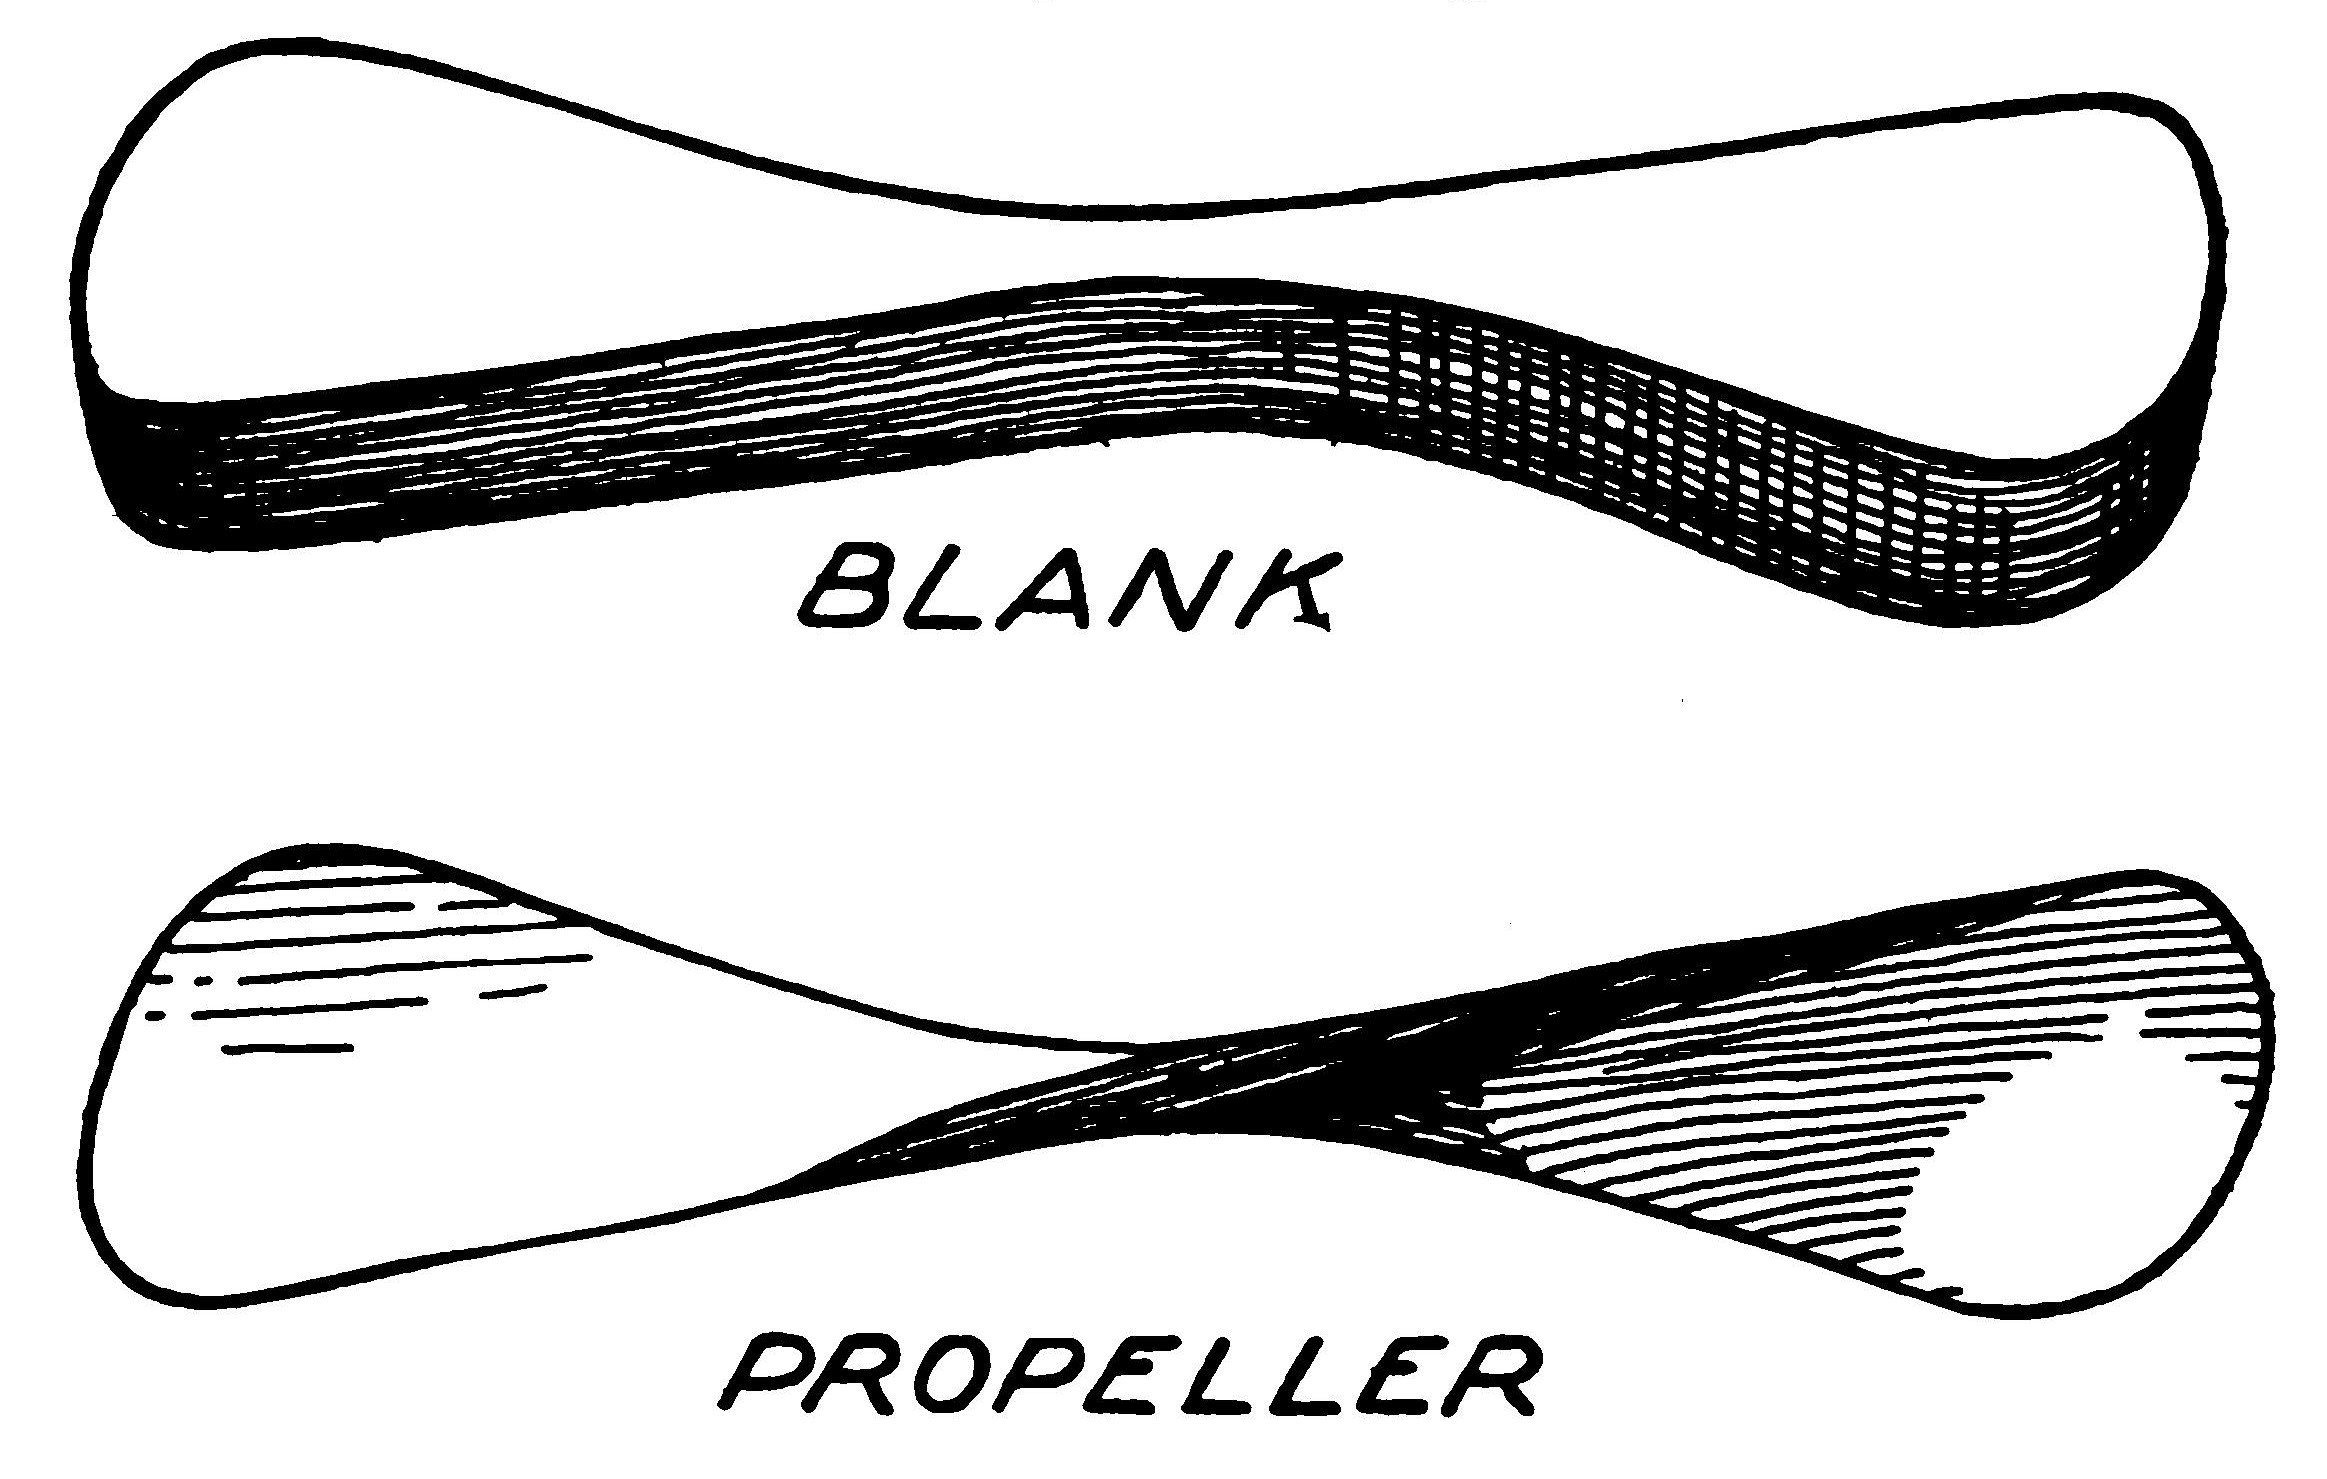
- FIG. 36. Propeller blank (top). Carved propeller (bottom).
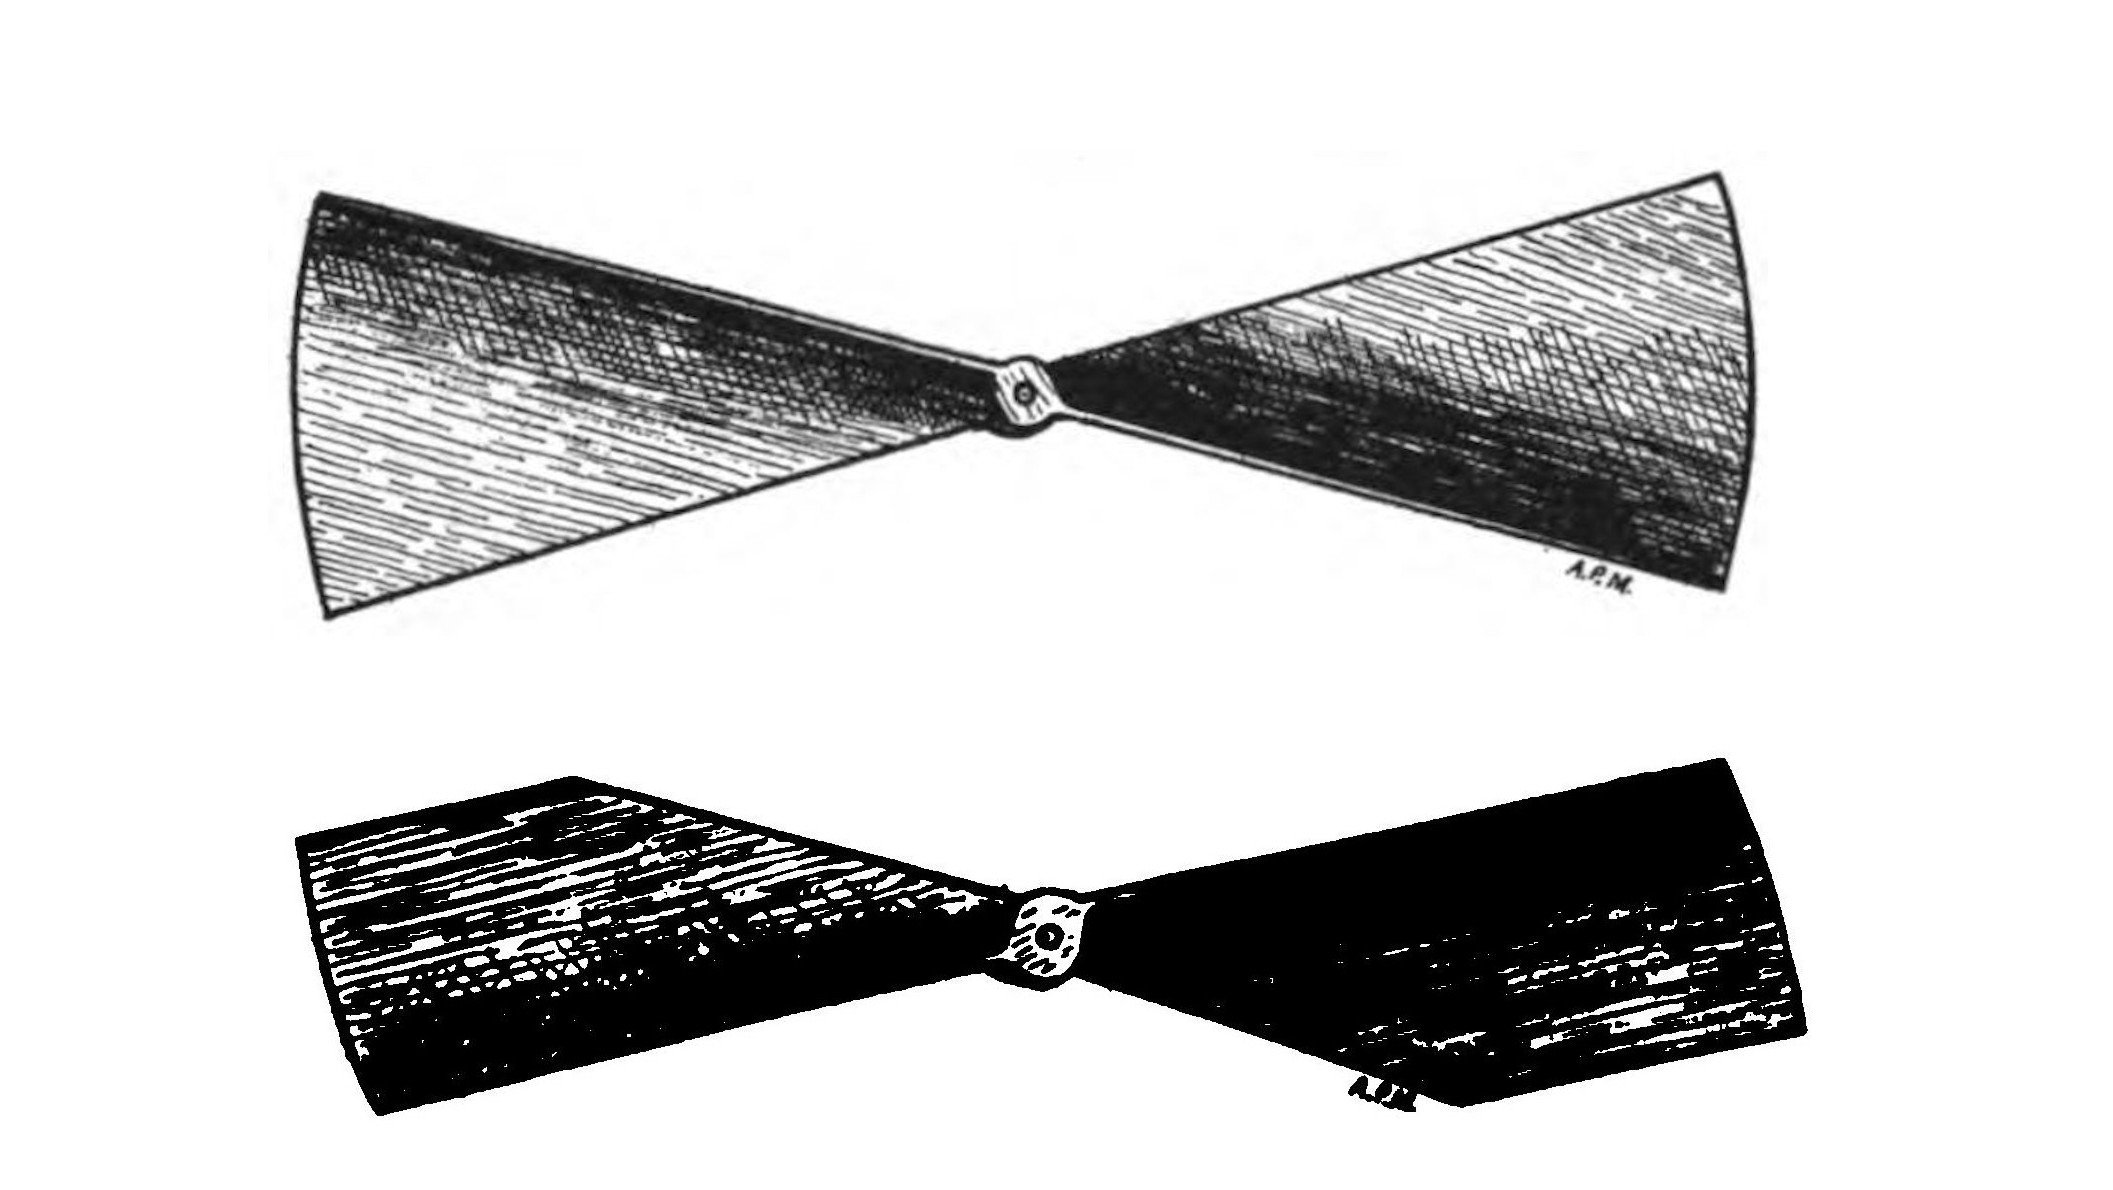
- FIG. 37. Langley type propeller (top). Wright type propeller (bottom).
- FIG. 38. Quasi-helical propeller.
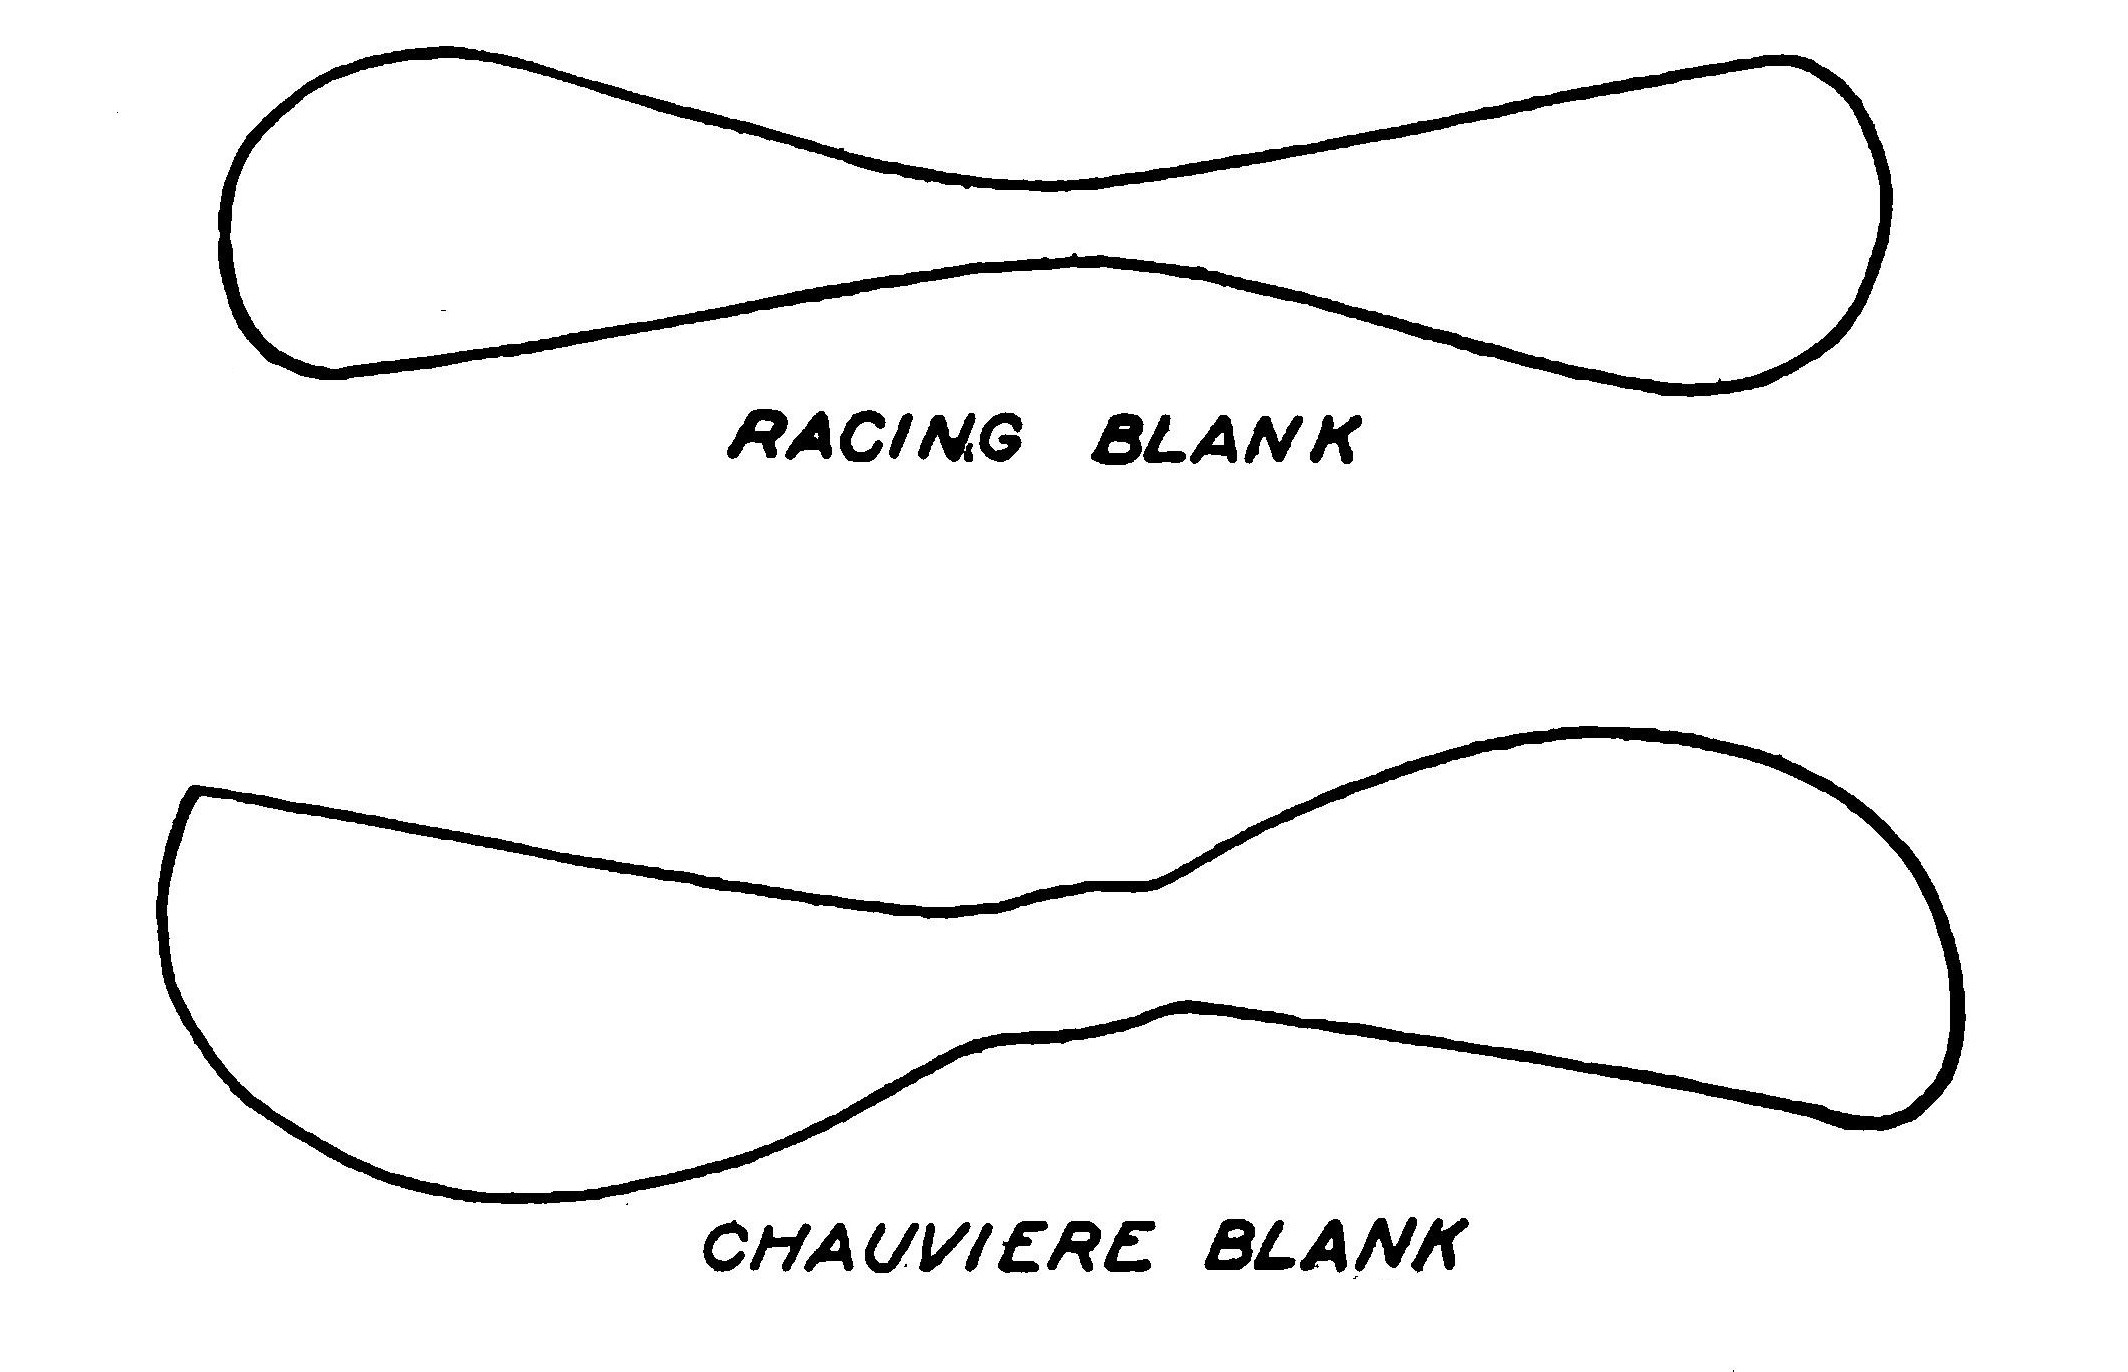
- FIG. 39. Blanks for racing (top) and chauviere (bottom) propellers.
- FIG. 40. The first step in carving a propeller. The blank. Hollowing the first blade.
- FIG. 41. One blade hollowed. Hollowing the second blade.
- FIG. 42 Rounding the back of the first blade. Rounding the back of the second blade.
- FIG. 43. All carving finished. Sandpapering to secure a smooth surface.
- FIG. 44. Varnishing. The propeller finished.
- FIG. 45. Accentricity. The effect of placing the center of gravity too low.
- FIG. 46. Simplest method of fitting two propellers to a model aeroplane.
- FIG. 47. A method of arranging two propellers on the same axis.
- FIG. 48. Simple bearings.
- FIG. 49. Double bearings.
- FIG. 50. Simple thrust bearing.
- FIG. 51. Ball thrust bearing.
- FIG. 52. Hooks.
- Plate IV.
- Plate V.
- Plate VI.
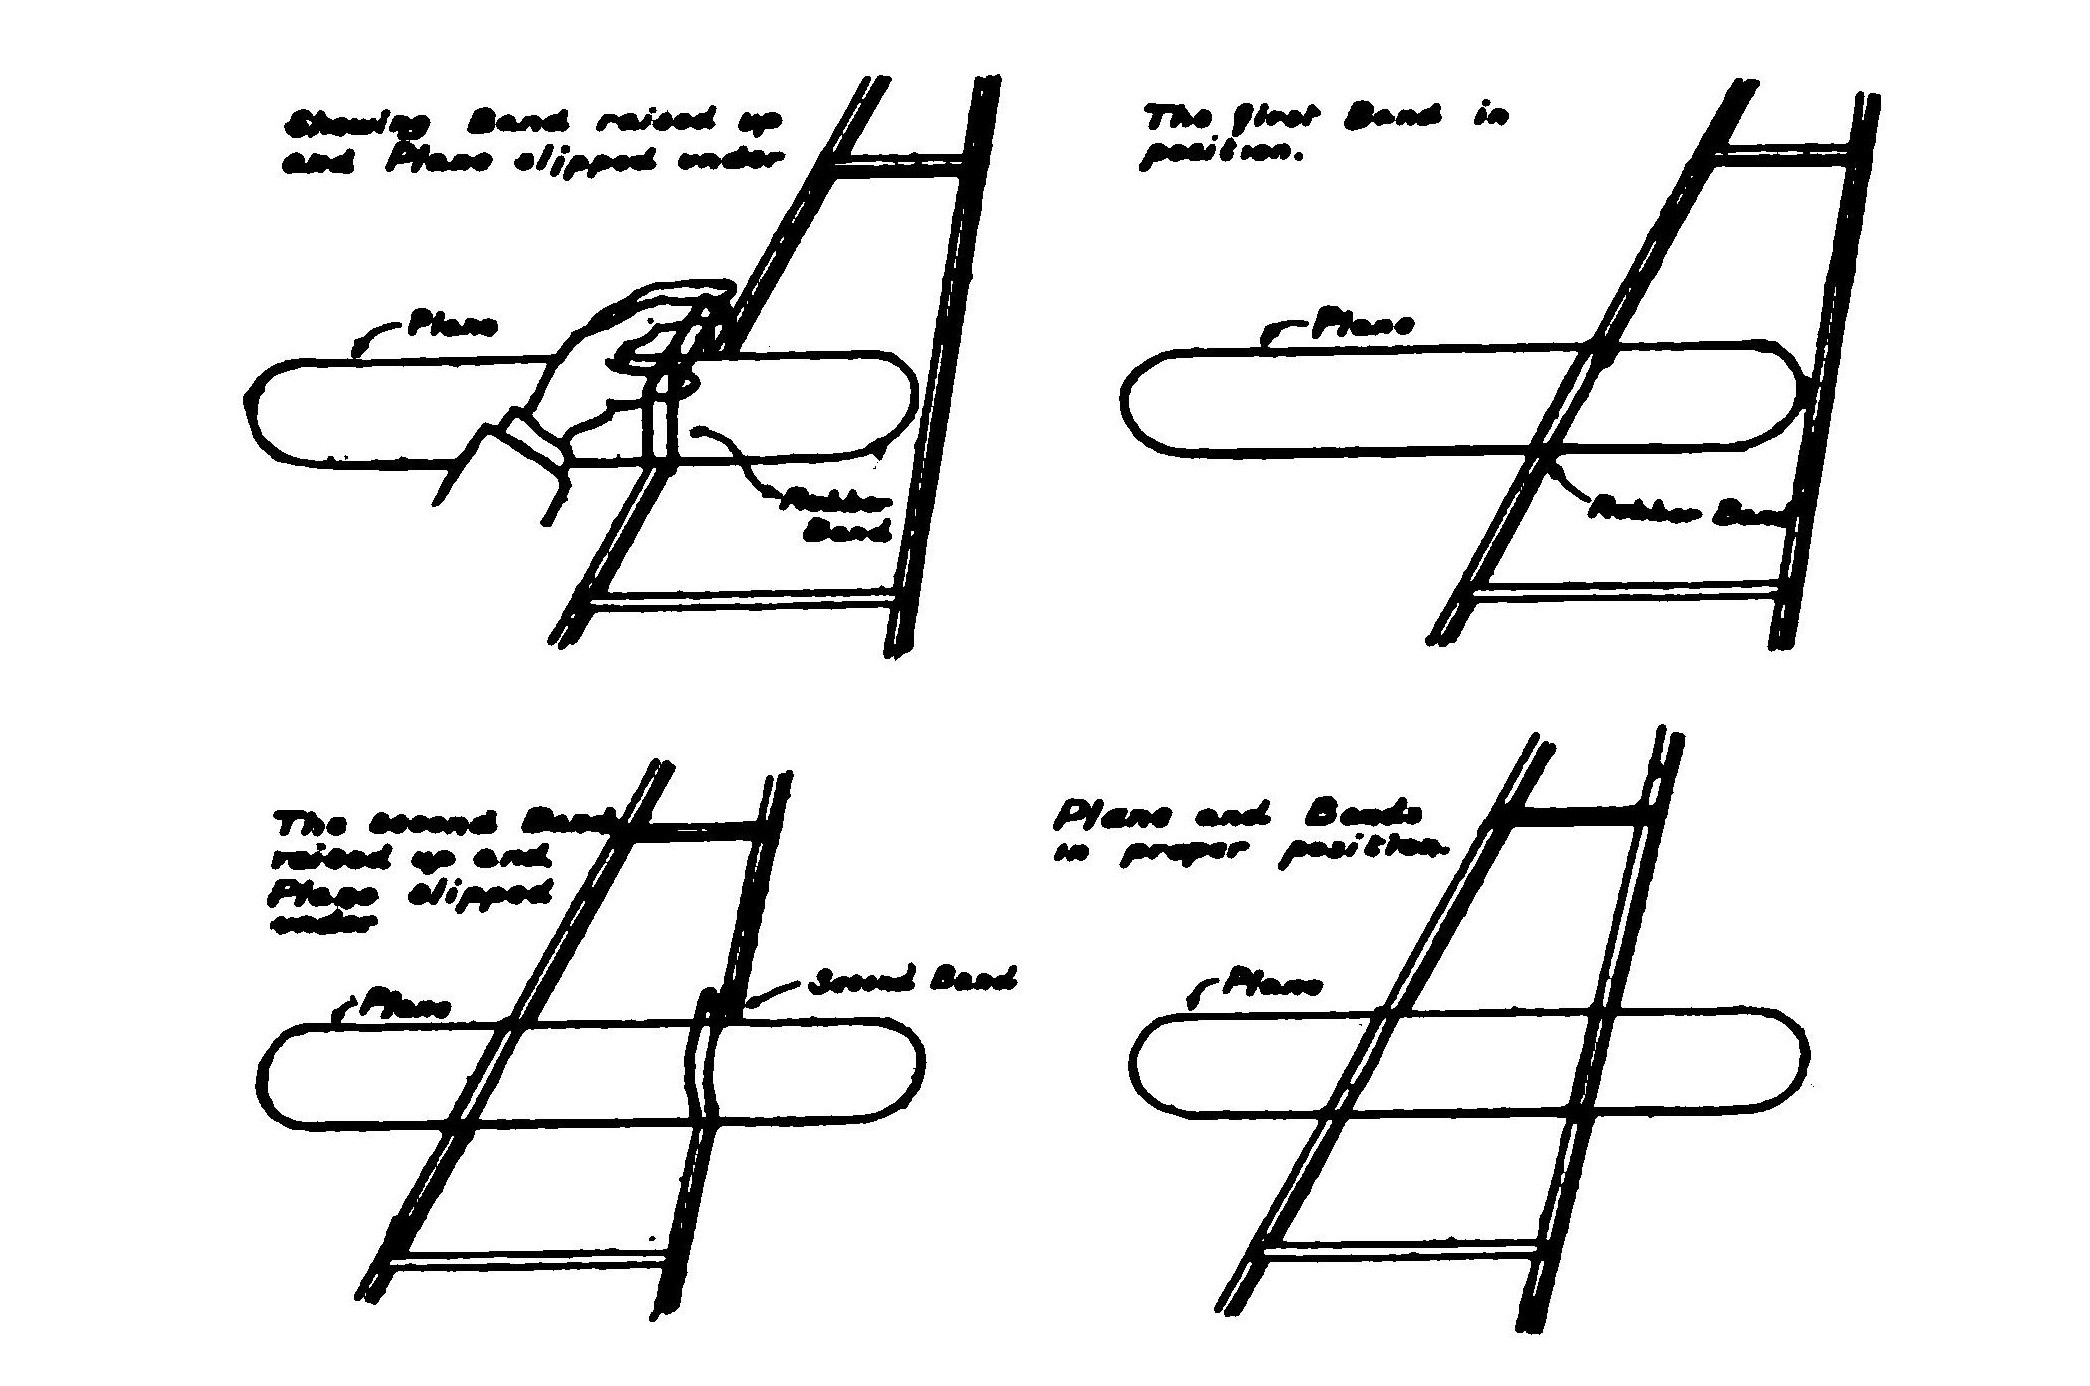
- FIG. 53. Method of holding plane to frame with rubber bands.
- Plate VII.
- FIG. 54. The Peerless Racer.
- Plate VIII.
- Plate IX.
- Plate X.
- FIG. 55. Racing blank and propeller.
- Plate XI. Winding a model.
- FIG. 56. A winder made from an egg beater.
CHAPTER I. GENERAL PRINCIPLES UNDERLYING AEROPLANE FLIGHT.
To enter deeply into a discussion of the theory of the aeroplane would not only tire the reader but would waste valuable space in endeavoring to explain that which has been more adequately dealt with in more notable works.
In order to gain a clear understanding of the following chapters, however, it will be necessary to first grasp the elementary principles underlying the flight of an aeroplane. In setting these forth, I shall try, as far as possible, not to hamper or confuse with unnecessary terms or technicalities, except where such might be of worth in rendering a better conception of that to which they apply.

An ordinary kite is one of the best examples of the action of an aeroplane. It is scarcely necessary to define the kite; it is a rigid frame of wooden sticks, on which is stretched a surface of cloth or paper. A string attached to the kite by means of a "bridle" serves to hold the apparatus to the ground.
In Fig. 1 is represented a kite against which the wind is blowing as indicated by the dotted lines. The string is so arranged that the kite is inclined at an angle to the wind and thus is sustained in the air by the force of the wind, viz., the molecules of air in striking against the slanting surface exert a pressure upon it which both calculation and experiment show to be perpendicular to the surface and tending to lift it. The kite also exerts a strong pull on the string which holds it in position.
But on days when there is no breeze or when the wind suddenly dies out; what is to be done then?
Wind is not an absolute thing. It is a relative movement of the surrounding air in comparison to a body. The effect is the same, and the relative movement takes place whether the air is still and the body in motion, or the air is in motion and the body motionless.
It is therefore an easy matter to "create a breeze" and a kite can be kept in the air providing the person flying the kite and holding the string commences to run.
Although no wind is blowing, the pressure of the air through which the kite is moving will cause it to remain in the air. In other words, the kite would be sustained in the air by virtue of its own relative motion to the wind. In order that the kite may fly, it makes no difference whether the wind moves against the kite or the kite moves against the wind.
An aeroplane, in fact, is nothing but a kite which creates its own breeze. If an aeroplane were attached to a strong wire serving as the string in the case of the kite, it would fly in the same manner as the kite, providing of course that the wind were sufficiently powerful. If the wind were not blowing at all, or not blowing hard enough, the other end of the wire could be attached to an automobile and by driving the automobile fast enough the required relative motion of the air would be produced and the aeroplane would fly.
There could be no direct benefit derived, however, from an aeroplane which must remain attached to a machine running over the earth and travel in its wake. Some other means of producing the required relative motion is necessary so that the aeroplane may be free to fly in any direction and either with or against the wind. This is accomplished by a propeller driven by a motor revolving at high speed in the aeroplane itself.
The action of an aerial propeller is similar to that of its marine prototype employed for driving ships through the water. Each depends for its action upon the imparting of a sternward motion to a column of fluid, in the one case air and in the other water. A propeller screws itself forward into the surrounding media in identically the same manner that an ordinary screw forces itself into a block of wood. An aeroplane therefore essentially consists of the wings or supporting surfaces, also sometimes called planes, driven through the air in an oblique manner by the propeller and motor.

Aeroplanes are usually of two general types, monoplanes and biplanes. A monoplane, as its name implies, is a machine having a single pair of wings or supporting surfaces. The Bleriot, Antoinette and Santos Dumont machines are the most prominent representatives of this type of aeroplane.
The "elevator" on a monoplane is usually in the rear of the main supporting surfaces. When in this position it also acts as a tail to furnish longitudinal stability to the machine in the same way that a feather on an arrow steadies its flight.

The most prominent machines of the biplane group are the Voisin, Wright, Curtiss and Farman aeroplanes. The old practice of placing the elevator in the front of a biplane is gradually being abandoned and it is safe to say that by the time this book has been printed all these machines will be of the "headless" variety with the elevator in the rear.
The vertical fins shown between the planes of the elevator in the old type of biplane, counterbalance the effect of gusts of wind striking the vertical rudder from the sides and also act as a pivot for turning to the right and left. Together with the steering rudder, they constitute a sort of keel which keeps the machine straight to its course.
In order for an aeroplane to fly in the accepted sense of the word, it must possess supporting surfaces, an elevator or tail and a propeller driven by a motor. These are essentially the sustaining, propelling and steering members of the machine.

The machine must, however, also possess "lateral stability," that is, the wings of the apparatus must not incline from the right to left or vice versa during the flight. The machine must be so constructed at it rights itself by its own effort or is under the immediate control of the aviator.
This is accomplished by "warping the wings," that is, the extreme tips of the planes can be moved up and down so as to present a greater or lesser angle and corresponding increase or decrease the lifting capacity of those portions.
The same result is also reached by means of small subsidiary moving planes attached to the rear of the main supporting surfaces called "aileron." When one aileron is lowered, the other is raised. The action of the air on the ailerons is to depress the one which is raised and to raise the one which is lowered as shown by the arrows in the illustration.
CHAPTER II. GENERAL REMARKS REGARDING MODEL AEROPLANE CONSTRUCTION. THE QUESTION OF RESISTANCE. WEIGHT. STABILITY.
The first requirement of a model aeroplane is that it shall fly. The first essential for a machine to fly well is that it must be simple. Simplicity usually insures success and is synonymous with efficiency. A complicated scale model having as its prototype one of the most successful man-carrying machines usually will not fly. If it does fly, it does not do so well. Miniature steam engines, motors, etc., can be constructed to exact scale and will justify their existence by actually working and performing duty, but in most cases a model aeroplane made to scale will not fly well until it begins to approach full size.
The next indispensable feature might be called lightness, but at the same time it must be borne in mind that strength is also "second to none" and it would be fatal to sacrifice the one for the other. The hard knocks and battering which a model usually receives at the hands of a novice will soon wreck any flimsy construction.
To design model aeroplanes will at first seem like "robbing Peter to pay Paul," that is, no one part can be developed to an extreme without seriously affecting the efficiency of the other parts. The successful machine is a sort of "happy medium" arrived at solely through experiment. A thorough understanding, however, of the part played by each individual member of a model and its characteristics will make it possible to avoid much unnecessary work in that connection. It is therefore well to carefully read the following chapters before commencing to carry out any original ideas or to make any radical departure from the designs offered in this book.
From these statements it must not be inferred that the successful model aeroplane builder is necessarily an individual possessed of consummate skill in the handling of tools or a person of unusual judgment. A few simple tools and trifling mechanical ability will enable any one to build the simple little machines herein described. The greatest asset required in the work is patience, patience spelled with a capital "P." Not only patience in building the machines, but patience in adjusting them and patience in flying them. Making haste with a model aeroplane is poor policy. It never pays to use slipshod methods. Take the time to make sure every part is the best that you can make it. Care with the little details will insure success.
Model aeroplanes are exasperating to the extreme. A new model will swerve to the right and left or dive with unerring precision to the ground or nearest object. They seem to defy all attempts to make them behave and in the first few flights usually perform a "new one" every time. This is the point where success comes to the model aeroplanist who possesses patience and perseverance. One must learn to adjust and fly a model aeroplane by practice just as he must also learn to swim or ride a bicycle by repeated trials. A little persuasion will soon make a model soar in a surprising manner.
The question of resistance is the first consideration of the model aeroplane designer. An aeroplane should pass through the air in such a manner that it leaves that medium in as motionless a state as possible. All motion of the surrounding air represents so much power wasted. It is obvious that a boat with a square prow will offer more resistance than a ship having a sharp bow. The latter causes considerably less disturbance of the fluid in which it moves than the former.

The resistance of an aeroplane is made up of:
Aerodynamic resistance.
Head resistance.
Surface resistance.
The first is offered by the planes of the machine itself and results directly from the pressure of the air supporting the model during flight.
The second is set up by the framework, the edges of the planes, the wires, etc., while the last is caused solely by the air in traveling over the surfaces of the various members composing the machines.

The head and surface or skin resistance, as it is sometimes called, can be reduced, but the aerodynamical resistance cannot.
Air is no less a fluid than water, and the same considerations apply to it, subject, of course, to certain conditions and with due regard for such factors as density, viscoscity, etc.
When an object, such as a square stick of wood, is moved through the air, the latter flows around it leaving behind a region of "dead air." The dead air represents so much waste energy or unnecessary resistance to overcome because it requires an expenditure of power to drag it along.

It is obvious then that bodies which are to move through the air with the least resistance possible should be given such a shape that the stream lines of air will flow around it smoothly and not leave a dead region behind. In other words, the stream line flow of the air shall keep the same contour as the surface.
The ichthyoid or fish-like form is of such a shape. This is illustrated in Fig. 8. Its greatest diameter should be about two-fifths of its entire length from the head. All struts, stanchions, etc., should be given this shape.

This shape is very interesting because of its probable origin, for a glance is sufficient to tell that it not only resembles a fish but also the body of a bird.
Weight is an all-important item in model aeroplaning. How to obtain the maximum strength with the minimum of weight is undoubtedly the most difficult problem which the aviator has to solve. Weight is a much more important factor in model aeroplanes than in the case of full-size machines because models do not fly fast enough to possess a high weight-carrying capacity.

It is only by the constant use of a pair of scales and an accurate knowledge of materials with the ability to combine them in the most efficient manner that the weight and strength may be kept in harmony. Such knowledge and experience come only with practice. They may, however, be acquired by any one. In this regard, a notebook forms an almost indispensable aid to the experimenter. After a machine has been built an accurate record of every flight and of every alteration or change in material should be made.

Automatic stability without doubt has attracted more attention from engineers and aviators than any other one problem connected with aviation. Since it is not possible for a model aeroplane to carry a pilot it is much more important that it should be naturally stable than any of its man-carrying prototypes. Automatic stability in a model of only two or three feet spread at the most, is quite a different proposition from that offered by a full-size machine.

It would at first seem, that by placing the centre of gravity of the machine very low such stability could be secured. This is accomplished to a certain extent by setting the wings or planes at a dihedral angle. But if the angle is excessive, the aeroplane will fly with a pitching motion known as accentricity.
The centres of gravity, of pressure and of head resistance should be at the same point. The centre of thrust of the propeller should also pass through this point. In this will be found the secret of the successful model aeroplane. It is only arrived at by careful experiment and calculation.
Head resistance increases stability while weight and speed lessen it. When an aeroplane is gliding (traveling downwards) its stability is greater than when it is rising or flying horizontally. It is the least stable when rising.
CHAPTER III. PLANES AND RUDDERS. ELEVATORS AND TAILS.
In Chapter I it was explained that an aeroplane is fundamentally composed of a supporting surface, divided into one or two parts, usually the planes or wings, which cut the air in an oblique manner, driven by a propeller and motor. Before going further it is perhaps best to understand more exactly how the planes operate and support the machine in the air than it was possible to explain in the first chapter without confusion. A theoretical aeroplane consists of a flat surface or plane. When the propeller is set into motion the plane is driven through the air in an oblique manner and compels the gaseous molecules to glide under its surface. Since the plane is at an angle, the front edge being higher than the back, the air must necessarily leave at the rear in a downward direction. The air molecules in traveling under the surface exercise a resistance upon it which is really a pressure against the plane. When this pressure is resolved into its components, it is found to be made up of two forces, one horizontal, tending to retard the forward motion, and called the drift; the other, vertical and tending to lift the plane.
The centre of these forces is not as might be supposed at the centre of the plane, but at a point between the centre and the front edge called the "centre of pressure." The centre of pressure approaches the front edge as the angle of the plane with the horizontal becomes less.
In order to render a better idea of how it is possible for an aeroplane to gain support in the air consider a skater moving swiftly over very thin ice which would not bear his weight, but since he is moving so rapidly that any one portion of the ice does not have time to bend to the breaking point, he is supported. In somewhat the same manner, the planes pass so rapidly on to new and undisturbed bodies of air, and stay over one body for so brief an instant that there is no time to completely overcome the inertia of the air and force it downwards.

First of all, we have been continually speaking of a "plane" as the supporting surface, which from the definition of the word would lead one to believe that they were flat. If the wings of a bird are examined, it will soon be noticed that they are concave underneath. Since the first attempts at aviation, therefore, machines have been built with planes or wings concave on the underside. The reason for this is very apparent from Fig. 12. The first illustration shows the action of a flat surface moving through the air. The air streams, as represented by the lines do not follow the surface of the plane, but leave a considerable region of dead air. This is the reason that a flat plane is very inefficient and not capable of giving so great a lift as the curved plane in the next figure where the lines follow the outline of the plane. The less disturbance a plane causes in the surrounding air, the closer it is said to approach to "stream line form." A correctly curved plane is considerably more effectual than a flat one, giving at the same time greater "lift" and less "drift."
Built-up Planes, that is, planes having a double curve approaching true stream line form, come nearer being the ideal plane than any other from some standpoints, but do not possess any advantages when used on models of less than four feet spread.

There are innumerable substances which would at first seem to recommend themselves as material for planes, but we may immediately thrust the greater portion aside. By all means avoid tracing cloth or linen, not only because its heavy weight forever precludes it from this use, but because it wrinkles and cockles so as to be absolutely useless when slightly damp or wet.
Tissue paper wrinkles easily and is not strong enough.
Jap silk is an excellent material for fabric covered planes, being at once light and strong. However, by far the most satisfactory plane of this kind is formed by silk bolting cloth which has been coated with collodion. The collodion is brushed on with a fine camel's hair brush after the fabric is in place and it is thereby rendered both waterproof and air-tight.
Fabrics should always be stretched over the planes from end to end and not front to back or vice versa. Make the lap joints or pockets around the end spars as long as possible so that they will not draw "dead air" and impede the forward motion of the machine.
Bamboo Paper is one of the best materials for covering the planes of a model aeroplane and is to be highly recommended. It is made in Japan from bamboo fibre and is very strong. It is usually stretched tightly over the framework and then given two coats of collodion or, what is much better, bamboo varnish.
The framework of the planes may be made of rattan, split bamboo, spruce, or steel piano wire. Piano wire is excellent for small machines since it is springy and light and able to withstand shocks. It is easily bent to any shape and offers considerably less head resistance than rattan because of its small diameter. Rattan can be bent into almost any shape by wetting.
Nothing is better for the cross pieces, ribs, etc., of the planes or framework than split bamboo. Bulk for bulk it is heavier but infinitely stronger than other woods. It is easily worked and can be bent into all kinds of shapes. Bamboo must always be bent while hot. The best source of heat is a spirit lamp or a bunsen burner. Always bend toward the hottest side. When bent apply a cold wet rag to cool quickly. If bent more than necessary, it may be straightened by applying heat again and allowing it to straighten itself.
In order to make long bends, such as the ends of planes, alighting skids, etc., first wind a strip of wet rag around, the bamboo and allow it to remain on for ten or fifteen minutes. Then remove the rag, heat the bamboo in a flame and bend slowly.
With a little care, strips several feet long may be easily split from bamboo rods. The best method of accomplishing this is to use a fine saw, but a sharp knife will often be successful.

Planes of any considerable size require ribs to support and hold the fabric in shape. Split bamboo is one of the best materials for this purpose. Two very good methods of joining the ribs to the long members of the planes are illustrated in Fig. 14. In the first, a strip of thin sheet aluminum is bent around the rib and spar and fastened by lashing with silk thread. Care must be taken to file off all sharp edges on the aluminum which might otherwise cut the thread. The second method is the neatest and probably the best, since the rib cannot so easily twist or slip out of place.
Wood Planes. In spite of the many advantages of fabric planes they cannot approach wooden planes for efficiency on a small machine. Wood is strong, light and does not change its adjustment.
Whitewood and spruce are the best materials for the purpose. Do not endeavor to saw out the wood. Use a carpenter's plane as much as possible in the work. A saw tears the fibres of the wood and will make the finished plane full of tiny splits.
The wood, however, may be sawed down to a thickness of 5/32 of an inch and then planed down from that. The finished plane should be about 1/16 of an inch thick.
When planing down the wood do not butt one end against a bench stop, because as the wood becomes thin, the pressure exerted by the plane against the wood will cause it to rise in the middle and thereby become thinner at that part. Instead, use a clamp to fasten the wood at one end to the bench and plane away from the clamp—Plane down to a smooth surface and avoid the use of sand-paper.

Forming the Curve by steaming and bending the wood is a very poor method. It soon becomes distorted and warped.

The best method is illustrated in Fig 16. A piece of wood of the same length as the completed plane and having a cross section like that at A is glued to the forward under edge of a flat plane B. After the glue has hardened, the plane is worked down to the shape shown at D which is very close to the stream line form. The plane is then varnished to prevent it from absorbing moisture and losing its shape. The ends may be covered with thin Jap silk, carefully glued on to prevent splitting. The Wright brothers cover the blades of the propellers on their aeroplanes with silk for the same purpose.
Air does not flow smoothly when changing from an interrupted flow to an uninterrupted flow around a square corner and so by rounding the ends of the planes, the disturbance at that point is somewhat eliminated.
Planes having rattan or piano wire edges cannot very well be of any other shape than those which are illustrated in Fig. 17.

It is a good plan to give wooden planes the shape shown by 3 and 4 in Fig. 17, as the disturbances mentioned above are not so marked.

The planes of large man-carrying machines possess the same characteristics, but not to such an alarming extent as in a model. The Voisin aeroplanes overcome the objection by the use of vertical panels set between the planes.
The angles at which the planes are set may vary from 1 in 6 to 1 in 20. One in ten might be called the "happy medium." If the planes are given too great an angle, the drift becomes so great that the propeller thrust is severely taxed. The smaller the angle, the less will be the drift and consequently the greater the speed. However, if the surface is curved the angle must not be made too small or not much lift will result.

The angle of the tail planes should be adjustable. If too great, the machine will slow down and the tail will drop, destroying the equilibrium of the machine and consequently the flight. If the lift of the tail is too great, however, it will cause that part to rise and the machine will dive downwards.
Elevators and Tails are usually made of thin wood or fabric stretched over a rattan or wire framework. They are usually rectangular or elliptical in shape.
In case they are made of wood one of the best methods of attachment is to fasten the plane to a small stick by means of two or three small rivets. The stick is secured to the framework of the machine by two small rubber bands. Then in case the machine strikes head on in alighting, the band will absorb the shock and permit the elevator to move so that it is not damaged by the fall.
Vertical Fins. It is a much mooted question whether or not a vertical fin is of any value on a model aeroplane since a good model should be so designed that it will fly in a straight line without the use of a rudder. It has been the author's experience that it is often of decided advantage in correcting the flight of an "erratic machine" or in compensating any little difference that there may result in the drift of the two halves of the planes.

The fin should be placed well toward the rear of the machine and, whenever possible, stretched both above and below the centre line of the machine, so that the pressure due to cross winds will be equal both above and below and there will be no tendency for the machine to twist about its longitudinal axis.
When it is not possible to place the fin both above and below the centre line it should be placed above rather than below.
Fins may be made out of thin wood, sheet aluminum or fabric stretched over a wire or rattan framework.
CHAPTER IV. THE FUSELLAGE OR FRAMEWORK.
By the term "fusellage" or frames, that part of the aeroplane which serves as the "backbone" and to which all the other members are attached is implied.
The fusellage above all must be strong. The second requisite is lightness. The simplest frame for a model aeroplane is a long straight stick. The cross section of the stick may vary and be either round or square. A careful workman, however, can build them of "I" section like a steel girder. Increased lightness and strength is the result.

A single skein of elastic when wound up tends very strongly to twist the framework of the machine out of true. Since the tail and elevator are usually attached to the ends, the adjustment is thrown out to a marked degree and the flight of the machine is liable to be erratic.
We have tried building the fusellage of a network of girders such as the Bleriot and Voisin aeroplanes employ. Nothing could have been prettier than these carefully designed and constructed frames with their little struts and guy wires, but we soon found that for plain ordinary everyday efficiency, the simple stick is the best, provided, of course, that it is of the proper size to resist the twist of the rubber.
In some cases it is desirable to retain the framework because of the realistic appearance of the model to the larger machines which it gives. The only practical method then is to employ a plain stick backbone to withstand the torque of the rubber and build a false framework around it. The framework need only be strong enough to support the fabric and resist the shocks of landing. This method of construction is best suited to models of the Bleriot and Antoinette types.
The only type of frame consisting of a single member which will resist the torque of powerful rubber bands successfully is a tube. The rubber skein is placed inside the tube which may be of wood, paper or aluminum.

Paper tubes are excellent for small machines, being exceedingly light and very strong. They are formed by wrapping tough, unglazed paper around a rod of the required inside diameter. The paper is well smeared with glue and wrapped tightly. The rod is afterwards removed. Be sure that the glue is thoroughly dry before attempting to use the tube.
In larger machines it is preferable to employ some other means of avoiding the nuisance of a single skein rather than to use a tubular frame. There are several ways of accomplishing this, the best one undoubtedly being to balance the torque of one elastic by an equal torque tending to twist in the opposite direction.

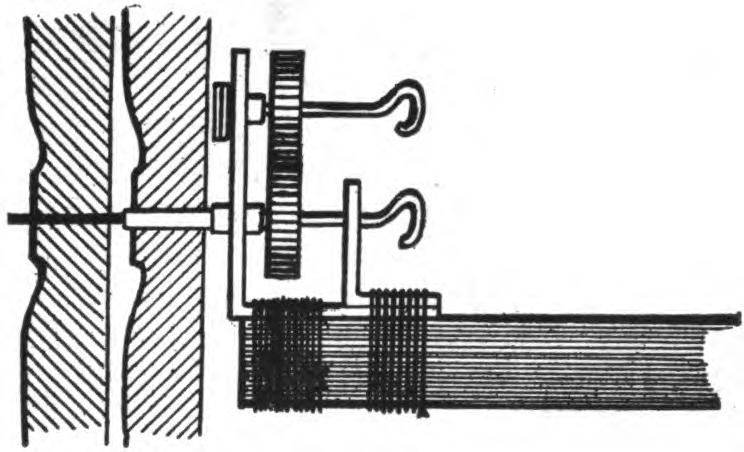
In Fig. 23, a second skein of elastic is geared to the first with equal sized gear wheels. The second skein is placed immediately underneath the first and is equal in length and strength. Placing one skein under the other and not side by side as might be the first tendency allows the propeller to be arranged centrally. The lower part of the same figure illustrates a second method. In this, the propeller is attached to a long shaft, the other end of which is fitted with a gear wheel. Two elastic skeins of equal length and strength are attached to a second gear which meshes with the first. The only disadvantage of this form of motor is the long propeller shaft required. The objection, however, is sometimes outweighed by the fact that it is possible to employ a small gear wheel on the shaft meshing with a large one between the bands so that the action of the elastic is multiplied and a greater number of propeller revolutions secured where the length of the bands is limited and could not be increased in order to bring about the same result.
Skids. It requires only very little experience with model aeroplanes to prove the need of efficient skids on the machine. After the rubber band motor has run down, the propeller offers considerable resistance to the forward travel of the machine so that it does not glide properly and causes it to land on its "nose," often damaging the propeller or front planes. At the least, the framework of the machine is strained by such a shock.

Skids of course weigh something and offer a certain amount of resistance, but the advantages more than outweigh those drawbacks.
Skids are usually made of piano wire, split bamboo or rattan. The skids should not be made any larger than is necessary to protect the machine. They do not usually take any special shape but are formed to fit each individual case.
CHAPTER V. MOTIVE POWER.
By far the simplest and most efficient form of power which could be installed in a model aeroplane to drive the propeller is a twisted skein of rubber. Nothing is lighter, or more easily handled and repaired.
The word elastic, in physics, is the name given to the tendency which a body exerts, when distorted, to return to its original shape. Rubber possesses more elasticity than any other material known, it being possible to stretch a piece of rubber cord to eight or nine times its original length without fracture. Rubber also possesses the added requisite of lightness and will store up more energy than any form of steel spring.
The Simplest Form of Motor is a single skein of elastic stretched between two hooks, one fixed and the other to which the propeller is attached, free to rotate. In some cases it is a decided advantage to divide the motor into one or more parts. One phase of this question has already been considered. The others will be discussed in the following chapter.
The type of Elastic which gives at once the longest life and the greatest power is the square rubber, preferably about 3/32 x 3/32 inches, and not the flat strip. When examined under the microscope the edges of the square rubber show to be cleaner and sharper and not so ragged as those of the flat strips. To be of any value for use in a model aeroplane, the rubber should be absolutely pure and fresh.
There are certain precautions which if observed will add greatly to the power and efficiency of a rubber band motor.
Always remove the elastic from the machine when the flights are over for the time being. Rubber spoils very quickly when kept under tension. It also deteriorates if warm, so keep in a cool place. Strong sunlight causes rubber to harden and lose its elasticity, due to the presence of the sulphur used in vulcanizing. If talcum powder or finely powdered soapstone is rubbed on the bands from time to time it will prevent them from sticking together. The strands will then run and slip more easily upon each other, making it possible to store up a greater number of propeller revolutions.
In spite of the use of talcum powder, however, when a skein of rubber is twisted very tightly, the strands stick together, causing it to soon break up.
This nuisance may be somewhat alleviated if the strands are lubricated with pure redistilled glycerine free from grease, etc. Such a precaution will not always greatly lengthen the life of the rubber, but will increase the number of turns which it is possible to give the skein (and this is a very important advantage in model contests). Due to its sticky nature, however, the glycerine will cause the rubber to gather dust and particles of dirt which, if allowed to grind into the rubber, would soon weaken it. The skein should therefore be washed from time to time in warm soda and water and fresh glycerine applied. By all means, avoid all oils or substances of a greasy nature, such as lubricants. They quickly soften and rot the rubber.
The Amount of Elastic required for a model will vary considerably for propellers of the same pitch and diameter. There is always a tendency to use too much rather than too little and this fault should be carefully guarded against. In nine cases out of ten it is the cause of the unsatisfactory behavior of a model.
The motor should always be "stranded," that is, made up of a skein of bands. It is then possible to secure a larger number of turns than if a single strip were used.
Always start a new machine with a small number of strands and gradually add to the number until the proper amount of power is obtained. The distance between the propeller and the fixed hook should always be as great as possible so as to secure the maximum number of turns.
Doubling the Number of Elastic Strands increases the power of the motor but cuts down the number of turns which it is possible to give the propeller. That is to say, a certain skein composed of six strands of rubber will take perhaps two hundred and twenty-five turns while a twelve strand skein of he same sized rubber strands strands is only capable of less than half or about one hundred turns before it is wound tight.
Doubling the number of strands and at the same time keeping them the same length increases the torque more than three times but diminishes the number of turns from one-half to one-third.
Doubling the length of the strands does not materially reduce the torque for the first hundred turns. After two hundred turns have been reached, the torque is only about one-half as great as it would be in case the length were not doubled.
Doubling the length of the strands doubles the number of turns it is possible to give the skein. It is easy to see from this why it is always advisable to make the motor as long as possible and to compose it of the fewest number of strands if long flights are desirable.
By using several separate skeins geared together so as to apply their energy to one screw, it is possible to obtain a greatly increased number of turns. The weight of the gearing is very small and hardly a factor, considering the advantages derived therefrom. Since the skeins revolve in opposite directions the frame of the machine is relieved of the harmful twisting effect so often present in a single skein.
The gears should be of steel accurately cut and of no larger diameter than is necessary to separate the rubber skeins the requisite distances so that they will not rub.
Holes may be bored in the gears to lighten them. The gears are easily and conveniently cut out of steel pinion wire.
CHAPTER VI. SCREW PROPELLERS.
We might compare a propeller to an ordinary screw or bolt by likening the thread of the screw to the two blades of the propeller. If the screw penetrates wood or metal nut it will advance a certain distance known as the pitch which is always the same, namely, the distance separating two consecutive turns of the threads. The revolving blades of the propeller cut their way through the air in identically the same manner. But since air is a very thin medium as compared to wood or iron the propeller slips a little just like a screw going into an unsteady nut and does not advance the distance it theoretically should considering the angle of the blades. The distance lost in each revolution is called the slip. Thus a screw having a ten-foot pitch in actual operation perhaps only advances the aeroplane eight feet.

If a propeller blade had a uniform angle throughout its entire length the portions of the blade near the centre would not have as great a pitch as the extreme tips because the diameter of the circle they travel in one revolution is not as great as that at the tips. For this reason it is usual to give the blades an increasing angle as they approach the centre.

Fig 26 shows a diagram illustrating the theoretical pitch of a screw, the angle of the blade varying inversely as its radial distance from the centre of the screw.
When a propeller revolves it sets in motion a cylinder of air. If the angle of the blades is uniform throughout their length the air in the centre of the cylinder will move much more slowly than that near the outside as shown by the arrow heads in A of Fig. 27. If the blades are given an increasing pitch, the air in all parts of the cylinder will move away from the propeller at the same speed.
From a diagram like this it is very easy to calculate the angle of a blade at any point to secure a certain pitch. Suppose that the problem in hand is to design a propeller eight inches in diameter and a pitch of twelve inches. On a sheet of paper draw a vertical line AM twelve inches long to represent the pitch. Draw a long horizontal line AN of indefinite length from the lower end of AM and at right angles to it. The diameter of the propeller being eight inches, the tips of the blades must travel in one revolution 8 x 3.1416 (the circumference of an eight inch circle in inches), a distance of 33.1 inches. Lay off on AN the distance AB which is 33.1 inches, draw the line MB. The angle MB forms with AN is the proper angle for the blades at the tips. To find the angle one inch from the tips lay off the distance AC, which is. 8 - 2 x 3.1416 or 24.8 inches. MC gives the right angle. The angle two inches from the tip would be shown by MD where AD is 8 - 4 x 3.1416 or 18.8 inches. Any other points can be located in the same manner.


If desirable, a number of small templets having the proper angle may be cut out of sheet tin and fastened to a board as shown in Fig 28. When making the propeller it can be frequently laid on the templets to see if the proper angle has been secured yet.
There are a great many other ways of making propellers for model aeroplanes, the simplest and best of which are described below.
Metal Propellers have advantages and disadvantages which may be summed up only to find that as far as efficiency is concerned the advantages outweigh the disadvantages.

The simplest method of making a small metal propeller is to cut a piece of sheet aluminum into the shape shown by A in Fig. 29. Fold along the dotted lines so that the result is like B in the same illustration. The shaft may be a small piece of piano wire passed through the hole in the centre and bent around as shown.

Another method of making a metal propeller which is more suitable for large machines than that just described is illustrated in Fig. 30. The blades are cut out of sheet aluminum to the shape shown and set in the slots in the end of a small aluminum tube. They are held in position with aluminum solder. Ordinary solder will not accomplish the work and cannot be used. The shaft is soldered into a hole in the tube halfway between the two blades.

The propeller shown in Fig. 31 is extensively used by manufacturers of model aeroplanes because of its simplicity and strength. The propeller is cut out of sheet aluminum and then bent and folded. The shaft is held in place by a brass eyelet riveted firmly over on both sides.

Wooden Screws. Single piece screws cut out of a block of wood are easy to make and very efficient. The propeller is laid out on a square or rectangular strip of wood (according to the pitch), cut to the required length. A pocket knife or a wood rasp is used to rough the wood down to the shape shown at B. It is then finished down to the form shown at C. After rubbing with sand-paper a coat of varnish is applied and allowed to dry. The varnish is then rubbed down to a smooth surface.
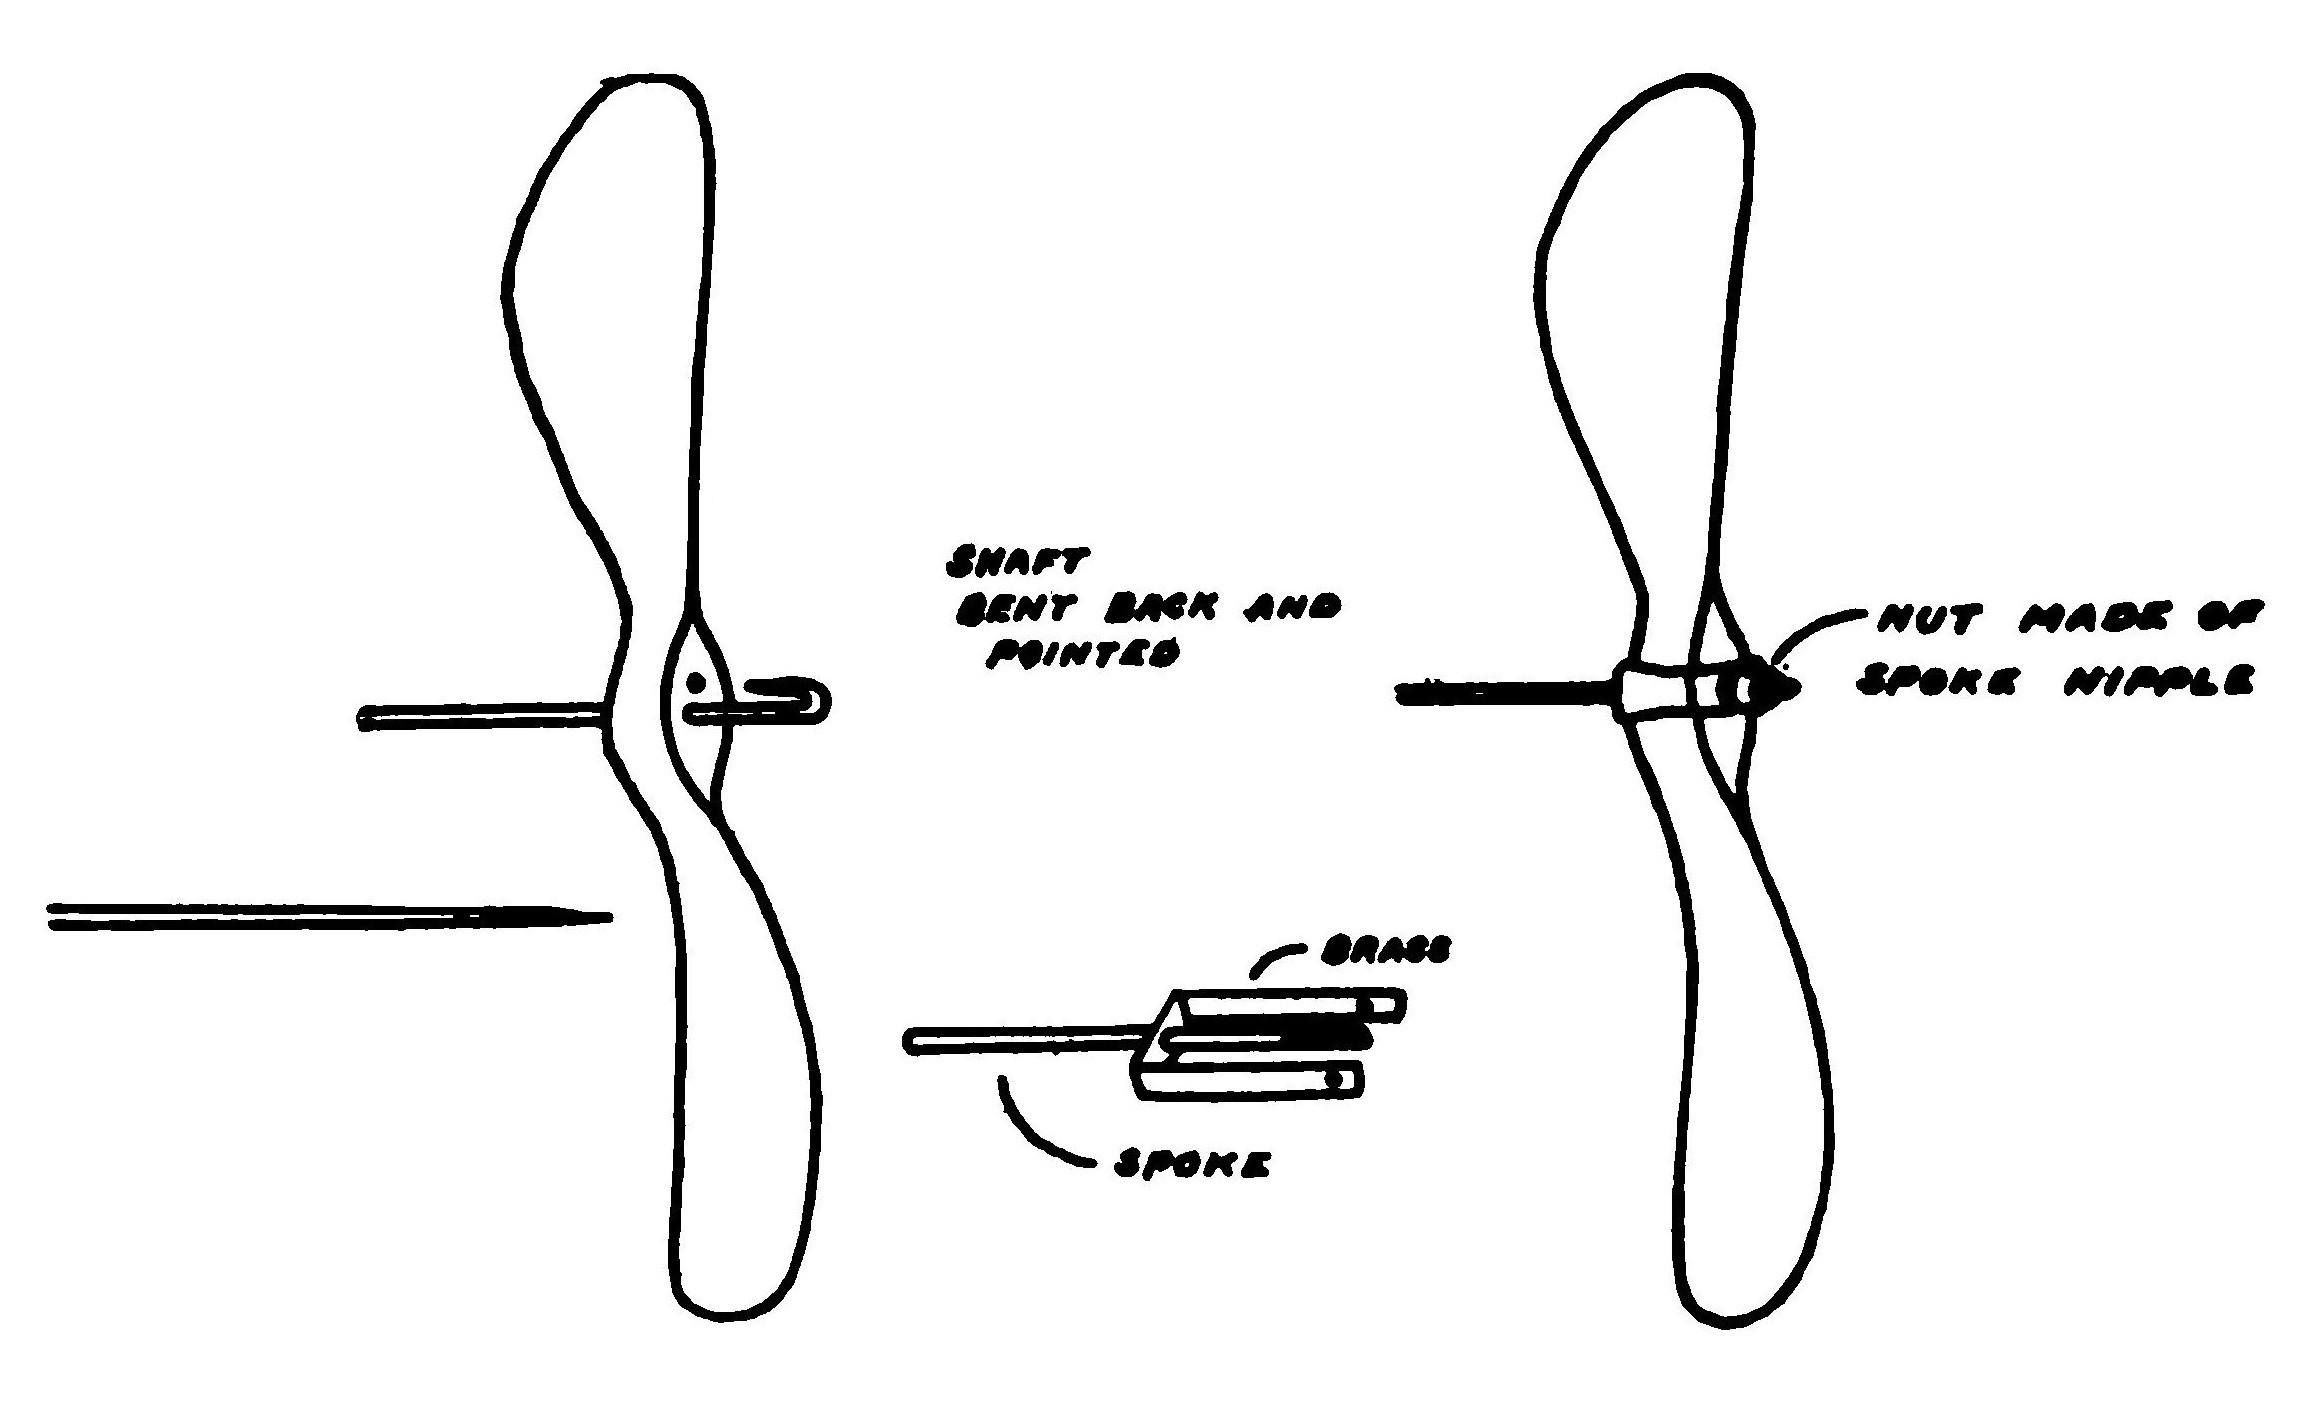
Fig. 33 shows a very good method of mounting the propeller on the shaft. A piece of stiff brass is soldered to one end of a bicycle spoke and bent around the propeller. A small nut made by cutting a spoke nipple is screwed on the end to hold the propeller in position. (The same illustration shows another very good method of fastening the propeller to the shaft. The end of the shaft is filed to a sharp point, bent into the shape shown in the illustration and then driven into the propeller. A small pin hole should be made in the propeller at the place where the sharp point is to enter in order to avoid the possibility of splitting.)
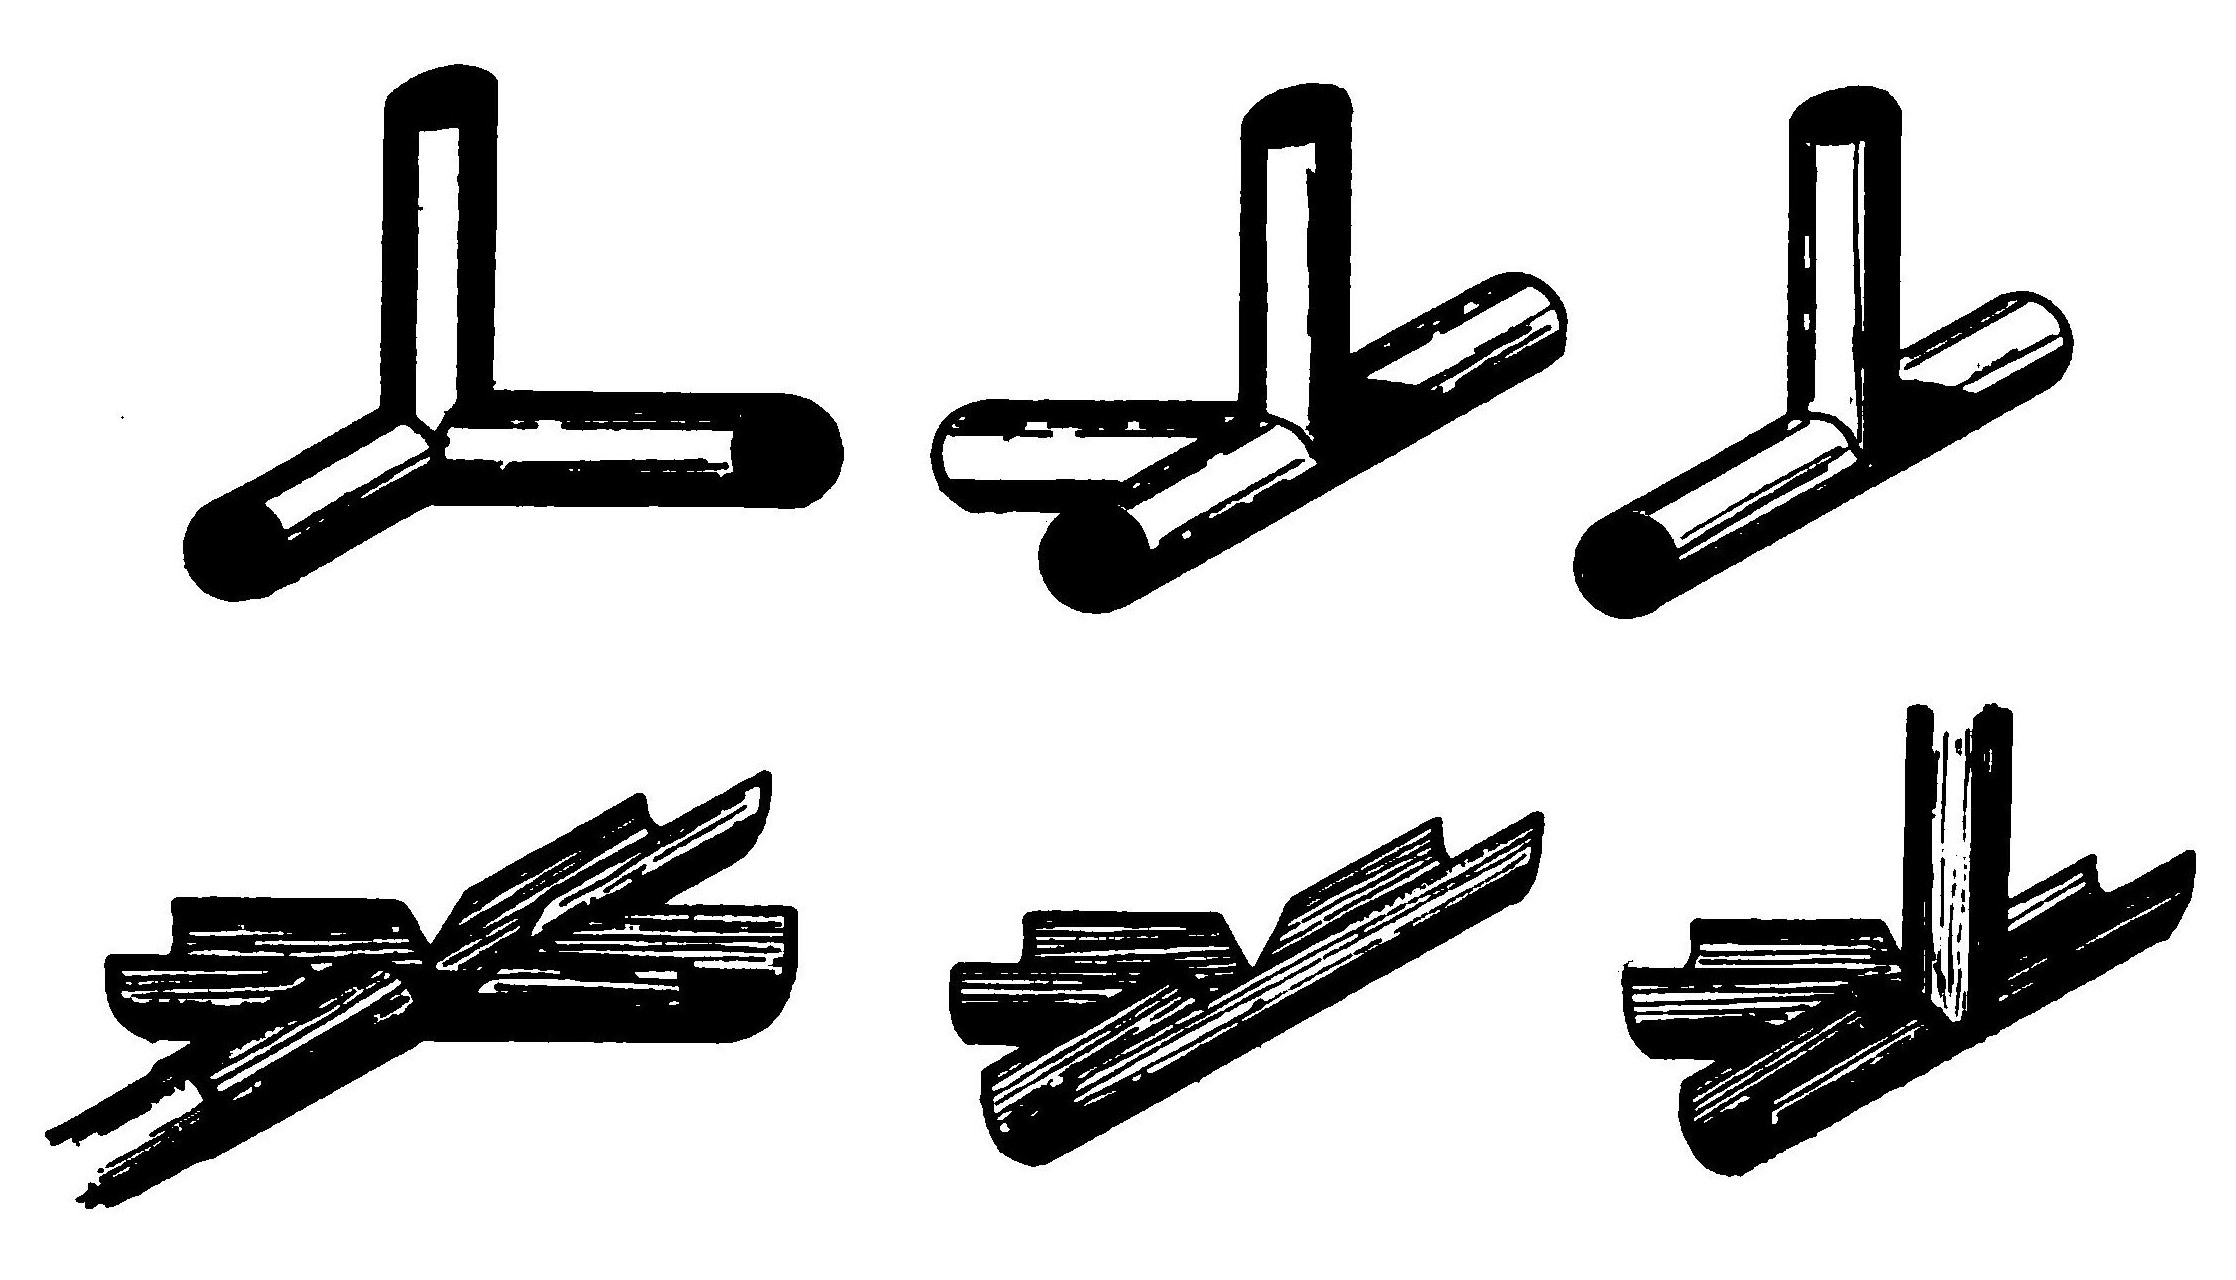
There are two methods of making propellers by steaming and bending thin wood. American whitewood and spruce are the best woods for the purpose. After steaming place one end of the strip in a vise and holding the other in the fingers twist it into the right shape. Fasten it in position and allow it to remain so until dry. Then give it a coat of varnish to prevent the absorption of moisture and consequent warping. The method of fastening the shaft, which in this case is a piece of piano wire or a bicycle spoke is illustrated in Fig. 35. Two small pieces of wood shaped like a half cylinder and having a groove cut on the curved surface are glued on either side at the centre. The shaft is then bent around and twisted.
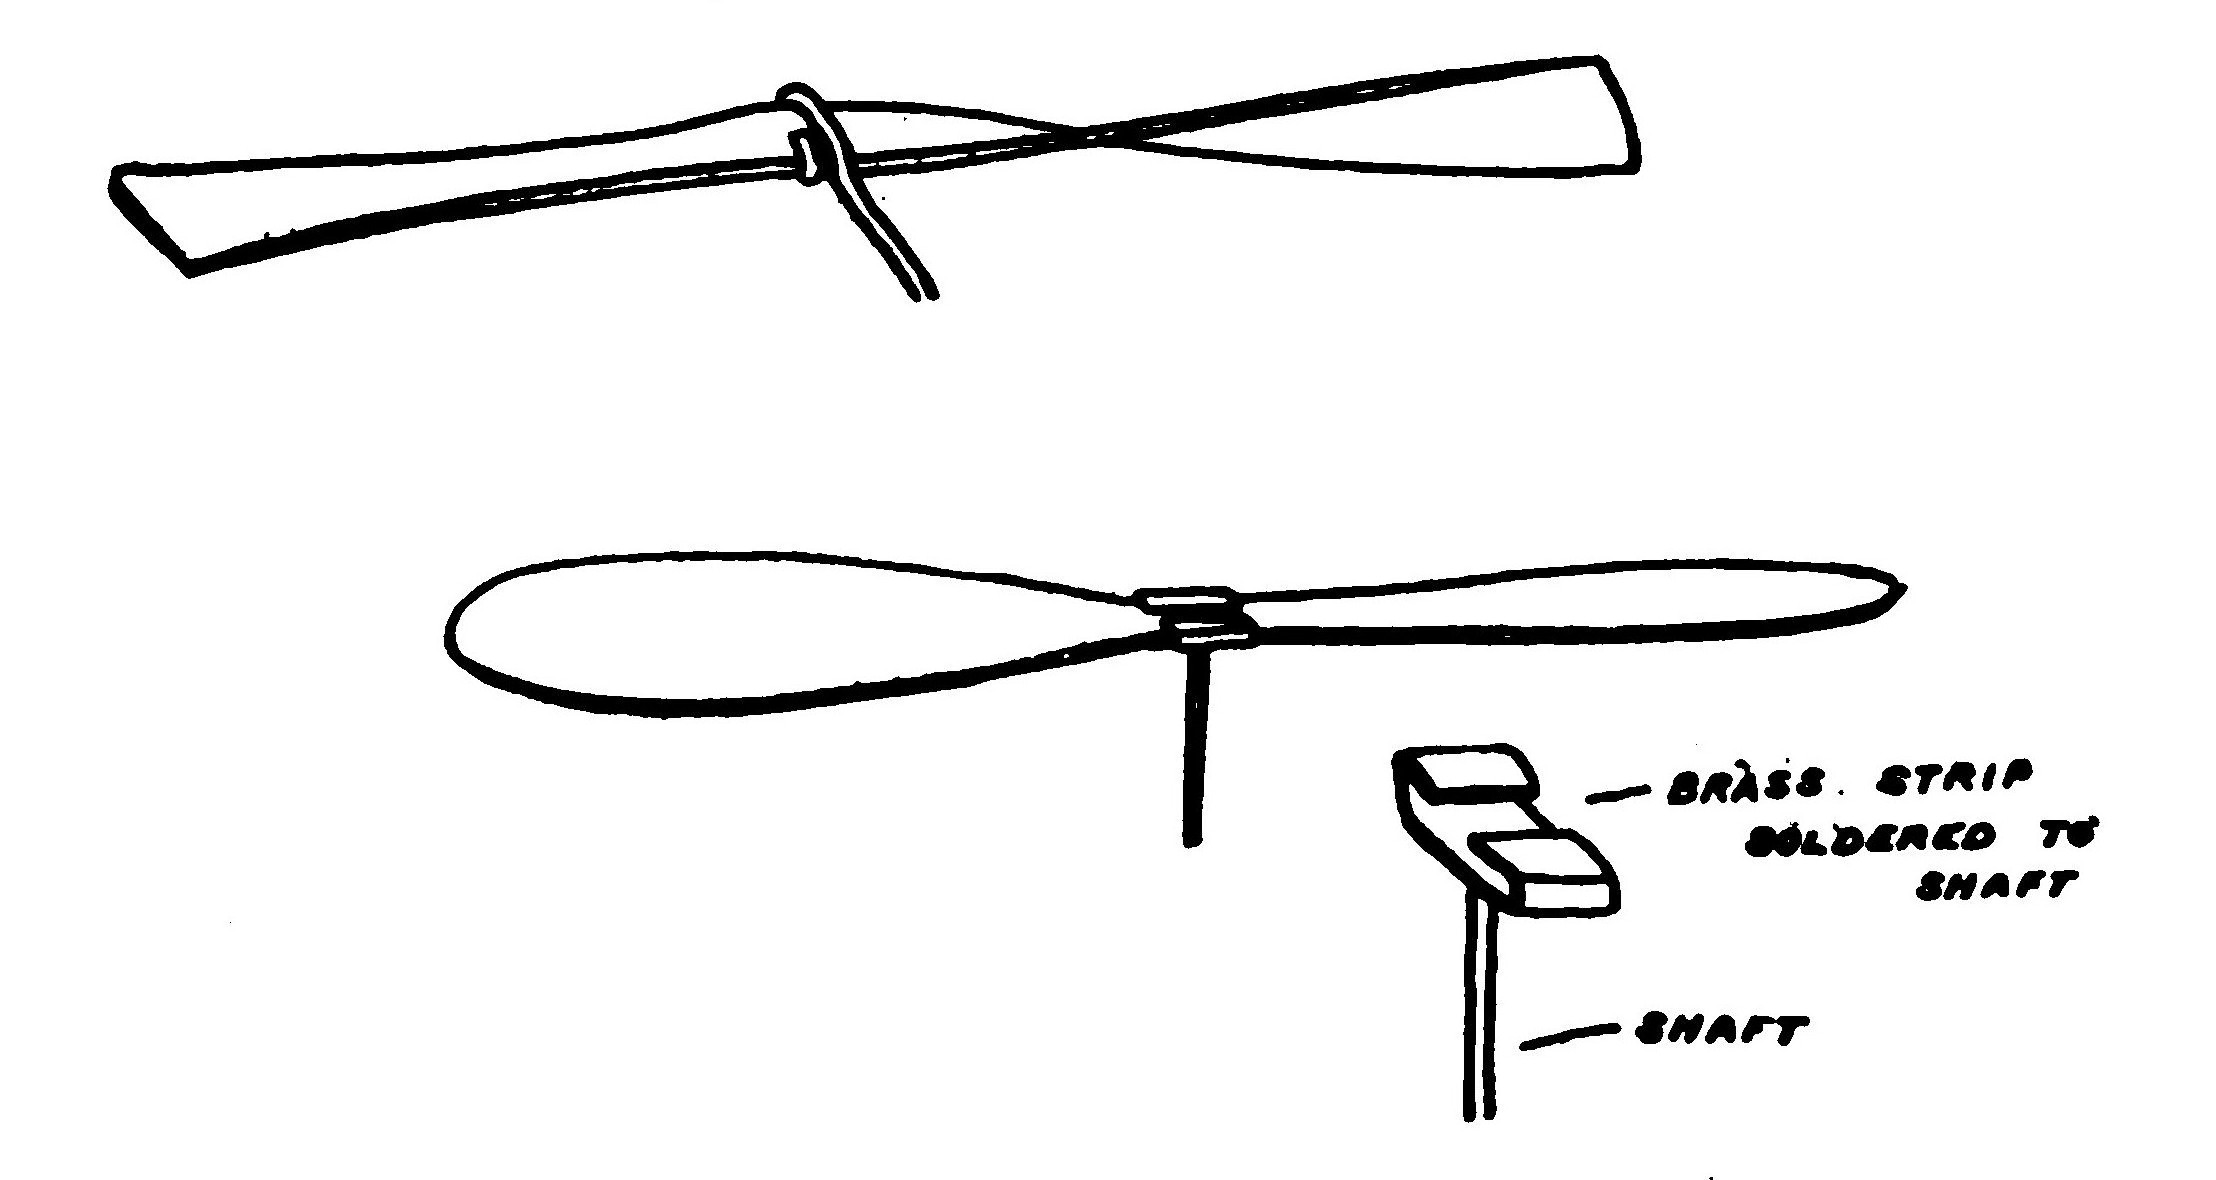
In order to make the second type the wood must first be bent into shape. It is steamed and bent along the dotted lines. It is attached to the shaft by means of a piece of sheet brass doubled over the edge and soldered to the end of a bicycle spoke. The only disadvantage of this form of propeller is that it is easily broken. It turns very easily with little expenditure of power.
Size of Propeller. One bad feature about most of the model aeroplanes offered for sale in toy shops is the propeller. In almost every case it is decidedly too small. In order for a model to fly really well the propeller must usually be out of all proportion to the rest of the machine. In fact its size will make the machine appear very awkward and unsightly.

The enormous slip of small screw propellers when turning rapidly makes them very inefficient. The thrust of the propeller is dependent upon the volume of air sent backwards. A large propeller naturally deflects more air than a small one and so in order for the latter to equal the work of a large propeller it must either have an increased pitch or revolve more rapidly.
A small pitched propeller is less wasteful of power than one having a high pitch and so it is of no advantage to make a small screw do the work of a larger one. It is not only wasteful of energy but also permits the rubber skein to untwist too rapidly. The advantage therefore lies with a propeller of low pitch driven slowly.


The average propeller should have a pitch of from 2-3 times its diameter, that is, the blade should have an angle at the tips of slightly less than 45 degrees.
The propeller diameter (of course this rule is not infallible, but only a general statement) should be about one-third the spread of the planes.
The edges of the blades should come to a clean edge but not be too sharp.

One of the best means of determining the efficiency of a propeller is to connect it to a small electric motor which will drive it at high speed and by blowing tobacco smoke around it or holding a piece of burning rag nearby and test whether or not the air is thrown out from the sides by centrifugal force. A correctly designed propeller will pull air in from the sides instead of throwing it out.

Calculation in fitting a model with a propeller is almost useless. The experimental error is so large that the empirical or "cut and try" method is the only reliable one. It is best to make a number of propellers of varying pitch and diameter and give to each a thorough tryout on the machine before making a decision.
The Single Screw Machine. A propeller placed in the rear of a machine is usually more efficient than a "tractor" screw placed in front. A machine drags along considerable air with it (due to skin friction of the planes, etc.), and so a screw placed in the rear revolves in air which is really traveling with the machine itself and so the effect is somewhat as though it were traveling with the wind. A further advantage of placing the propeller in the rear of the machine lies in the fact that there is less likelihood of damage in landing.

An aeroplane having a single screw always betrays a marked tendency to turn completely over in a direction opposite to that in which the screw is rotating. Action and reaction are always equal and opposite in their effects and so the motor has a tendency to rotate the machine against the resistance of the screw as well as to rotate the screw against the resistance of the machine.
One way in overcoming this difficulty is to set the two halves of the plane at a slight angle to one another or at a dihedral angle as it is called. Then if the machine tends to twist and turn over the lifting power of the lower wing becomes greater as it approaches the horizontal while that of the other wing grows less. Accordingly the machine resists and tends to turn back to its normal position.
Another method is to keep the weight or centre of gravity as low as possible so that the machine will automatically right itself as soon as it begins to turn. The objection to this, however, is that the machine will fly very unsteadily on a gusty day (and most days are more or less gusty). The effect of placing the centre of gravity low is shown in Fig. 45. The dotted line represents the centre of pressure acting against a plane P. The weight of the machine is centred at W. Imagine the machine in flight. Then the resistance of the plane P acting along the dotted line will tend to stop the machine while W tends to still go forward because of its inertia. As a result, the front of the machine tilts upwards and increases the angle of P, which in turn increases the resistance. The machine therefore slows down but W tends to still move forward and tilt the machine further until the thrust of the screw is unable to support the weight and so W swings back down and beyond the position shown at B. The angle of P decreases, the machine travels forward quickly and gathers sufficient speed for W to swing up again. Thus the performance is repeated and the machine will have a flight path very much like the dotted line shown in the lower part of the illustration. The motion is slight but is sufficient to considerably shorten the length of the flight.
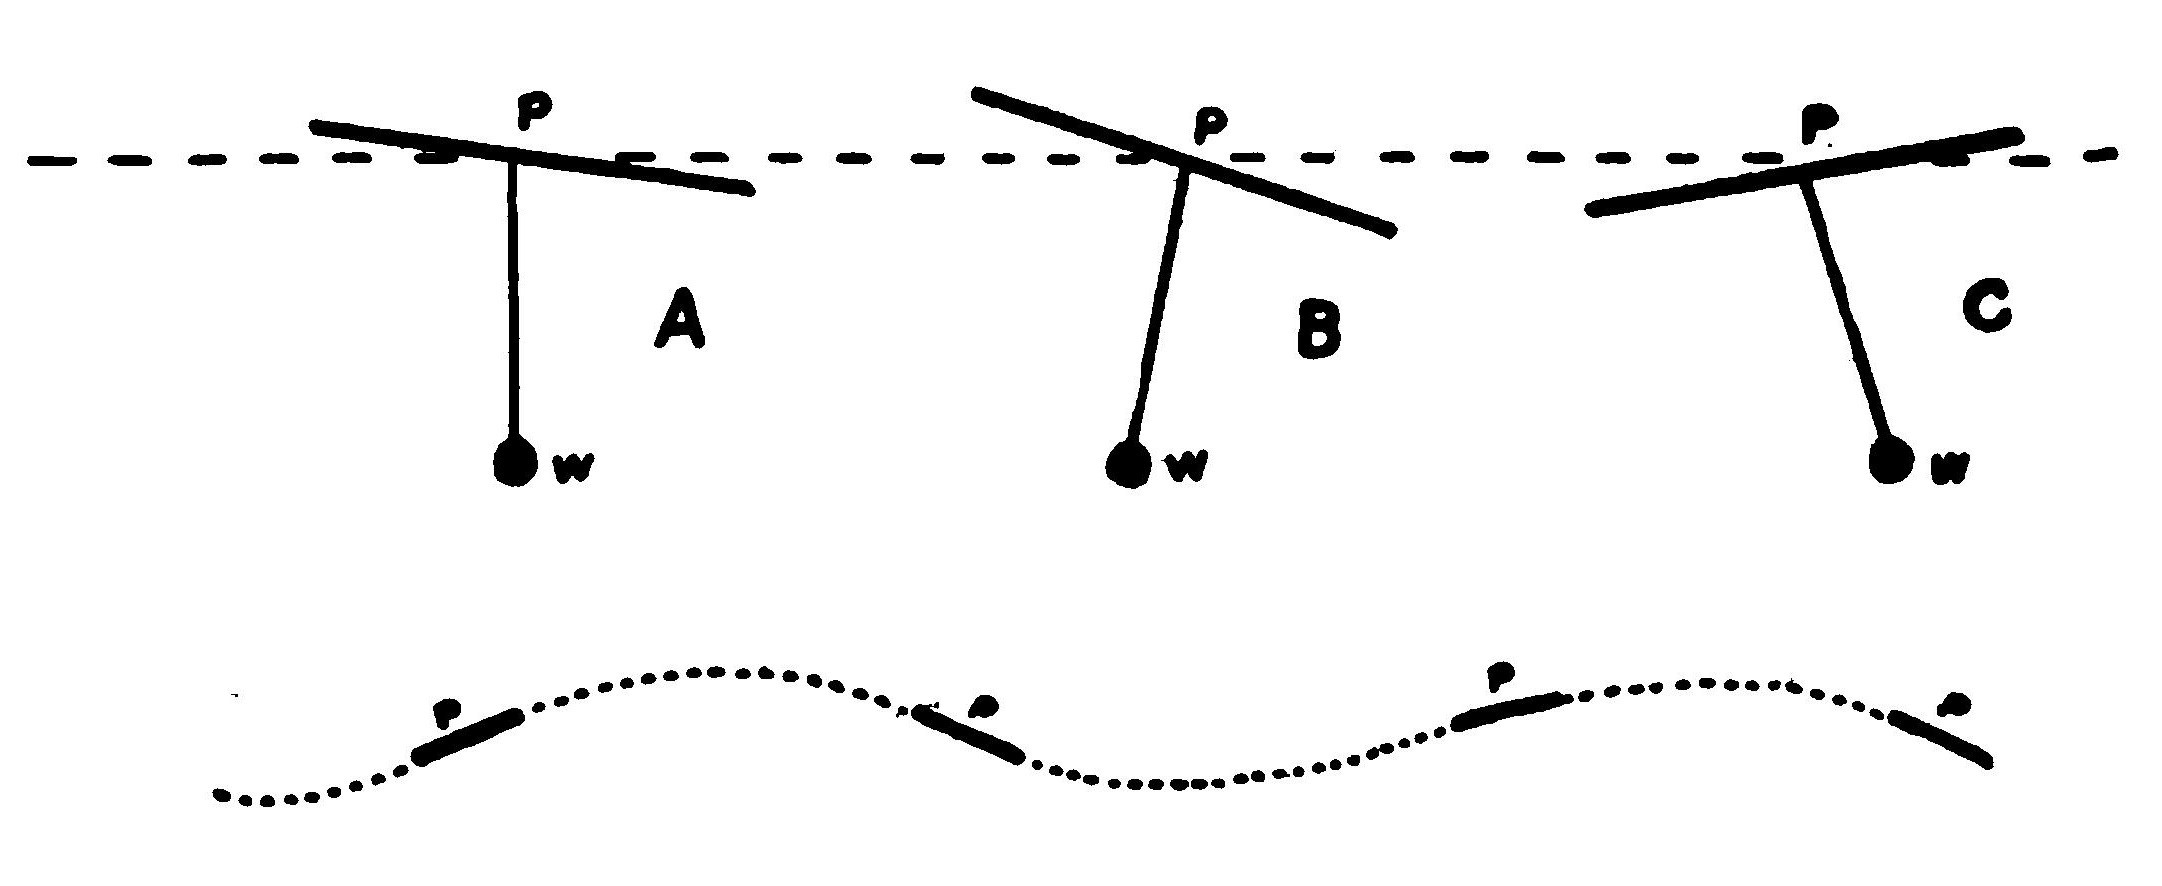
If the machine meets wind, the motion is somewhat increased. In fact the author has seen a small biplane turn completely over and actually "loop the loop." When the machine flies with the wind the effect is largely reduced. If the wind is of just the right strength and comes from the rear, the machine will fly quite steadily. If too strong, however, the model will dive to the ground. A tail somewhat dampens the swing while an elevator will slightly increase it.
The only other methods of partially mitigating the evils of a single screw are to ballast the machine, that is, place a weight on one side or to give one plane an increased sustaining surface. The first may be dismissed immediately because the weight will cause one side of the machine to drop as the elastic runs down and the reaction of the propeller becomes smaller. The last named method is the usual one employed. The wing on that side of the machine opposite to which the propeller is revolving is given a larger surface than the other and so exerts a greater lift on that side. This also has disadvantages, however, for by giving one wing a greater lifting power the machine is caused to fly in a long spiral path when the propeller begins to run down and when it stops completely to glide in the same manner.

The propeller should be placed as nearly as possible on a level with the planes. The centre of pressure on the planes and the centre of gravity should coincide if true stability is desired. The centre of pressure on a machine having the planes set at a dihedral angle is halfway between the lowest point and the highest providing the planes are the same width all the way along. If they taper towards the ends it is slightly lower while if they are wider at the extremities it is higher. The rubber skein and the propeller are usually placed on top of the fusellage of a dihedral winged machine.
The Double Propeller Machine. The best method and the only one which entirely removes the difficulty is to fit the machine with two propellers. A machine having two propellers to the author's mind is the only one worth much attention.
Fig. 46 illustrates the simplest arrangement for fitting two propellers to a machine. In the first a second propeller is attached to the other end of the skein. At first it might seem in the second arrangement that there would be difficulty in getting the screws to revolve at the same speed. However, if the propellers are similar and the same number of rubber strands employed to drive each, the difference will be so small as to be negligible.
When the first arrangement is employed the pitch of the screw in the rear must be slightly greater than that in the front because it is revolving in the slip of the latter.
Placing both propellers on a double shaft on the same axis has the disadvantage of decreasing the efficiency of the propellers because they are operating in each other's draft.
The first of these methods is undoubtedly the best construction. It is then possible to use the same rubber skein to drive both propellers. Also any possible difference in their speed will not so readily cause the machine to change its course as if the propellers were alongside of each other. When two propellers are used in this latter position it is a very good idea to fit them with two small pulleys and a connecting belt so that any tendency for a difference in speed between the two will be immediately equalized.
The power absorbed varies directly with the volume of air acted upon and the square of the speed with which it moves away. If the pitch of the propeller or its rate of revolution were doubled, four times the power previously required would be necessary. Vice versa, decreasing the rate of revolution or the pitch by one-half will make only one-fourth the power previously required necessary.
Doubling the speed and doubling the diameter requires eight times more power. Doubling the diameter, halving the pitch and halving the speed will give twice the thrust for the same power as in the first case.
CHAPTER VII. BEARINGS, THRUST BLOCKS AND GEARS.
Since the power available for driving the model is very limited it is obvious that every precaution should be taken to enable the propeller to absorb every last fraction of energy stored in the motor. With this end in view the bearing or thrust block in which the shaft of the propeller revolves should receive careful attention in order to remove as far as possible all causes which would result in friction.

The simplest form of bearing is a simple piece of sheet brass or aluminum having a hole drilled through it and bent up at right angles so that it may be lasted to the frame as shown in Fig. 48 by A.
Single bearings of this type are employed on the model aeroplanes manufactured by toy makers whose only desire is to flood the department stores and toy shops around Christmas time with their impossible machines. Such single bearings are a decidedly poor and unsatisfactory construction. Unless the elastic is very short it soon begins to vibrate in unwinding. Since the rubber is directly connected to the propeller shaft, the propeller is set into vibration as shown by the dotted lines in the second part of Fig. 48. The long blades of the propeller considerably magnify the motion and there is a very appreciable loss of power due to the erratic path of the propeller and the increased friction at the bearing. The rubber skein also offers considerably more resistance to the forward travel of the machine than if it were not in vibration.
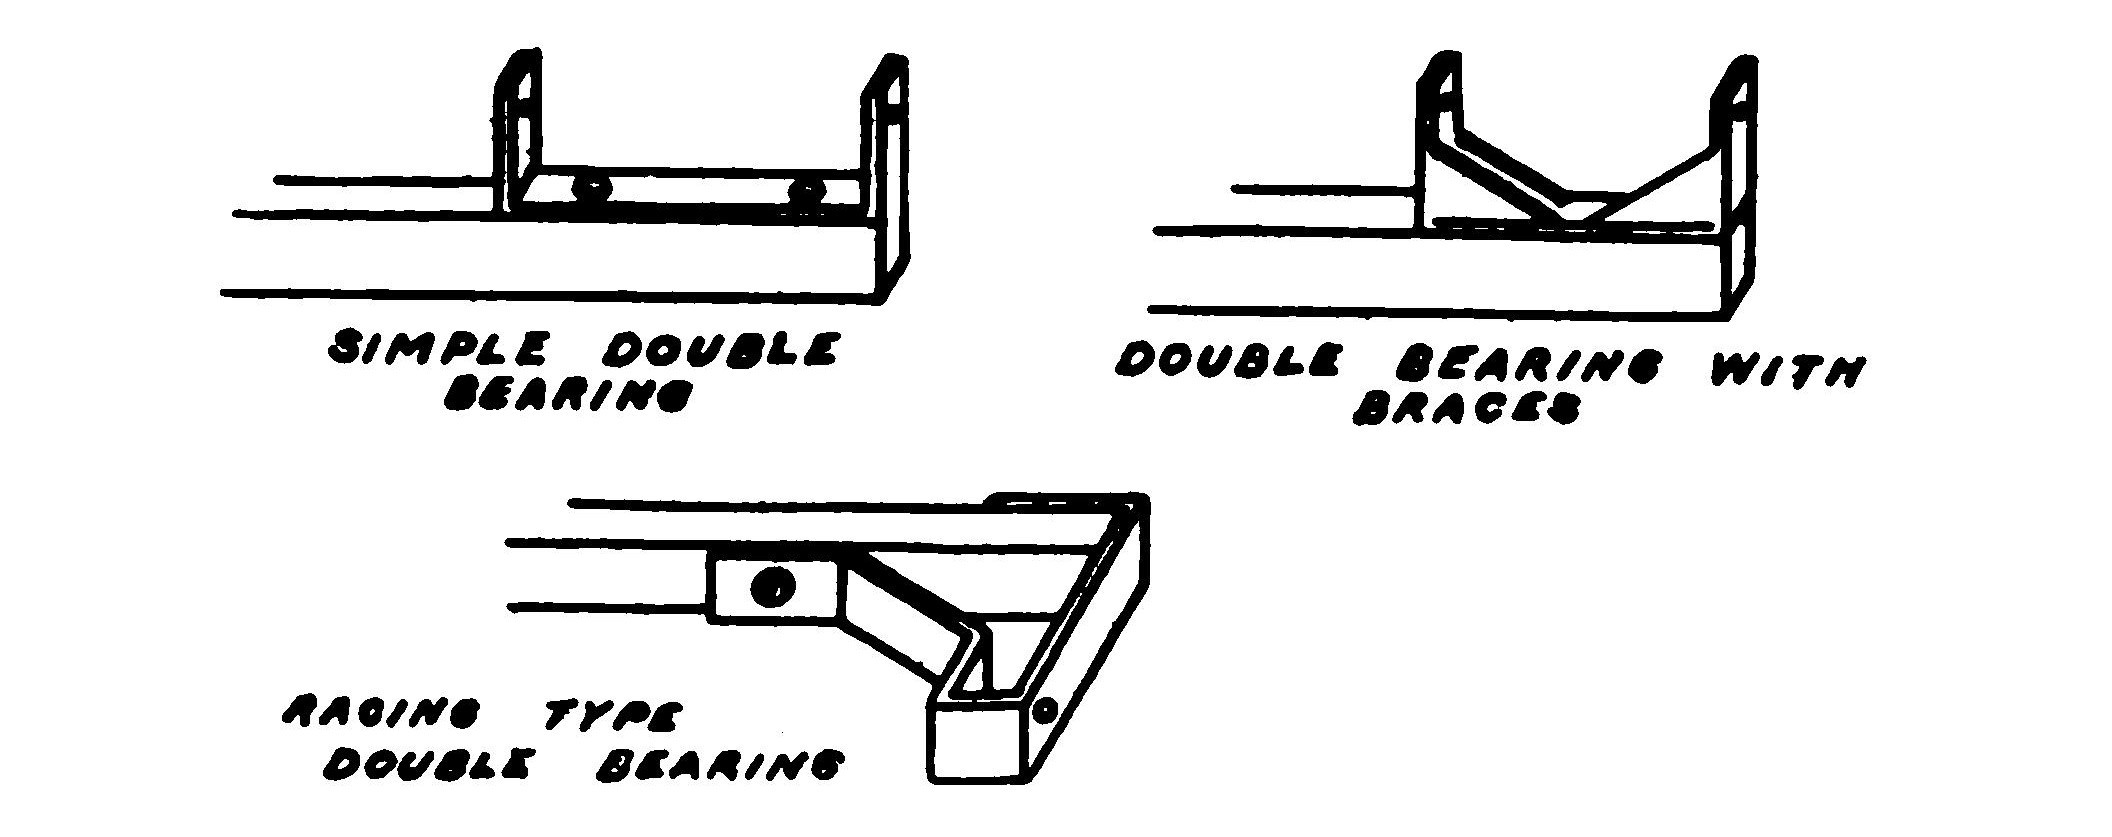
The advantage of a double bearing more than offsets the added weight. Such a bearing is formed out of a piece of sheet brass bent up at right angles at both ends as in Fig. 49. The third method of construction in the accompanying figure makes it possible to employ lighter sheet metal in the construction of the bearing and still resist the pull of the rubber and the thrust of the propeller successfully.

Friction is reduced and the thrust taken up by placing one or two glass beads between the propeller and the bearing. Only those beads which are flat, with parallel sides and have a round hole in the centre, should be used.
Four or five copper washers or rings may be made to serve the same purpose with equally good results.
Another method is to employ two washers separated by a small spiral spring. Such an arrangement is employed on some of the French models and might be called a "friction thrust." That is, when the rubber skein is wound up tight and the propeller is released the friction acts as a brake and reduces the speed, preventing the propeller from "racing." As the elastic unwinds, the tension, and with it also, the friction becomes less so that the propeller revolves more rapidly and maintains a somewhat even speed. The importance of preserving as far as possible an even propeller speed can hardly be overestimated and that is why such emphasis has been laid in several places upon the desirability of a model whose propeller is driven by a long skein of rubber composed of the fewest possible number of strands.

Ball bearing thrusts are by all means the most desirable, but not all models are large enough to accommodate their size and weight. Wherever it is possible, however, to use them it should be done. The increased amount of energy available for turning the propeller will make it possible to employ less rubber and so increase the number of turns and consequently the length of the flight.
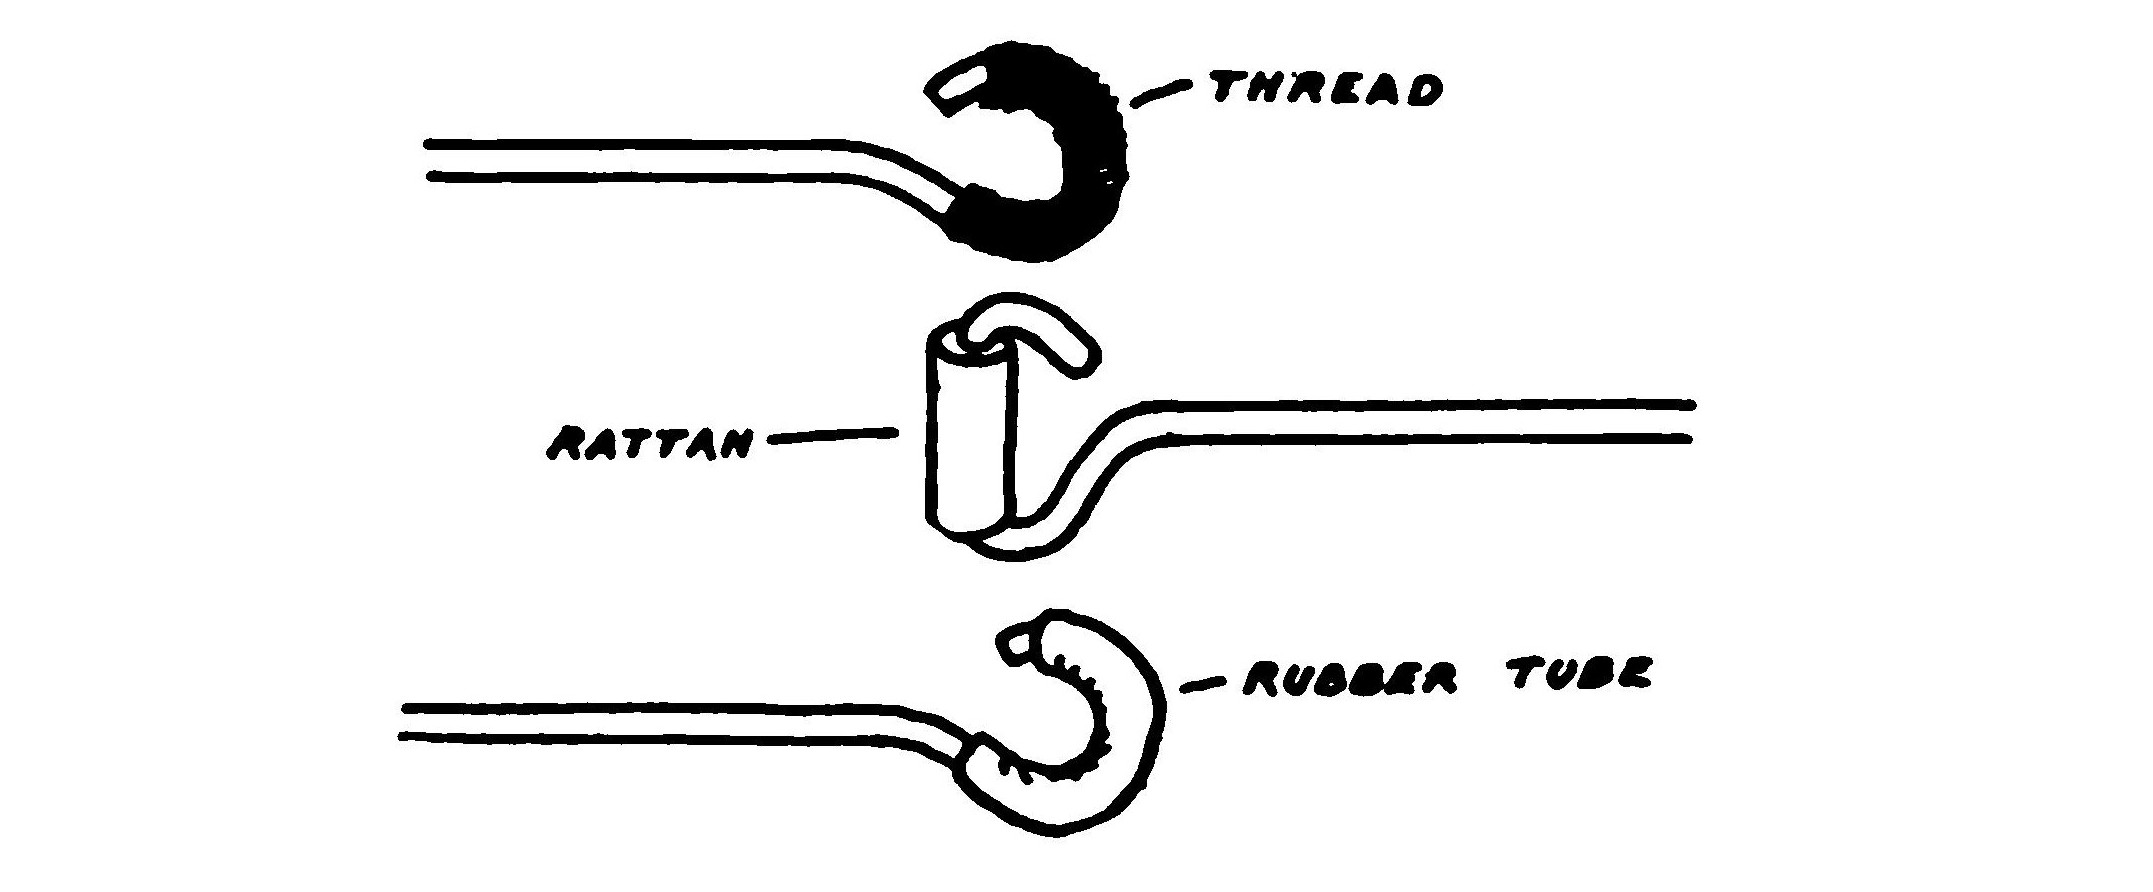
The hooks at either end of the rubber skein are apt to cut the rubber unless some precautions are taken to prevent it. This can be done by binding with cotton thread or slipping a piece of rubber tubing or aluminum over the hook as shown in Fig. 52.
CHAPTER VIII. BUILDING AND FLYING MODEL AEROPLANES.
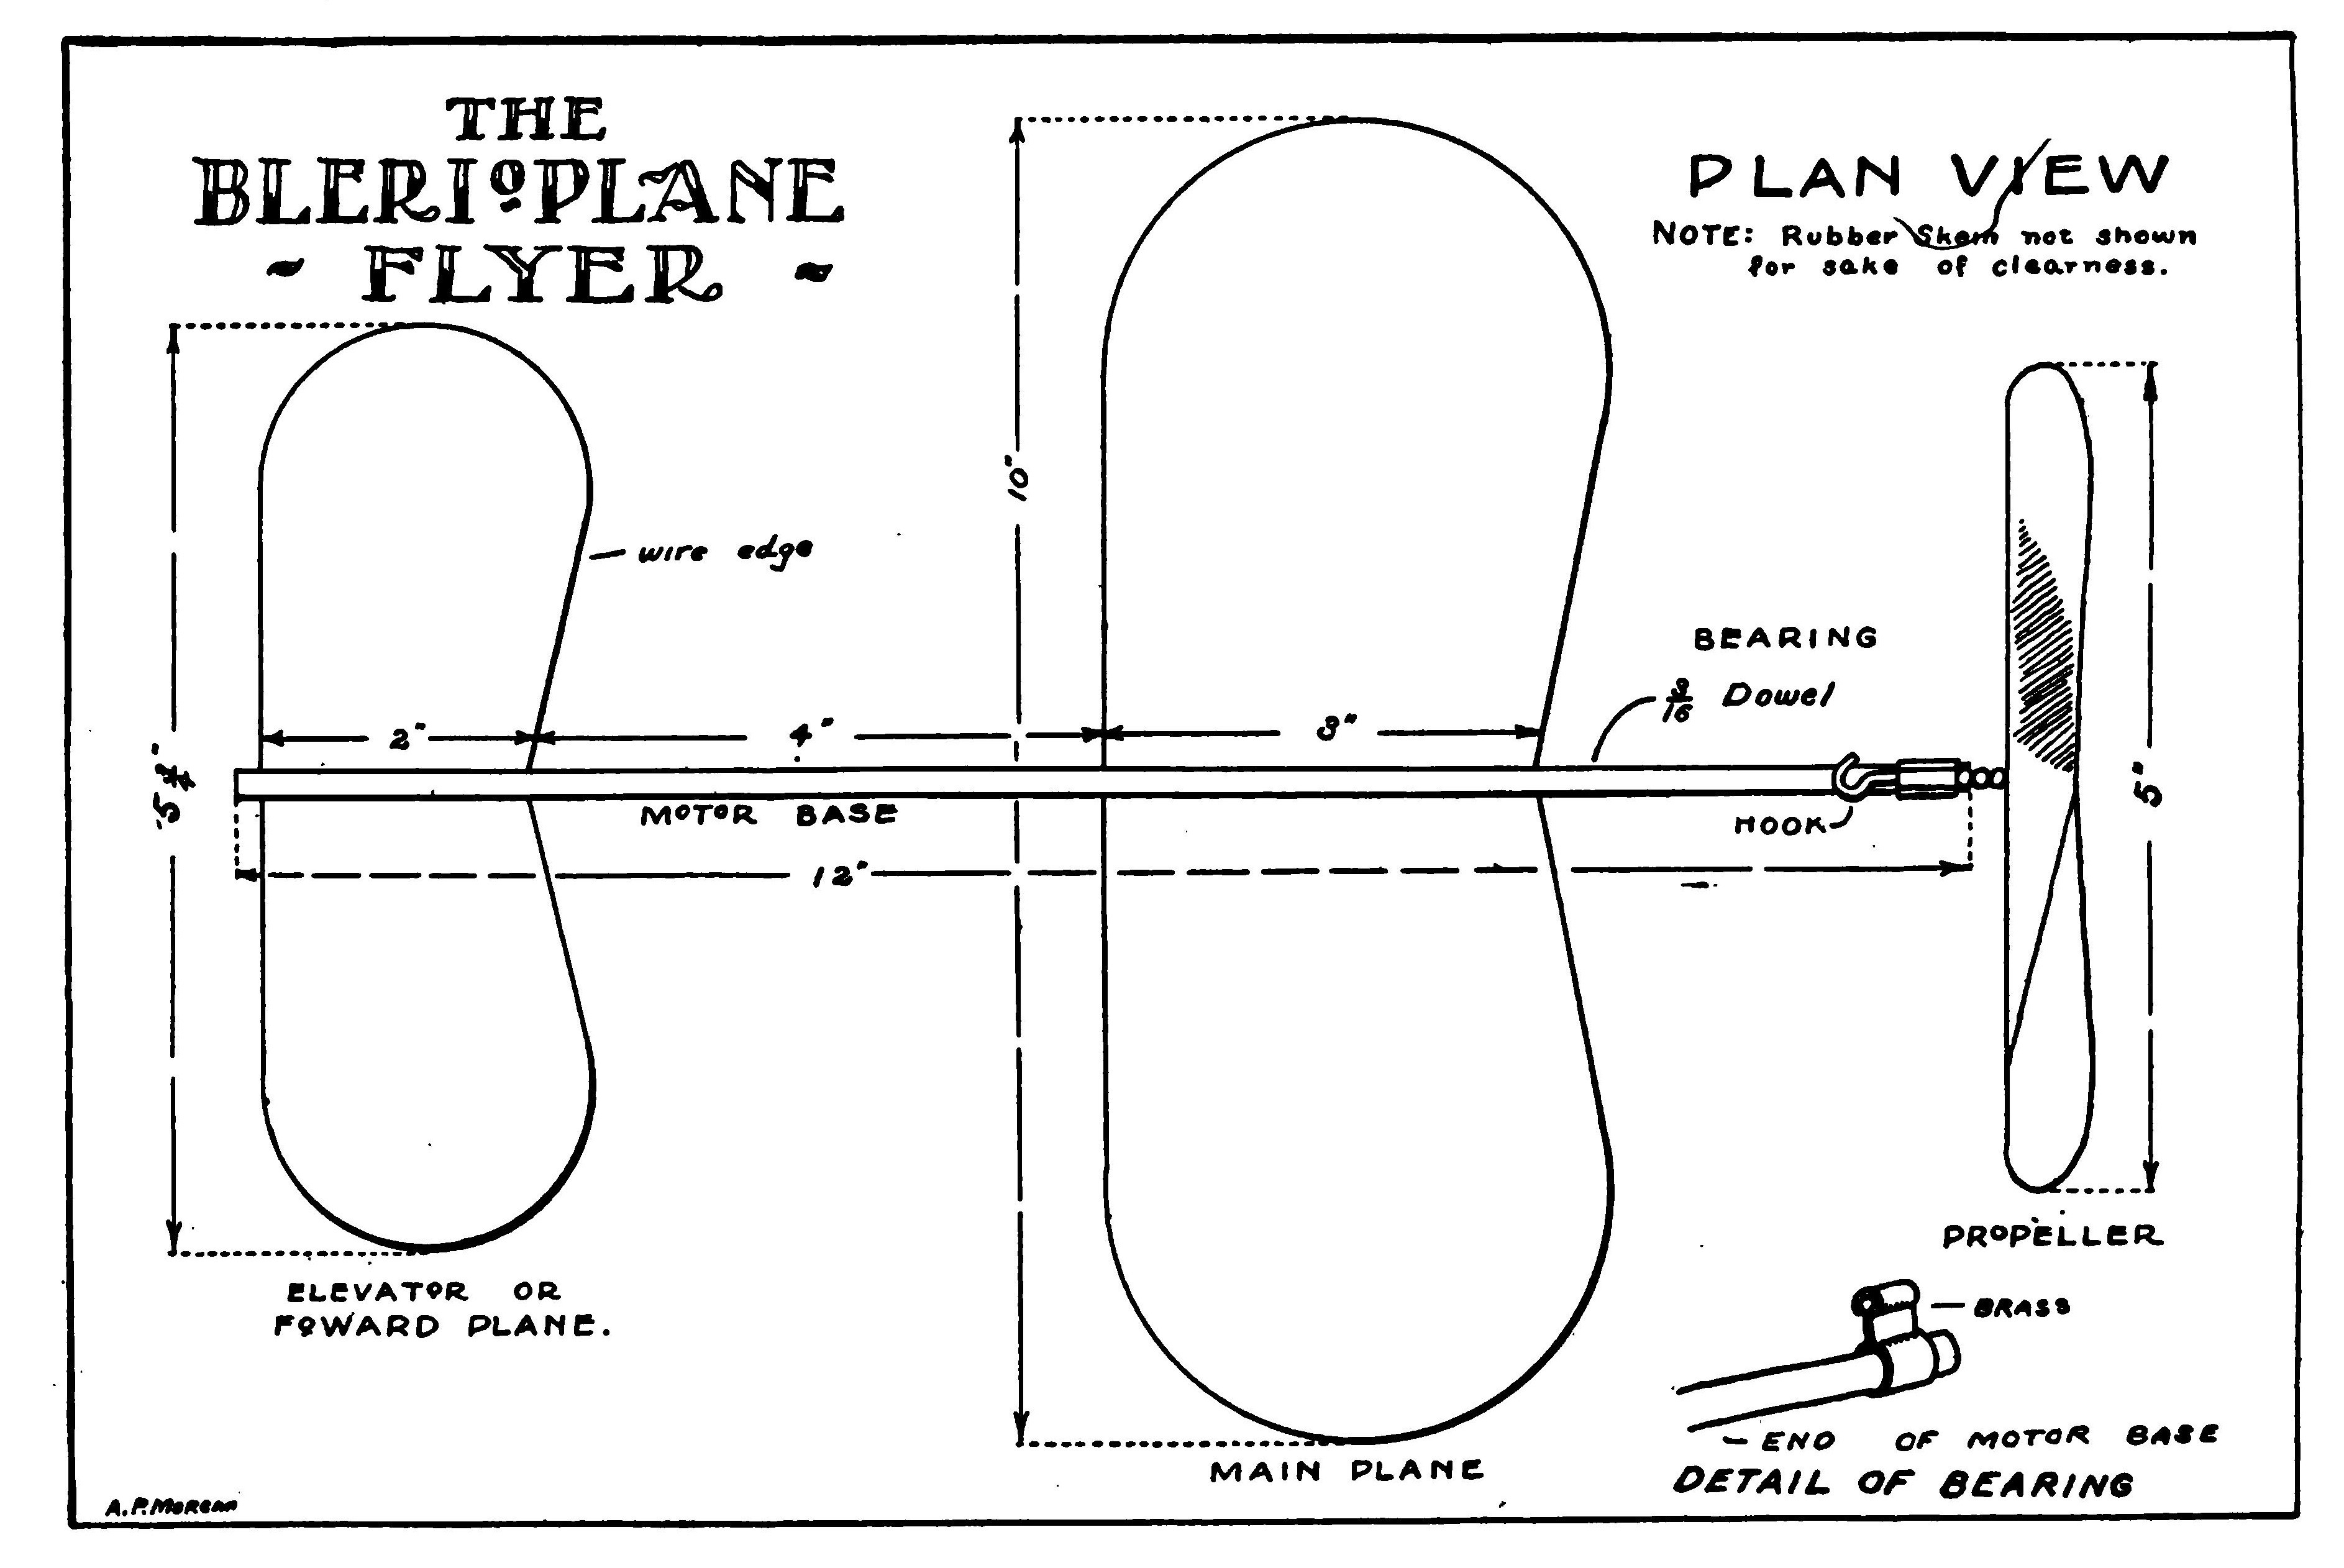
The Blerioplane Flyer. (Plate II.)
The Blerioplane Flyer is of the simple monoplane type and is very easily constructed. It is a remarkable flyer when properly adjusted and will fly over one hundred and fifty feet.
The motor base is a piece of 3/16 dowel, 12 inches long. The edges of the planes are made of fine steel piano wire bent to the shape shown in Plate I. The planes are covered with silk which is carefully turned over at the edges, around the wires and fastened either by sewing or with bamboo varnish. The dimensions of the planes are clearly shown in the illustration.
The propeller is placed at the rear of the machine, the smaller plane being considered the elevator. The bearing is shown in detail in the accompanying illustration. It is made by folding and bending a piece of sheet brass into the shape shown. A piece of steel piano wire is passed through the forward end of the motor base to act as an anchor hook for the rubber band.
The propeller is easily wound up by hand.
One side of the main plane will have to be made slightly larger than the other in some cases in order to counteract the twisting action of the propeller by one side of the machine more of a lift than the other.
The planes are adjusted by bending the wire edge. They should form a slight dihedral angle. The rubber strands lie along the top of the motor base so as to bring the centre of the propeller thrust coincident with the centre of pressure on the planes. Bending the front edge of the planes down will cause the machine to take a downward path while bending them up will cause the aeroplane to fly higher. A little experimental work will determine the proper position.
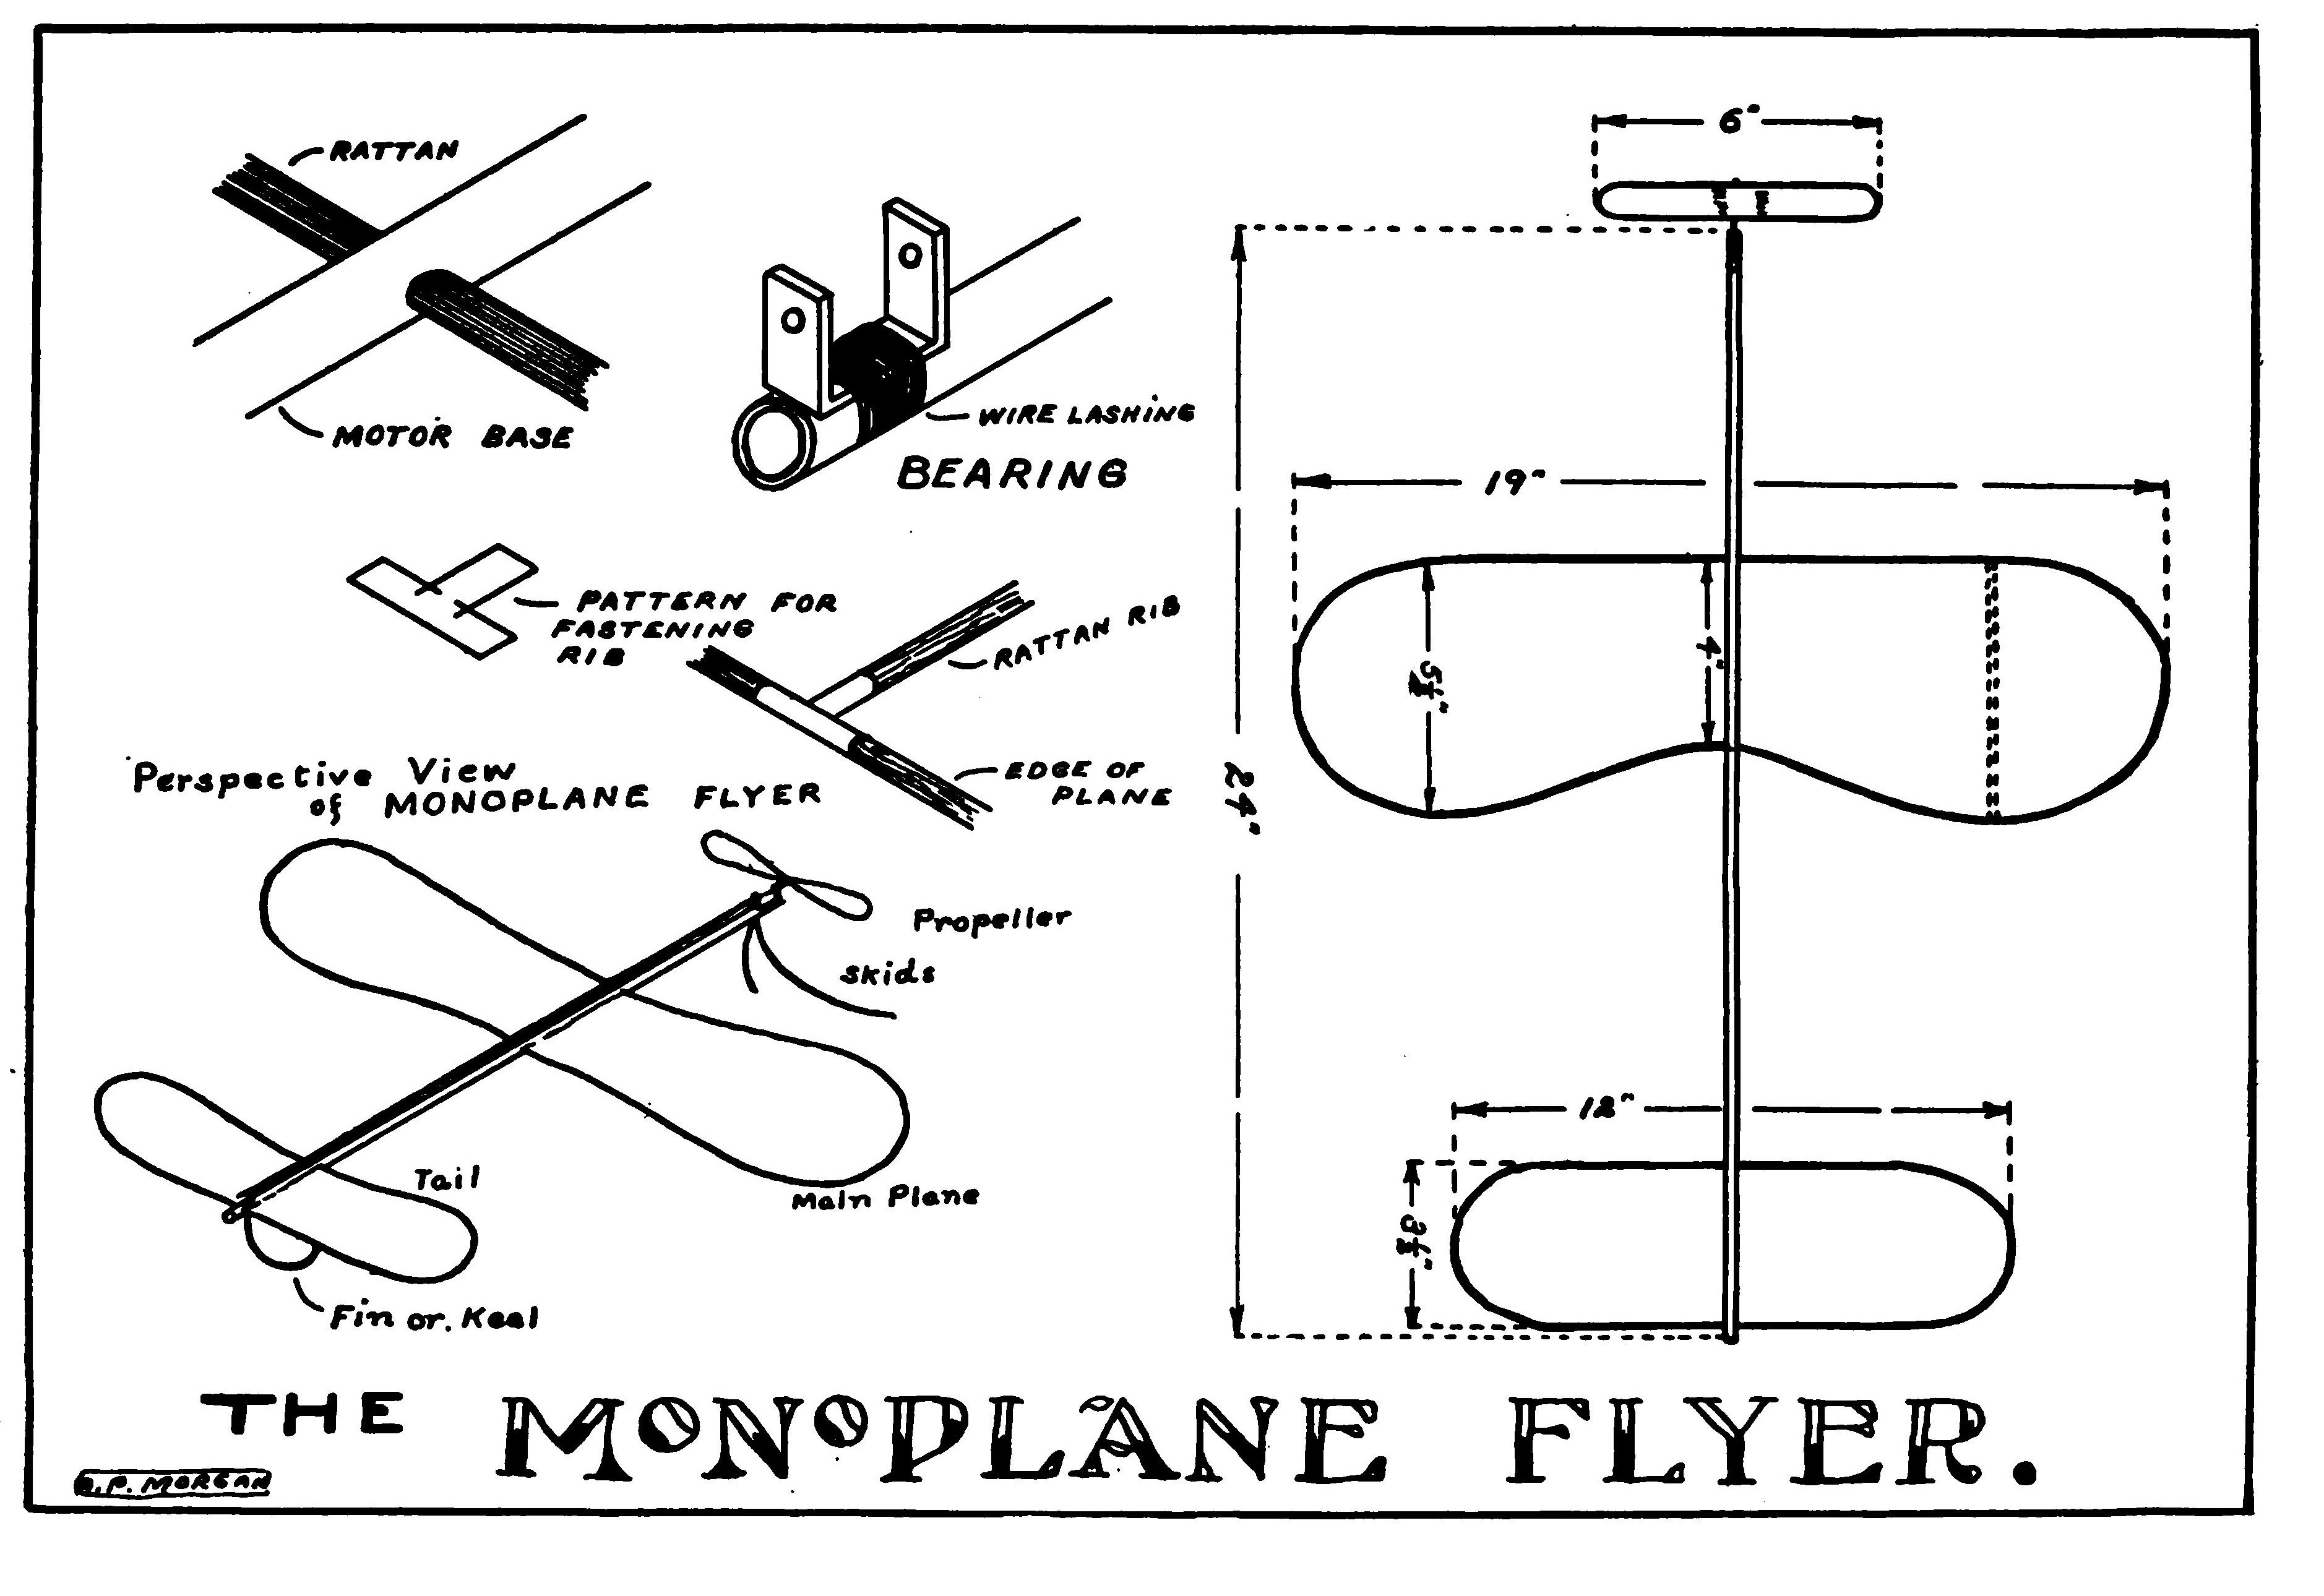
The Monoplane Flyer. (Plate III.)
The fusellage or "backbone" of the machine is formed out of a piece of thin walled aluminum tubing having an outside diameter of one-quarter of an inch and measuring twenty-four inches long.
The framework of the planes is formed out of rattan reed, one-eighth of an inch in diameter. The main plane is 19 inches across from tip to tip. It is 4 inches deep at the centre and 5 1/2 inches at the widest point near the tips. The framework is spread near the centre of each wing by a piece of rattan reed 5 1/4 inches long. The ends of the reed are joined by rolling a small piece of copper sheet into a tube and closing it around the reed tightly with a pair of pliers.
The reed forming the frame of the plane passes through a hole in the aluminum tube.
The plane forming the tail is almost the same in all respects save that of size as the forward main plane.
A small vertical fin 3 inches wide and 3 1/2 inches deep is placed below the tail plane, in line with the "backbone" to act as a keel or rudder and hold the machine to a straight course.
The covering of the planes is China silk or bamboo paper coated with bamboo varnish.
The bearing is made out of sheet brass bent into the shape shown and fastened to the tube by lashing with a wire.
The propeller should be 6 inches in diameter. One or two glass beads placed between the bearing and the propeller will reduce the friction.
The motive power consists of 8 strands of 3/32 x 3/32 inch rubber connected at one end to the propeller and at the other to a hook at the rear end of the aluminum tube.
The machine is provided with two piano wire skids to protect the propeller in landing.
If the aeroplane tends to rise too abruptly when in flight, bend the rear edge of the main planes up. If on the contrary, it dips or dives, bend the rear edge down.
The Baby Racer. (Plate IV.)
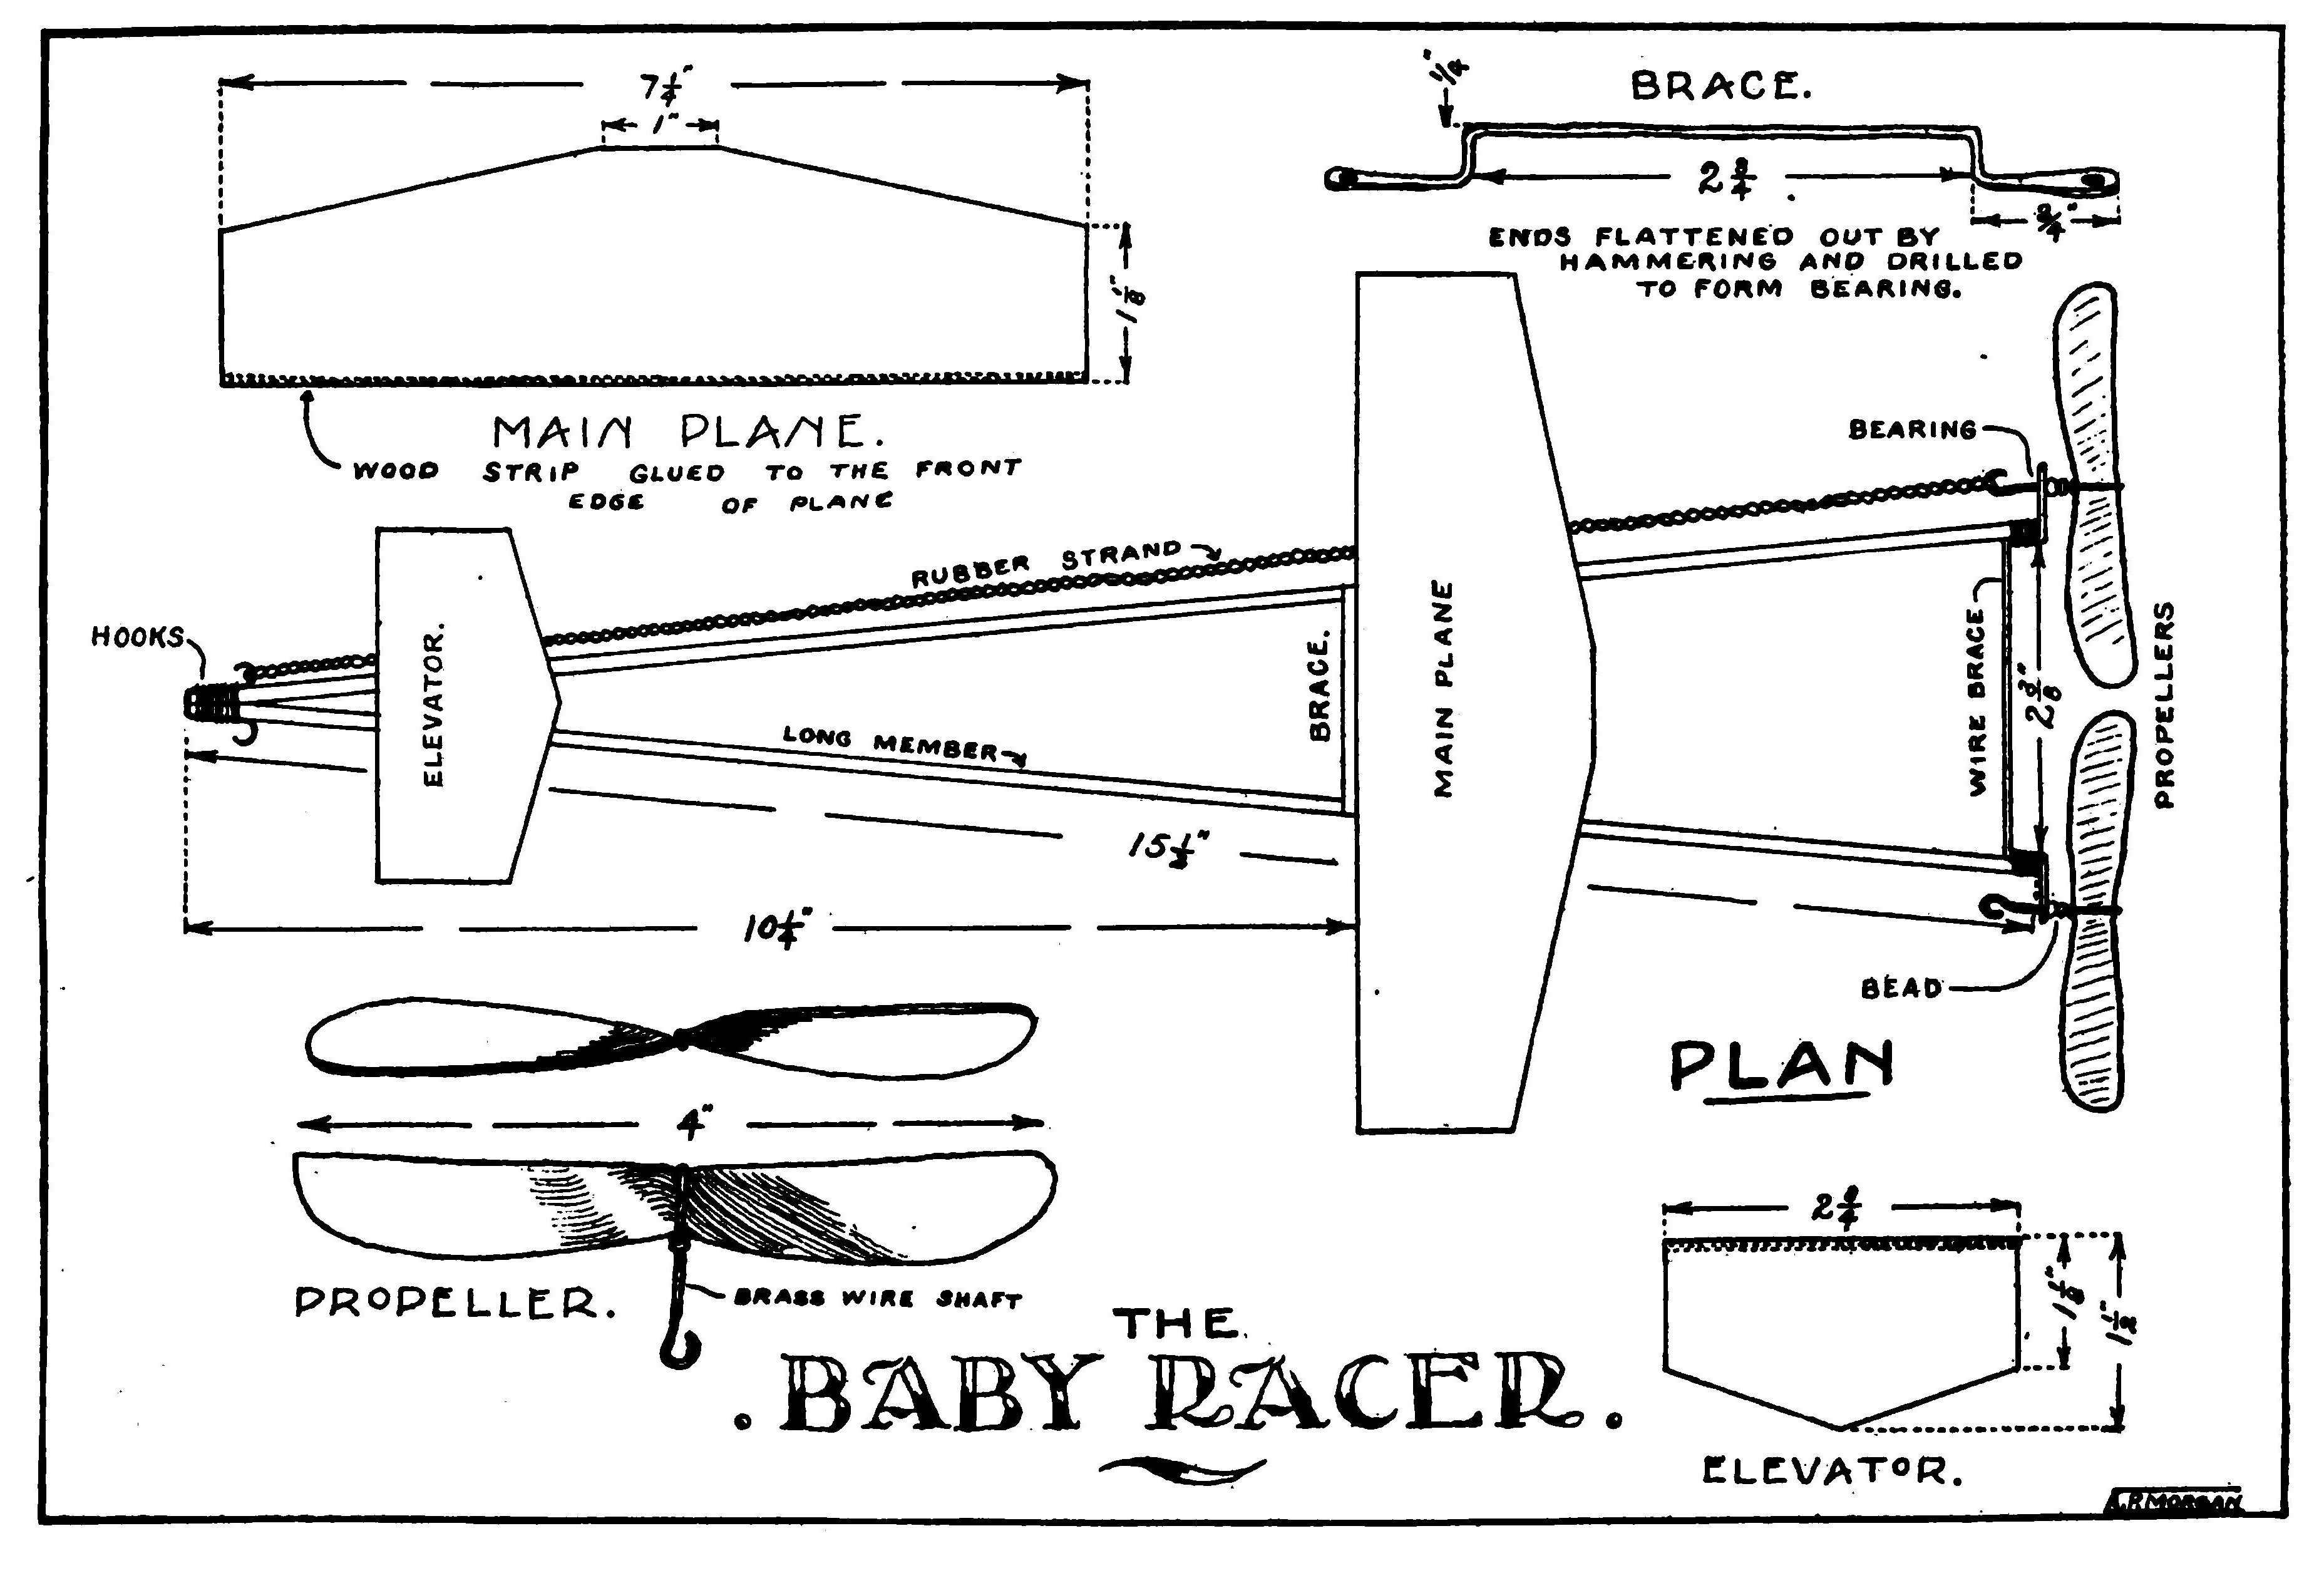
This is one of the smallest and simplest machines of the twin propelled racing models. The two main members of the motor base or fusellage are 1/8" x 1/8" in section and 5 1/2 inches long. One end of each is tapered and then glued and bound with strong thread. The opposite ends are held apart by a brace made from flat steel wire. The wire is hammered out flat at the ends and drilled with a small hole to form a propeller bearing. The details of the brace are given in the upper right-hand corner of the plate. The brace is fastened to the sticks by lashing with thread.
It is well to place a small wooden brace across the frame about midway of its length. This will serve to considerably stiffen the frame and prevent it from sagging under the tension of the rubber bands.
The planes are cut from stiff paper. The main plane is 7 1/4 inches across and the elevation plane 2 3/4 inches. Each plane is cut to the shape shown in the drawings and stiffened by gluing a thin wooden strip across the front edges of the planes.
A small piece of steel wire is passed around the front end of the frame and bent to form two anchor hooks for the rubber bands. It is then lashed firmly into position and the thread covered with glue so that it will not untwist if broken.
The propellers are made from thin whitewood or veneer. They are four inches in diameter and formed by steaming and bending. The shaft is formed out of brass wire by bending it around the centre of the propeller. Two small beads are slipped over the shaft to eliminate friction between the propeller and the bearing.
The planes are held in position by small rubber bands. The sketches in Fig. 53 explain exactly how this is accomplished.
The sticks glued along the front edges of the planes are sufficient to give them a slight angle. The machine is controlled by moving the planes back and forth so as to shift their lifting effort to the proper position.
The motor consists of two strands of 3/32 x 3/32 rubber attached to each propeller.
The Peerless Racer. (Plate V.)
This excellent flyer is very simple to put together and by carefully following the directions anyone can construct the machine and obtain splendid flights.
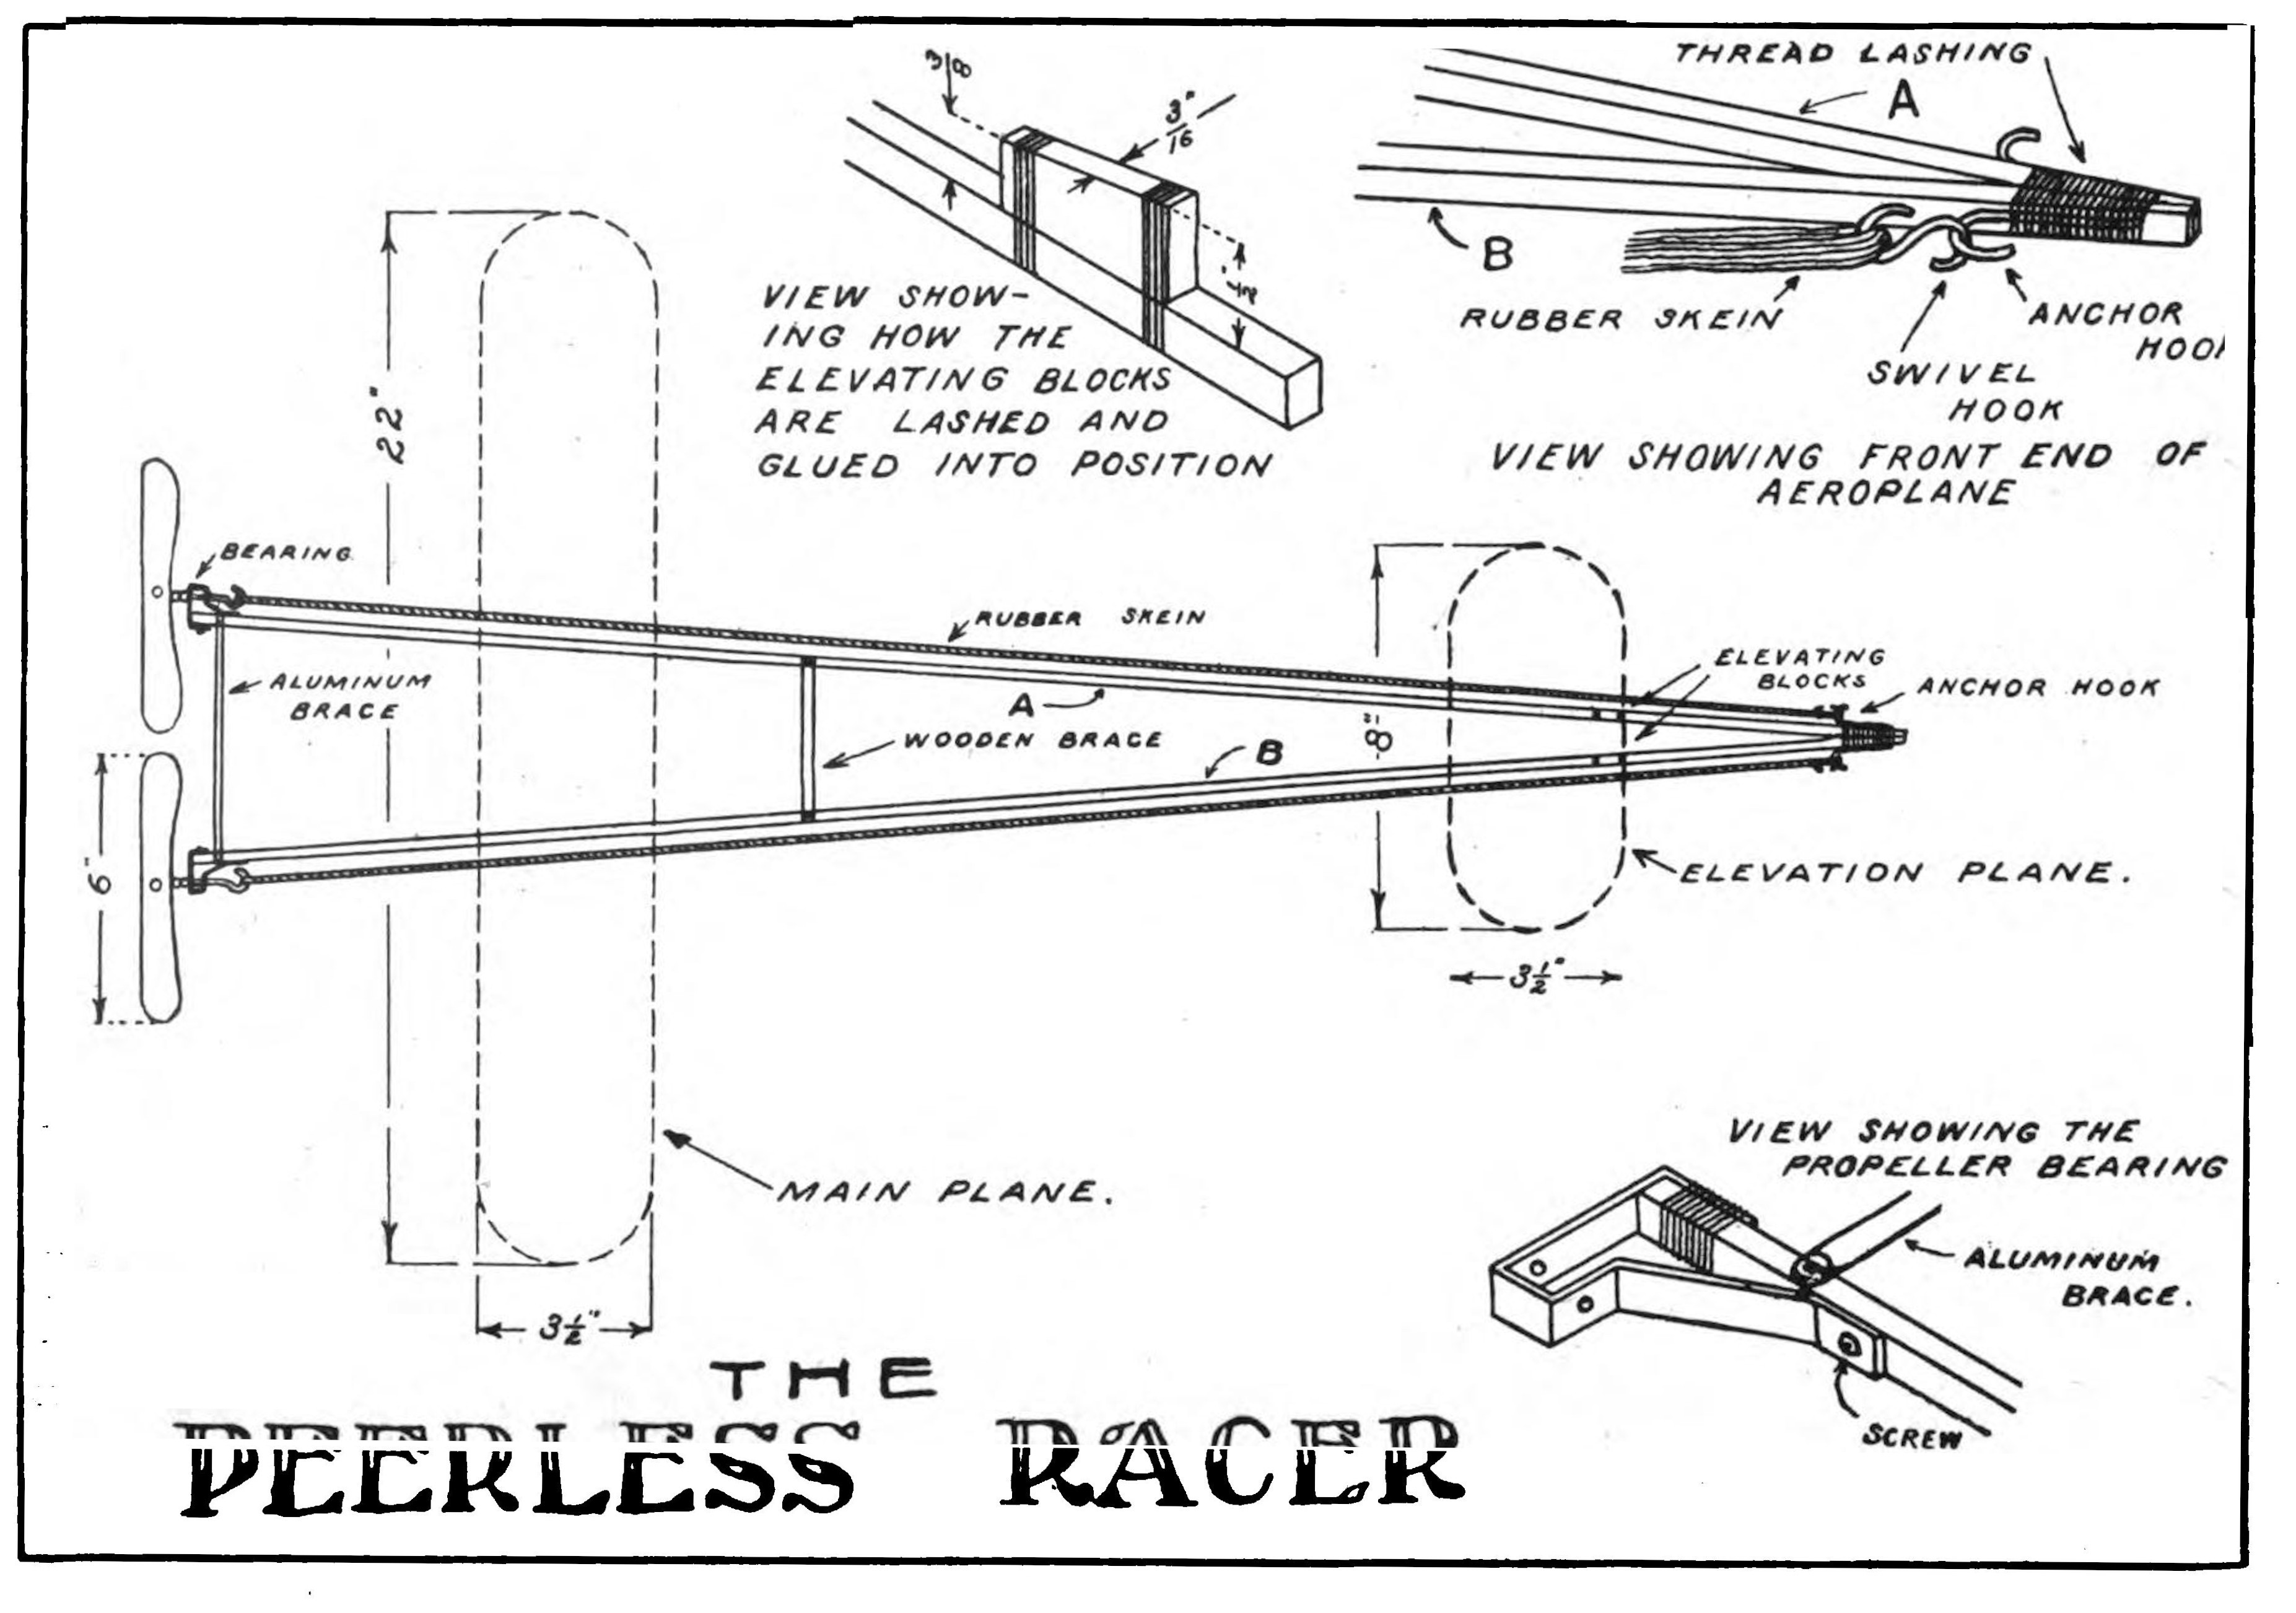
The two long members of the frame or fusellage, marked "A" and "B" in the drawing are 36 inches in length. They measure 1/4 x 3/16 in cross section.
Bevel one 1/4 inch side of one end of each of the two long sticks so that they can be joined to form an angle as shown in the upper right hand corner of the accompanying plate. The tip should not be greater than one quarter inch in width after joining. Glue the ends together using plenty of glue and before it has set, bind with strong linen thread, starting at the tip and winding back for about one inch. The surplus glue will squeeze out between the threads and when hard prevent them from unwinding if broken.
An aluminum brace must be made by flattening the ends of a piece of 1/8 inch aluminum rod. The rod should be about 5 1/4 inches long so that when the brace is placed 5/8 of an inch back from the ends of the sticks, the distance between them will be about 4 3/4 inches.
Glue and bind a small wooden cross brace to the frame, 12 inches from the rear end. The brace should be made 3/16 of an inch wide and 3/32 of an inch thick.
The elevating blocks are 3/4 of an inch long, 3/16 of an inch thick, 3/8 of an inch high at the rear and 1/2 inch high at the front. They should be fastened to the machine by gluing and binding six inches back from the tip. The highest part of the blocks should be towards the front of the machine as shown in the illustration. Be careful to see that the frame is lined up perfectly true and then lay it aside until the glue dries.
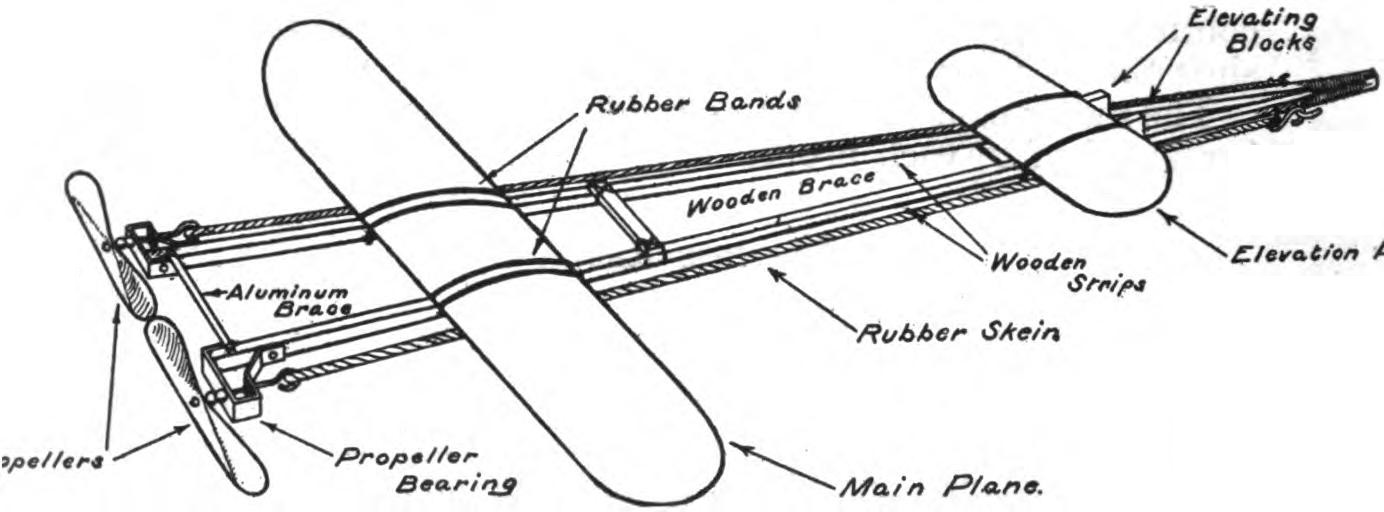
The propeller bearings are made from No. 18 hard sheet aluminum. It is cut into a strip 1/4 of an inch wide and then drilled and bent as shown in the accompanying illustrations. The bearings are screwed on the rear ends of the sticks "A" and "B." It is also a good plan to bind some linen thread around tightly.
Pass the propellers through the bearings and bend the end of the shaft into the shape of a hook, being very careful not to twist the bearings during the operation. A bead should be slipped over the propeller shaft previous to passing it through the bearing so that it comes between the bearing and the propeller and lessens the friction.
Bore a small hole through the frame of the machine 1/2 inch back from the tip, making the hole pass from side to side. Pass a piece of stiff wire through this hole and bend back each end snugly to the frame to form the anchor hooks as illustrated. Bind some thread over the anchor hooks to keep them from twisting.
Bend two small pieces of wire into "S" shaped hooks and slip one over each of the anchor hooks.
Pass the rubber skein through one of the "S" hooks and back to the hook in the end of the propeller shaft, weaving it back and forth seven times so that there are seven strands. Do the same with the other propeller. The ends of the rubber must be tied to the hook with some strong cotton cord. The cord should be soft and the rubber should be passed loosely around the hook so that it will not easily become cut.
The planes are made of hard fibre 1/32 of an inch thick. The main plane is 22 inches long and 3 1/2 inches wide. The elevating plane is 8 inches long and 3 1/2 inches wide. The ends are rounded as shown in the illustration. Glue a strip of wood 1/16 x 3/16 inches to the front edge of each plane. The strip for the large main plane should be 19 inches long and that for the elevating plane 5 inches. The edges should be smoothed with a piece of fine sandpaper and rubbed down until they are dry.
The planes are attached to the frame by rubber bands in the usual manner. The edges of the planes should be squeezed together slightly until they are slightly concave on the under side. The position of the main plane will have to be determined by trial. The front edge of the elevating plane should rest on the elevating blocks.
The propeller should be given from 600-700 turns. The propellers should be six inches in diameter and of medium pitch.
The Peerless Racer is a splendid flyer and will fly over 1,000 feet if properly adjusted.
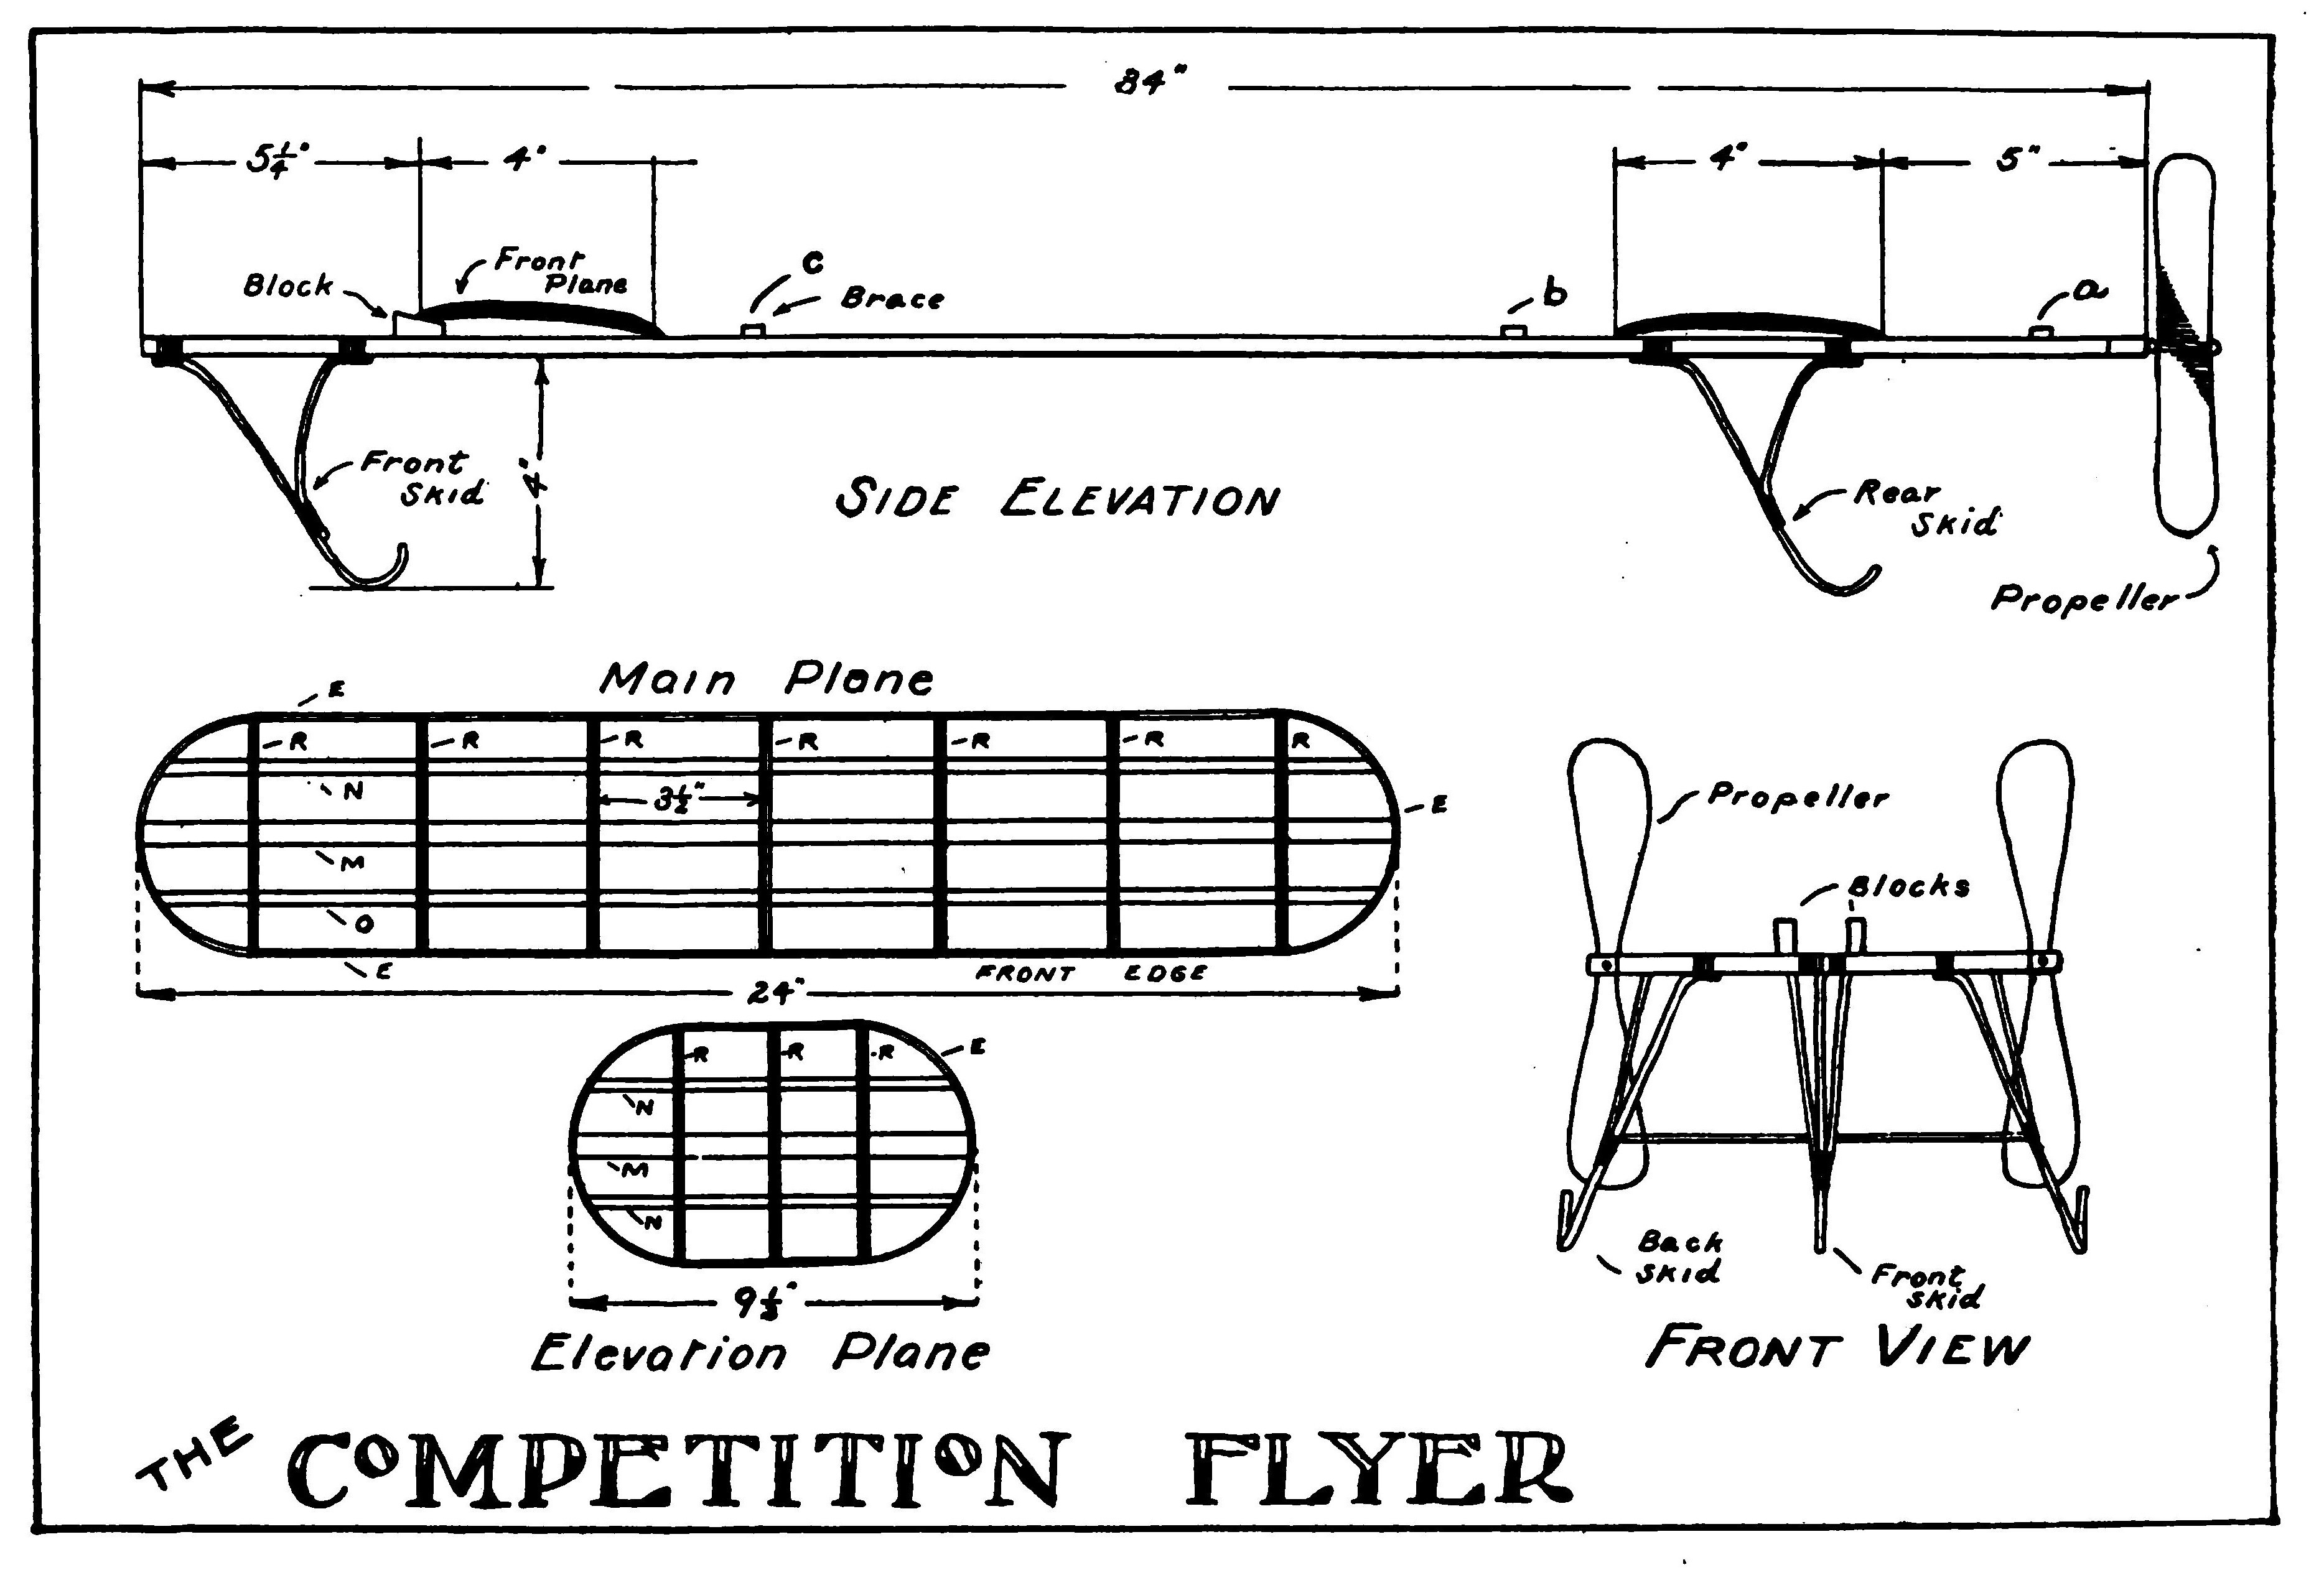
The Competition Flyer. (Plates VI and VII.)
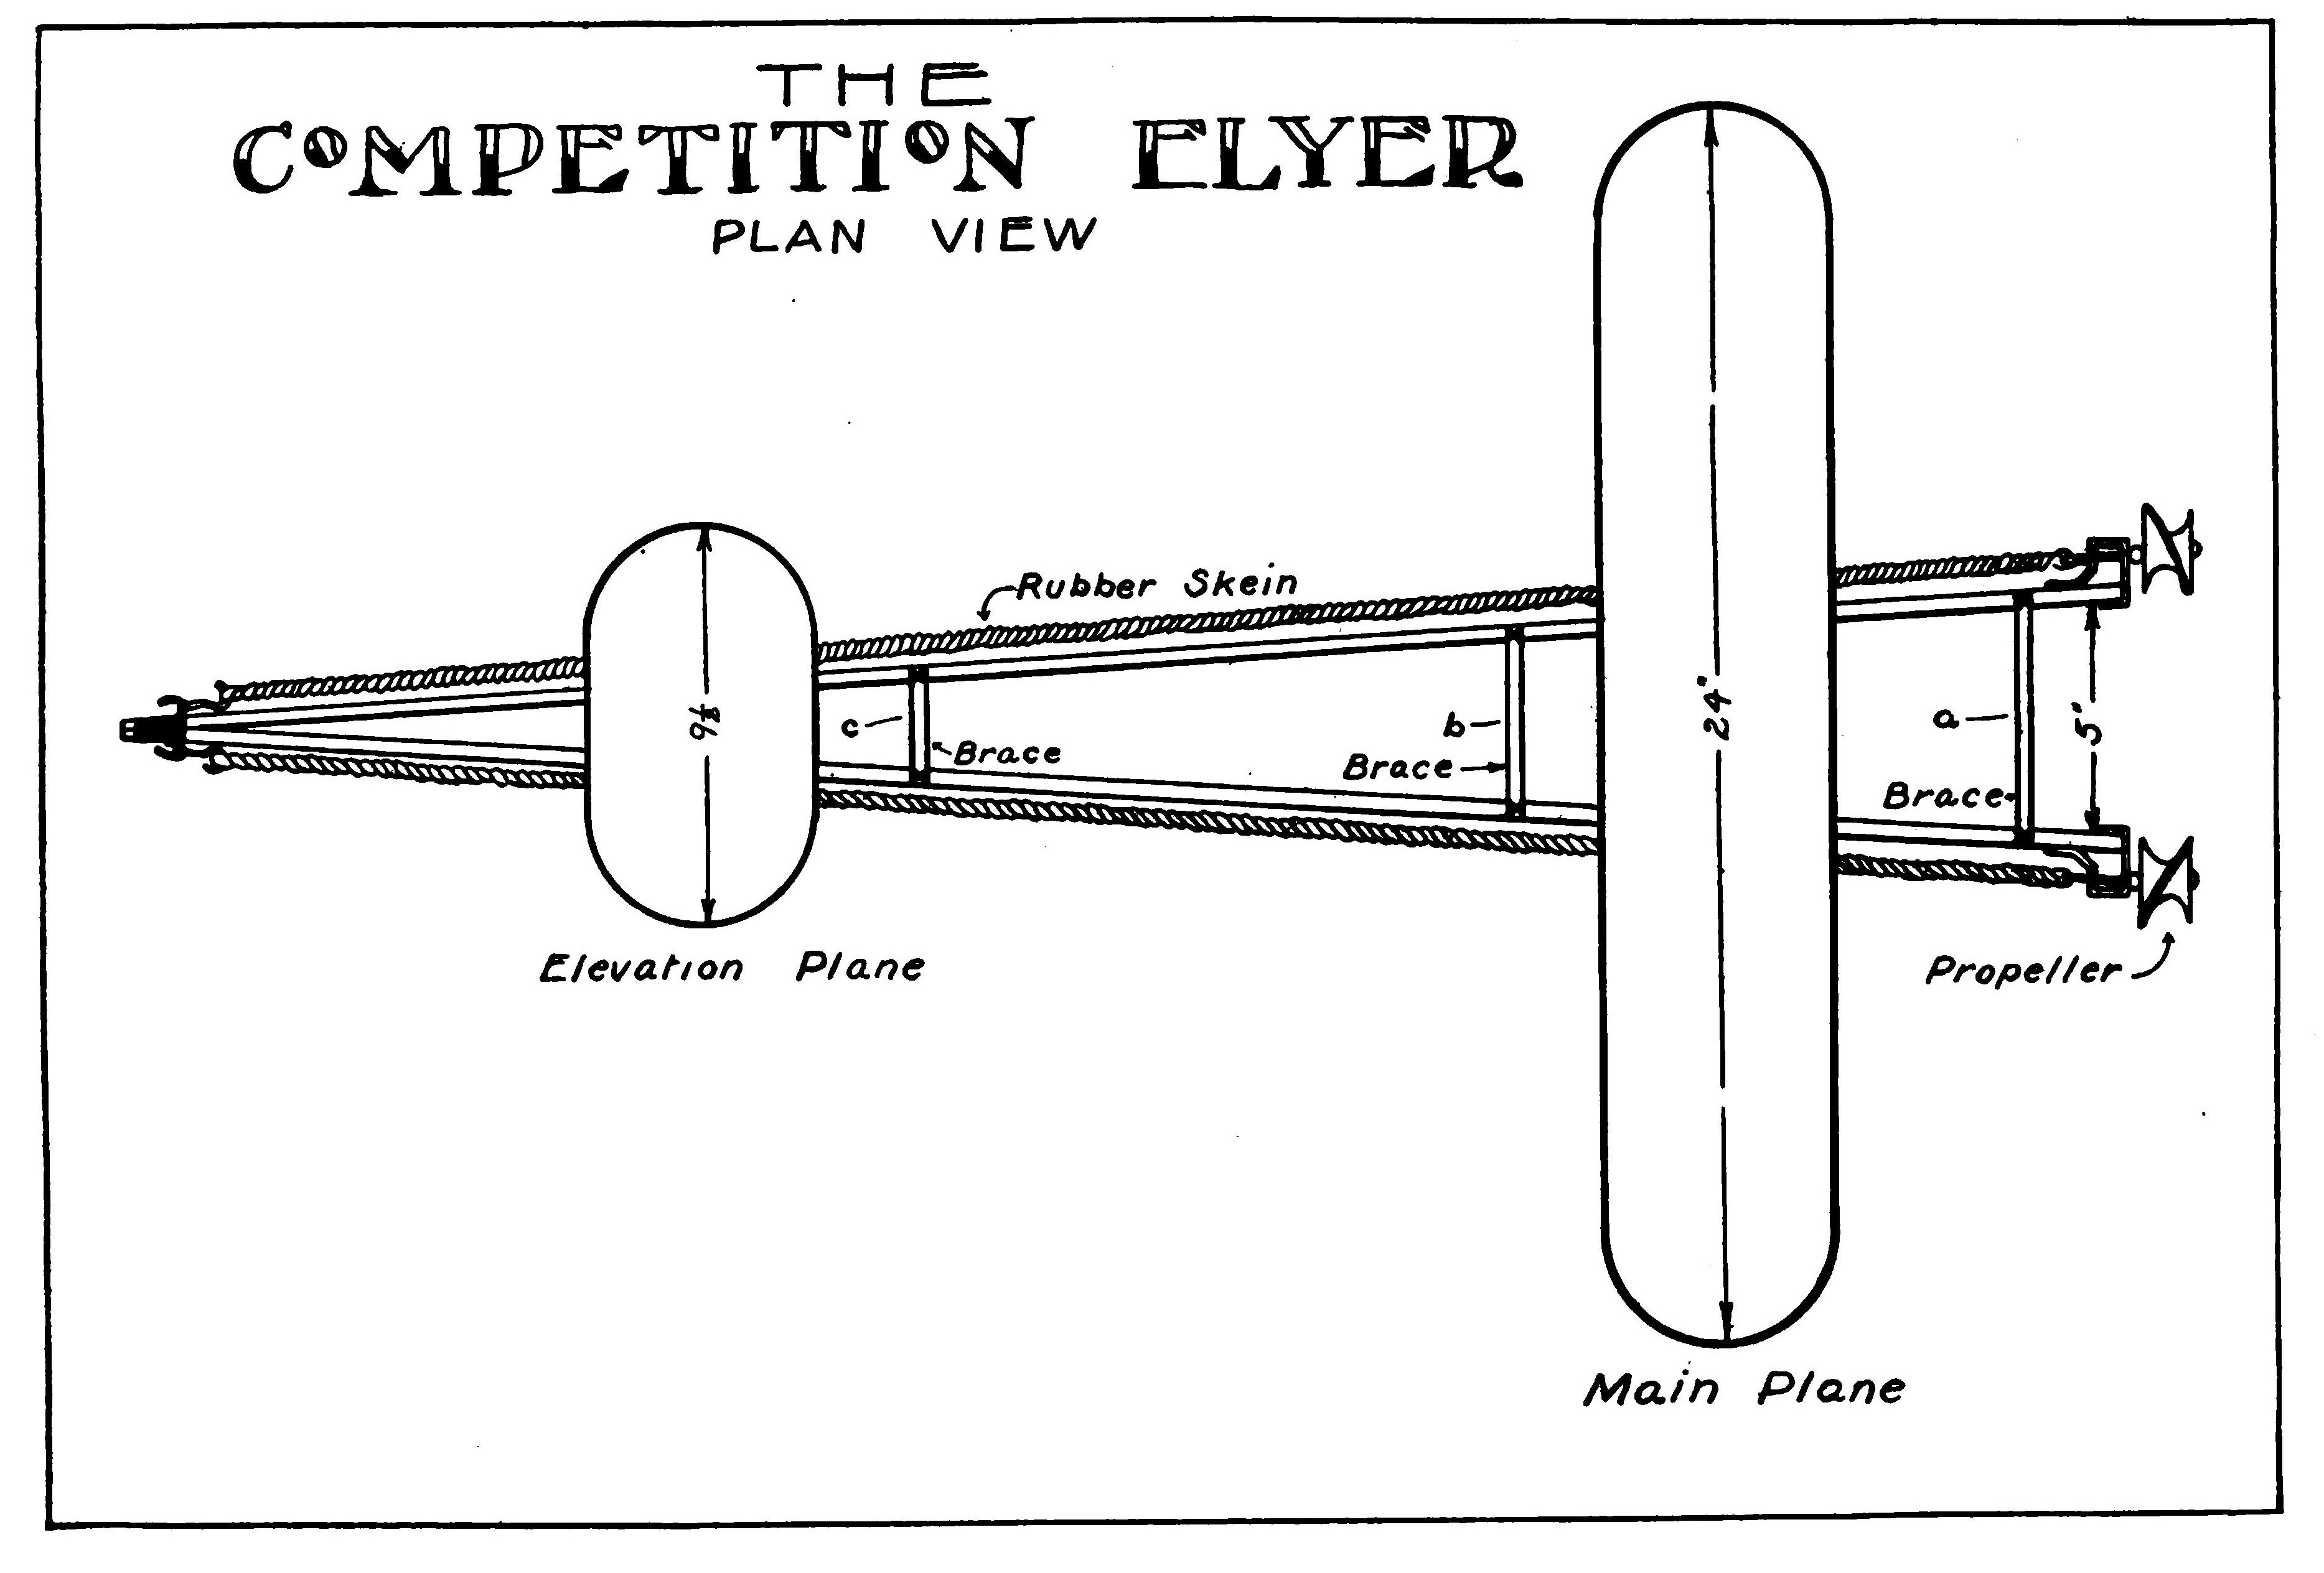
The Competition Flyer does not differ materially from the Peerless Racer just described except in some of the details of construction. The motor base of the machine is composed of two long members 36 inches in length tapered and lashed together at one end in the usual manner. The other ends are held apart by a wooden brace (marked a) about 4 7/8 inches long. Two other braces (marked b and c) are placed at equal distances along the frame.
The bearings used on this machine are similar to those used on the Peerless Racer and are fastened to the rear end of the frame by three small screws.
The planes of this machine are "built up" planes, that is, they are double surfaced. The main plane is 24 inches long and four inches broad.
The accompanying illustration shows the details of the planes. The long members of the planes are made of whitewood or spruce and the edges and ribs are split bamboo.
The elevating plane is 9 1/2 inches long and five inches wide.
The planes are covered with bamboo paper and then given a coat of bamboo varnish. The front plane is tilted upwards by two small elevating blocks similar to those used on the Peerless Racer.
The machine is fitted with skids made by bending 3/32 inch square split bamboo into the shape shown and lashing them to the frame. The skids protect the planes and the propeller of the machine from possible damage in landing.
The propellers should be of the racing type, six inches in diameter and carved out from a blank in the method described in the chapter on propellers.
The planes are held to the frame of the machine by rubber bands in the usual manner. Their exact position will have to be determined by experiment.
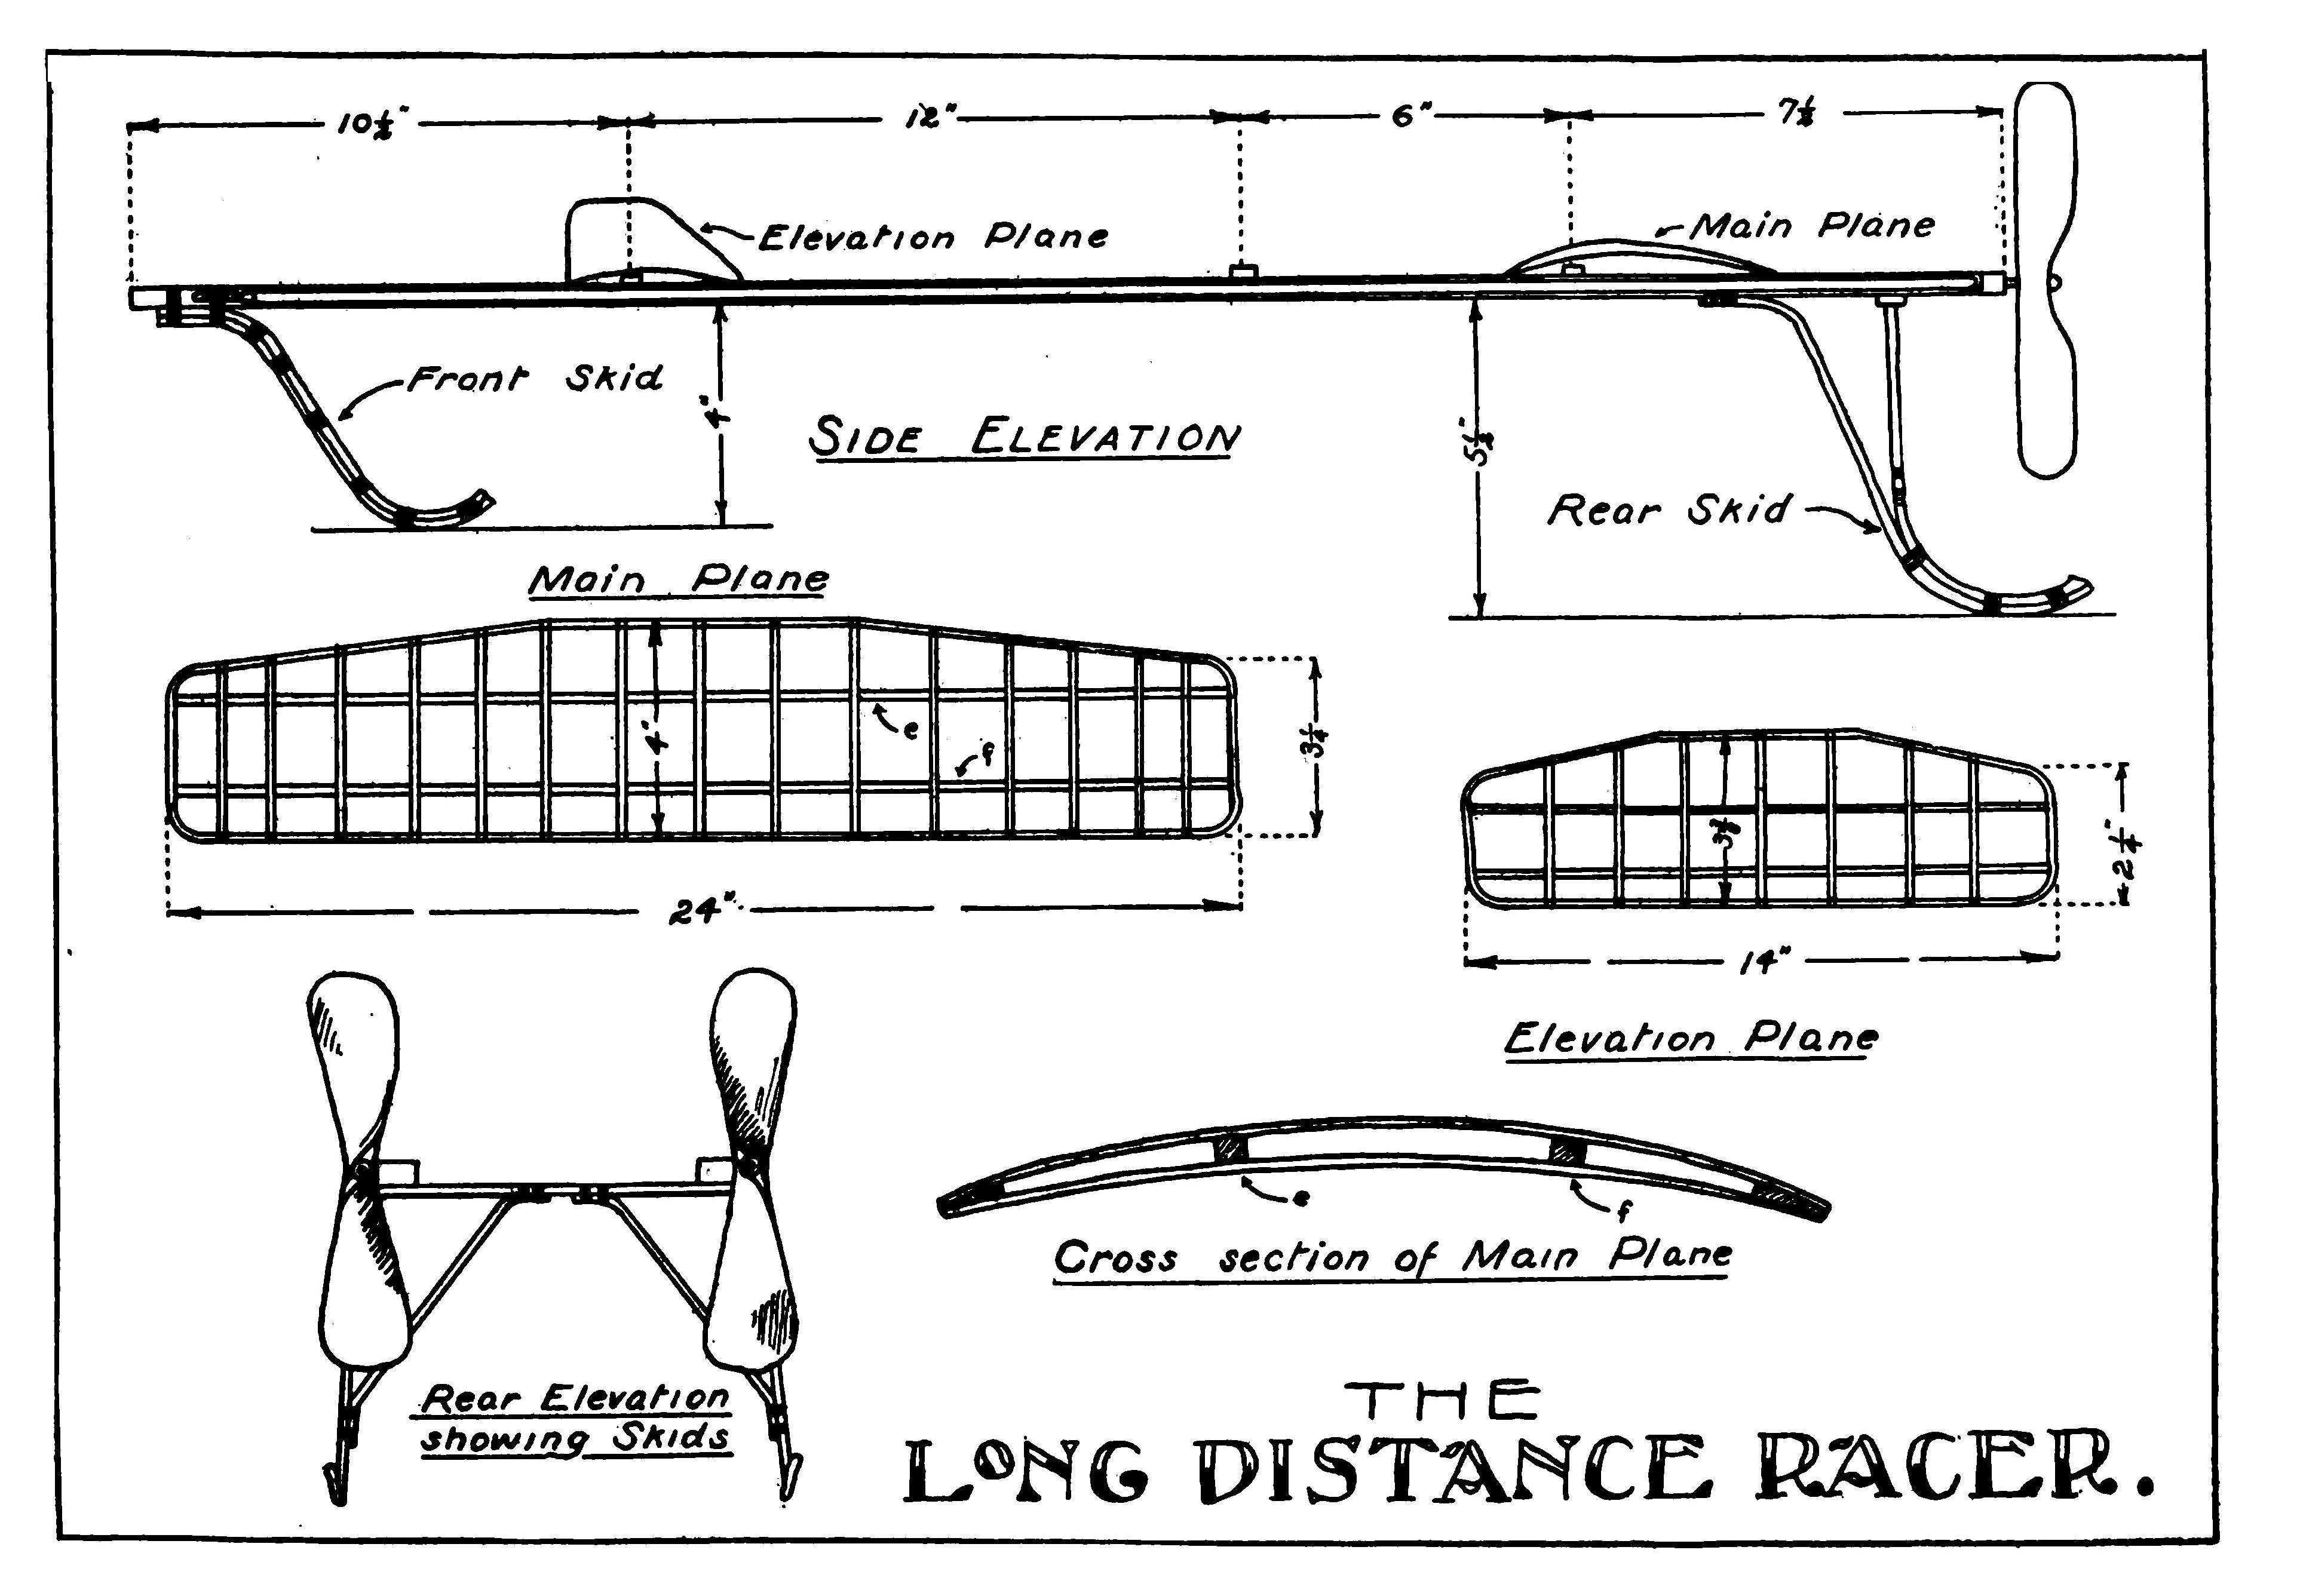
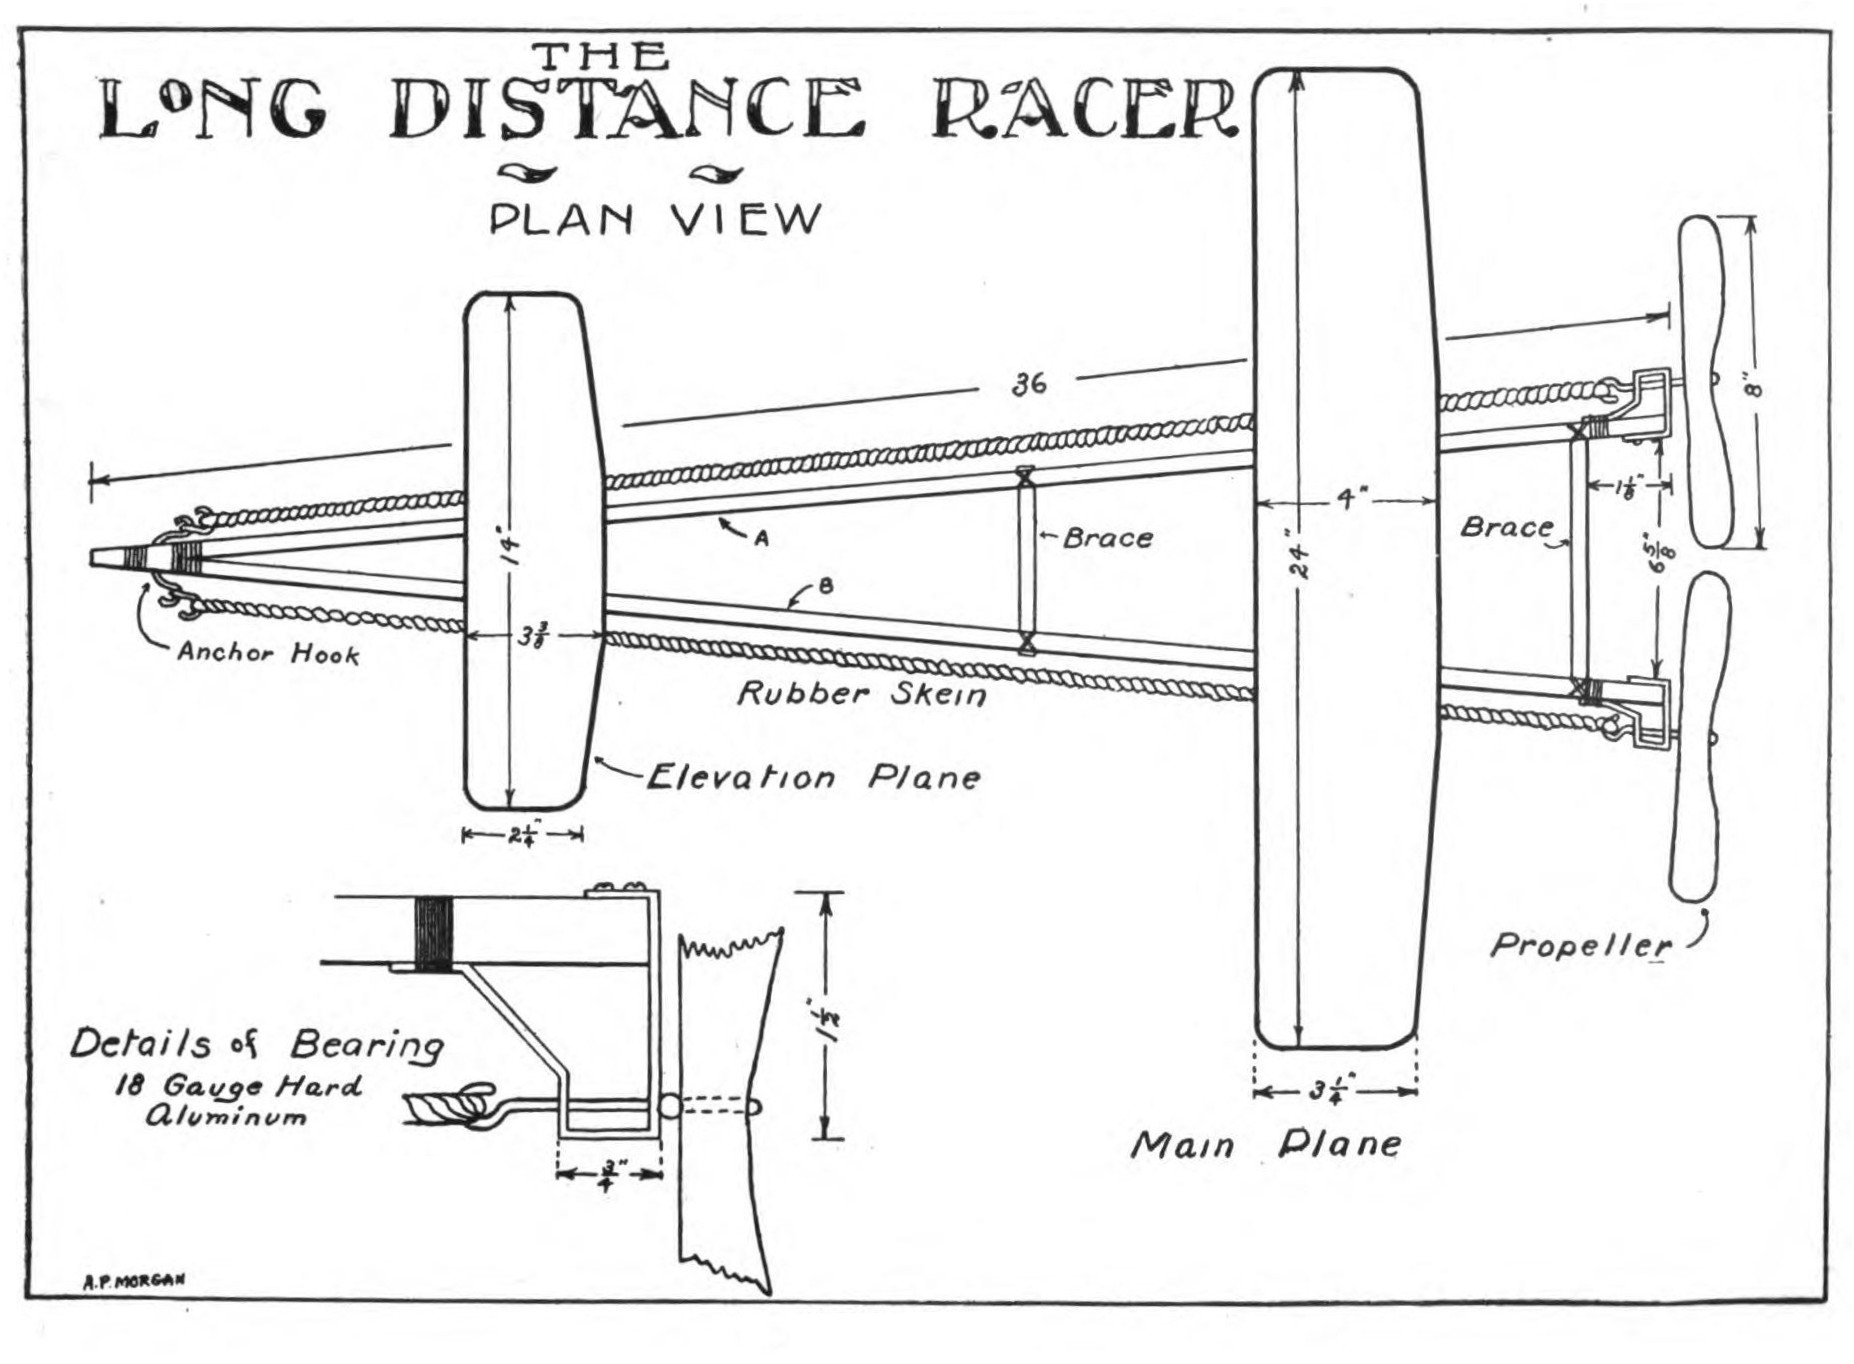
The Long Distance Racer. (Plates VIII and IX.)
The Long Distance Racer is a model adapted from the Competition Flyer and similar to it in many respects.
The drawings show the dimensions and arrangement of the various parts sufficiently well so that little comment is necessary.
The planes are of the built-up type, being made entirely from split bamboo according to the size and shape shown in the drawings. They are covered with bamboo paper and given two coats of bamboo varnish.
The propellers are of the racing type and carved from wood in the manner described in the chapter on propellers.
The machine is fitted with skids to prevent possible damage to the propeller and planes. The front plane is bent so as to form a slight dihedral angle. This tends to make the machine keep to a straight course.
The rubber skeins are each composed of 7 to 10 strands of 3/32 x 3/32 inch rubber. The best number will have to be determined for each particular machine.
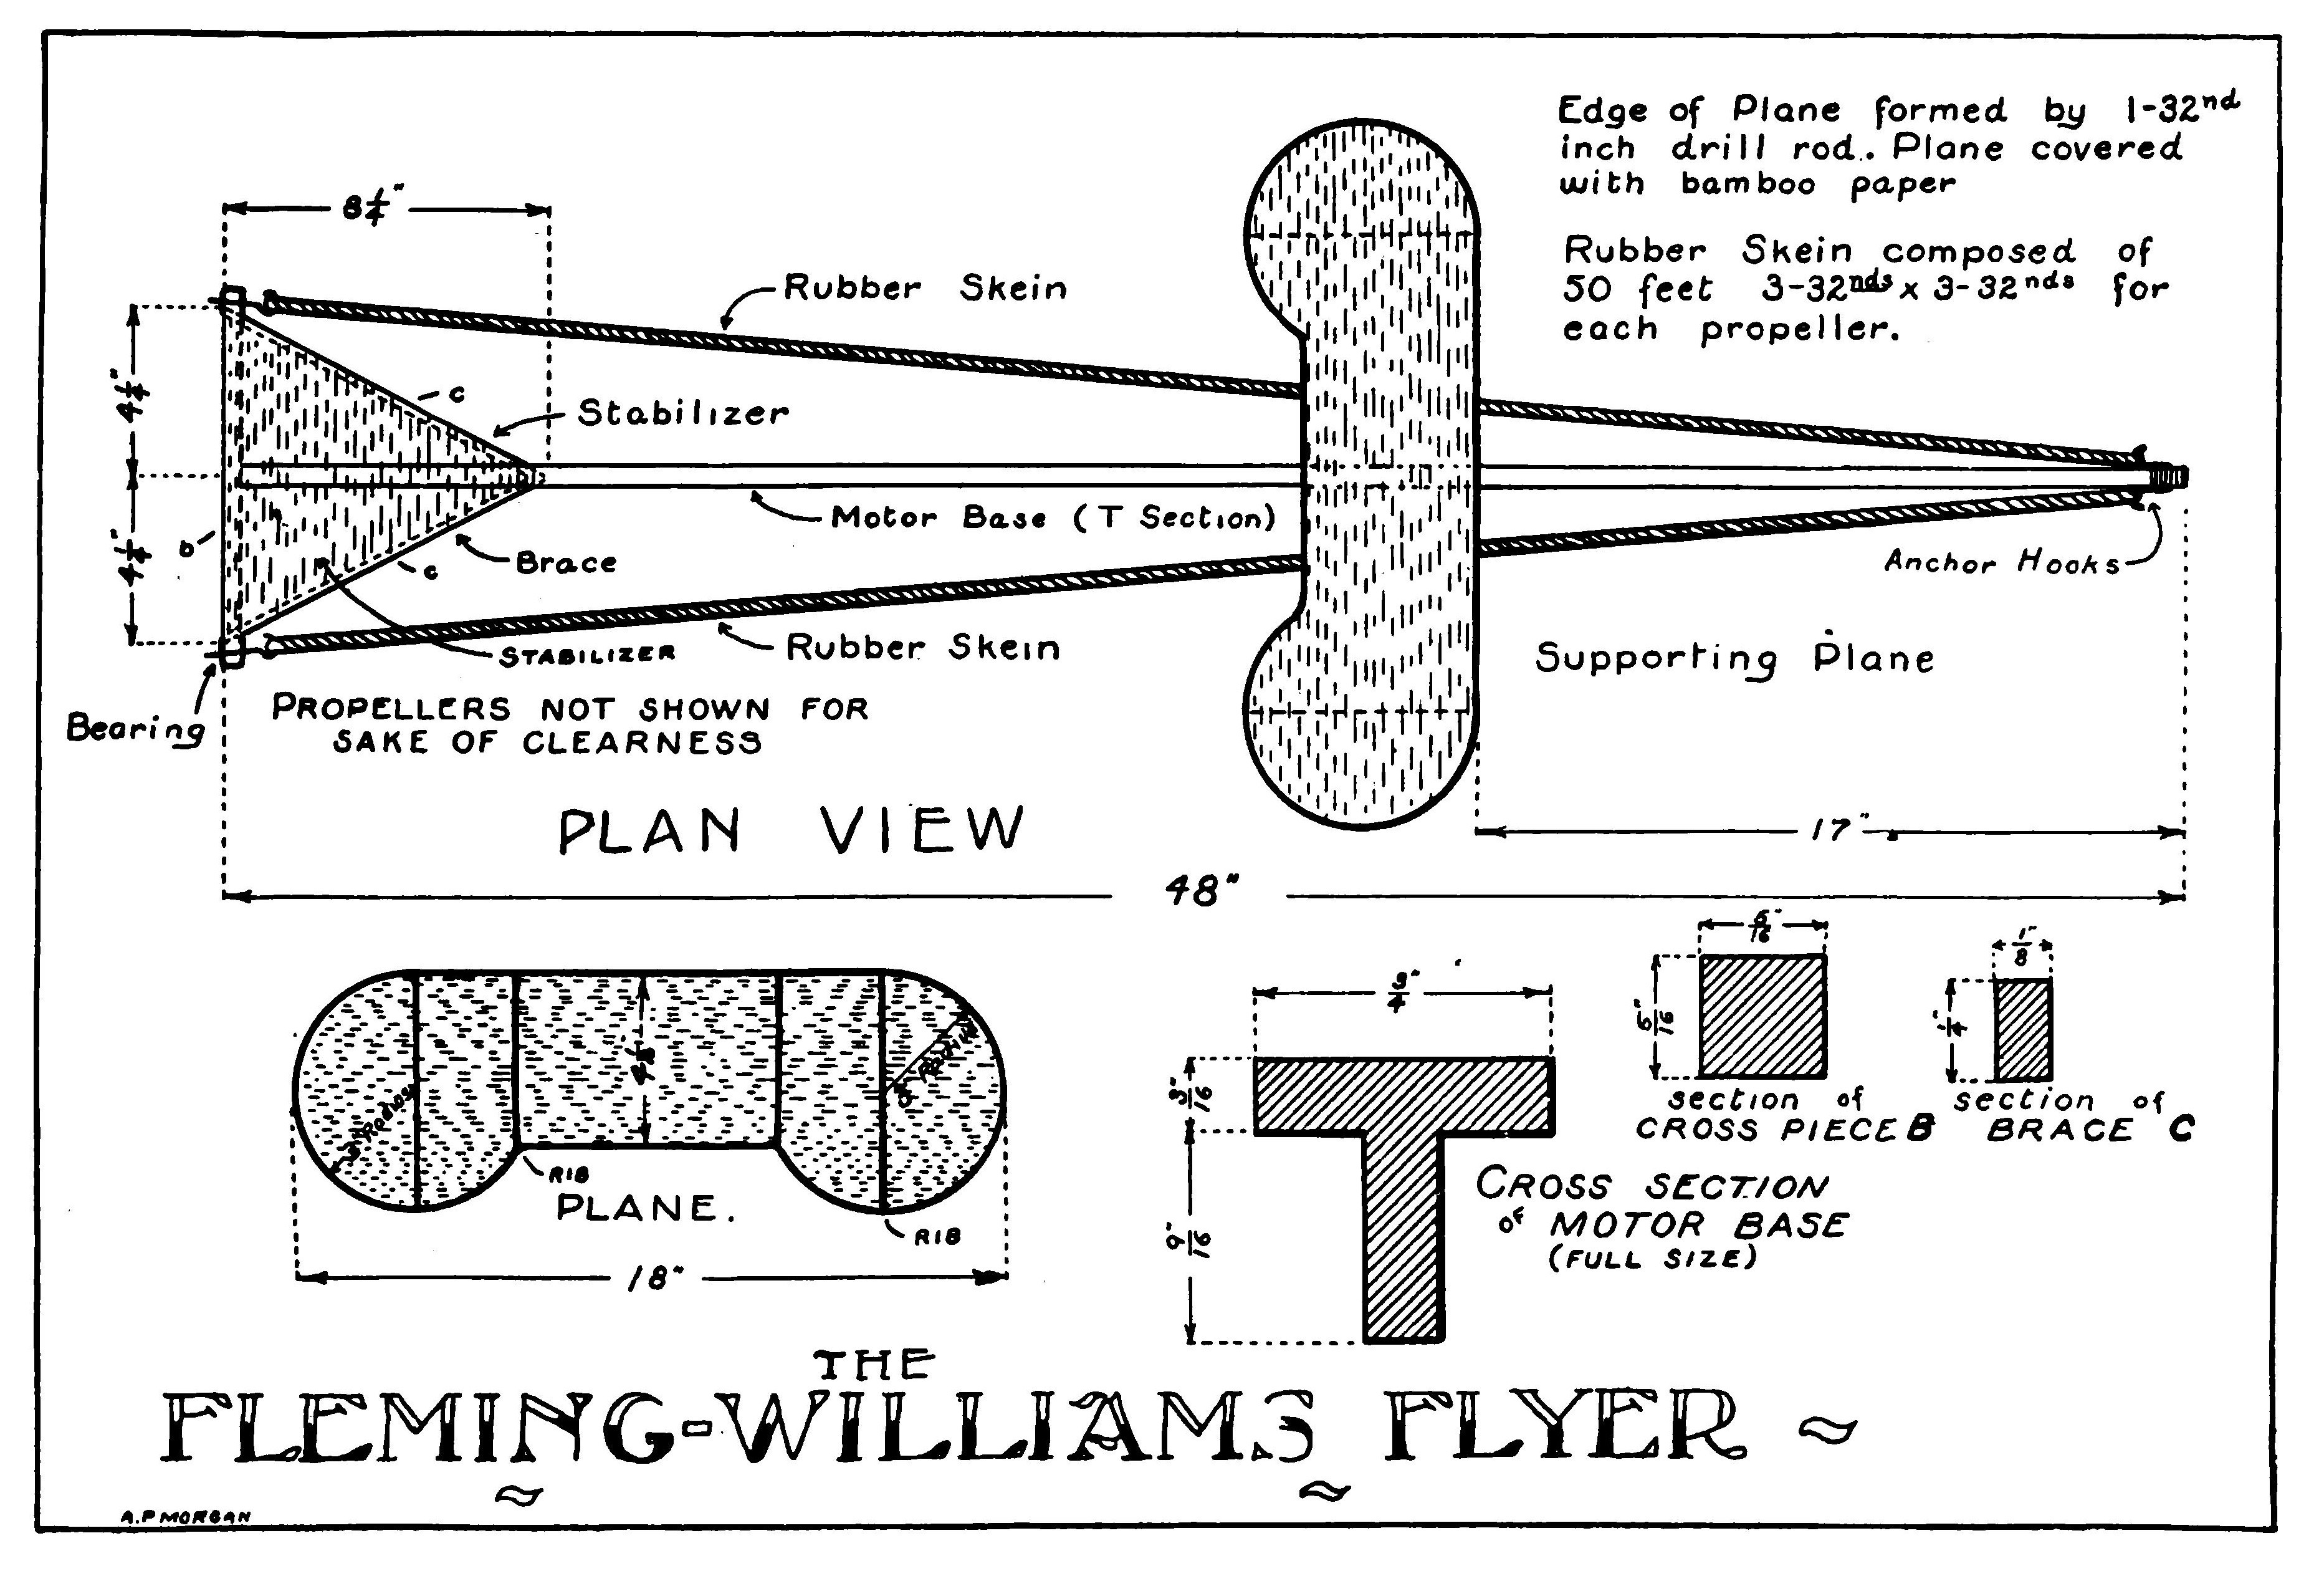
Fleming-Williams Flyer. (Plate X.)
The Fleming-Williams model is a type well known in England where it has won many prizes. The motor base is a piece of "T" section wood 48 inches long. The detailed dimensions of the "T" section are given on the plate. A crosspiece B, 5/16 square and 8 1/2 inches long is fastened at one end of the motor by gluing and lashing as shown in the drawing.
Two braces, C, C, 1/8 x 1/4 inches in section are lashed near the ends of the cross piece and brought together on the motor base so as to form a triangle. This is covered with bamboo paper to form a triangular shaped plane called the stabilizer.
The bearings are simple strips of hard sheet aluminum bent around the ends of the cross brace and fastened into place with several small screws.
The main plane is formed by bending 1/32nd inch drill rod into the shape shown in the detailed drawing on the plate. Mark out the wing form on a board, and by means of nails driven into the board around the outline, bend the drill rod into shape, splicing the ends neatly with some fine wire. Then bend the ribs into shape and twist the ends around the wing form. It is a very good plan to solder all joints. Cover the frame with bamboo paper and when dry apply two coats of "bamboo varnish."
Drill a hole through the motor base at the front to receive a piece of steel wire. Bend the wire to form two anchor hooks.
The propellers are each 8 inches in diameter. Each propeller is driven by a skein composed of 50 feet of 3/32 x 3/32 rubber.
The main plane is fastened temporarily to the motor base with rubber bands. Its normal position is about 17 inches from the tip of the machine, but its exact position will have to be determined by experiment. After it is formed, the plane should be fastened into position more securely.
The propellers must be of opposite pitch and wound in opposite directions. Each should receive from 500 to 600 turns. The model is launched by casting from the hand as though it were a spear.
FLYING THE MODELS.
A suitable winder of some sort is essential for winding up the strands of a model aeroplane.
A winder is most easily made from an egg beater of the dover pattern. The egg beater is dismantled and fitted up in the manner shown in the illustration. The blades are fitted with hooks which engage those on the end of the rubber skein.
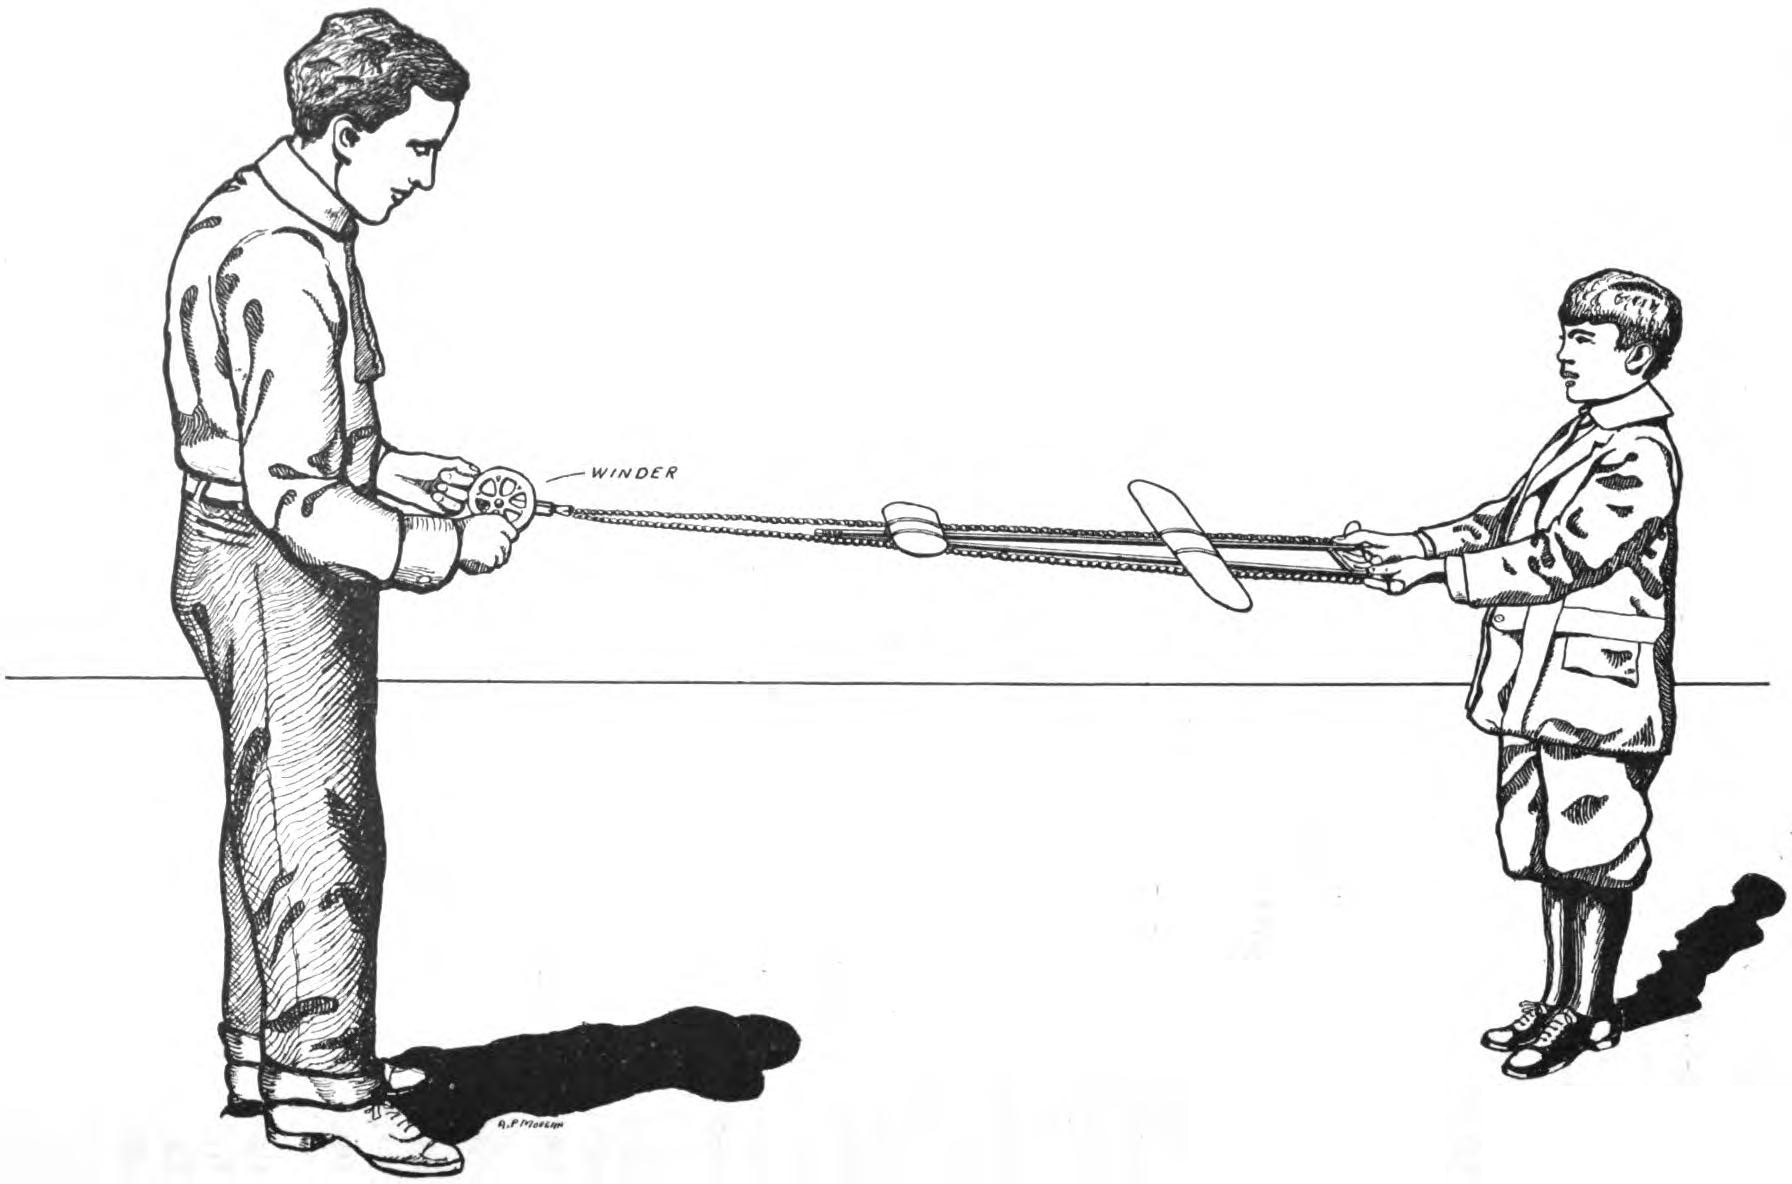
In order to wind a model remove the skeins from the anchor hooks and hook them on the winder. Have some one hold the machine at the rear end, slipping the fingers around the propellers to keep them from untwisting. Stretch the skeins out to about twice their normal length and commence to wind. Gradually shorten the skein as the winding progresses until, at the time it is finished, it is down to its normal length.
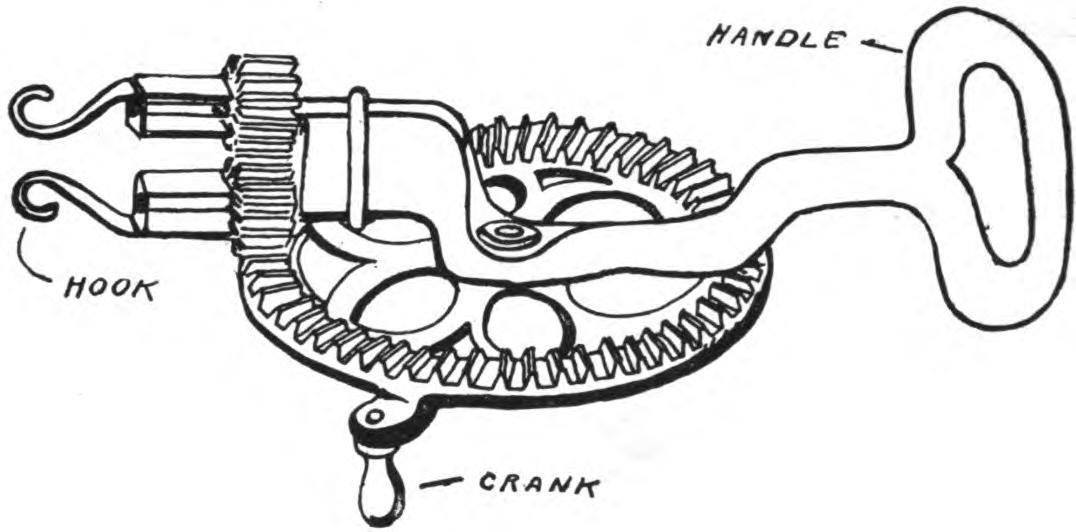
In winding the machine be careful to do it in such a manner that the machine is not wrenched or twisted. Always count the number of turns given the winder so that there will be no danger of twisting them up too tightly and causing them to break.
The successful flying of a model aeroplane is an acquired knack just like swimming or bicycle riding. It is usually necessary to make several attempts before the model can be made to fly well. As soon as one gets acquainted with the vagaries of a model aeroplane it is a very easy matter to launch and adjust a machine.
The large page in the front of the book shows the right way of launching a model. The fingers are passed over the propellers and the frame grasped firmly, but gently. The tip of the machine should be raised and pointed slightly upward. Then give it a gentle slow push forward and release it. Always launch a machine into the wind, that is against it. The machine will fly forward, rise rapidly, turn completely around and race down the wind for a thousand feet or more in the case of some of the larger machines described in this book when properly adjusted.
All the models described in this book with the exception of the first three must be flown out of doors because, when properly handled, they will travel upwards of one thousand feet.

You can not afford to be without
"Aeronautics"
Each month it gives articles of value, based on definite results obtained by the foremost experimenters-propellers surfaces, general design, etc.
Successful aeroplanes involving new features are described in minute detail, with scale drawings and all dimensions.
Articles of practical interest in the painting and finishing of woodwork, making of propellers, landing chasses, etc.
Monthly page of drawings of constructional details of machines all over the world.
Questions involving principles and experimental data of aerodynamos, and of motors, answered in full by an authority.
Every issue a complete directory of American manufacturers of planes and all accessories.
Exclusive principal articles only are published.
A file of "AERONAUTICS" is more valuable than any book yet written on the subject of Aeronautics.
"AERONAUTICS" is the oldest aero journal in America; established 1907.
Send for a sample copy and compare it with any other aeronautical magazine.
Ask any reader of "AERONAUTICS" for his opinion as to its worth.
All aeronautical patents issued in the U. S. are listed monthly.
Subscription $3.00 yearly.
Send for Low Rate Combination
Offer and Sample Copy
Any of the Following
Practical Books
will be sent At Once, Post-paid on receipt of price.
There is very little danger of losing currency in a letter if the following directions are observed:
Cut a circular hole the diameter of
the coin in a piece of cardboard, of
sufficient size to fit closely in the
envelope. The cardboard should
be no thicker than the coin.
Insert the coin in the hole and paste
a piece of paper on both sides of
the cardboard to prevent the coin
from falling out.
WE HAVE THE LARGEST LINE OF
TWENTY-FIVE CENT BOOKS
COLE &
MORGAN
Publishers of the Arts and Sciences Series
187 N. 11th Street, NEWARK, N. J.
Wireless Telegraphy and Telephony
Simply Explained
By ALFRED P. MORGAN

A NEW BOOK by the author of "Wireless Telegraph
Construction for Amateurs."
This is undoubtedly one of the most complete and comprehensive treatises on the subject ever published, and a close study of its pages will enable one to master all the details of the wireless transmission of messages. The author has filled a long-felt want and has succeeded in furnishing a lucid, comprehensible explanation in simple language of the theory and practice of wireless telegraphy and telephony.
The book treats the subject from an entirely new standpoint. Several very novel and original ideas have been carried out in its making. It is well illustrated by over one hundred and fifty interesting photographs and drawings. All diagrams have been made in perspective showing the instruments as they actually appear in practice. The drawings are carefully keyed and labeled. Many of the photographs are accompanied by phantom drawings which reveal the name and purpose of each part.
It is a book which the wireless experimenter cannot afford to be without. It will prove even more valuable to the layman.
Among the contents are: Introductory. Wireless Transmission and reception. The ether. Electrical Oscillations. Electro-magnetic waves. The means for radiating and intercepting electric waves. Aerial Systems. Earth Connection. The Transmitting Apparatus. Current Supply. Spark Coils and Transformers. Condensers. Helixes. Spark Gaps. Anchor Gaps. Aerial Switches, Etc. The Receiving Apparatus. Detectors, etc. Tuning Coils and Loose Couplers. Variable Condensers. Tuning and Coupling. Directive Wave Telegraphy. The Dignity of Wireless. Its applications and service. Wireless in the army and navy. Wireless on an aeroplane. How a message is sent and received. The Wireless Telephone. The Ear. How we hear. Sound and Sound Waves. The Vocal Cords. The Structure of Speech. The Telephone Transmitter and Receiver. The Photophone. The Thermophone. The Selenium.
Handsomely bound in cloth with embossed cover
Postpaid, $1.00
Build Your Own Wireless Instruments
Complete Up-to-the-Minute Authentic Practical
WIRELESS TELEGRAPH
CONSTRUCTION FOR AMATEURS
By ALFRED POWELL MORGAN
3d EDITION
220 Pages 163 Illustrations
Price, $1.50, Postpaid
Handsomely Bound in Silk Cloth
Thoroughly up to date and unusually complete. Gives in minute detail, full directions for constructing wireless apparatus and various outfits capable of receiving from 100 to 1,500 miles and transmitting 3 to 100 miles. Also clearly explains the purpose and action of each instrument. Directions for Operating and Adjusting, etc.
A SPLENDID TREATISE OF WIRELESS ALONG
CONSTRUCTIVE LINES
Price, $1.50, Postpaid
CONTENTS OF CHAPTERS
I.—Introduction. II.—The Apparatus. III.—Aerials and Earth Connections. IV.—Induction Coils. V.—Interrupters. VI.—Transformers. VII.—Oscillation Condensers and Leyden Jars. VIII.—Spark Gaps or Oscillators. IX.—Transmitting Helixes. X.—Keys. XI.—Aerial Switches and Anchor Gaps. XII.—Hot Wire Ammeter. XIII.—Oscillation Detectors. XIV.—Tuning Coils and Tuning Transformers. XV.—Receiving Condensers. XVI.—Telephone Receivers and Headbands. XVII.—Operation. XVIII.—The Amateur and the Wireless Law. How to Secure a License. Oscillation Helix. Quenched Spark Gap. Rotary Gaps. Kick-Back. The Variometer. New Crystal Detectors. The Audion.—Appendix.
ENDORSED BY WIRELESS CLUBS THROUGHOUT THE COUNTRY AS BEING
THE MOST PRACTICAL BOOK PUBLISHED ON WIRELESS.
The value of this book has been greatly increased by the addition of much new subject matter and many illustrations of recent interest.
The new text explains fully how to build the most recent forms of Quenched Gaps, Rotary Gaps, Dough-Nut Tuners, Kick-back Preventers, Audion Detectors and numerous other instruments, accompanied by dimensioned working drawings. Several very interesting and instructive photographs have been included.
If you are interested in Wireless you need this book.
THE AMATEUR'S WIRELESS HANDY BOOK
YOU CANNOT AFFORD TO
BE WITHOUT THIS BOOK

Price 25 Cents, Postpaid
If you want to be an expert and an authority you must surround yourself with all available aids and helps. You have one of the best in the AMATEUR’S WIRELESS HANDY BOOK.
It contains 36 pages of wireless calls, 1500 in all. The list is complete and thoroughly revised to date and embodies all the wireless land stations in the world, the ships of the Merchant Marine, the U. S. Navy, the Revenue Service, etc. They are all there. All the calls are classified alphabetically. The list is the most reliable and complete in existence. All obsolete stations have been abolished. All corrections and changes have been made from the official lists.
BUT, THAT IS NOT ALL.
Pages with spaces to fill in names, call letters, etc., make it possible to keep an accurate record of nearby amateur stations.
THE CODES, BOTH MORSE AND CONTINENTAL, are shown in the form of two large full-page charts printed in heavy black type so that they can be read from a distance.
A BEGINNER’S SPEED CHART of both Codes so arranged that the codes may be quickly learned or consulted is provided.
All the Abbreviations used so constantly by the wireless operator to save time and labor are included. There are a couple of pages of them.
And last but not least
And last but not least Over 100 large hook-ups of wiring diagrams fully illustrated in a concise and clear manner. Loop and straightaway aerials, grounds, helixes, spark gaps, anchor gaps, leyden jars, induction coils, transformers, keys, aerial switches, tuning coils, loading coils, loose couplers, variometers, fixed condensers, silicon, electrolytic, carborundum, perikon and audion detectors, telephones, potentiometers, etc., you can find them all and how to connect. A hook-up for any set accompanied by full explanation. None are missing. They are all there. There are no two alike.
The most complete and reliable data ever collected. The result of thousands of experiments by some of the most famous wireless experts in the country.
Read now before the supply is exhausted or you forget. You will be sorry if you don’t.
Price, 25 Cents, Postpaid
Note: This book is always kept up-to-date by frequently issuing new editions. Send for the latest copy.
The Operation of Wireless Telegraph Apparatus

Do your Wireless friends come to you for advice on constructing and operating their apparatus or do you go to them for information?
Here is a chance for YOU to become the authority.
This book is a necessity to every Progressive Experimenter.
It shows how to obtain the very highest efficiency from any station, and how to comply with the law. How to tune, adjust your detector, spark gap, phones, etc.
Price, 25 Cents, Postpaid.
This book was written for the wireless experimenter who has passed the amateur stage, but explains how the beginner also can obtain the very best results from his station. It contains much useful information to this end and many "kinks".
IT SHOWS HOW to receive or send on long or short wave lengths with highest efficiency, to tune for longest distance reception of messages, to use the buzzer test, how to test and connect condensers, receivers, etc., how to use receiving transformers, variometers, etc., all with highest efficiency in view.
IT ALSO DESCRIBES the construction and use of a simple, inexpensive wave meter to tune the station to any desired wave length, and tells how to obtain a sharp wave and a pure wave.
EXTRACTS FROM THE LAW are also given in such a manner that they are easily understood.
THE MODEL LIBRARY SERIES
25c. BOOKS.
- ELECTRICITY.
The study of, and its laws for beginners, comprising the laws of electric current generation and flow, Ohm's law, galvanism, magnetism, induction, principles of dynamos and motors, wiring, with explanations of simple mathematics as applied to electrical calculations. By N. H. SCHNEIDER. With 55 original illustrations and 6 tables.
- DRY BATTERIES.
A practical handbook on the designing, filling and finishing of dry batteries, with tables, for automobiles, gas engine, medical and coil work, electric bells, alarms, telephones, experiments and all purposes requiring a first-rate battery. Fully illustrated with 30 original drawings.
- ELECTRICAL CIRCUITS AND DIAGRAMS.
Being a selection of original up-to-date and practical diagrams for installing annunciators, alarms, bells, electric gas lighting, telephones, electric power light and wiring circuits, induction coils, gas engine igniters, dynamos and motors, armature windings. By N. H. SCHNEIDER.
- ELECTRIC BELLS AND ALARMS.
How to install them. By N. H. SCHNEIDER. Including batteries, wire and wiring, circuits, pushes, bells, burglar alarms, high and low water alarms, fire alarms, Thermostats, annunciators, and the locating and remedying of faults. With 56 original diagrams.
- MODERN PRIMARY BATTERIES.
Their construction, use and maintenance, including batteries for telephones, telegraphs, motors, electric lights, induction coils, and for all experimental work. By N. H. SCHNEIDER. 94 pages, 55 illustrations. The best and latest American book on the subject.
- EXPERIMENTING WITH INDUCTION COILS.
H. S. NORRIE, author of "Induction Coils and Coil Making." A most instructive little book, full of practical and interesting experiments, fully explained in plain language with numerous hints and suggestions for evening entertainments. Arranged under the following headings: Introduction; The Handling of Ruhmkorff Coil; Experiments with Sparks; Effects in the Vacuum; Induction and Wireless Telegraphy. With 36 original illustrations. [In the press]
- SMALL ACCUMULATORS.
How made and used, by P. Marshall. Giving full descriptions how to make all the parts, assemble them, charge the cells and run them, with examples of their practical application. Useful receipts and memoranda and a glossary of technical terms. 80 pages, 40 illustrations, paper.
- ELECTRIC GAS LIGHTING.
How to install Electric gas igniting apparatus including the jump spark and multiple systems for all purposes. Also the care and selection of suitable batteries, wiring and repairs, by H. S. NORRIE. 101 pages, 57 illustrations, paper
- THE WIMSHURST MACHINE. HOW TO MAKE AND USE IT.
A practical handbook on the construction and working of Wimshurst machines, including radiography and wireless telegraphy and other static electrical apparatus. By A. W. Marshall. Second edition, revised and enlarged. Containing a number of sectional drawings and details to scale. Contents of chapters: 1. Introductory. 2. Static Electricity. 3. The electrophorus. 4. The Electroscope. 5. Condensers. 6. The Leyden Jar. 7. The Parts of a Wimshurst Machine and Their Use. 8. Making and Management of Wimshurst Machines. 9. Some Examples of Wimshurst Machines, small machines. 10. Complete detailed drawings and particulars for the construction of a 24-inch plate machine. 11. The Wimshurst machine for X-ray work with detailed drawings. 12. Experiments for Wimshurst machine. 112 pages, 30 illustrations and plates.
- WIRELESS TELEPHONE CONSTRUCTION.
By Newton Harrison. A comprehensive explanation of the making of a Wireless Telephone Equipment. Both the transmitting and receiving stations fully explained with details of construction sufficient to give an intelligent reader a good start in building a Wireless Telephone system and in operating it. 74 pages and 43 illustrations.
- LOW VOLTAGE ELECTRIC LIGHTING WITH THE STORAGE BATTERY.
Specially applicable to Country Houses, Farms, Small Settlements, Launches, Yachts, etc. By Norman H. Schneider. Giving full details and illustrations of the most up-to-date small American Plants. Contents of chapters. 1. Introduction. 2. The Storage Battery. 3. Estimating the Installation. 4. The Electric Plant. 5. Some Typical Plants. 6. Installation and Operation. 95 pages, 27 illustrations.
- PLANS AND SPECIFICATIONS FOR WIRELESS TELEGRAPH SETS, Part II,
by A. F. Collins. Complete and detailed data for constructing a five to ten mile set, also a ten to twenty-five mile set. 1. A five to ten mile tuned transmitter. 2. A five to ten mile tuned coherer receptor. 3. A five to ten mile tuned auto-detector receptor. 4 and 5. A ten to twenty-five mile tuned transmitter. 6. A ten to twenty-five mile tuned coherer receptor. 7. A ten to twenty-five mile auto-detector receptor. 80 pages, 63 illustrations.
- PLANS AND SPECIFICATIONS FOR WIRELESS TELEGRAPH SETS, Part I,
by A. Frederick Collins. Complete and detailed instructions for making an experimental set, also a one to five mile set. 1. An experimental transmitter. An experimental receptor. 3. A one to five mile transmitter. 4. A one to five miles coherer receptor. 5. A one to five mile auto-receptor. 55 pages, 37 illustrations.
- MODEL FLYING MACHINES, THEIR DESIGN AND CONSTRUCTION.
By W. G. Aston. Contents of chapters: 1. General principles and their application. 2. Power. 3. Supporting surfaces. 4. Screws, and how to make them. 5. Tails and elevators. 6. Fins. 7. Designs. With a number of examples of monoplane, bi-plane, tandem bi-plane and tri-plane models. 8. Dirigibles. 9. Helicopters. 10. Ornithopters. 11. Winding apparatus. 12. Compressed air motor. A first-rate book for Model Makers, 125 pages, 95 illustrations, 12mo. boards, postpaid, for 550.
- MODEL GLIDERS, BIRDS, BUTTERFLIES AND AEROPLANES.
How to Make and Fly Them. A booklet with one large sheet containing twelve butterflies and two birds in colors and material for making a small card-board Model Aeroplane Glider. Complete in folder, postpaid, for 55c.
- MODEL AEROPLANES, HOW TO BUILD AND FLY THEM.
By E. W. Twining. Consisting of one booklet and five large scaled drawings for three Twining Models, two of them being of the Bi-plane Glider type. Complete in folder, postpaid, for 55c.
- THE AEROPLANE PORTFOLIO.
By D. Ross Kennedy. Containing nine sheets of scale drawings of the following celebrated Aeroplanes: Bi-plane type-Wright, Farman, Voisin, Cody, Herring-Curtis. Monoplanes—Rep. Antoinette, Santos Dumont, and Bleriot. Each of these machines are here shown in End View, Plan and Elevation. Including booklet which contains a description of each machine. This timely set of drawings should prove of value to everyone interested in this important new industry. The complete set in folder, postpaid, for 55c.
- THE PERCY PIERCE FLYER.
A large scale drawing of this prize-winning Monoplane. With all measurements and details showing a front elevation, a side elevation and a top elevation; with 8-page descriptive booklet of particulars postpaid, 15c.
- HOW TO BUILD A 20-FT BIPLANE GLIDING MACHINE,
that will carry a man. By A. P. Morgan. A practical handbook on its construction and management. Enabling an intelligent reader to make his first step in the field of aviation with a comprehensive understanding of some of the principles involved. Fully illustrated with detailed drawings. Contents of chapters: 1. The frame work assembling and finishing the wood. 2. Covering the planes, laying out the fabric and fastening it. 3. Trussing, fastening the tie-rods and trueing the glider. 4. Gliding flight, the principles involved, instructions and precautions. 5. Remarks. 60 pages, 31 illustrations.
ELECTRICIAN AND MECHANIC
Is a magazine which will help you. It is a practical monthly for every one who wants to learn about electricity, or who uses tools. Its articles tell you how to make dynamos, engines, wireless telegraph apparatus, furniture, models, etc. It is the only magazine of its kind in the world.
EDITORS:
Frank Roy Frapie, M. Sc. Chem., F. R. P. S.
Prof. A. E. Watson, E. E., Ph. D.
M. O. Sampson.
CHARACTERISTIC FEATURES
- Electricity.
Practical and simple articles on electrical science, new applications and history, all illustrated. How to make dynamos, motors, batteries, all kinds of electrical apparatus. How to wire for bells and electric lights, install telephones, etc.
- Mechanical Articles.
How to use lathes and machine tools. How to build gas engines, steam engines and other machines. All about gas engines and flying machines. Illustrated articles on everything new in mechanical progress.
- Woodworking and Manual Training.
How to build mission furniture. Wood finishing, staining, polishing, etc. Woodwork joints and cabinet making. How to make useful and handy articles of wood. Mechanical drawing, etc.
- Wireless Telegraphy and Telephony.
Full information of all that is new in wireless. Any one can build a wireless station from our descriptions. Our Wireless Club has over a thousand members in America and even beyond the seas. For seven years the wireless authority in the magazine line.
All articles written in simple language for everybody to read. $1.50 a year, 3 months' trial 25c.
SPECIAL OFFER
Until our stock of back numbers is exhausted, we offer six back numbers and a full year's subscription for $1.50. Money orders only; no stamps accepted.
SAMPSON PUBLISHING COMPANY
161 Pope Building BOSTON, MASS.
When writing to advertisers, please mention this book.

Materials for Building
MODEL AEROPLANES
will be found listed in our catalog of apparatus and supplies for
EXPERIMENTERS
WE ARE HEADQUARTERS for Rubber Strand, Bamboo Sticks
and all the rest of the things that you need
WIRELESS TELEGRAPH APPARATUS
We manufacture the largest line of RELIABLE wireless
Apparatus in the country
Efficient Design Reasonable Cost Excellent Appearance
Skillful Workmanship and Unequalled Efficiency
are all yours when you buy AMCO Apparatus.
OUR CATALOG
Shows, Storage Cells, Step Down Transformers, Rectifiers, Induction Coils,
Wireless Instruments, Complete Transmitting and Receiving Outfits, Telephones,
Keys, Sounders, Flashlights, Lamps, Motors, Dynamos, Water Motors, Railways,
Model Aeroplanes, Books, Parts and Supplies.
Send 4 cents in stamps to help cover cost of mailing and ask for a copy of our catalog.
ADAMS - MORGAN CO.
"The Experimenters Supply House"
Box 72i Upper Montclair, N. J.

*** END OF THIS PROJECT GUTENBERG EBOOK MODEL FLYING MACHINES ***
The Full Project Gutenberg License
Please read this before you distribute or use this work.
To protect the Project Gutenberg™ mission of promoting the free distribution of electronic works, by using or distributing this work (or any other work associated in any way with the phrase “Project Gutenberg”), you agree to comply with all the terms of the Full Project Gutenberg™ License available with this file or online at https://www.gutenberg.org/license.
Section 1. General Terms of Use & Redistributing Project Gutenberg™ electronic works
1.A. By reading or using any part of this Project Gutenberg™ electronic work, you indicate that you have read, understand, agree to and accept all the terms of this license and intellectual property (trademark/copyright) agreement. If you do not agree to abide by all the terms of this agreement, you must cease using and return or destroy all copies of Project Gutenberg™ electronic works in your possession. If you paid a fee for obtaining a copy of or access to a Project Gutenberg™ electronic work and you do not agree to be bound by the terms of this agreement, you may obtain a refund from the person or entity to whom you paid the fee as set forth in paragraph 1.E.8.
1.B. “Project Gutenberg” is a registered trademark. It may only be used on or associated in any way with an electronic work by people who agree to be bound by the terms of this agreement. There are a few things that you can do with most Project Gutenberg™ electronic works even without complying with the full terms of this agreement. See paragraph 1.C below. There are a lot of things you can do with Project Gutenberg™ electronic works if you follow the terms of this agreement and help preserve free future access to Project Gutenberg™ electronic works. See paragraph 1.E below.
1.C. The Project Gutenberg Literary Archive Foundation (“the Foundation” or PGLAF), owns a compilation copyright in the collection of Project Gutenberg™ electronic works. Nearly all the individual works in the collection are in the public domain in the United States. If an individual work is unprotected by copyright law in the United States and you are located in the United States, we do not claim a right to prevent you from copying, distributing, performing, displaying or creating derivative works based on the work as long as all references to Project Gutenberg are removed. Of course, we hope that you will support the Project Gutenberg™ mission of promoting free access to electronic works by freely sharing Project Gutenberg™ works in compliance with the terms of this agreement for keeping the Project Gutenberg™ name associated with the work. You can easily comply with the terms of this agreement by keeping this work in the same format with its attached full Project Gutenberg™ License when you share it without charge with others.
1.D. The copyright laws of the place where you are located also govern what you can do with this work. Copyright laws in most countries are in a constant state of change. If you are outside the United States, check the laws of your country in addition to the terms of this agreement before downloading, copying, displaying, performing, distributing or creating derivative works based on this work or any other Project Gutenberg™ work. The Foundation makes no representations concerning the copyright status of any work in any country outside the United States.
1.E. Unless you have removed all references to Project Gutenberg:
1.E.1. The following sentence, with active links to, or other immediate access to, the full Project Gutenberg™ License must appear prominently whenever any copy of a Project Gutenberg™ work (any work on which the phrase “Project Gutenberg” appears, or with which the phrase “Project Gutenberg” is associated) is accessed, displayed, performed, viewed, copied or distributed:
This eBook is for the use of anyone anywhere in the United States and most other parts of the world at no cost and with almost no restrictions whatsoever. You may copy it, give it away or re-use it under the terms of the Project Gutenberg License included with this eBook or online at https://www.gutenberg.org . If you are not located in the United States, you'll have to check the laws of the country where you are located before using this ebook.
1.E.2. If an individual Project Gutenberg™ electronic work is derived from texts not protected by U.S. copyright law (does not contain a notice indicating that it is posted with permission of the copyright holder), the work can be copied and distributed to anyone in the United States without paying any fees or charges. If you are redistributing or providing access to a work with the phrase “Project Gutenberg” associated with or appearing on the work, you must comply either with the requirements of paragraphs 1.E.1 through 1.E.7 or obtain permission for the use of the work and the Project Gutenberg™ trademark as set forth in paragraphs 1.E.8 or 1.E.9.
1.E.3. If an individual Project Gutenberg™ electronic work is posted with the permission of the copyright holder, your use and distribution must comply with both paragraphs 1.E.1 through 1.E.7 and any additional terms imposed by the copyright holder. Additional terms will be linked to the Project Gutenberg™ License for all works posted with the permission of the copyright holder found at the beginning of this work.
1.E.4. Do not unlink or detach or remove the full Project Gutenberg™ License terms from this work, or any files containing a part of this work or any other work associated with Project Gutenberg™.
1.E.5. Do not copy, display, perform, distribute or redistribute this electronic work, or any part of this electronic work, without prominently displaying the sentence set forth in paragraph 1.E.1 with active links or immediate access to the full terms of the Project Gutenberg™ License.
1.E.6. You may convert to and distribute this work in any binary, compressed, marked up, nonproprietary or proprietary form, including any word processing or hypertext form. However, if you provide access to or distribute copies of a Project Gutenberg™ work in a format other than “Plain Vanilla ASCII” or other format used in the official version posted on the official Project Gutenberg™ web site (https://www.gutenberg.org), you must, at no additional cost, fee or expense to the user, provide a copy, a means of exporting a copy, or a means of obtaining a copy upon request, of the work in its original “Plain Vanilla ASCII” or other form. Any alternate format must include the full Project Gutenberg™ License as specified in paragraph 1.E.1.
1.E.7. Do not charge a fee for access to, viewing, displaying, performing, copying or distributing any Project Gutenberg™ works unless you comply with paragraph 1.E.8 or 1.E.9.
1.E.8. You may charge a reasonable fee for copies of or providing access to or distributing Project Gutenberg™ electronic works provided that
You pay a royalty fee of 20% of the gross profits you derive from the use of Project Gutenberg™ works calculated using the method you already use to calculate your applicable taxes. The fee is owed to the owner of the Project Gutenberg™ trademark, but he has agreed to donate royalties under this paragraph to the Project Gutenberg Literary Archive Foundation. Royalty payments must be paid within 60 days following each date on which you prepare (or are legally required to prepare) your periodic tax returns. Royalty payments should be clearly marked as such and sent to the Project Gutenberg Literary Archive Foundation at the address specified in Section 4, “Information about donations to the Project Gutenberg Literary Archive Foundation.”
You provide a full refund of any money paid by a user who notifies you in writing (or by e-mail) within 30 days of receipt that s/he does not agree to the terms of the full Project Gutenberg™ License. You must require such a user to return or destroy all copies of the works possessed in a physical medium and discontinue all use of and all access to other copies of Project Gutenberg™ works.
You provide, in accordance with paragraph 1.F.3, a full refund of any money paid for a work or a replacement copy, if a defect in the electronic work is discovered and reported to you within 90 days of receipt of the work.
You comply with all other terms of this agreement for free distribution of Project Gutenberg™ works.
1.E.9. If you wish to charge a fee or distribute a Project Gutenberg™ electronic work or group of works on different terms than are set forth in this agreement, you must obtain permission in writing from both the Project Gutenberg Literary Archive Foundation and The Project Gutenberg Trademark LLC, the owner of the Project Gutenberg™ trademark. Contact the Foundation as set forth in Section 3. below.
1.F.
1.F.1. Project Gutenberg volunteers and employees expend considerable effort to identify, do copyright research on, transcribe and proofread works not protected by U.S. copyright law in creating the Project Gutenberg™ collection. Despite these efforts, Project Gutenberg™ electronic works, and the medium on which they may be stored, may contain “Defects,” such as, but not limited to, incomplete, inaccurate or corrupt data, transcription errors, a copyright or other intellectual property infringement, a defective or damaged disk or other medium, a computer virus, or computer codes that damage or cannot be read by your equipment.
1.F.2. LIMITED WARRANTY, DISCLAIMER OF DAMAGES – Except for the “Right of Replacement or Refund” described in paragraph 1.F.3, the Project Gutenberg Literary Archive Foundation, the owner of the Project Gutenberg™ trademark, and any other party distributing a Project Gutenberg™ electronic work under this agreement, disclaim all liability to you for damages, costs and expenses, including legal fees. YOU AGREE THAT YOU HAVE NO REMEDIES FOR NEGLIGENCE, STRICT LIABILITY, BREACH OF WARRANTY OR BREACH OF CONTRACT EXCEPT THOSE PROVIDED IN PARAGRAPH 1.F.3. YOU AGREE THAT THE FOUNDATION, THE TRADEMARK OWNER, AND ANY DISTRIBUTOR UNDER THIS AGREEMENT WILL NOT BE LIABLE TO YOU FOR ACTUAL, DIRECT, INDIRECT, CONSEQUENTIAL, PUNITIVE OR INCIDENTAL DAMAGES EVEN IF YOU GIVE NOTICE OF THE POSSIBILITY OF SUCH DAMAGE.
1.F.3. LIMITED RIGHT OF REPLACEMENT OR REFUND – If you discover a defect in this electronic work within 90 days of receiving it, you can receive a refund of the money (if any) you paid for it by sending a written explanation to the person you received the work from. If you received the work on a physical medium, you must return the medium with your written explanation. The person or entity that provided you with the defective work may elect to provide a replacement copy in lieu of a refund. If you received the work electronically, the person or entity providing it to you may choose to give you a second opportunity to receive the work electronically in lieu of a refund. If the second copy is also defective, you may demand a refund in writing without further opportunities to fix the problem.
1.F.4. Except for the limited right of replacement or refund set forth in paragraph 1.F.3, this work is provided to you ‘AS-IS,’ WITH NO OTHER WARRANTIES OF ANY KIND, EXPRESS OR IMPLIED, INCLUDING BUT NOT LIMITED TO WARRANTIES OF MERCHANTABILITY OR FITNESS FOR ANY PURPOSE.
1.F.5. Some states do not allow disclaimers of certain implied warranties or the exclusion or limitation of certain types of damages. If any disclaimer or limitation set forth in this agreement violates the law of the state applicable to this agreement, the agreement shall be interpreted to make the maximum disclaimer or limitation permitted by the applicable state law. The invalidity or unenforceability of any provision of this agreement shall not void the remaining provisions.
1.F.6. INDEMNITY – You agree to indemnify and hold the Foundation, the trademark owner, any agent or employee of the Foundation, anyone providing copies of Project Gutenberg™ electronic works in accordance with this agreement, and any volunteers associated with the production, promotion and distribution of Project Gutenberg™ electronic works, harmless from all liability, costs and expenses, including legal fees, that arise directly or indirectly from any of the following which you do or cause to occur: (a) distribution of this or any Project Gutenberg™ work, (b) alteration, modification, or additions or deletions to any Project Gutenberg™ work, and (c) any Defect you cause.
Section 2. Information about the Mission of Project Gutenberg™
Project Gutenberg™ is synonymous with the free distribution of electronic works in formats readable by the widest variety of computers including obsolete, old, middle-aged and new computers. It exists because of the efforts of hundreds of volunteers and donations from people in all walks of life.
Volunteers and financial support to provide volunteers with the assistance they need, is critical to reaching Project Gutenberg™'s goals and ensuring that the Project Gutenberg™ collection will remain freely available for generations to come. In 2001, the Project Gutenberg Literary Archive Foundation was created to provide a secure and permanent future for Project Gutenberg™ and future generations. To learn more about the Project Gutenberg Literary Archive Foundation and how your efforts and donations can help, see Sections 3 and 4 and the Foundation web page at http://www.pglaf.org .
Section 3. Information about the Project Gutenberg Literary Archive Foundation
The Project Gutenberg Literary Archive Foundation is a non profit 501(c)(3) educational corporation organized under the laws of the state of Mississippi and granted tax exempt status by the Internal Revenue Service. The Foundation's EIN or federal tax identification number is 64-6221541. Its 501(c)(3) letter is posted at https://www.gutenberg.org/fundraising/pglaf . Contributions to the Project Gutenberg Literary Archive Foundation are tax deductible to the full extent permitted by U.S. federal laws and your state's laws.
The Foundation's principal office is in Fairbanks, Alaska, with the mailing address: PO Box 750175, Fairbanks, AK 99775, but its volunteers and employees are scattered throughout numerous locations. Its business office is located at 809 North 1500 West, Salt Lake City, UT 84116, (801) 596-1887, email business@pglaf.org. Email contact links and up to date contact information can be found at the Foundation's web site and official page at http://www.pglaf.org
For additional contact information:
Section 4. Information about Donations to the Project Gutenberg Literary Archive Foundation
Project Gutenberg™ depends upon and cannot survive without wide spread public support and donations to carry out its mission of increasing the number of public domain and licensed works that can be freely distributed in machine readable form accessible by the widest array of equipment including outdated equipment. Many small donations ($1 to $5,000) are particularly important to maintaining tax exempt status with the IRS.
The Foundation is committed to complying with the laws regulating charities and charitable donations in all 50 states of the United States. Compliance requirements are not uniform and it takes a considerable effort, much paperwork and many fees to meet and keep up with these requirements. We do not solicit donations in locations where we have not received written confirmation of compliance. To SEND DONATIONS or determine the status of compliance for any particular state visit https://www.gutenberg.org/fundraising/donate
While we cannot and do not solicit contributions from states where we have not met the solicitation requirements, we know of no prohibition against accepting unsolicited donations from donors in such states who approach us with offers to donate.
International donations are gratefully accepted, but we cannot make any statements concerning tax treatment of donations received from outside the United States. U.S. laws alone swamp our small staff.
Please check the Project Gutenberg Web pages for current donation methods and addresses. Donations are accepted in a number of other ways including checks, online payments and credit card donations. To donate, please visit: https://www.gutenberg.org/fundraising/donate
Section 5. General Information About Project Gutenberg™ electronic works.
Professor Michael S. Hart is the originator of the Project Gutenberg™ concept of a library of electronic works that could be freely shared with anyone. For thirty years, he produced and distributed Project Gutenberg™ eBooks with only a loose network of volunteer support.
Project Gutenberg™ eBooks are often created from several printed editions, all of which are confirmed as not protected by copyright in the U.S. unless a copyright notice is included. Thus, we do not necessarily keep eBooks in compliance with any particular paper edition.
Each eBook is in a subdirectory of the same number as the eBook's eBook number, often in several formats including plain vanilla ASCII, compressed (zipped), HTML and others.
Corrected editions of our eBooks replace the old file and take over the old filename and etext number. The replaced older file is renamed. Versions based on separate sources are treated as new eBooks receiving new filenames and etext numbers.
Most people start at our Web site which has the main PG search facility:
This Web site includes information about Project Gutenberg™, including how to make donations to the Project Gutenberg Literary Archive Foundation, how to help produce our new eBooks, and how to subscribe to our email newsletter to hear about new eBooks.