
MACHINERY’S REFERENCE SERIES
EACH NUMBER IS ONE UNIT IN A COMPLETE LIBRARY OF
MACHINE DESIGN AND SHOP PRACTICE REVISED AND
REPUBLISHED FROM MACHINERY
NUMBER 135
CONTENTS
| Precision Locating Methods | 3 |
| Accurate Dividing and Spacing Methods | 21 |
| Locating Work for Boring on Milling Machine | 32 |
Copyright, 1914, The Industrial Press,
Publishers of Machinery,
140-148 Lafayette Street, New York City
| Other books in this series dealing with |
| the subjects of Toolmaking and kindred |
| topics are as follows: |
| No. 31—Thread Tools and Gages |
| No. 64—Gage Making and Lapping |
| No. 107—Drop Forging Die Sinking |
| No. 130—Gaging Tools and Methods |

Machinery
The Leading
Mechanical Journal
Machine Design
Construction
Shop Practice
THE INDUSTRIAL PRESS
140-148 Lafayette St. New York City
51-52 Chancery Lane, London
[Pg 3]
The degree of accuracy that is necessary in the construction of certain classes of machinery and tools, has made it necessary for toolmakers and machinists to employ various methods and appliances for locating holes or finished surfaces to given dimensions and within the prescribed limits of accuracy. In this treatise, various approved methods of locating work, such as are used more particularly in tool-rooms, are described and illustrated. These are not given, in every case, as being the best possible method under all conditions, because, as every mechanical man knows, the best way may be dependent upon the element of accuracy with little regard for the time required to do the work, or this order may be reversed; therefore, one method is seldom, if ever, the best under all circumstances, and it is necessary for the workman to consider the conditions in each case and then be guided by his judgment and experience in determining just how the work should be done.
Among the different methods employed by toolmakers for accurately locating work such as jigs, etc., on the faceplate of a lathe, one of the most commonly used is known as the “button method.” This method is so named because cylindrical bushings or buttons are attached to the work in positions corresponding to the holes to be bored, after which they are used in locating the work. These buttons which are ordinarily about ½ or ⅝ inch in diameter, are ground and lapped to the same size, and the ends are finished perfectly square. The outside diameter should preferably be such that the radius can easily be determined, and the hole through the center should be about ⅛ inch larger than the retaining screw so that the button can be adjusted laterally.
As a simple example of the practical application of the button method, suppose three holes are to be bored in a jig-plate according to the dimensions given in Fig. 1. A common method of procedure would be as follows: First lay out the centers of all holes to be bored, by the usual method. Mark these centers with a prick-punch and then drill holes for the machine screws which are used to clamp the buttons. After the buttons are clamped lightly in place, set them in correct relation with each other and with the jig-plate. The proper location of the buttons is very important, as their positions largely determine the accuracy of the work. The best method of locating a number of buttons depends, to some extent, upon their relative positions, the instruments available, and the accuracy required. When buttons must be located at [Pg 4] given distances from the finished sides of a jig, a surface plate and vernier height gage are often used. The method is to place that side from which the button is to be set, upon an accurate surface plate and then set the button by means of the height gage, allowance being made, of course, for the radius of the button. The center-to-center distance between the different buttons can afterwards be verified by taking direct measurements with a micrometer.

Fig. 1. Simple Example of Work Illustrating Application of Button Method
Figs. 2 and 3 illustrate a method which requires only a micrometer. Two of the buttons are set at the correct distance from one edge of the plate by measuring from a parallel strip. Obviously, the micrometer reading will exceed the distance from the center of a button to the edge of the plate, by the amount equal to the thickness of the parallel strip plus the radius of the button. The center-to-center distance between each pair of buttons is also tested as indicated in Fig. 3, by measuring the overall distance and deducting the diameter of one button.
After the buttons have been set and the screws are tightened, all measurements should be carefully checked. The work is then mounted on the faceplate of the lathe and one of the buttons is set true by the use of a test indicator as shown in Fig. 4. When the dial of the indicator ceases to vibrate, thus showing that the button runs true, the latter should be removed so that the hole can be drilled and bored to the required size. In a similar manner other buttons are indicated and the holes bored, one at a time. It is evident that if each button is correctly located and set perfectly true in the lathe, the various holes will be located the required distance apart within very close limits.
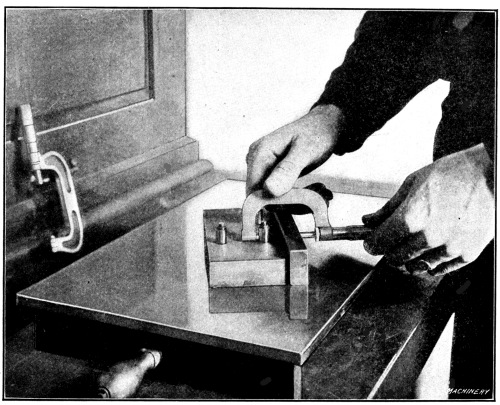
Fig. 2. Determining Distance from Button to Edge of Plate
Another example of work illustrating the application of the button method is shown in Fig. 5. The disk-shaped part illustrated is a flange templet which formed a part of a fixture for drilling holes in flanged plates, the holes being located on a circle 6 inches in diameter. It was necessary to space the six holes equi-distantly so that the holes in the flanges would match in any position, thus making them interchangeable. First a plug was turned so that it fitted snugly in the [Pg 5] 1¼-inch central hole of the plate and projected above the top surface about ¾ inch. A center was located in this plug and from it a circle of three inches radius was drawn. This circle was divided into six equal parts and then small circles ⅝ inch in diameter were drawn to indicate the outside circumference of the bushings to be placed in the holes. These circles served as a guide when setting the button and enabled the work to be done much more quickly. The centers of the holes were next carefully prick-punched and small holes were drilled and tapped for No. 10 machine screws. After this the six buttons were attached in approximately the correct positions and the screws tightened enough to hold the buttons firmly, but allow them to be moved by tapping lightly. As the radius of the circle is 3 inches, the radius of the central plug, ⅝ inch, and that of each button, ⁵/₁₆ inch, the distance from the outside of the central plug to the outside of any button, when correctly set, must be 3 ¹⁵/₁₆ inches. Since there are six buttons around the circle, the center-to-center distance is equal to the radius, and the distance between the outside or any two buttons should be 3⅝ inches. Having determined these dimensions, each button is set equi-distant from the central plug and the required distance apart, by using a micrometer. As each button is brought into its correct position, it should be tightened down a little so that it will be located firmly when finally set. The work is then strapped to the faceplate of a lathe and each button is indicated for boring the different holes by means of an indicator, as previously described. When the buttons are removed it will be found that in nearly all cases the [Pg 6] small screw holes will not run exactly true; therefore, it is advisable to form a true starting point for the drill by using a lathe tool.

Fig. 3. Testing Location of Buttons
Fig. 7 shows a method of locating buttons from the finished sides of a plate, and this same plate with the five buttons attached is shown in Fig. 6. As the dimensions in Fig. 7 indicate, the holes must not only be accurate with relation to each other, but also with reference to the edges of the templet; therefore, it is necessary to work from the sides as well as the center. The width of the plate was first measured carefully and found to be 5 inches. As the center-to-center distance between buttons B and C and also buttons D and E, is 2½ inches, the distance from the center of each outside button to the edge of the plate is 1¼ inch. A ¼-inch parallel was clamped against the side, as shown in the illustration, and then the distance from the outside of each button to the outside of the parallel (1 ¹³/₁₆ inch) was measured in conjunction with the distance L from the central button. The distance L was obtained by first determining the center-to-center distance M which represents the hypotenuse of a right-angled triangle.
M² = 1.25² + 1.625²
or M = √1.25² + 1.625² = √4.024 = 2.050 inches.
Therefore, L = 2.050 + 0.625 = 2.675 inches.
[Pg 7] In this case, the center button was first located correctly from the sides and end and then the other buttons were set. When doing precision work of this kind, the degree of accuracy obtained will depend upon the instruments used, the judgment and skill of the workman, and the care exercised. A good general rule to follow when locating bushings or buttons is to use the method which is the most direct and which requires the least number of measurements, in order to prevent an accumulation of errors.
Comparatively small precision work is sometimes located by the disk method, which is the same in principle as the button method, the chief difference being that disks are used instead of buttons. These disks are made to such diameters that when their peripheries are in contact, each disk center will coincide with the position of the hole to be bored; the centers are then used for locating the work. To illustrate this method, suppose that the master-plate shown at the left in Fig. 8 is to have three holes a, b, and c bored into it, to the center distances given.

Fig. 4. Testing Concentricity of Button Preparatory to Boring Hole in Lathe
It is first necessary to determine the diameters of the disks. If the center distances between all the holes were equal, the diameters would, of course, equal this dimension. When, however, the distances between the centers are unequal, the diameters may be found as follows: Subtract, say, dimension y from x, thus obtaining the difference between the radii of disks C and A (see right-hand sketch); add this difference to dimension z, and the result will be the diameter of disk A. Dividing this diameter by 2 gives the radius, which, subtracted from center distance x equals the radius of B; similarly the radius of B subtracted from dimension y equals the radius of C. [Pg 8]
For example, 0.930-0.720 = 0.210 or the difference between the radii of disks C and A. Then the diameter of A = 0.210 + 0.860 = 1.070 inch, and the radius equals 1.070 ÷ 2 = 0.535 inch. The radius of B = 0.930-0.535 = 0.395 inch and 0.395 × 2 = 0.790, or the diameter of B. The center distance 0.720-0.395 = 0.325, which is the radius of C; 0.325 × 2 = 0.650 or the diameter of C.
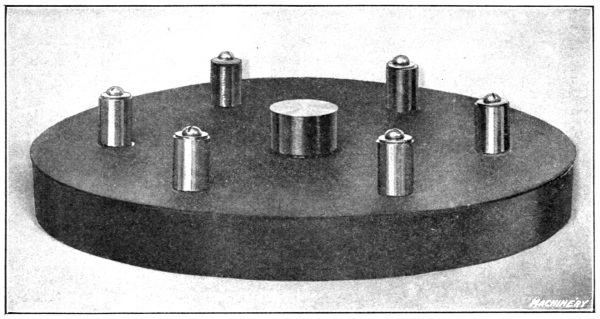
Fig. 5. Flange Templet with Buttons Attached
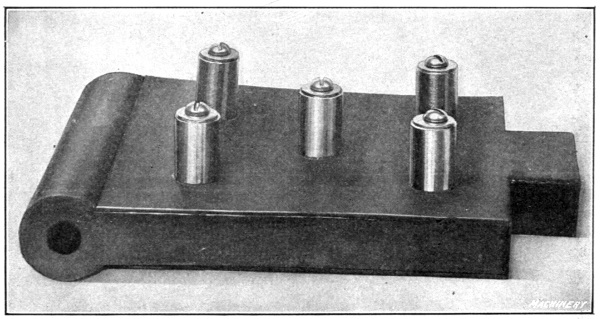
Fig. 6. Hinge Jig Templet with Buttons Attached
After determining the diameters, the disks should be turned nearly to size and finished, preferably in a bench lathe. First insert a solder chuck in the spindle, face it perfectly true, and attach the disk by a few drops of solder, being careful to hold the work firmly against the chuck while soldering. Face the outer side and cut a sharp V-center in it; then grind the periphery to the required diameter. Next fasten the finished disks onto the work in their correct locations with their peripheries in contact, and then set one of the disks exactly central with the lathe spindle by applying a test indicator to the center in the disk. After removing the disk and boring the hole, the work is located for boring the other holes in the same manner. [Pg 9]

Fig. 7. Hinge Jig Templet Illustrated in Fig. 6
Small disks may be secured to the work by means of jeweler’s wax. This is composed of common rosin and plaster of paris and is made as follows: Heat the rosin in a vessel until it flows freely, and then add plaster of paris and keep stirring the mixture. Care should be taken not to make the mixture too stiff. When it appears to have the proper consistency, pour some of it onto a slate or marble slab and allow it to cool; then insert the point of a knife under the flattened cake thus formed and try to pry it off. If it springs off with a slight metallic ring, the proportions are right, but if it is gummy and ductile, there is too much rosin. On the other hand, if it is too brittle and crumbles, this indicates that there is too much plaster of paris. The wax should be warmed before using. A mixture of beeswax and shellac, or beeswax and rosin in about equal proportions, is also used for holding disks in place. When the latter are fairly large, it may be advisable to secure them with small screws, provided the screw holes are not objectionable.
The accuracy of work done by the button method previously described is limited only by the skill and painstaking care of the workman, but setting the buttons requires a great deal of time. By a little modification, using what is sometimes called the “disk-and-button method,” a large part of this time can be saved without any sacrifice of accuracy. The disk-and-button method is extensively used in many shops. Buttons are used, but they are located in the centers of disks of whatever diameters are necessary to give the required locations. As three disks are used in each step of the process, it is sometimes called the “three-disk method.”
To illustrate the practical application of this method, suppose six [Pg 10] equally-spaced holes are to be located in the circumference of a circle six inches in diameter. To locate these, one needs, besides the buttons, three disks three inches in diameter, each having a central hole exactly fitting the buttons. It is best to have, also, a bushing of the same diameter as the buttons, which has a center-punch fitted to slide in it. First the center button is screwed to the templet, and one of the disks A, Fig. 9, is slipped over it; then a second disk B carrying a bushing and center-punch is placed in contact with disk A and a light blow on the punch marks the place to drill and tap for No. 2 button, which is kept in its proper place while tightening the screw by holding the two disks A and B in contact. Next the third disk C is placed in contact with disks A and B and locates No. 3 button, and so on until the seven buttons are secured in position. The templet is then ready to be strapped to the lathe faceplate for boring.

Fig. 8. An Example of Precision Work,
and Method
of Locating Holes by Use of Disks in Contact
Of course, it is not possible to use disks of “standard” sizes for many operations, but making a special disk is easy, and its cost is insignificant as compared with the time saved by its use. One who employs this method, especially if he also uses disks to lay out angles, soon accumulates a stock of various sizes. While it is desirable to have disks of tool steel, hardened and ground, or, in the larger sizes, of machine steel, case-hardened and ground, a disk for occasional use will be entirely satisfactory if left soft.
Another example of work is shown in Fig. 10. This is a jig templet similar to the one illustrated in Figs. 6 and 7. Sketch A gives its dimensions and sketch B shows the disk-and-button way of locating the holes. A steel square is clamped with its stock against the right-hand edge of the templet and its blade extending across the top. The lower edge of the blade should be located 0.250 inch from the upper edge of the templet by the use of size blocks. A 2½-inch disk, touching both blade and stock, locates hole C. Another 2½-inch disk, touching the first disk and the square blade, locates hole B. Next a disk 1.600 inch diameter is placed in contact with the [Pg 11] two upper disks and locates the center hole A; and, finally, the disks for holes B and C are used to locate holes D and E.
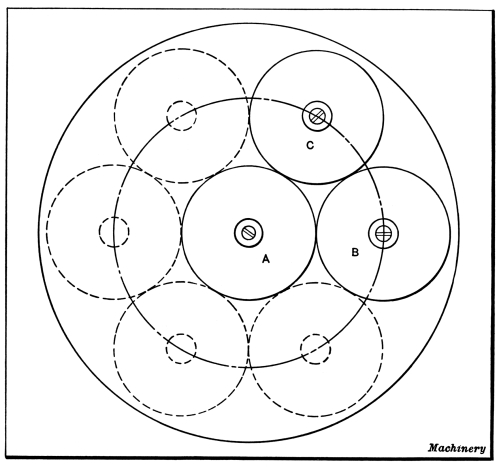
Fig. 9. Locating Holes on a Circle
and Equi-distant
by using Disks and Buttons in Combination
Two other jobs that illustrate this method may be of interest. The first one, shown in Fig. 11, required the locating of nine equally-spaced holes on a circumference of 7⅜ inches diameter. In any such case, the size of the smaller disks is found by multiplying the diameter of the circle upon which the centers of the disks are located by the sine of half the angle between two adjacent disks. The angle between the centers of adjacent disks equals 360 ÷ number of disks. 360 ÷ 9 = 40; hence, in this case, the diameter of the smaller disks equals 7⅜ multiplied by the sine of 20 degrees, or 7⅜ × 0.34202 = 2.5224 inches. 7⅜-2.5224 = 4.8526 inches, which is the diameter of the central disk.
The templet shown in Fig. 12 required two holes on a circumference 6½ inches diameter, with their centers 37 degrees 20 minutes apart. To find the diameter of the smaller disks, multiply the diameter of the large circle by the sine of one-half the required angle, as in the preceding example; thus 6½ × sin 18 degrees 40 minutes = 2.0804 inches, which is the diameter of the two smaller disks. The diameter of the larger disk equals 6½-2.0804 = 4.4196 inches.
Very accurate results can be obtained by the disk-and-button method. Of course, absolute exactness is equally unattainable with buttons and a micrometer, or any other method; the micrometer does not show the slight [Pg 12] inaccuracy in any one chordal measurement, while in using the disks the error is accumulative and the insertion of the last disk in the series shows the sum of the errors in all the disks. It is only in cases like the one illustrated in Fig. 9 that we note this, and then, though in correcting the error, we may change the diameter of the circle a very slight amount, an exceedingly accurate division of the circumference is secured.
Use of Two- and Three-Diameter Disks
Fig. 13 illustrates, on an enlarged scale, a piece of work requiring great accuracy, which was successfully handled by an extension of the three-disk method. Fourteen holes were required in a space hardly larger than a silver half-dollar, and, although the drawing gave dimensions from the center of the circle, the actual center could not be used in doing the work, as there was to be no hole there; moreover, a boss slightly off center prevented the use of a central disk, unless the bottom of the disk were bored out to receive this boss, which was not thought expedient. Hence, the method adopted was to make the plate thicker than the dimension given on the drawing, and then bore it out to leave a rim of definite diameter, this rim to be removed after it had served its purpose as a locating limit for the disks.
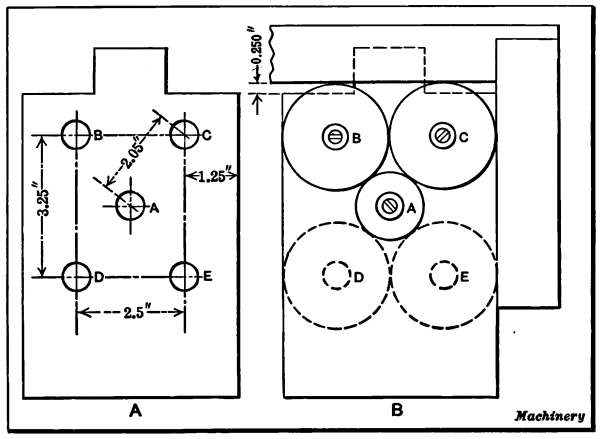
Fig. 10. (A) Layout of Jig-Plate.
(B) Disk-and-Button Method of Locating Holes
As the holes A and B, which were finished first, were 0.600 inch apart and 0.625 inch from the center, the rim was bored to 1.850 inch and two 0.600-inch disks, in contact with the rim and with each other, located these holes. As hole C was to be equi-distant from holes A and B, and its distance from the center was given, the size of the disk for this hole was readily determined. The disks for holes A, B and C have [Pg 13] two diameters; the upper diameters are made to whatever size is required for locating the disks of adjacent holes, and they also form a hub which can be used when setting the disks with an indicator. Hole D was 0.4219 inch from B, and calculations based on this dimension and its distance from the center showed that it was 0.4375 inch from hole C.
A “three-story” disk or button was made for hole D. The diameter of the large part was 0.46875 inch and it overlapped disks C and B (the upper sections of which were made 0.375 inch and 0.4062 inch, respectively), thus locating D. Then hole F and all the remaining holes were located in a similar manner. The upper diameters of disks E and D were used in locating disks for other adjacent holes, as well as a hub for the indicator; for instance, to locate a hole with reference to holes C and D, the diameter of the new disk and the diameter of the upper part of disk D, were varied to give the required location. The relation between the disks B, D and F is shown by the side view.

Fig. 11. Example of Circular
Spacing
requiring a Large Central Disk
It had been decided that no screws should be used in attaching the buttons or disks to the work, as it was feared that the tapped holes would introduce inaccuracy by deflecting the boring-tools; therefore the following method was employed. After all the disks were fastened in place by clamps, a soft solder of low melting point was flowed about them, filling the work to the top of the rim. When the solder had cooled, the clamps were removed, the work transferred to the lathe faceplate, indicated in the usual way, and the holes bored by a “D” or “hog-nose” drill, guided by an axial hole in each disk, which had been provided for that purpose when the disks were made. It was thought that the unequal contraction of the solder and the plate in cooling might throw the holes “out of square;” however, careful measurements failed to show any appreciable lack of parallelism in test-bars inserted in the holes. [Pg 14]
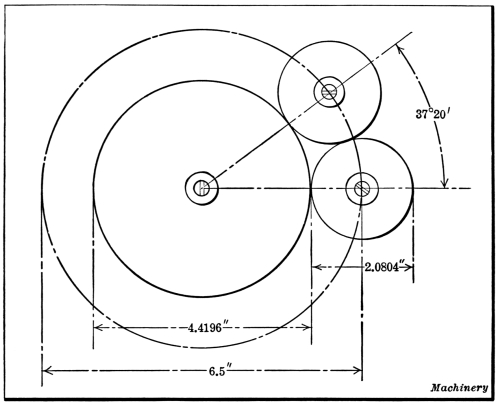
Fig. 12.Locating Holes at an Angle by use of Disks and Buttons
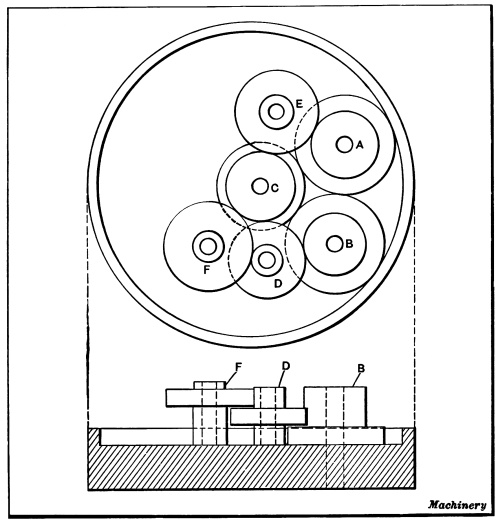
Fig. 13. Locating Holes by
Means of Two- and
Three-Diameter Disks in Contact
[Pg 15]
For setting up a piece of work on which a surface is to be planed or milled at an exact angle to a surface already finished, disks provide an accurate means of adjustment. One method of using disks for angular work is illustrated at A in Fig. 14. Let us assume that the lower edge of plate shown is finished and that the upper edge is to be milled at an angle a of 32 degrees with the lower edge. If the two disks x and y are to be used for locating the work, how far apart must they be set in order to locate it at the required angle? The center-to-center distance can be determined as follows: Subtract the radius of the larger disk from the radius of the smaller disk, and divide the difference by the sine of one-half the required angle.

Fig. 14. Obtaining Accurate Angular Measurements with Disks
Example: If the required angle a is 32 degrees, the radius of the large disk, 2 inches, and the radius of the small disk, 1 inch, what is the center-to-center distance?
The sine of one-half the required angle, or 16 degrees, is 0.27564. The difference between the radii of the disks equals 2 - 1 = 1, and 1 ÷ 0.27564 = 3.624 inches. Therefore, for an angle of 32 degrees, disks of the sizes given should be set so that the distance between their centers is 3.624 inches.
Another method of accurately locating angular work is illustrated at B in Fig. 14. In this case, two disks are also used, but they are placed in contact with each other and changes for different angles are obtained by varying the diameter of the larger disk. The smaller disk is a standard 1-inch size, such as is used for setting a 2-inch micrometer. By this method any angle up to about 40 degrees can be obtained within a very close limit of accuracy. The following rule may be used for determining the diameter of the larger disk, when both disks are in contact and the diameter of the small disk is known: [Pg 16]
Multiply twice the diameter of the small disk by the sine of one-half the required angle; divide this product by 1 minus the sine of one-half the required angle; add the quotient to the diameter of the small disk to obtain the diameter of the large disk.
Example: The required angle a is 15 degrees. Find the diameter of the large disk to be in contact with the standard 1-inch reference disk.
The sine of 7 degrees 30 minutes is 0.13053. Multiplying twice the diameter of the small disk by the sine of 7 degrees 30 minutes, we have 2 × 1 × 0.13053 = 0.26106. This product divided by 1 minus the sine of 7 degrees 30 minutes
| = | 0.26106 | = 3.002. |
| 1 - 0.13053 |
This quotient added to the diameter of the small disk equals 1 + 0.3002 = 1.3002 inch, which is the diameter of the large disk.

Fig. 15. Disk-and-Square Method of Accurately Setting Angular Work
The accompanying table gives the sizes of the larger disks to the nearest 0.0001 inch for whole degrees ranging from 5 to 40 degrees inclusive. Incidentally, the usefulness of these disks can be increased by stamping on each one its diameter and also the angle which it subtends when placed in contact with the standard 1-inch disk.
DISK DIAMETERS FOR ANGULAR MEASUREMENT
| Deg. | Inch | Deg. | Inch | Deg. | Inch |
|---|---|---|---|---|---|
| 5 | 1.0912 | 17 | 1.3468 | 29 | 1.6680 |
| 6 | 1.1104 | 18 | 1.3708 | 30 | 1.6983 |
| 7 | 1.1300 | 19 | 1.3953 | 31 | 1.7294 |
| 8 | 1.1499 | 20 | 1.4203 | 32 | 1.7610 |
| 9 | 1.1702 | 21 | 1.4457 | 33 | 1.7934 |
| 10 | 1.1909 | 22 | 1.4716 | 34 | 1.8262 |
| 11 | 1.2120 | 23 | 1.4980 | 35 | 1.8600 |
| 12 | 1.2334 | 24 | 1.5249 | 36 | 1.8944 |
| 13 | 1.2553 | 25 | 1.5524 | 37 | 1.9295 |
| 14 | 1.2775 | 26 | 1.5805 | 38 | 1.9654 |
| 15 | 1.3002 | 27 | 1.6090 | 39 | 2.0021 |
| 16 | 1.3234 | 28 | 1.6382 | 40 | 2.0396 |
| Machinery | |||||
[Pg 17]
The method shown in Fig. 15 for determining angles for setting up work on a milling machine or planer, possesses several advantages. No expensive tools are required, the method can be applied quickly, and the results obtained are quite accurate enough for any but the most exacting requirements. As will be seen, an ordinary combination square is used in connection with a disk, the head of the square being set at different points on the blade according to the angle that is desired. Theoretically, a one-inch disk could be used for all angles from about 6 degrees up to a right angle, but in practice it is more convenient and accurate to employ larger disks for the larger angles.
The only inaccuracy resulting from this method is due to setting the square at the nearest “scale fraction” instead of at the exact point determined by calculation. This error is very small, however, and is negligible in practically all cases. The dimension x required for any desired angle a can be found by multiplying the radius of the disk, by the cotangent of one-half the desired angle, and adding to this product the radius of the disk.
Example: The square blade is to be set to an angle of 15 degrees 10 minutes, using a 2-inch disk. At what distance x (see Fig. 15) should the head of the square be set?
Cot 7 degrees 35 minutes = 7.5113,
and 7.5113 × 1
+ 1 = 8.5113 inches.
By setting the square to 8½ inches “full,” the blade would be set very close to the required angle of 15 degrees 10 minutes.
[Pg 18] The size-block method of locating a jig-plate or other part, in different positions on a lathe faceplate, for boring holes accurately at given center-to-center distances, is illustrated in Fig. 16. The way the size blocks are used in this particular instance is as follows: A pair of accurate parallels are attached to a faceplate at right angles to each other and they are so located that the center of one of the holes to be bored will coincide with the lathe spindle. The hole which is aligned in this way should be that one on the work which is nearest the outer corner, so that the remaining holes can be set in a central position by adjusting the work away from the parallels. After the first hole is bored, the work is located for boring each additional hole by placing size blocks of the required width between the edges of the work and the parallels. For instance, to set the plate for boring hole D, size blocks (or a combination of blocks or gages) equal in width to dimension A₁ would be inserted at A, and other blocks equal in width to dimension B₁ beneath the work as at B. As will be seen, the dimensions of these blocks equal the horizontal and vertical distances between holes C and D. With the use of other combinations of gage blocks, any additional holes that might be required are located in the central position. While only two holes are shown in this case, it will be understood that the plate could be located accurately for boring almost any number of holes by this method.
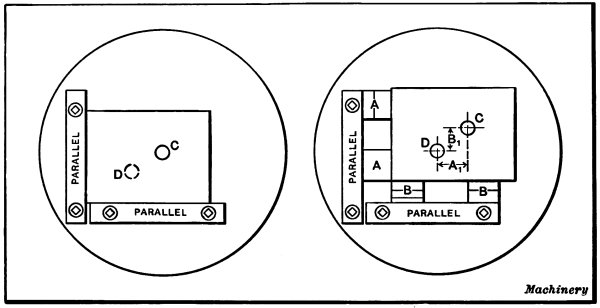
Fig. 16. Method of setting Work on Faceplate
with Size Blocks or Gages
Incidentally, such gages as the Johansson combination gages are particularly suited for work of this kind, as any dimension within the minimum and maximum limits of a set can be obtained by simply placing the required sizes together. Sometimes when such gages are not available, disks which have been ground to the required diameter are interposed between the parallels and the work for securing accurate locations. Another method of securing a positive adjustment of the work is to use parallels composed of two tapering sections, which can be adjusted to vary the width and be locked together by means of screws. Each half has the same taper so that outer edges are parallel for any position, and the width is measured by using a micrometer. The size-block method is usually applied to work having accurately machined edges, although a part having edges which are of a rough or irregular shape can be located by this method, if it is mounted on an auxiliary plate having accurately finished square edges. For instance, if holes were to be bored in the casting for a jig templet which had simply been planed on the top and bottom, the casting could be bolted to a finished plate having square edges and the latter be set in the different positions required, by means of size blocks. Comparatively large jig plates are sometimes located for boring in this way and the milling machine is often used instead of a lathe.
When it is necessary to machine two or more plates so that they are duplicates as to the location of holes, circular recesses, etc., what is known as a master-plate is often used for locating the work on the lathe faceplate. This master-plate M (see Fig. 17) contains holes which correspond to those wanted in the work, and which accurately fit a central plug P in the lathe spindle, so that by engaging first one hole and then another with the plug, the work is accurately positioned for the various operations.
When making the master-plate, great care should be taken to have the sides parallel and the holes at right angles to the sides, as well as [Pg 19] accurately located with reference to one another. The various holes may be located with considerable precision by the use of buttons as previously described. Of course, it is necessary to have a hole in the master-plate for each different position in which the work will have to be placed on the faceplate; for example, if a circular recess r were required, a hole r₁ exactly concentric with it would be needed in the master-plate. The method of holding the work and locating it with reference to the holes in the master-plate will depend largely on its shape. The cylindrical blank B illustrated, is positioned by a recess in the master-plate in which it fits. The work is commonly held to the master-plate by means of clamps and tap bolts or by screws which pass through the work and into the master-plate. Solder is sometimes used when it is not convenient to hold the work by clamps or screws.

Fig. 17. Master-plate applied to a Bench Lathe Faceplate
The plug P which locates the master-plate, is first turned to fit the spindle or collet of the lathe and the outer or projecting end is roughturned for the holes in the master-plate, which should all be finished to exactly the same diameter. The plug is then inserted in the spindle and ground and lapped to a close fit for the holes in the master-plate. The latter, with the work attached to it, is next clamped to the faceplate by the straps shown, which engage a groove around the edge of the master-plate. The first hole is finished by drilling to within, say, 0.005 or 0.006 inch of the size, and then boring practically to size, a very small amount being left for reaming or grinding. The remaining holes can then be finished in the same way, the work being positively located in each case by loosening the master-plate and engaging the proper hole in it with the central plug. It is apparent that by the use of this same master-plate, a number of pieces B could be made which would be practically duplicates.
The master-plate method of locating work can be applied in many different ways. It is used for making duplicate dies, for accurately locating the various holes in watch movements, and for many other operations requiring great precision. Master-plates are quite frequently [Pg 20] used by toolmakers when it is necessary to produce a number of drill jigs which are to be used for drilling holes in different parts having the same relative locations, thus requiring jigs that are duplicates within very close limits.
When a master-plate is required, that is to be used in making duplicates of an existing model, the holes are bored in the master-plate by reversing the process illustrated in Fig. 17. That is, the central plug P is turned to fit the largest hole in the model and the latter with the attached master-plate blank is clamped to lathe faceplate. The first hole is then bored to within say 0.002 inch of the finish diameter, to allow for grinding, provided the master-plate is to be hardened. The central plug is then turned down to fit the next largest hole and the second hole is bored in the master-plate. This method is continued until all the holes are bored. In order to prevent any change in the position of the master-plate relative to the model, it may be secured by inserting dowel-pins through both parts, the work being held to the lathe faceplate by ordinary screw clamps. If the holes in the model do not extend clear through, a flat plate having parallel sides may be interposed between the model and master-plate to provide clearance between the two and prevent cutting into the model when boring the master-plate.
[Pg 21]
Toolmakers and machinists occasionally find it necessary to locate a number of equally-spaced holes on a straight line between two points, or to divide a circle with holes which are equi-distant within a very small limit of accuracy. Several dividing and spacing methods are described in this chapter; some of these methods can, with slight modification, be applied in various ways.
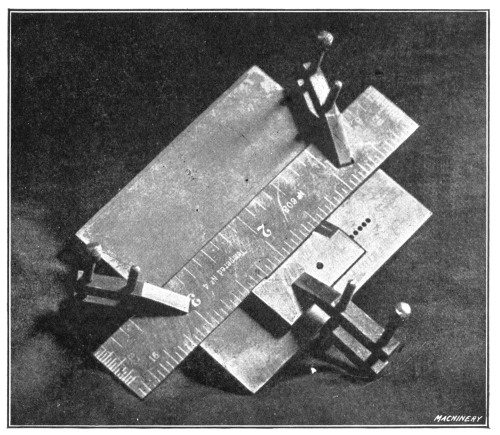
Fig. 18. Method of Drilling Small Equally-spaced Holes in Rows
It is sometimes necessary to drill one or more rows of small equally-spaced holes. The best method of doing this work naturally depends, to some extent, upon the accuracy required, but even when a high degree of accuracy is not necessary, if an attempt is made to lay out the holes and drill them in the ordinary way, considerable time is usually required and the results are liable to be unsatisfactory. For example, suppose a row of holes ¹/₁₆ inch in diameter and ⅛ inch center-to-center distance were to be drilled in a flat plate. Some machinists would proceed by first scribing a center-line and then laying out the centers of the holes by means of dividers. A much easier and accurate method is illustrated in Fig. 18, and is as follows: [Pg 22] Lay out the first hole and drill it; then secure a small piece of flat steel for a drill guide, drill a hole through it, bevel one corner and scribe a fine line on the beveled section, as shown in the illustration. Align the hole drilled in the guide with the hole in the work, by inserting a close-fitting plug, and clamp a scale against one edge of the drill guide so that one of the graduation marks exactly matches with the line on the guide. The edge of the scale must also be located parallel to the center-line of the row of holes to be drilled. Now proceed to drill the holes, setting the drill guide each time, to whatever graduation line represents the required spacing or pitch of the holes.
It is advisable to use a magnifying glass to accurately align the graduation mark on the scale with the line on the drill guide. If two or more rows of holes are to be drilled parallel, the guide block can be drilled accordingly, so that the different rows of holes can be finished at the same time. The drill guide block should be relieved slightly in the center so as to insure the ends of the block bearing against the edge of the scale. A toolmaker or machinist can drill a row of holes accurately by this simple method, in the time required to lay them out in the usual way, and even though accuracy is not necessary, it is quicker to drill holes by this method than by the one more commonly employed.
A simple method of spacing holes that are to be drilled in a straight line is illustrated in Fig. 19. Two disks are made, each having a diameter equal to the center-to-center distance required between the holes. These disks must also have holes which are exactly central with the outside to act as a guide for the drill or reamer. The first two holes are drilled in the work while the disks are clamped so that they are in contact with each other and also with the straightedge as shown. One disk is then placed on the opposite side of the other, as indicated by the dotted line, and a third hole is drilled; this process of setting one disk against the opposite side of the other is continued until all the holes are drilled. When it is necessary to drill a parallel row of “staggered” holes, the second row can be located by placing disks of the proper size in contact with the first row of disks.
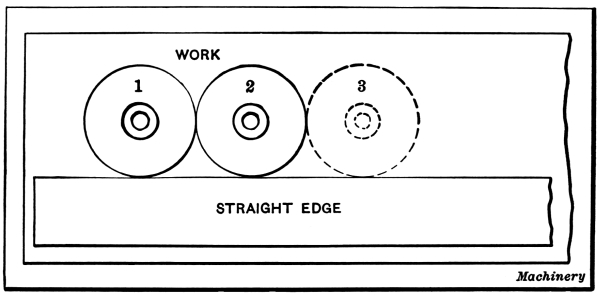
Fig. 19. Locating Equi-distant Holes
in a Straight Line
by Means of Disks and Straightedge
[Pg 23] A method of using disks, which is preferable for very accurate work, is shown in Fig. 20. The disks are clamped against each other and along straightedge A by the screws shown, and if the outside diameters are correct and the guide holes concentric with the outside, very accurate work can be done. With this device there may be as many disks as there are holes to be drilled, if the number of holes is comparatively small, but if it is necessary to drill a long row of holes, the disks and frame are shifted along an auxiliary straightedge B, the hole in one of the end disks being aligned with the last hole drilled by inserting a close-fitting plug through the disk and hole.
An adjustable jig for accurately spacing small holes is shown in Fig. 21.
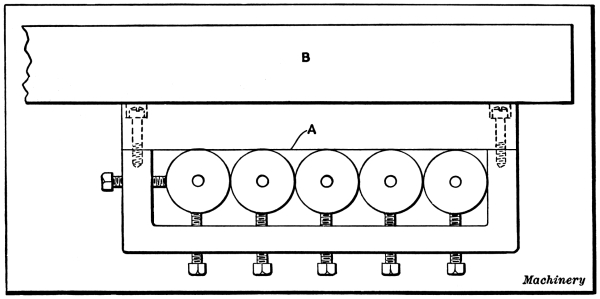
Fig. 20. Special Disk-jig for Precision Drilling
This form is especially adapted for locating a number of equally spaced holes between two previously drilled or bored holes, and the accuracy of the method lies in the fact that a slight error in the original spacing of the guide bushing is multiplied, and, therefore, easily detected. There are two of these guide bushings A and B which are carried by independent slides. These slides can be shifted along a dovetail groove after loosening the screws of clamp-gib C. To illustrate the method of using this jig, suppose five equally-spaced holes are to be located between two holes that are 12 inches apart. As the center-to-center distance between adjacent holes is 2 inches, slides A and B would be set so that the dimension x equals 2 inches plus the radii of the bushings. A straightedge is then clamped to the work in such position that a close-fitting plug can be inserted through the end holes which were previously drilled or bored. Then with a plug inserted through, say, bushing B and one of the end holes, the first hole is drilled and reamed through bushing A; the jig is then shifted to the left until the plug in B enters the hole just made. The second hole is then drilled and reamed through bushing A and this [Pg 24] drilling and shifting of the jig is continued until the last hole is finished. The distance between the last hole and the original end hole at the left is next tested by attempting to insert close-fitting plugs through both bushings. Evidently, if there were any inaccuracy in the spacing of the bushings, this would be multiplied as many times as the jig was shifted, the error being accumulative. To illustrate how the error accumulates, suppose that the bushings were 0.001 inch too far apart; then the distance to the first hole would be 2.001 inch, to the second hole, 4.002 inch, and finally the distance from the first to the sixth hole would be 10.005 inches; consequently, the distance between the sixth and seventh holes would equal 12-10.005 = 1.995 inch, or 0.005 inch less than the required spacing, assuming, for the sake of illustration, that the first and last holes were exactly 12 inches apart. In case of an error of 0.005 inch, the bushings would be set closer together an amount equal to one-fifth of this error, as near as could be determined with a micrometer, and all of the holes would then be re-reamed.
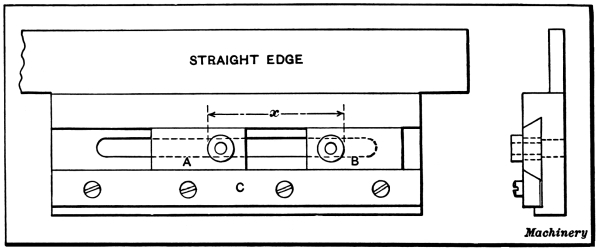
Fig. 21. Adjustable Jig for Accurate Hole Spacing
Sometimes it is necessary to machine a number of holes in a plate so that all the holes are on a circle or equi-distant from a central point, and also the same distance apart, within very small limits. A simple method of spacing holes equally is illustrated at A, Fig. 22. A number of buttons equal to the number of holes required are ground and lapped to exactly the same diameter, preferably by mounting them all on an arbor and finishing them at the same time. The ends should also be made square with the cylindrical surface of the button. When these buttons are finished, the diameter is carefully measured and this dimension is subtracted from the diameter of the circle on which the holes are to be located, in order to obtain the diameter d (see illustration). A narrow shoulder is then turned on the plate to be bored, the diameter being made exactly equal to dimension d. By placing the buttons in contact with this shoulder, they are accurately located radially and can then be set equi-distant from each other by the use of a micrometer. In this particular case, it would be advisable [Pg 25] to begin by setting the four buttons which are 90 degrees apart and then the remaining four. The buttons are next used for setting the work preparatory to boring. (See “Button Method of Accurately Locating Work.”)

Fig. 22. Four Methods of Accurately Dividing a Circle
Another method of securing equal spacing for holes in indexing wheels, etc., is illustrated at B, Fig. 22. This method, however, is not to be recommended if the diameter of the circle on which the holes are to be located, must be very accurate. The disk or ring in which the holes are required, is formed of two sections e and f, instead of being one solid piece. The centers for the holes are first laid out as accurately as possible on ring e. Parts e and f are then clamped together and the holes are drilled through these two sections. Obviously, when the holes are laid out and drilled in this way, there will be some error in the spacing, and, consequently, all of the holes would not match, except when plate e is in the position it occupied when being drilled. Whatever errors may exist in the spacing can be eliminated, however, by successively shifting plate e to different positions and re-reaming the holes for each position. A taper reamer is used and two pins should be provided having the same taper as the reamer. Ring e is first located so that a hole is aligned quite accurately with one in the lower plate. The ring is then clamped and the hole is [Pg 26] partly reamed, the reamer being inserted far enough to finish the hole in plate e and also cut clear around in the upper part of plate f. One of the taper pins is then driven into this hole and then a hole on the opposite side is partly reamed, after which the other pin is inserted. The remaining holes are now reamed in the same way, and the reamer should be fed in to the same depth in each case. If a pair of holes is considerably out of alignment, it may be necessary to run the reamer in to a greater depth than was required for the first pair reamed, and in such a case all the holes should be re-reamed to secure a uniform size.
The next step in this operation is to remove the taper pins and clamps or turn index plate e one hole and again clamp it in position. The reaming process just described is then repeated; the holes on opposite sides of the plate are re-reamed somewhat deeper, the taper pins are inserted, and then all of the remaining holes are re-reamed to secure perfect alignment for the new position of the plate. By repeating this process of shifting plate e and re-reaming the holes, whatever error that may have existed originally in the spacing of the holes, will practically be eliminated. It would be very difficult, however, to have these holes located with any great degree of accuracy, on a circle of given diameter.
When an accurate indexing or dividing wheel is required on a machine, the method of securing accurate divisions of the circle illustrated at C, Fig. 22, is sometimes employed. There is a series of circular disks or bushings equal in number to the divisions required, and these disks are all in contact with each other and with a circular boss or shoulder on the plate to which they are attached. The space between adjacent disks is used to accurately locate the dividing wheel, engagement being made with a suitable latch or indexing device. When making a dividing wheel of this kind, all of the disks are ground and lapped to the same diameter and then the diameter of the central boss or plate is gradually reduced until all of the disks are in contact with each other and with the boss. For an example of the practical application of this method see “Originating a Precision Dividing Wheel.”
Another indexing method of spacing holes equi-distant, is illustrated by the diagram at D, Fig. 22. An accurately fitting plug is inserted in the central hole of the plate in which holes are required. Two arms h are closely fitted to this plug but are free to rotate and are provided with a fine-pitch screw and nut at the outer ends for adjusting the distance between the arms. Each arm contains an accurately made, hardened steel bushing k located at the same radial distance from the center of the plate. These bushings are used as a guide for the drill and reamer when machining the holes in the plate.
To determine the center-to-center distance between the bushings, divide [Pg 27] 360 by twice the number of holes required; find the sine corresponding to the angle thus obtained, and multiply it by the diameter of the circle upon which the holes are located. For example, if there were to be eleven holes on a circle 8 inches in diameter, the distance between the centers of the bushings would equal
| 360 | = 16.36 degrees. |
| 2 × 11 |
The sine of 16.36 degrees is 0.2815, and 0.2815 × 8 = 2.252 inches. The arms are adjusted to locate the centers of the bushings this distance apart, by placing closely fitting plugs in the bushings and measuring from one plug to another with a micrometer or vernier caliper. Of course, when taking this measurement, allowance is made for the diameter of the plugs.
After the arms are set, a hole is drilled and reamed; an accurately fitting plug is then inserted through the bushing and hole to secure the arms when drilling and reaming the adjacent hole. The radial arms are then indexed one hole so that the plug can be inserted through one of the arms and the last hole reamed. The third hole is then drilled and reamed, and this operation is repeated for all of the holes. Evidently, if the center-to-center distance between the bushings is not exactly right, the error will be indicated by the position of the arms relative to the last hole and the first one reamed; moreover, this error will be multiplied as many times as there are holes. For instance, if the arms were too far apart, the difference between the center-to-center distance of the last pair of holes and the center-to-center distance of the bushings in the arms, would equal, in this particular case, eight times the error, and the arms should be re-adjusted accordingly. Larger bushings would then be inserted in the arms and the holes re-reamed, this operation being repeated until the holes were all equi-distant.
As will be seen, the value of this method lies in the fact that it shows the accumulated error. Thus, if the arms were 0.0005 inch too far apart, the difference between the first and last hole would equal 8 × 0.0005 = 0.004 inch. This same principle of dividing can be applied in various ways. For instance, the radial arms if slightly modified, could be used for drilling equally-spaced holes in the periphery or disk of a plate, or, if a suitable marking device were attached, a device of this kind could be used for accurately dividing circular parts.
There are various methods employed for making accurate indexing wheels for a definite number of divisions. One of these methods, suitable particularly for small numbers of divisions, employs a split wheel with a series of taper holes reamed through the two divisions. By shifting the two divisions from point to point (as explained in connection with sketch B, Fig. 22) and reaming and re-reaming the taper holes at each shifting, they may finally be brought very accurately into position. Another method that has been employed consists in clamping [Pg 28] about the rim of the dividing wheel a number of precisely similar blocks, fitting close to each other and to the wheel itself. These blocks are then used for locating the wheel in each of its several positions in actual work. A third and simpler method (a modification of the one last described) consists in grinding a series of disks and clamping them around a rim of such diameter that the disks all touch each other and the rim simultaneously, as explained in connection with sketch C, Fig. 22. The wheel described in the following, which is illustrated in Fig. 23, was made in this way.
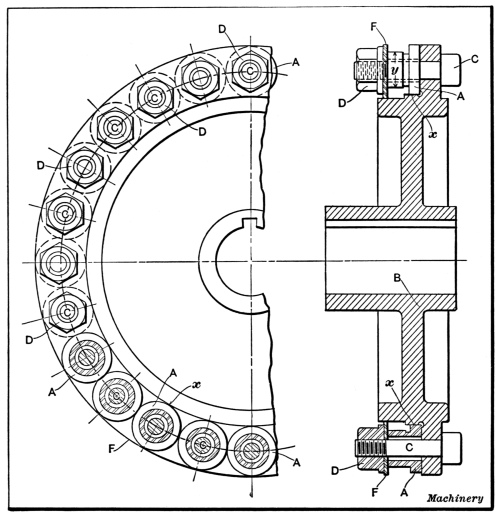
Fig. 23. Precision Dividing Wheel
Disks A are clamped against an accurately ground face of the wheel B and are supposed to just touch each other all around, and to be each of them in contact with the ground cylindrical surface at x. They are held in proper position by bolts C and nuts D. The bolts fit loosely in the holes of the disks or bushings A so that the latter are free to be located as may be desired with reference to the bolts.
One or two improvements in the construction of this type of dividing wheel may be noted before proceeding to a description of the way in which it is made. For one thing, instead of having an indexing bolt enter the V-space between two adjoining disks, a smaller diameter y is ground on each of them, over which locking finger or pawl passes, holding the wheel firmly from movement in either direction. This construction has the advantage of a probable lessening of error by [Pg 29] locating on each bushing instead of between two bushings; moreover, it gives a better holding surface and better holding angles than would be the case if this smaller diameter were not provided.
A second improvement lies in the method of clamping the bushings A in place. Instead of providing each bolt with a separate washer, a ring F is used. This ring fits closely on a seat turned to receive it on the dividing wheel B. When one bushing A has been clamped in place, the disk is locked from movement so that there is no possibility, in clamping the remaining bushings, of having their location disturbed in the slightest degree by the turning of the nuts in fastening them in place.
The bushings A, of which there were in this case 24, were all ground exactly to the required diameters on their locating and locking surfaces. The important things in this operation are, first, that the large or locating diameter of the bushing should be exactly to size; and second, that this surface should be in exact alignment with the diameter in which the locking is done; and, finally, that the face of the bushing should be squared with the cylindrical surfaces. A refined exactness for the diameter of the locking surfaces is not so important, as the form of locking device provided allows slight variations at this point without impairment of accuracy. This dimension was kept within very close limits, however. The truth of the two cylindrical surfaces and the face of the bushing was assured by finishing all these surfaces in one operation on the grinding machine.
The sizing of the outer diameter of the bushing, which was 1.158 inch, must be done so accurately that it was not thought wise to trust to the ordinary micrometer caliper. An indexing device was therefore made having a calipering lever with a long end, in the ratio of 10 to 1, which actuated the plunger of a dial test indicator of the well-known type made by the Waltham Watch Tool Co. The thousandth graduations on the dial of this indicator would then read in ten-thousandths, permitting readings to be taken to one-half or one-quarter of this amount. The final measurements with this device were all taken after dipping the bushings in water of a certain temperature, long enough to give assurance that this temperature was universal in all the parts measured. It will be understood, of course, in this connection, that getting the diameter of these bushings absolutely to 1.158 inch was not so important as getting them all exactly alike, whether slightly over or slightly under this dimension; hence, the precaution taken in measurement.
Wheel B was next ground down nearly to size, great care being taken that it should run exactly concentric with the axis. As soon as the diameter of the surface x was brought nearly to the required dimension as obtained by calculation, the disks were tried in place. The first one was put in position with its loose hole central on the bolt and clamped in place under ring F. The next bushing was then pressed up against it and against the surface x of the wheel and clamped in place. The third one was similarly clamped in contact with its neighboring bushing and the wheel, and so on, until [Pg 30] the whole circle was completed. It was then found that the last disk would not fill the remaining space. This required the grinding off of some stock from surface x, and a repetition of the fitting of the bushings A until they exactly filled the space provided for them.
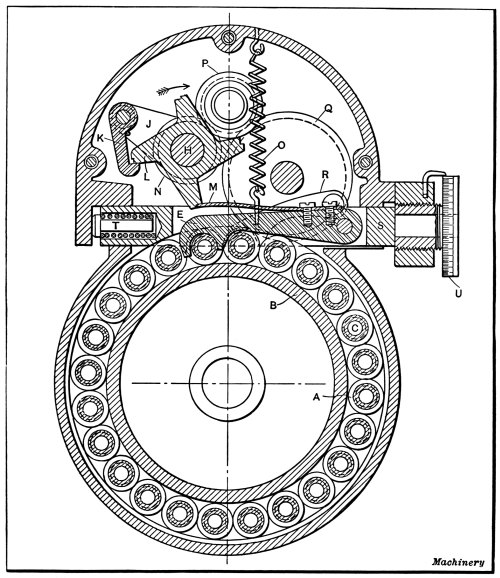
Fig. 24. Precision Dividing Wheel and its Indexing Mechanism
This operation required, of course, considerably more skill than a simple description of the job would indicate. One of the points that had to be carefully looked out for was the cleaning of all the surfaces in contact. A bit of dust or lint on one of the surfaces would throw the fitting entirely out. The temperature of the parts was another important consideration. As an evidence of the accuracy with which the work was done, it might be mentioned that it was found impossible to do this fitting on a bench on the southern or sunny side of the shop, the variations of temperature between morning and noon, and between bright sunshine and passing clouds, being such that the disks would not fit uniformly. The variation from these minute temperature changes resulted [Pg 31] from the different coefficients of expansion of the iron wheel and the steel bushings. The obvious thing to do would be to build a room for this work kept at a constant temperature and preferably that of the body, so that the heat of the body would make no difference in the results. It was found sufficient in this case, however, to do the work on the northern side of the shop where the temperature was more nearly constant, not being affected by variations in sunshine.
The dividing wheel, the construction of which has just been described, was made by the Fellows Gear Shaper Co. It is used for indexing the Fellows gear cutters in the machine in which the teeth are ground. The indexing mechanism of this machine is shown in Fig. 24. It is operated by a handle or lever pinned to rock-shaft H, to which is keyed arm J. Pivoted to J is a pawl K engaging the teeth of ratchet L, which revolves loosely on shaft H. This ratchet L controls the movement of locking finger E. The parts are shown in their normal or locked position in the engraving.
As the handle on shaft H is pulled in the direction indicated by the arrow, arm J is raised, carrying the ratchet wheel around to the right. This allows flat spring M to drop off of the ratchet tooth, permitting helical spring O to raise latch E and thus leave the wheel free. The continued movement of the hand-lever and of rock-shaft H, by means of gear N, intermediate pinion P and gear Q, causes the indexing pawl R, which is pivoted to gear Q and acts on the head of one of the bolts C (see Fig. 23), to index the wheel one step. Just before reaching its new location the new tooth of ratchet wheel L coming up, bears down on the top of spring M, pressing latch E into place against the tension of coil spring O. By this means the wheel is locked in position.
When the operator pushes the handle on shaft H back again to its position of rest, the pawl R is retracted into position to act on the next bolt head for the next indexing. Star-wheel L remains stationary on this backward movement, being prevented from revolving by the notch on the top of the tooth into which spring M fits. Pawl K on its return engages with the next tooth of this wheel, ready for the next indexing operation.
A slight rotary adjustment of dividing wheel B, independent of this indexing mechanism, is required for the feeding of the machine. This is accomplished by the end movement of latch E, which is pivoted in slide S. This slide is pressed to the right by spring plunger T, and is adjusted positively in the other direction by feed-screw U, which is finely graduated to permit accurate adjustment. The accuracy in indexing obtained by the use of a wheel thus made was required to bring the finished cutters within the very narrow limits allowed for them in the final inspection.
[Pg 32]
It is often desirable to perform boring operations on the milling machine, particularly in connection with jig work. Large jigs, which because of their size or shape could not be conveniently handled in the lathe, and also a variety of smaller work, can often be bored to advantage on the milling machine. When such a machine is in good condition, the necessary adjustments of the work in both vertical and horizontal planes, can be made with considerable accuracy by the direct use of the graduated feed-screw dials. It is good practice, however, when making adjustments in this way, to check the accuracy of the setting by measuring the center distances between the holes directly. For the purpose of obtaining fine adjustments when boring on the milling machine, the Brown & Sharpe Mfg. Co. makes special scales and verniers that are attached to milling machines, so that the table may be set by direct measurement. By attaching a scale and vernier to the table and saddle, respectively, and a second scale to the column with a vernier on the knee, both longitudinal and vertical measurements can be made quickly and accurately, and the chance of error resulting from inaccuracy of the screw, or from lost motion between the screw and nut, is eliminated.
One method of checking the accuracy of the location of holes bored in the milling machine, is to insert closely fitting ground plugs into the bored holes and then determine the center-to-center distance by taking a direct measurement across the plugs with a micrometer or vernier caliper. For example, if holes were to be bored in a jig-plate, as shown in Fig. 1, assuming that hole A were finished first, the platen would then be moved two inches, as shown by the feed dial; hole B would then be bored slightly under size. Plugs should then be accurately fitted to these holes, having projecting ends, preferably of the same size. By measuring from one of these plugs to the other with a vernier or micrometer caliper, the center distance between them can be accurately determined, allowance being made, of course, for the radii of each plug. If this distance is incorrect, the work can be adjusted before finishing B to size, by using the feed-screw dial. After hole B is finished, the knee could be dropped 1.5 inch, as shown by the vertical feed dial, and hole C bored slightly under size; then by the use of plugs, as before, the location of this hole could be tested by measuring center distances between C-B and C-A.
An example of work requiring the micrometer-and-plug test, is shown set [Pg 33] up in the milling machine in Fig. 25. The large circular plate shown has a central hole and it was necessary to bore the outer holes in correct relation with the center hole within a limit of 0.0005 inch. The center hole was first bored and reamed to size; then an accurately fitting plug was inserted and the distances to all the other holes were checked by measuring from this plug. This method of testing with the plugs is intended to prevent errors which might occur because of wear in the feed-screws or nuts, that would cause the graduated dials to give an incorrect reading. On some jig work, sufficient accuracy could be obtained by using the feed-screw dials alone, that is, without testing with the plugs, in which case the accuracy would naturally depend largely on the condition of the machine.
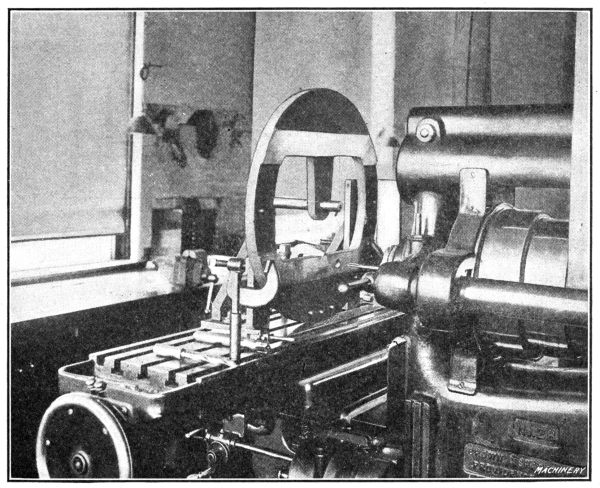
Fig. 25. Example of Precision Boring on Milling Machine
A method that is a modification of the one in which plugs are used to test the center distance is as follows: All the holes are first drilled with suitable allowance for boring, the location being obtained directly by the feed-screw dials. A special boring-tool, the end of which is ground true with the shank, is then inserted in the spindle and the first hole, as at A in Fig. 1 is finished, after which the platen is adjusted for hole B by using the dial as before. A close-fitting plug is then inserted in hole A and the accuracy of the setting is obtained by measuring the distance between this plug and the end of the boring-tool, which is a combination tool and test plug. In a similar manner, the tool is moved from one position to another, and, as all the holes have been previously drilled, all are bored without removing the tool from the spindle. [Pg 34]
Another modification of the micrometer-and-plug method is illustrated in Figs. 26 and 27. It is assumed that the plate to be bored is finished on the edges, and that it is fastened to an angle-plate, which is secured to the table of the milling machine and set square with the spindle. A piece of cold-rolled steel or brass is first fastened in the chuck (which is mounted on the spindle) and turned off to any diameter. This diameter should preferably be an even number of thousandths, to make the calculations which are to follow easier. The turning can be done either by holding the tool in the milling machine vise, or by securing it to the table with clamps. In either case, the tool should be located near the end of the table, so as to be out of the way when not in use.

Fig. 26. Obtaining Vertical
Adjustment by Means of
Depth Gage and turned Plug in Chuck
After the piece in the chuck is trued, the table and knee are adjusted until the center of the spindle is in alignment with the center of the first hole to be machined. This setting of the jig-plate is effected by measuring with a micrometer depth gage from the top and sides of the work, to the turned plug, as illustrated in Fig. 26. When taking these measurements, the radius of the plug in the chuck is, of course, deducted. When the plate is set the plug is removed from the chuck and the first hole drilled and bored or reamed to its proper size. We shall assume that the holes are to be located as shown by the detail view, Fig. 26, and that hole A is the first one bored. The plug is then again inserted in the chuck and trued with the tool, after which [Pg 35] it is set opposite the place where the second hole B is to be bored; this is done by inserting an accurately fitting plug in hole A and measuring from this plug to the turned piece in the chuck, with an outside micrometer as indicated in Fig. 27. Allowance is, of course, again made for the radii of the two plugs. The horizontal measurement can be taken from the side of the work with a depth gage as before. The plug is then removed and the hole drilled and bored to the proper size. The plug is again inserted in the chuck and turned true; the table is then moved vertically to a position midway between A and B, and then horizontally to the proper position for hole C, as indicated by the depth gage from the side of the work. The location can be verified by measuring the center distances x with the micrometer. In a similar manner holes D, E, F and G are accurately located.

Fig. 27. Adjusting for
Center-to-center Distance
by use of Plugs and Micrometer
If the proper allowances are made for the variation in the size of the plug, which, of course, is made smaller each time it is trued, and if no mistakes are made in the calculations, this method is very accurate. Care should be taken to have the gibs on all sides fairly tight at the beginning, and these should not be tightened after each consecutive alignment, as this generally throws the work out a few thousandths. If the reductions in the size of the plug, each time it is turned, are confusing, new plugs can be used each time a test is made, or the end of the original plug can be cut off so that it can be turned to the same diameter for every test. If the center distances x are not given, it is, of course, far more convenient to make all the geometric calculations before starting to work. [Pg 36]
The use of the button method as applied to the milling machine, is illustrated in Fig. 28, where a plain jig-plate is shown set up for boring. The jig, with buttons B accurately located in positions corresponding to the holes to be bored, is clamped to the angle-plate A that is set at right angles to the spindle. Inserted in the spindle there is a plug P, the end of which is ground to the exact size of the indicating buttons. A sliding sleeve S is accurately fitted to this plug and when the work is to be set for boring a hole, the table and knee of the machine are adjusted until the sleeve S will pass over the button representing the location of the hole, which brings the button and spindle into alignment. When setting the button in alignment, all lost motion or backlash should be taken up in the feed-screws. For instance, if the button on the jig should be a little higher than the plug in the spindle, do not lower the knee until the bushing slips over the button, but lower the knee more than is required and then raise it until the bushing will pass over the button. This same rule should be followed for longitudinal adjustments.
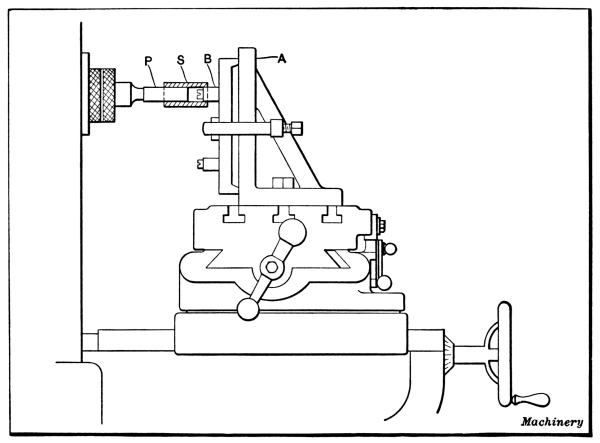
Fig. 28. Accurate Method of Aligning Spindle with Button on Jig-Plate
After the button is set by this method, it is removed and the plug in the spindle is replaced by a drill and then by a boring-tool or reamer for finishing the hole to size. In a similar manner the work is set for the remaining holes. The plug P for the spindle must be accurately made so that the outer end is concentric with the shank, and the latter should always be inserted in the spindle in the same relative position. With a reasonable degree of care, work can be set with considerable precision by this method, providing, of course, the buttons are properly set. [Pg 37]
Some toolmakers use, instead of the plug and sleeve referred to, a test indicator for setting the buttons concentric with the machine spindle. This indicator is attached to and revolves with the spindle, while the point is brought into contact with the button to be set. The difficulty of seeing the pointer as it turns is a disadvantage, but with care accurate results can be obtained.
Another method which can at times be employed for accurately locating a jig-plate in different positions on an angle-plate, is shown in Fig. 29. The angle-plate is, of course, set at right angles to the spindle and depth gages and size blocks are used for measuring directly the amount of adjustment. Both the angle-plate and work should have finished surfaces on two sides at right angles to each other, from which measurements can be taken. After the first hole has been bored, the plate is adjusted the required distance both horizontally and vertically, by using micrometer depth gages, which should preferably be clamped to the angle-plate. If the capacity of the gages is exceeded, measurements may be taken by using standard size blocks in conjunction with the depth gages.

Fig. 29. Locating Work from
Edges of Angle-Plate
by means of Depth Gages and Size Blocks
It is frequently necessary to bore holes in cast jig-plates or machine parts, which either have irregularly shaped or unfinished edges. A good method of locating such work is illustrated in Fig. 30. The part to be bored is attached to an auxiliary plate A which should have parallel sides and at least two edges which are straight and at right angles to each other. This auxiliary plate with the work, is clamped against an accurate angle-plate B, which should be set square with the axis of the machine spindle. A parallel strip is bolted to the angle-plate and the inner edge is set square with the machine table. After the first hole is bored, the work is located for boring the other [Pg 38] to the edge of the auxiliary plate, and horizontal measurements y between the parallel and the plate. These measurements, if quite large, might be taken with micrometer gages, whereas, for comparatively small adjustments, size blocks might be more convenient.
When a vernier height gage is available, it can often be used to advantage for setting work preparatory to boring in a milling machine. One advantage of this method is that it requires little in the way of special equipment. The work is mounted on an angle-plate or directly on the platen, depending on its form, and at one end an angle-plate is set up with its face parallel to the spindle. An accurately finished plug is inserted in the spindle and this plug is set vertically from the platen and horizontally from the end angle-plate, by measuring with the vernier height gage. After the plug is set for each hole, it is, of course, removed and the hole drilled and bored or reamed.

Fig. 30. Method of Holding and
Locating Casting
of Irregular Shape, for Boring Holes
The way the plug and height gage is used is clearly illustrated in Figs. 31 and 32. The work, in this particular case, is a small jig. This is clamped directly to the machine table and at one end an angle-plate is also bolted to the table. This angle-plate is first set parallel with the traverse of the saddle or in line with the machine spindle. To secure this alignment, an arbor is inserted in the spindle and a test indicator is clamped to it by gripping the indicator between bushings placed on the arbor. The table is then moved longitudinally until the contact point of the indicator is against the surface plate; then by traversing the saddle crosswise, any lack of parallelism between the surface of the angle-plate and the line of saddle traverse will be shown by the indicator. [Pg 39]
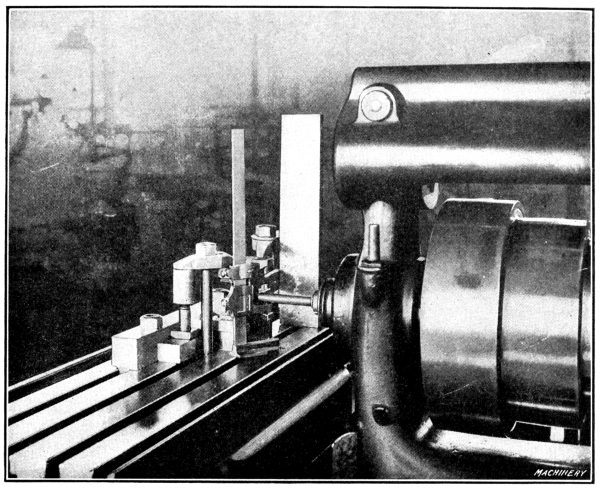
Fig. 31. Making a Vertical Adjustment by Measuring to Ground Plug in Spindle

Fig. 32. Making a Horizontal Adjustment by measuring from Angle-Plate to Ground Plug
[Pg 40] When the work is to be adjusted horizontally, the vernier height gage is used as shown in Fig. 32, the base of the gage resting on the angle-plate and the measurement being taken to an accurately ground and lapped plug in the spindle. For vertical adjustments, the measurements are taken between this ground plug and the machine platen as in Fig. 31.
The problem of accurately locating holes to be bored on the milling machine has received much attention, and the method generally used when accuracy has been required is the button method, which was previously described. So much time is required for doing the work by this method, however, that numerous efforts have been made to obtain equally good results in other ways.

Fig. 33. Diagram Illustrating Rapid
but Accurate Method of
Locating Holes to be bored on Milling Machine
The increasing demand for rapidity combined with accuracy and a minimum liability of error, led to the development of the system described in the following: A center-punch mark takes the place of the button, from which to indicate the work into the proper position for boring. The fundamental principle involved is to lay out, accurately, two lines at right angles to each other, and correctly center-punch the point where they intersect. With proper care, lines may be drawn with a vernier height gage at right angles, with extreme accuracy, the chief difficulty being to accurately center the lines where they cross. For semi-accurate work this may be done with a common center-punch but where extreme accuracy is required this method is not applicable, as the average man is incapable of marking the point of intersection accurately.
The diagram, Fig. 33, illustrates, in a simple way, the procedure adopted in laying out work by this system. The base E is in contact with a surface plate while the line BB is drawn with a [Pg 41] height gage; then with side F on the plate the line AA is drawn. It will be seen that these lines will be at right angles to each other, if the bases E and F are square. Work done by this method must have two working surfaces or base lines, and these must be at right angles to each other. There is no difficulty in drawing the locating lines AA and BB correctly, either with a vernier height gage or with a special micrometer gage reading to 0.0001 inch, the only difficult element being to accurately center-punch the lines where they intersect as at D. It is assumed that two holes are to be bored, so that the intersection at C would also be center-punched.
The scriber point of the height gage should be ground so that it will make a V-shaped line, as shown by the enlarged sketch G, rather than one which would resemble a saw-tooth, as at H, if a cross-section of it were examined with a microscope. This is important because when the lines are V-shaped, an accurate point of intersection is obtained.

Fig. 34. Center Locating Punch

Fig. 35. Center Enlarging Punch
As it is quite or almost impossible to accurately center-punch the intersection of even two correctly drawn lines, by ordinary means, the punch shown in Figs. 34 and 36 was designed and an extended experience with it on a very high grade of work has demonstrated its value for the purpose. It consists essentially of a small center-punch O (Fig. 36) held in vertical position by a holder P which is knurled to facilitate handling. Great care should be exercised in making this tool to have the body of the punch straight, and to have it stand at right angles to the surface to be operated upon, for the slightest inclination will cause the finished hole to be incorrect, no matter how [Pg 42] carefully the lines are drawn. The 60-degree point must be ground true with the axis. The holder for the punch stands on three legs, located as indicated, and ground accurately to a taper fit in the holder, where they are secured by watch screws bearing on their tops. The lower ends are hardened, and terminate in an angular point of 55 degrees (the point of the vernier scriber being 60 degrees). The edges are sharp, and slightly rounded at the ends, so that the legs will slide along a line smoothly. The points V and U (Fig. 36) have edges that are in line with each other, while the point T has an edge at right angles to the other two. The center of the punch is located at equal distances from all the legs, and is held off the work normally by a leather friction acted upon by a set-screw in the side of holder P.

Fig. 36. Section of
Center Locating Punch
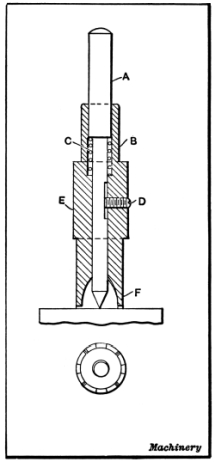
Fig. 37. Section of
Center Enlarging Punch
If this tool is placed upon lines of the form shown at G, Fig. 33, the legs V and U may be slid along horizontal line B-B, Fig. 33, until the sharp edge of leg T drops into line A-A. When this occurs the punch O is lightly tapped with a hammer, and the resulting mark will be accurately located in the center of the intersection of the lines. It is good practice to make the work very smooth before drawing the lines, and after laying them out, to stone them so as to remove the slight burr raised in drawing them. A drop of oil is then rubbed into the lines, and the surplus [Pg 43] wiped off. This procedure permits points V and U to run very smoothly along the line, and the burr having been removed, the edge of leg T drops into the line very readily with a slight click. As it is not advisable to strike punch O more than a very light blow, it marks the work but slightly, and a more distinct indentation is made with the follower punch shown in Figs. 35 and 37. This punch is made like the previous one, so that it will stand at right angles to the work. The sectional view (Fig. 37) shows the punch A supported by the holder E which has four legs cut away on the sides so that the point of the punch may be seen. When this punch is in position, it is struck a sufficiently heavy blow to make a distinctly visible mark. The work is now ready to be placed upon the work table of the milling machine, and indicated for boring the holes, an indicator being used in the milling machine spindle.

Fig. 38. Indicator used for Aligning Punch Marks with Machine Spindle
An indicator which has been found especially valuable for this purpose is shown in Figs. 38 and 39. It is of the concentric centering type, and with it the work is brought concentric with the axis of the spindle. The arbor I is provided with a threaded nose on which disk D is screwed. This disk has four holes in its rim, equally-spaced from each other. Hardened, ground, and lapped bushings b are put into these holes to receive plug A which is made a gage-fit both in these holes and in hole B in the outer end of sector C. This sector is held by a split sleeve to the barrel L which carries the 60-degree centering-rod K that comes into contact with the work to be bored. The spherical base of barrel L fits into a corresponding concave seat in the nose of the arbor at H, and is held in place by a spring E which connects at one end to the cylindrical stud in the base of the barrel, and at the other to the axial rod M by which it and the other connecting parts may be drawn into place, and held by the headless set-screw J, bearing on a flat spot on the tang end of the rod.
Now, if plug A is removed from bushing b the point of the centering-rod K may be made to describe a circle. At some point [Pg 44] within this circle is located the center-punch mark on the work to be bored. The holes in the rim of the faceplate all being exactly the same distance from an axial line through both the arbor I and centering-rod K, it follows that the center mark on the work must be so located by horizontal and vertical movements of the work table that pin A may be freely entered in all the four holes in the rim of disk D. When that occurs, the center coincides with the axis of the spindle.
The point of the center-punch A (Fig. 37) should have an angle slightly greater than the angle on the centering-rod K, as it is impossible to locate the work in the preliminary trials so that the center of the work will be coincident with the axis of the spindle, and unless the precaution mentioned is taken, the true center on the work is liable to be drawn from its proper location when trying to bring the work into such a position that the plug will enter all the holes in the disk. As the work being operated on is brought nearer to the proper location by the movements of the milling machine table, spring G will be compressed, the center rod sliding back into barrel L. This spring is made so that it will hold the center against the work firmly, but without interfering with the free rotation of the sector C around disk D. When the work is located so that the plug enters the holes, the gibs of the machine should be tightened up and the plug tried once more, to make sure that the knee of the machine has not moved sufficiently to cause the work on the table to be out of line. The work table is now clamped to prevent accidental horizontal shifting, and the work is drilled and bored.

Fig. 39. Sectional View of Indicator shown in Fig. 38
In using this indicator the milling machine spindle is not rotated together with arbor I, only the sector being turned around the disk. The tool is set, however, in the beginning, so that the axes of two of the bushings b are at right angles to the horizontal plane of the machine table, while the axes of the other holes in the [Pg 45] disk are parallel with the top of the work table. The centering-rods are made interchangeable and of various lengths, to reach more or less accessible centers. Fig. 38 shows the indicator with one of the long center-rods in the foreground.
The only part of the milling machine on which dependence must be placed for accuracy is the hole in the spindle, and this is less liable to get out of truth, from wear such as would impair the accuracy, than are the knee, table, or micrometer screws. The only moving part is the sector, and this, being light, is very sensitive.
A series of 24 holes was laid out and bored in one and one-half day by the method described in the foregoing. Measurements across accurately lapped plugs in the holes, showed the greatest deviation from truth to be 0.0002 inch, and running from that to accuracy so great that no error was measurable. This same work with buttons would have required considerably more time.

Machinery is the leading journal in the machine-building field and meets the requirements of the mechanical engineer, superintendent, designer, toolmaker and machinist, as no other journal does. Machinery deals exclusively with machine design, tool design, machine construction, shop practice, shop systems and shop management. The reading matter in Machinery is written by practical men and edited by mechanical men of long practical training.
Each number of Machinery contains a variety of articles on machine shop practice. These articles include carefully prepared descriptions of manufacturing methods and current mechanical developments. Shop systems and shop managements are ably handled by the foremost writers. Every number contains the most extensive and complete record published by any journal, or in any form, of new machinery and tools and accessories for the machine shop. A special department is devoted to “Letters on Practical Subjects,” to which practical mechanics contribute their experiences. There is a department of Shop Kinks—brief, concise little contributions which contain ideas of value to the man in the shop or at the drafting table.
The mechanical engineer, machine designer and draftsman are also well provided for in Machinery. Every number contains articles on the theory and practice of machine design, on the properties of materials, and on labor-saving methods and systems. There are reviews of research work in the mechanical field, and valuable results of carefully made experiments are recorded.
The supremacy of Machinery in the mechanical field is due to the care with which all matter offered for publication in its pages is scrutinized. Only the best of the material offered by mechanical writers is published, and, as a result, its pages contain the most authoritative, practical and up-to-date mechanical information.
Machinery, 140-148 Lafayette Street,
New York City
51 and 52, CHANCERY LANE, LONDON, W. C.
Heat-Treatment of Steel

is one of a series of high-class authoritative, attractive and well-bound books published by Machinery.
The strongest claim that can be made for these books is that they have all the characteristics of Machinery itself.
These books cover comprehensively, and in a thoroughly practical manner, the most important subjects in the metal-working field.
Each book comprises about 300 pages, printed on high-grade paper, with engravings of the same superior type that has made Machinery distinctive in its field.
The price of each book is $2.50. Special combination offers on a monthly payment plan will be sent upon request.
Machinery 140-148 Lafayette St.
New York City
51 and 52, CHANCERY LANE, LONDON, W. C.
The Five New Books
Brought Out by Machinery
SPUR AND BEVEL GEARING
A treatise on the principles, dimensions, calculation, design and strength of spur and bevel gearing, together with chapters on special tooth forms and methods of cutting gear teeth.
SPIRAL AND WORM GEARING
A treatise on the principles, dimensions, calculation and design of spiral and worm gearing, together with chapters on the methods of cutting the teeth in these types of gears.
TURNING AND BORING
By Franklin D. Jones Associate Editor of Machinery
A specialized treatise for machinists, students in industrial and engineering schools, and apprentices on turning and boring methods, including modern practice with engine lathes, turret lathes, vertical and horizontal boring machines.
PLANING AND MILLING
By Franklin D. Jones Associate Editor of Machinery
A treatise on the use of planers, shapers, slotters and various types of horizontal and vertical milling machines and their attachments.
HEAT-TREATMENT OF STEEL
A comprehensive treatise on the hardening, tempering, annealing and case-hardening of various kinds of steel, including high-speed, high-carbon, alloy and low-carbon steels, together with chapters on heat-treating furnaces and on hardness testing.
Price of each book $2.50. Special combination offers on a monthly payment plan will be sent upon request.
Machinery 140-148 Lafayette St.
New York City
51 and 52, CHANCERY LANE, LONDON, W. C.
Transcriber’s Notes:
The illustrations have been moved so that they do not break up paragraphs and so that they are next to the text they illustrate.
Typographical and punctuation errors have been silently corrected.