3
KNOTS
A study of
With chapters on
Compiled and Edited by Dedicated to the Sailors of the United States
THE RUDDER PUBLISHING COMPANY |
|
KNOTS
A study of
With chapters on
Compiled and Edited by Dedicated to the Sailors of the United States
THE RUDDER PUBLISHING COMPANY |
4
COPYRIGHT 1918
BY
THE RUDDER PUBLISHING CO.
NEW YORK, U. S. A.
All Rights Reserved
PRESS OF
THOMSON & COMPANY
9 Murray Street, New York
5
| Preface | 7 |
| History of Knots | 9 |
| Cordage | 11 |
| Rope and Its Care | 15 |
| Simple Knots and Loops | 21 |
| Knots for Uniting Ropes | 31 |
| Bends and Hitches | 36 |
| Knots Formed on Ropes by Their Own Strands | 50 |
| Shortenings | 68 |
| Ties | 73 |
| Purchases and Slings | 79 |
| Fastenings, Moorings and Ring Knots | 88 |
| Lashings and Seizings etc. | 101 |
| Splicing and Rope Work | 112 |
| Wire Rope Splicing | 128 |
| Matting | 134 |
| Hammock Making | 146 |
| Strength of Rope etc. | 152 |
| Index | 157 |
The study of knots is always fascinating. To twist ropes so that they will hold and not break is an art that comes natural to the sailor and the amateur will watch him in wonder as he does his work. Knots are just as important in these days of steam vessels as they were in the days of the sailing vessel, and now when thousands of men are being trained to handle the fleets of vessels building tying knots is a part of their training.
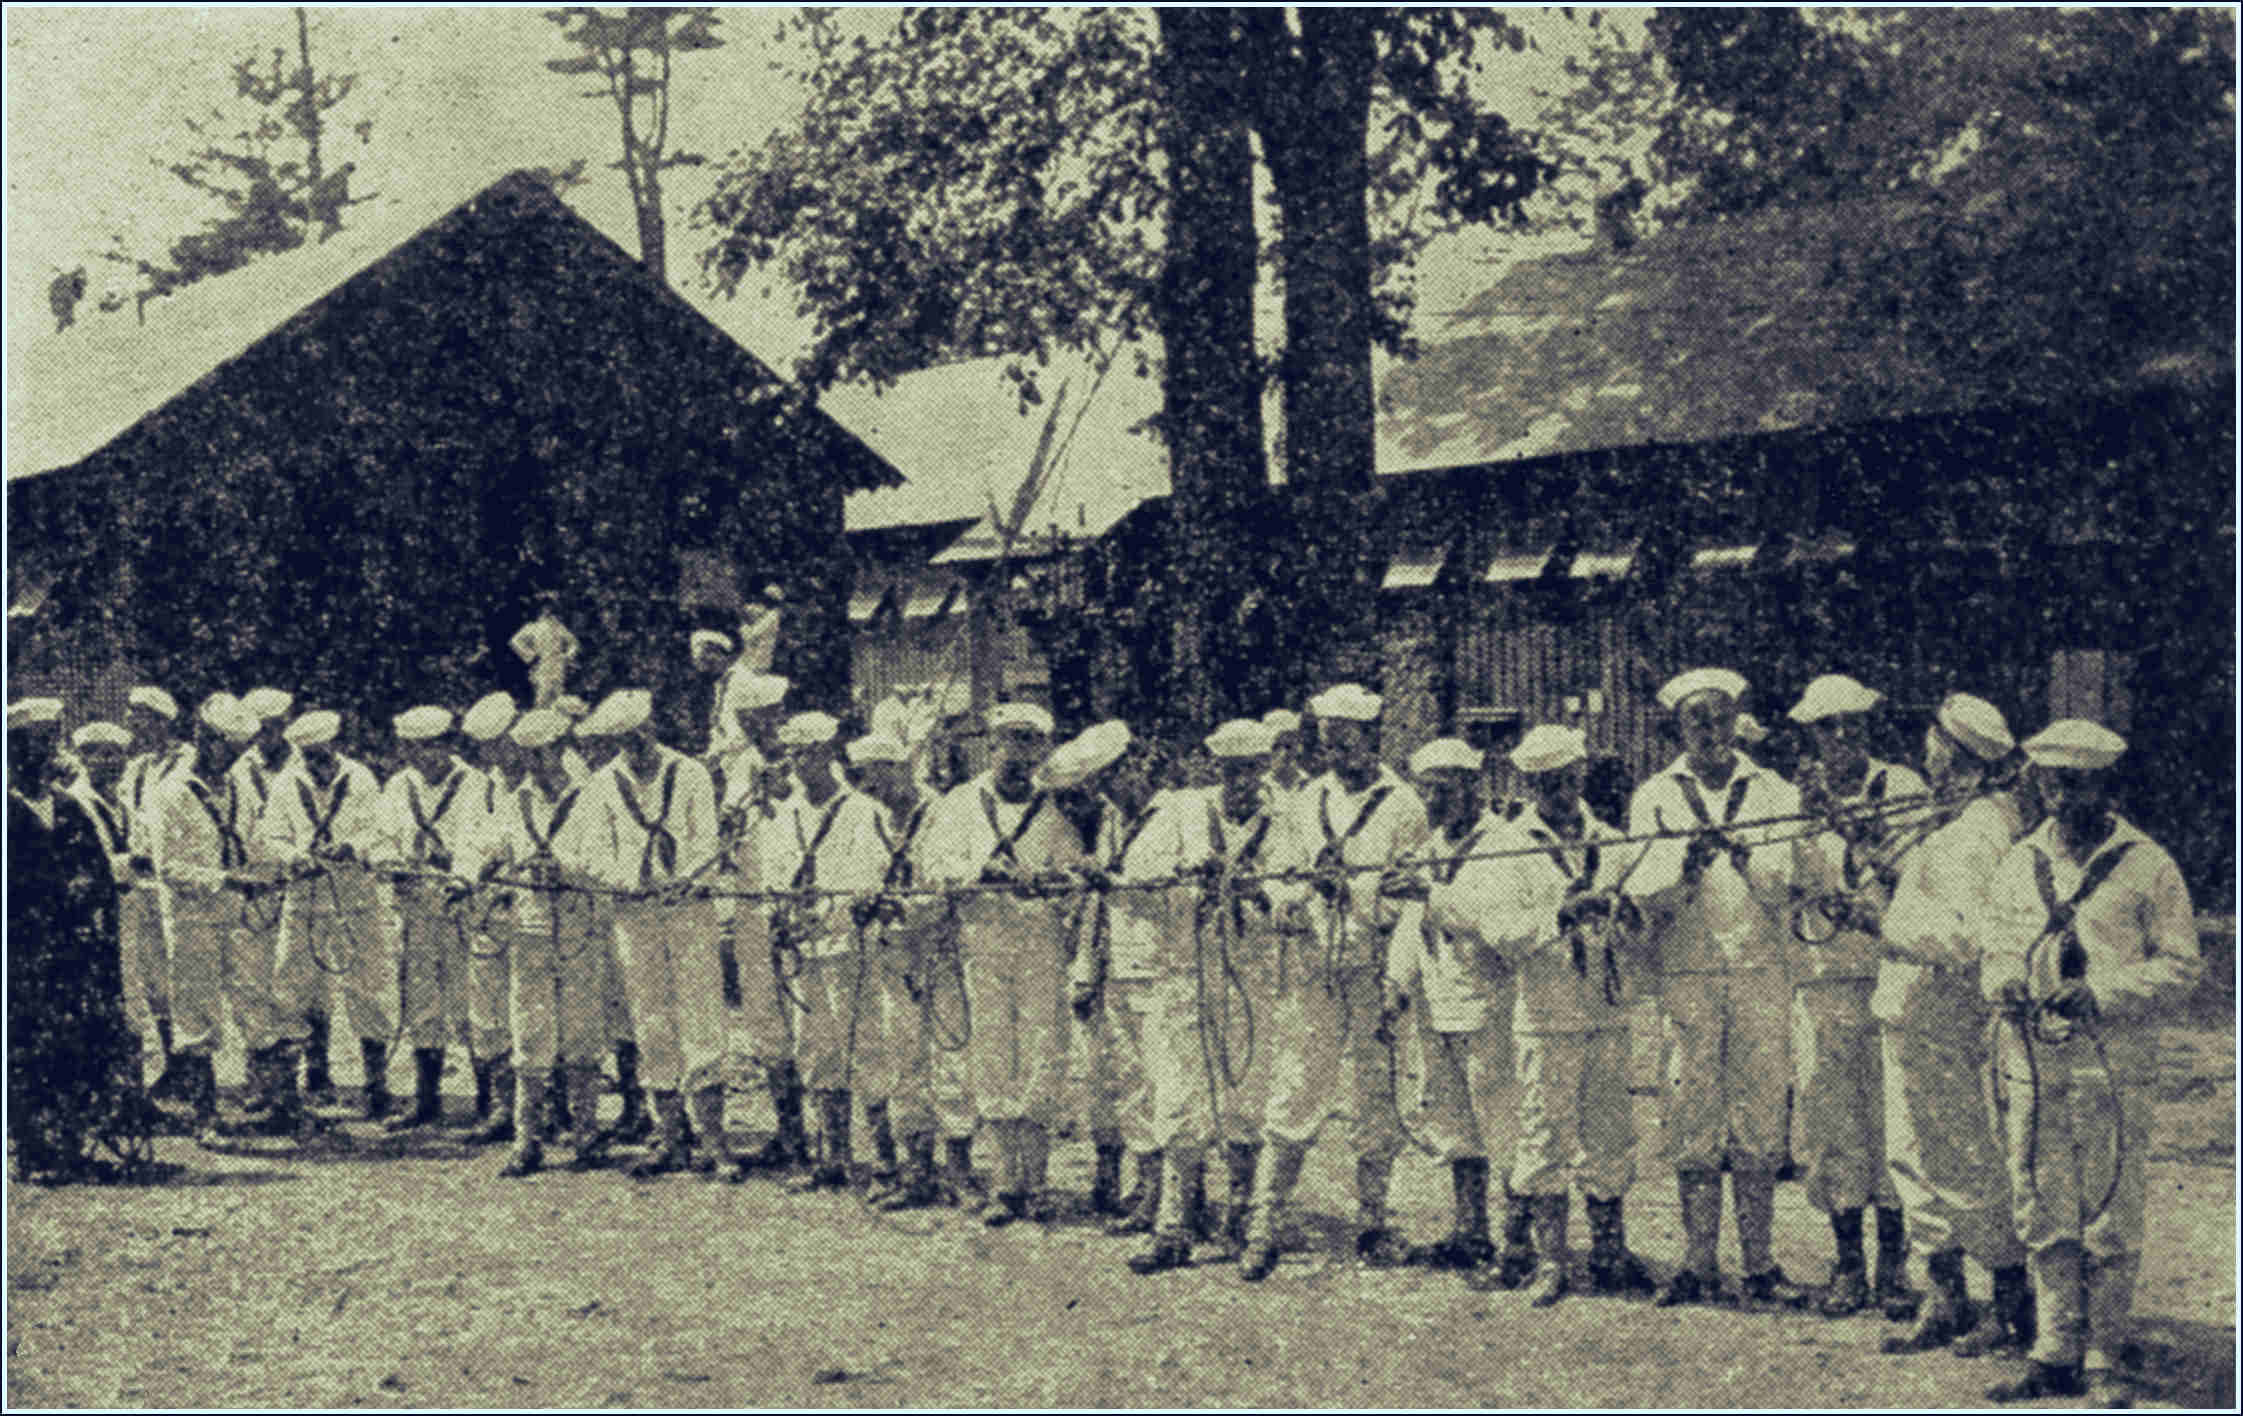
At the Naval camps and the nautical schools the men are trained in squads and with a little practice they soon acquire the art. To aid those students this book has been published. It has been compiled from American and British Government records and from many other sources, so that it is as complete a collection of knots as it is possible to obtain.
It will be of great assistance to men of the U. S. Navy, U. S. Naval Reserve, U. S. Junior Naval Reserve, the U. S. Nautical Schools and the U. S. Power Squadrons who are working so loyally to aid their country in its time of need. To these men this book is dedicated in the hope that it may be of some help to them in their work.
Knots, according to an ingenuous essayist, are probably as “old as human fingers” and their history is lost in antiquity. Doubtless when man was first placed on this earth he learned to make fastenings from the tendrils of climbing vines and trailing flowers which twist themselves into odd fastenings as they lift themselves from the earth. The first cords were probably twisted grasses and rushes. Since those early days knots, like Topsy, have “just growed” and man’s ingenuity has enabled him so to arrange ropes and cords that they will sustain weights, fasten various articles together and take up strains so that they will hold under ordinary conditions.
Seamen are credited with having devised the most knots. They have invented ties upon which depend the safety of their ships and the lives of those on board. Operatives in many trades such as building have borrowed from the seamen their knots and applied them to their work. In some instances the land operator has invented new knots or ties to suit conditions not found on shipboard.
To tie a knot properly or to be able to join ropes so that they will hold and withstand heavy strains is 10so important with seamen that careful attention is paid to the instruction of the men in this particular work. At the many naval training camps scattered about the country capable instructors show the recruits how to properly make knots, ties, hitches, bends and splices, and until the recruit knows how to handle ropes quickly and properly he is not much use at sea. In the nautical schools, too, and in the divisions of the U. S. Power Squadron much attention is paid to this part of the novice’s instruction.
The steamship is steadily driving the sailing vessel from the seas. Of course on a sailing ship, where every spar is stayed by rope and where all the sails, the propelling power, are handled by ropes, the ability to properly tie knots is more important than on a vessel driven by steam or oil engines, but on the powered vessel there are many occasions when it is necessary to have a knowledge of knots, particularly in handling cargoes, in making fast to piers or moorings, in towing, in handling boats, and in hundreds of other instances so that the steam engine is not making “marlinespike seamanship” a lost art.
11
Rope is a word that is taken to mean almost every pliable material. Technically a rope is a cord one inch or more in diameter. It is generally made of hemp, manila, coir, cotton, steel, iron or copper wire. In studying the nature and uses of knots, particularly those which come under the designation of splices, some knowledge of the mode and of the principles on which ropes are made, is essentially necessary. The simplest and most effectual mode of obtaining the united strength of fibres composing the rope would be to lay them side by side and fasten them together at each end as in the selvagee, which is described on page 120. This plan, even if the fibres of hemp were of the necessary length, would be open to many objections; hence it was necessary to devise some plan which would give unlimited length to the rope and at the same time preserve its torsion and portability. This has been achieved by the compression and twisting of the fibres in different directions, until they produce a compact, hard and strong rope, neither breaking the fibres on the one hand nor leaving them so loose as to be easily drawn out from the mass on the other—either extreme would be equally fatal in its results 12and injurious to the stability of the rope. This is achieved by the modern processes of rope making.
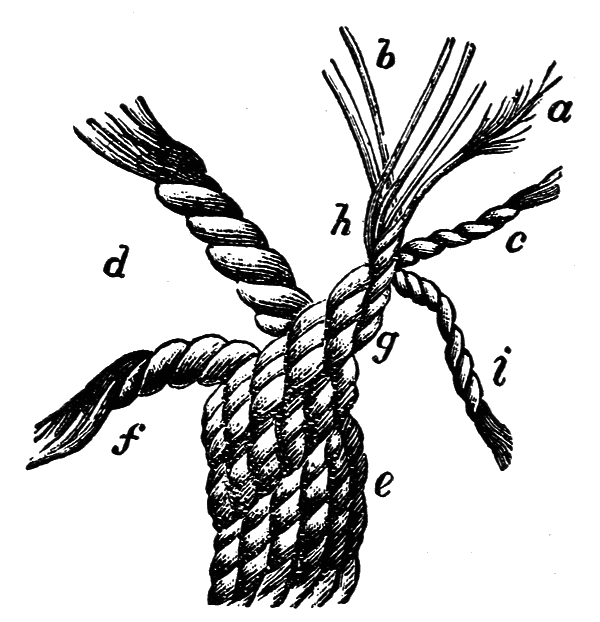
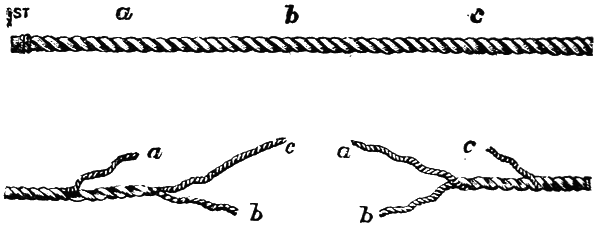
First the fibres of hemp are loosely twisted together, right-handed, and form what is technically known as yarn. Two or three yarns twisted together form a strand; three strands form a rope and three ropes a cable. The diagram illustrates this clearly. A is a yarn teased out to show the original fibre; B shows the yarn forming the strand; the strands C, H, and J form the rope D; the ropes D, F, and G form the cable E.
13
A hawser rope is composed of three strands laid up generally right-handed—that is, the direction taken by the strands in forming the rope always runs from left to right.
A shroud-laid rope, also laid right-handed, consists of four strands with a heart in the center.
A cable-laid rope is composed of three right-handed hawser-laid ropes laid up together left-handed, so that it may be said to consist of nine strands, or it may be formed by three left-handed ropes laid up right-handed.
14
| HAWSER ROPE | SHROUD-LAID ROPE | CABLE-LAID ROPE |
Spun yarn is a number of yarns twisted up right-handed. The number varies from two to eight.
Nettle stuff is made of two or three yarns laid together and is used for making clews of hammocks, harbor gaskets, etc.
Sennit is made of a number of yarns plaited up into square, round or flat sennit as required and used for various purposes.
Junk consists of lengths of condemned cordage 4 inches and above.
Oakum is old rope unlaid and the yarns picked into hemp for caulking the seams in ships’ decks or sides.
Boltrope is cordage tarred and white, made of Italian hemp from ½ inch to 6 inches. It is soft laid and well stretched and is used for roping sails and awnings.
Hammock lashings and lanyards are of white Italian hemp 1¼ inch.
Coir rope is three-stranded right-handed rope. The yarn is spun from the fibres of the cocoanut tree. It is one-third lighter than hemp but not nearly so durable. It soon rots after being wet, if not well dried before being stowed away. As it floats so light it is very useful for warps and is about a quarter the strength of hemp rope.
Twine is made from very fine hemp.
15
Rope—and a sailor’s mind instantly pictures a ship. Ropes belong to a ship in his mind’s processes and since man launched his first boat on the water, rope has been in one form or another part of a boat’s equipment. Savages probably had ropes before they had boats, but with the development of the boat has come the development of rope into the product of today.
Did you ever stop to think why rope is so much used aboard ships? What are the qualities which make it such a necessary part of a ship’s gear? Ropes are primarily used to transmit power in a convenient way. If sailors could grasp the sail in their hands and clew it up no clew-lines would be necessary. But their arms are not long enough and the power would be spread over such a large area that it would become ineffective. A clew-line concentrates that power from that point of application to a convenient place for the sailor to apply it. An iron rod would do the same thing, you say. Yes, but an iron rod lacks two essential qualities—lightness and flexibility. Flexibility is the cardinal virtue of a rope. When not in use it can be coiled down to a very small space and it can follow the wake of the worst helmsman without fear of 16breaking its back. A chain is flexible, but its own weight is so great that it is only of value for certain kinds of work.
Ropes are made of organic material such as cotton, hemp, manila, grass, and of metals such as iron, steel, bronze and sometimes aluminum.
The class of organic materials is classified as to the material and the manner in which they are made up. Grass, manila and hemp are spun into rope, while cotton is spun, braided and knitted. Braided and knitted ropes have the distinctive quality of being able to transmit torsional stresses such as a flexible shaft and are used for this purpose in the patent log-line. They are also free from turns, which makes them valuable as signal halyards, though by the use of small swivels this bad feature on spun rope has been overcome for use as signal halyards. When you do use cotton, remember it has a great ability for shrinking. Therefore, do not haul your halyards taut in dry weather and wonder why they parted in the first rain-squall.
If spun rope has ruined so many dispositions by the diabolical turn which it can foul itself into—why use it? Because that very same twist—the cause of so much cursing—is the secret of its strength. Rope is subjected to a tension or pull along the line of its 17longest axis. The thread is made of little fibres which are twisted together. The threads are then twisted to make yarns or strands and the strands twisted or spun into rope or lines. Rope or lines are made up into hawsers.
Take a coil spring and pull out the ends. If you put power enough on the wire it straightens out. This is exactly what happens when you put a strain on a rope; the twists or turns try to straighten out, and lie in a straight line along the center. But there is yarn already in the center, and the coils are pressing in on all sides, squeezing it more and more as the load increases. Now the reason why the two first fibres clung together when they were twisted was that this same pressure made the friction between the fibres so great that they could not slide by each other. This applies to the many hundreds of fibres which make up the rope as a whole. So the harder the pull the harder the squeeze and the harder it is for them to slip by each other. The fact that some pieces of fibre are first on the outside and then on the inside makes all get an equal share of the squeeze. Why does this not go on indefinitely? Because up to a certain load the tendency to cling together is greater than the reaction from the center, which has to push them apart, but when this pressure or reaction becomes greater than 18the friction the little fibres begin to slide and the ropes part.
The smaller sizes of spun ropes of this organic class are designated by the number of threads used to make up the rope, such as nine-thread or eighteen-thread line. The larger sizes are designated by the number of inches of circumference, such as one-inch, three-inch, etc. Hawsers are measured by the circumference in inches. Spun ropes are three-stranded or four-stranded. A three-stranded rope is more flexible than a four, but a four has greater surface area for the same strength and weight and therefore wears longer.
Hemp rope is harder and less flexible than manila and is used for standing rigging, while manila rope is used for running rigging.
Grass or coir ropes are used where the rope is submerged often, as they do not rot when damp and can be stowed wet. They are very elastic and are specially used for towing light weights, such as targets in the Navy.
Just a few hints about this general class of organic ropes:
Always dry these ropes before stowing them to prevent rotting.
Protect them from chafing by use of chafing gear 19or reversing end for end to bring the wear in different places.
Always coil down right-handed or with the sun.
The greater the surface the less the wear on any one strand, so use four-stranded for ropes whose particular wear is from chafing such as anchor warps, for small boats and boat-falls. A small size rope would often be strong enough but would chafe through quicker.
Metallic or wire ropes are generally either iron, steel, bronze or combinations of metal strands spun with hemp or manila strands.
Bronze rope is used for tiller ropes because it is non-magnetic and it will not rust. This is important, as tiller ropes are often in inaccessible places. If it does not pass near your compass and it is out where it can be easily examined and cared for to prevent rusting, a flexible steel tiller rope is cheaper and stronger for the same weight and also wears longer.
Galvanized iron wire is used for standing rigging, and the rusting in places where turns have broken the surface coating, such as around thimbles of an eye splice, should be carefully looked for. Most sailors think it wiser not to paint wire except for decorative purposes. If it is painted be sure to remove all grease and water from the surface.
20
Steel rope is used for running rigging because of its flexibility and lightness. It is not adapted, however, for small boats.
A combination of alternate strands of wire and hemp is made into rope known as durable rope, and is used particularly for cargo falls and it is more flexible and more easily handled.
21
All knots are begun with loops or hitches. These may be single or double as required. The simple hitch is self-explanatory, as are the underhand and the overhand loops. The illustrations explain them clearly.
| SIMPLE HITCH | UNDERHAND LOOP | OVERHAND LOOP |
The Simple Knot begins with one of these loops by passing the loose end through the loop and then drawing it taut as shown in the diagram.

| SIMPLE KNOT | FIGURE OF 8 KNOT |
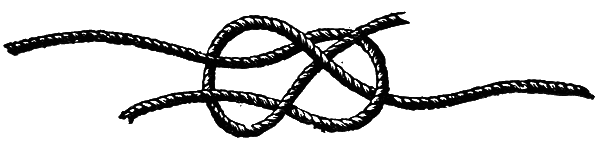
The Figure of 8 Knot is known as the perfect knot. It is formed by an overhand and an underhand loop overlapping each other and the loose end passed through the loop. When drawn tight it bears a close resemblance to the Arabic numeral 8, hence its name.
22
| DOUBLE KNOT | NIPPED | TREBLE KNOT | OPEN |
The Double, Treble, Four-Fold, or Six-Fold Knots may be called compound knots. They are used often when it is necessary to shorten a rope a few inches or to increase the size or strength of a holding knot to prevent it passing through an eye or a block. These knots are made by passing the end of a rope twice, three times, or as many times as may be necessary, through a loop as shown in the Simple Knot. The diagrams show a double knot loosely formed and when nipped or drawn taut, and a treble knot in its open formation and pulled taut.
| FIVE-FOLD KNOT OPEN | NIPPED |
The Five and Six-Fold Knots present handsome coils and are useful to travelers who do not wish to cut the precious cords of their baggage.
23
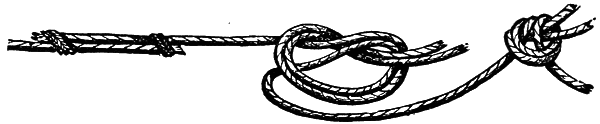
From Simple knots the student passes to loops, nooses and running knots. The Bight of a rope is the loop formed when a rope is bent back on itself. The Standing Part is the principal portion or longest part of the rope and the end is that part used in forming the knot or hitch.
| SIMPLE RUNNING KNOT | LOOP KNOT |
The Simple Running Knot is made by passing a hitch instead of the end of a rope when making a simple knot. The variations of this knot are numerous. When the loose end is knotted with a simple perfect or double knot it forms one of the most useful and easily made loops.
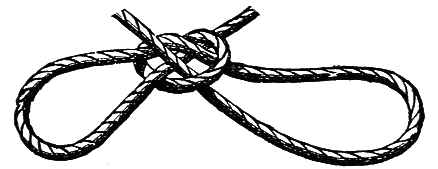
The Tomfool Knot is a double loop through a simple knot. This knot is also known as the Single Pitcher Knot. It is said that this knot has baffled many experts 24who profess to be able to break any knot. It is made like the running knot. The firm end is then passed through the open, simple knot so as to form a double loop or bow. If the wrists are passed within the loops, the loops then drawn taut and the loose ends tied firmly around the central part a pair of very good handcuffs is furnished.
The Loop Knot is the ordinary useful loop of everyday life and it forms the foundation for many more elaborate knots and for shortenings. A more ornamental and even stronger loop, which is well adapted for large cordage, is made by the figure 8 knot. This loop, like the common loop knot, when once made and has been subjected to a lengthened strain, is very difficult to untie. In this case there is nothing better than 25a running knot with a check knot, which is a modification of the fisherman’s knot. A simple knot is tied over the running line as shown in the figure. After use it may be easily drawn apart, the loop slipped and the knot untied in very short time.
26
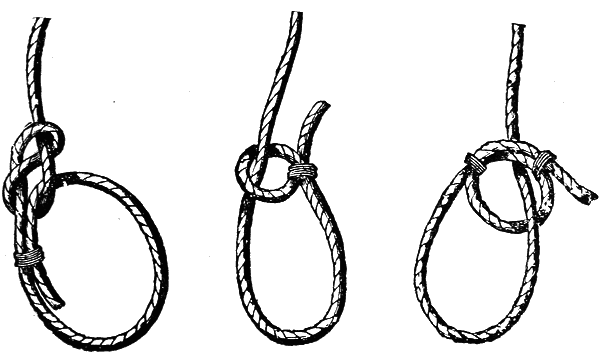
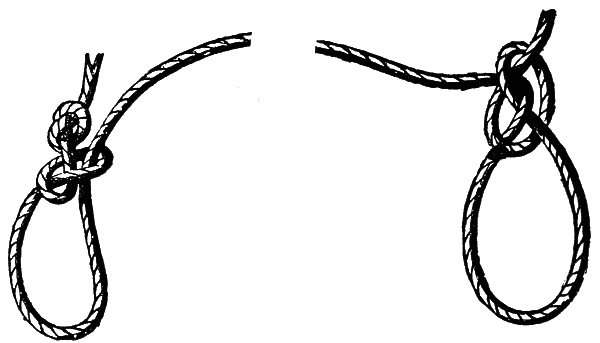
The Bowline Knot cannot slip and is therefore always used for slinging a man for the purpose of doing some particular piece of work; the workman sits in the sling. First take the part Z in the right hand with Y in the left hand, place Z on Y, and, turning the left hand over from you to the left, form a loop and reeve C as shown by the dotted line and haul taut.

| FIG. 1 | FIG. 2 |
The Running Bowline is used whenever a running 27noose is required. Form a loop with a long end C lying underneath the standing part as shown in Fig. 1. Now bring end C over part Y and with it form the bowline knot on part Z as in the previous case it was formed on its own part, when it will appear as in Fig. 2.
| FIG. 1 | FIG. 2 |
The Bowline on the Bight is used for lowering a man from aloft or slinging a man over the ship’s side. Using both parts of the rope together, commence as 28in making an ordinary bowline. To finish off, open out bight C, taking it in the direction indicated by the dotted line, pass the whole knot through it and haul taut when it will appear as in Fig. 2.
A Simple Clinch is formed by closing up the initial loop to form a small ring and securing, by a seizing, a small lashing at D.
| SIMPLE CLINCH | RUNNING OR INSIDE CLINCH | OUTSIDE CLINCH |
A Running or Inside Clinch is formed by the end of a rope on its own standing part and is often used for securing buntlines to the foot of a sail.
An Outside Clinch is formed in a similar way but the end, C, is brought round on top; that is, away from the bight.
29
The Standing Bowline Knot is formed by passing the loose end through the lower loop of a figure 8 knot and seizing or tying the end with small cord or marline.
Slip Clinches are very easily made. They are really open running knots seized instead of tied.
The Running Noose is one of the most common and useful of running knots used in commerce but it is only applicable to small cords. A simple knot is made 30on the end of the cord which is then simply knotted round.
The Crossed Running Knot is useful in packing heavy goods as well as a useful anchor fastening.
| RUNNING NOOSE | CROSSED RUNNING KNOT |
31
The most common knots, those used in everyday life, are to unite the ends of two separate pieces of cord or rope.
| FIG. 1 | FIG. 2 |
The Reef Knot is the simplest of all knots and always used when a common tie is required. The two illustrations show how this knot is made. Having constructed the knot as far as Fig. 1, be sure part A is kept in front of part B as shown, and the end led in according to the direction of the dotted line.
| FIG. 1 | FIG. 2 | FIG. 3 |
32
If the cords be of unequal thickness the knot will slip, form a loop and part company, as shown in Fig. 1 above. If the ends are not parallel to the rope it becomes the False Knot or Granny Knot. Figs. 2 and 3 show the difference.
A better way to fasten two ropes of unequal size is to tie or seize the ends (Fig. 1 below) and when this is done as shown the square knot or reef can be made as usual.
| FIG. 1 |
FIG. 2 FIG. 3 OPEN-HAND KNOT |
The Open-Hand Knot is a good one for joining two ropes of unequal diameter. It is very quickly made and has the recommendation of never slipping or untying. If, however, a great strain is put on the rope it is apt to break at the knot. The illustrations above, 33one showing the open formation (Fig. 2), and the other its back view when drawn taut (Fig. 3), explain the process of making.
| FIG. 1 | FIG. 2 | FIG. 3 |
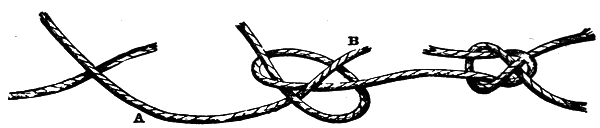
The Weaver’s Knot is very useful in joining small cord or twine and is the best for thread. The ends are crossed as in Fig. 1 and both cords are held between the thumb and forefinger of the left hand. The right end, A, is then looped back over the left end and brought under the thumb, where it is held fast, while the right-hand end, B, is slipped through the loop. The knot (Fig. 3) is then formed by tightening the right-hand cord. If cord thicker than thread is used, the end, B, must be held between the thumb and finger of the left hand while the knot is being drawn taut, as in Fig. 4 (below).

| FIG. 4 | FIG. 5 | FIG. 6 |
The Fisherman’s or Englishman’s Knot is of quite another character. It is formed by two simple knots (Fig. 7) slipped over each cord as in Fig. 5, and when drawn taut its front appearance is seen in Fig. 6. It is used by anglers, as it may be separated by taking the ends A and B in Fig. 6 so as to admit a third line.
34

| FIG. 7 | FIG. 8 | FIG. 9 |
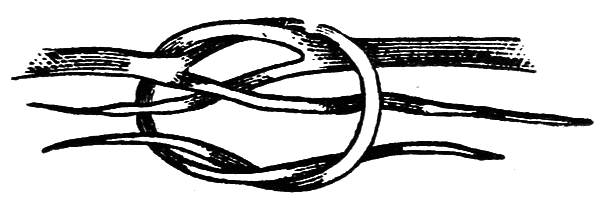
The Ordinary Knot or Tie for uniting large ropes is shown in Fig. 8. It has all the advantages of the open-hand knot, with the additional recommendations that it is easy to make, very strong and does not strain the fibres of the rope. First make the simple knot (Fig. 7) and then interlace the other cord in the manner shown in Fig. 8. When drawn taut it has the appearance of Fig. 9. If the ends are whipped it is really a neat and handsome as well as useful knot.

The Shortening Tie is used when there is too much rope and where it is necessary to use a large knot for the purpose of preventing its running too far through the eye, ring or loop. It is formed by making the figure of 8 knot at the end of a rope, then interlacing it 35with another rope, and when drawn taut it has the appearance of the third diagram.
A Rope Yarn Knot is for joining two yarns together and is clearly shown in the diagram.
36
It is rather difficult to say where knots end and bends begin, because a tie made in a particular way and under certain circumstances may be called a knot, but differently constructed and under other conditions it is called a bend or a hitch. The result is the same in each case. A single hitch may be merely a loop formed in a rope.
| HALF HITCH | TIMBER HITCH |
A Half Hitch is used generally in conjunction with 37other hitches. Its formation is easily seen from the diagram.
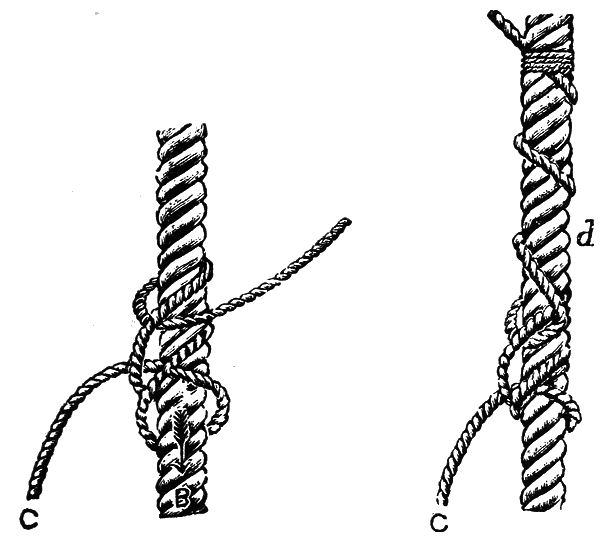
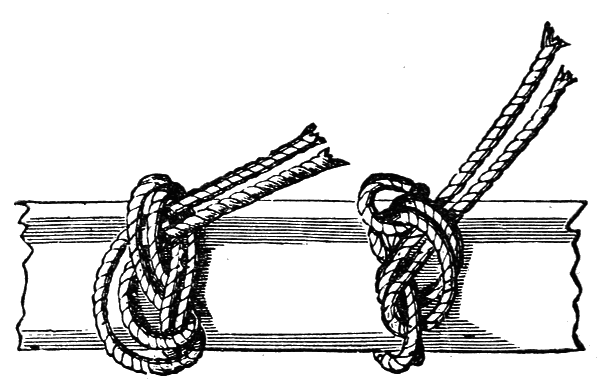
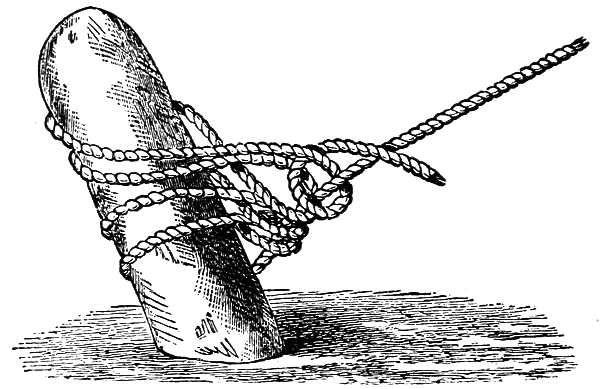
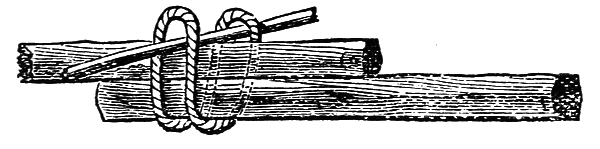
The Timber Hitch is used to secure the end of a rope to a spar, also for bending a rope round light cases, bales, etc., when provisioning ships. It is formed by making a half hitch with rather a long end and expanding the end backwards round its own part. It is used also with a half hitch for towing spars, as shown in the diagram below.

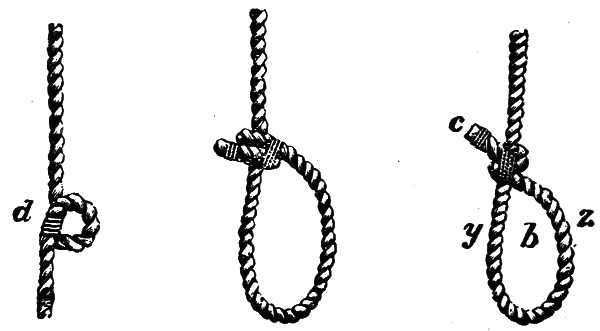
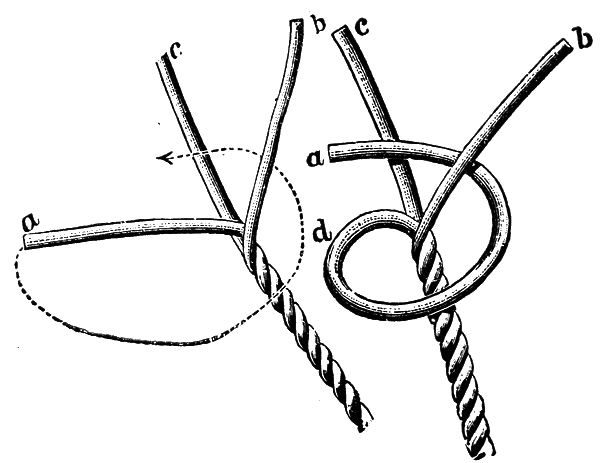
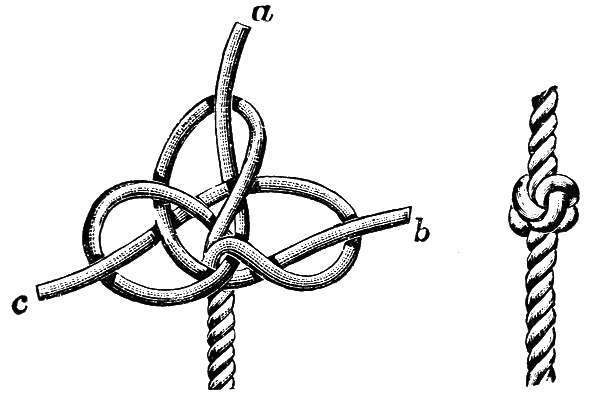
The Crabber’s Eye Knot is not well known but is one that is not likely to part when strained. To make it bring the end back to form a loop, taking it first under and then over the standing part, up through the main loop, over the standing bight again and up through its own bight. Before the turns are hauled into their places, the knot will slip on the part A, as in an ordinary knot. If the part B is hauled upon the strand, A, which passes through the center knot, rises and the coil which goes round it jambs, making 38the knot secure so that it may be used as a running knot or otherwise, as desired.
A Buntline Hitch is commenced as in making an outside clinch but instead of putting on a seizing, the end is passed over and through the bight, as clearly shown in the diagram.
| CRABBER’S EYE KNOT | BUNTLINE HITCH |
The Clove Hitch is really a jamming of two half hitches and is generally used when a small rope has to be secured to a larger one and the end kept free for use for further purposes, as in securing ratlines to the shrouds, and used also for securing the end of butt slings. Its formation can be followed very easily in the diagrams.
39
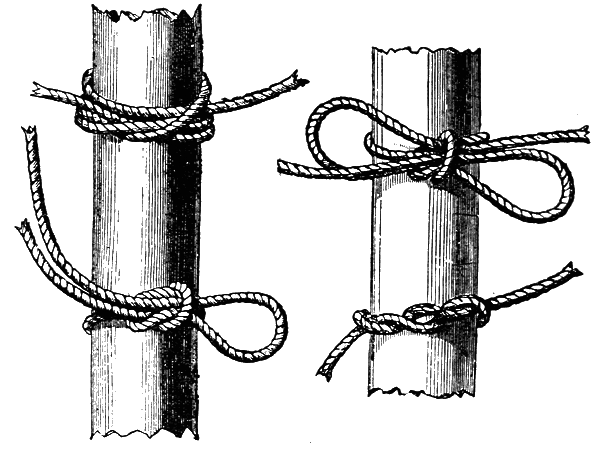
The Roband Hitch is very useful when a tackle, hook, ring or another rope is to be fastened to a beam 40or spar. This is another simple hitch, clearly illustrated in the diagram.
| ROBAND HITCH | SLIPPERY HITCH |
The Slippery Hitch is valuable because of the ease with which it can be cast off in an emergency. It will hold securely while there is a strain on the rope.
| FIG. 1 | FIG. 2 |
The Rolling Hitch is commenced and finished like a clove hitch, but, as can be seen from the figures, there is an intermediate round turn between the first and last hitches. It will be seen that the round turn in Fig. 2 is taken around both the standing part, A, and the larger rope B. The great value of this hitch is that 41it does not slip, and this can be rendered doubly sure by backing the end, C, round the part, D, and securing the end with a strop. It is used for bending a small rope to a larger one, for putting a tail jigger on a rope, and for securing hammocks to gantlines.
| FIG. 3 | FIG. 4 |
The Double Blackwall Hitch is made by taking the bight of the rope and placing it across the neck of the strop of the block, crossing it behind, then placing the under part over the hook and crossing the upper part 42on top of it. It holds better than the two preceding hitches.
The Marling Hitch is for lashing up hammocks or putting temporary seizing on two ropes or spars. It is also used when making swabs.
The Midshipman’s Hitch is used at times instead of a Blackwall Hitch and it will hold better if the rope is at all greasy. It is made by first forming a Blackwall hitch and then taking the underneath part and placing it over the bill of the hook.
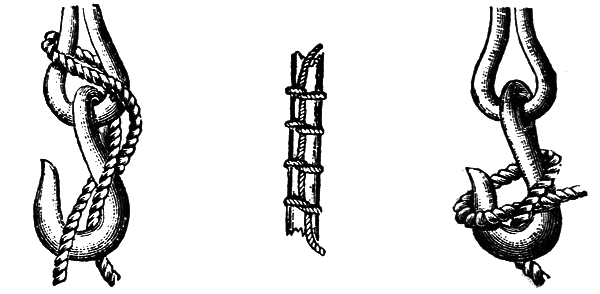
| DOUBLE BLACKWALL HITCH | MARLING HITCH | MIDSHIPMAN’S HITCH |
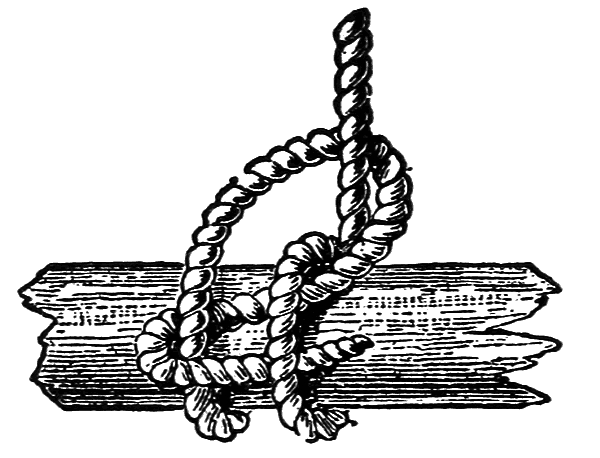
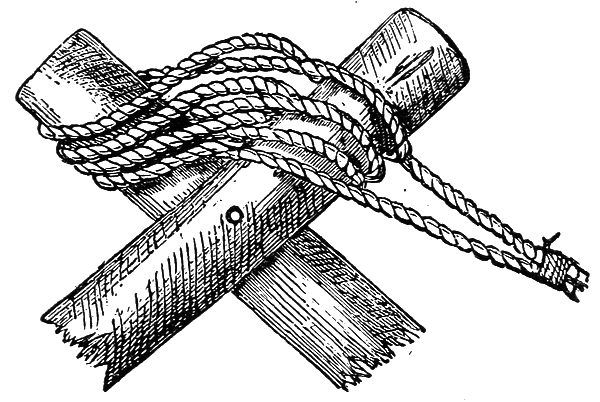
The Killick Hitch is a modification of the timber hitch. After making a timber hitch and hauling it taut, a single hitch is made and slipped over the end 43of a stone. This makes a secure anchor on fishing grounds on rocky coasts where an anchor will not hold.
The Magnus Hitch is a method of securing a rope to a spar. Take the end of the rope twice round a spar in front of the standing part, round the spar again and then pass it through the last bight.
| KILLICK HITCH | MAGNUS HITCH |
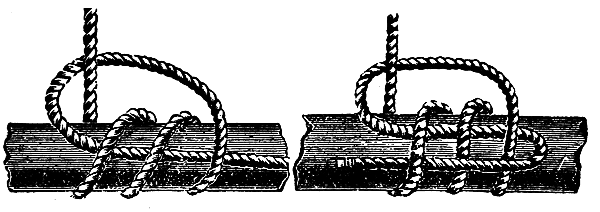
The Round Turn with Two Half Hitches is used to secure a hawser to the ring of a buoy and the rope in this case should be parcelled as shown in the diagram.
The Marlinespike Hitch is used for heaving the turns of a seizing taut with a marlinespike or hooking the hook of tackle to any rope where a small pull is required. It is formed by the standing part being picked through a loop laid over it, so that the spike lays under the standing part and over the sides of the loop. Its advantage is that it never jams.
44
|
ROUND TURN WITH TWO HALF HITCHES |
MARLINESPIKE HITCH |
BLACKWALL HITCH |
The Blackwall Hitch is used for hooking a tackle to a rope and bringing the fall of one jigger to the double block of another. It consists of a half hitch, and as soon as any strain comes on it the standing part, A, jambs the end part, C. By taking another round turn at B, before passing C under A, it will hold more securely.
45
A Stun’sail Halyard Bend is simply a Fisherman’s bend with the end backed again over the last round and under the first.
The Topsail Halyard Bend is made by bringing the rope twice round the spar, back over the standing part, under all turns, over two turns and under the last. Then jamb all the coils close and haul taut.
46
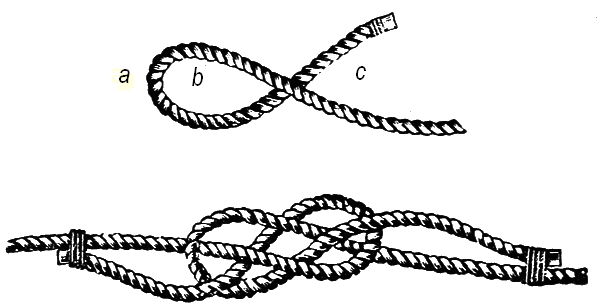
The Sheet Bend, as its name implies, is the method of attaching the sheet to the clew of the sail. It is also used for securing boats’ lazy painters to the Jacob’s ladders of the lower booms. In making a bend the ends of the two ropes are not used simultaneously as in forming reef knots, but an eye or loop is first formed in the end of one of the ropes as seen in the first diagram and the other rope’s end is then rove through it in the various ways required. To form a Sheet Bend pass the second rope’s end underneath the eye at point A and bring up through the loop, then form with it a half hitch round C and B. It will hold still better and is less likely to jamb, if the end is passed round again as in the third diagram. This is called a Double Sheet Bend.
47
The Fisherman’s Bend is formed by taking two round turns around the object to which the rope is to be secured and then backing the end round in the form of a half hitch under both the standing part and the second round turn. The end may be further secured by taking a half hitch around its own part or by stopping it to it. The dotted line in the first diagram shows the direction the end C must take. This bend is used for bending a hawser to the ring of an anchor or a rope’s end to a bucket.
The Hawser Bend is so easy as to be constantly used when only a temporary purpose has to be served.
48
The Bowline Bend is the strongest of all knotted hawsers. It is formed of two Bowline knots, one crossing the loop of the other as shown in the diagram.
The Half Hitch and Seizing Bend is used on hawsers which are to be joined for a long period. Its formation is shown in the illustration clearly.
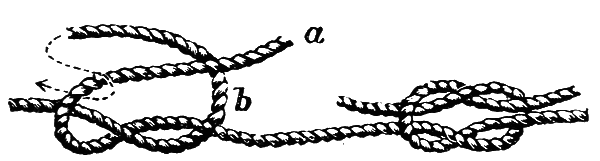
The Carrick Bend is for bending two hawsers together when required to go around a capstan. First form with hawser No. 1 a loop as in the upper diagram. Pass the second hawser under the first at A, bring up through the eye B, back it over the cross at C and bring up again towards you through the eye B, and then stop the ends of each hawser to their own respective parts as shown in the lower diagram.
A Double Carrick Bend is formed in precisely the same way, but a complete round turn is taken around 49the cross of the first hawser and then led up again through the eye and finished off.
The Chain Hitch is used to attach a small rope to aid in pulling a larger. When it is necessary to use a lever as a handspike the fastening in the lower diagram is used. First a clove hitch is formed to the spar and as many single hitches as required are then made. It may be finished off with any secure knot.
50
If ropes, hawsers or cables are left with their ends unguarded, they are sure to become untwisted or otherwise unmanageable. The same is true in a lesser degree of lanyards and smaller ropes. These can easily be secured with a fine whipping and the smaller yarns and threads by a single overhand or other knot. The ends of ropes at sea are variously treated. In some instances they are finely tapered to a point, to pass easily through a block or ring. While some of these knots for guarding the rope ends may seem fanciful they are by no means merely ornamental and many of them play important parts in the standing rigging of a ship.
At first glance some of these knots may appear to be very intricate and difficult to make. They are not as difficult as their pictures would seem to indicate and a little thoughtful study, carefully following the explanatory diagrams, will smooth away all troubles.
To Whip a Rope first lay the end of a length of twine along the end of the rope, and then, commencing at the part furthest from the rope’s end take a half dozen or more turns around both the rope and the 51twine, as shown in the first diagram. Then lay the twine in the form of a loop along the rope and over the turns already taken as seen in the second diagram. To finish off take that portion of the loop designated A, and continue taking turns tightly round the rope and part B of the twine until the loop is all used up. Pull through the remainder snugly by part C and cut off short when no end of twine will be visible as in the third diagram.
A Palm and Needle Whipping is a permanent way of securing a rope’s end from fraying and better than the whipping put on by hand. First place the needle under one of the strands and draw nearly the whole length of twine through. Take a number of turns 52round the rope with the twine, drawing each well taut in turn, and finish up by following round with the needle between each strand, forming a series of wrappings, and cut off the end of the twine.
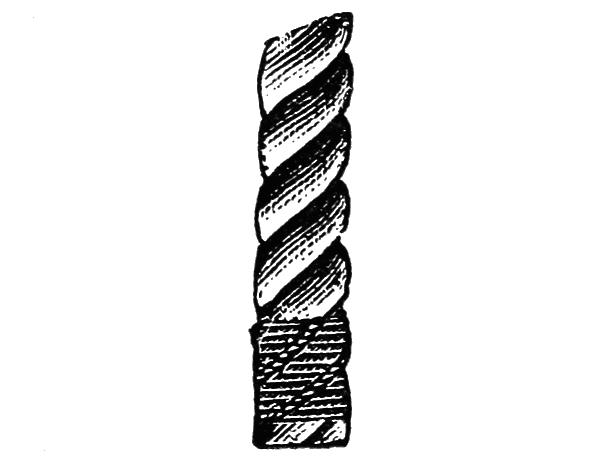
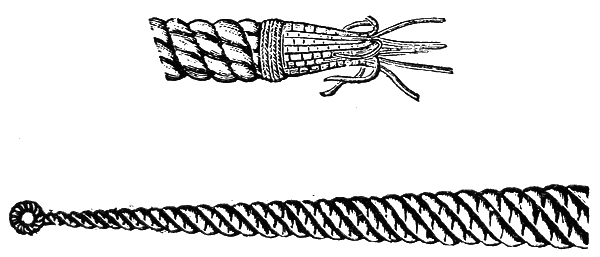
To point a rope first put on a stop at two and one-half times the circumference of the rope from the end, which will leave about the length for pointing. Unlay the rope to the stop, then unlay the strands, split a number of the outside yarns and make a nettle out of each yarn. A nettle is made by laying up the yarns with the finger and thumb left-handed. When the nettles are made up stop them back on the standing part of the rope. Then with the rest of the yarns, form the point by scraping them down to a proper size with a knife and marl them down together with twine. Divide the nettles, taking every other one up 53and every other one down. Pass three turns with a piece of twine which is called the warp very taut round the part where the nettles separate taking a hitch with the last turn. Repeat this process by placing every alternate nettle up or down, passing the warp or filling, taking a hitch each time until the point is to its required length. You may either form a bight with the last lay by passing the warp through the bights, haul them taut, and cut them off, or, work a becket in the end by taking a small piece of rope one-fourth the size of the rope, form a bight, unlay the ends, and twist the six strands up again by two taking some of the inside yarns and lay them up as the rope, then short splice that and the becket together and marl it down.
54
The Wall Knot is used for finishing off seizings forming a shroud knot. It is also used on the end of a rope to prevent it unreeving. To form a wall knot first unlay the rope so that the strands appear as in the first diagram below.
Holding the rope with the left hand, with the right lead strand A in the direction indicated, viz., under strand B and up between strands B and C as in the second diagram.
55
Then with strand B form a similar loop, enclosing strands A and C and bringing the end of strand B up between A and D as in the first diagram above.
Now with strand C form a similar loop enclosing strands B and A by leading the end of strand C up through the loop E in strand A as in the second 56diagram. Finally work all parts well taut, whip the ends of the strands together and cut off short, at the bottom diagram.
A Double Wall Knot is formed by making the single wall knot first and not hauling it taut. Then take one end and bring it underneath the part of the first walling next to it and push it up through the same bight. Do the same with the other strands, pushing them up and through two bights. If made this way it will have a double and a single crown. A double wall double crowned is a continuation of the double wall. The strands are laid by the side of those of the single crown and pushed through the same bight in the single crown and down through the double walling as shown in the illustration. The middle 57figure shows one method of finishing a single wall by cutting off the strands and tying them with twine. The double crowned wall knot may be finished by a Lark’s Nest by interlacing the loose strands one within another by a requisite number of turns over the pudding. This forms a knot at the end of the rope.
| CROWN KNOT | MANROPE KNOT |
STOPPER KNOT |
The Crown Knot or crowning forms the basis of other knots. To make a crown pass the bights of the first and second strands over the second and third strands respectively, dip the end of the third down through the bight of the first and work the knot into shape. Its construction can be followed very easily in the diagram. Double crowning is done by following round each strand again alongside the first lead.
58
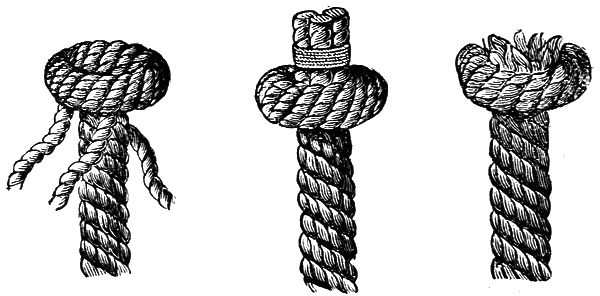
The Manrope Knot is used for securing the upper ends of the gangway manropes. It is made by first forming a wall and then crowning it as in the first diagram. Then follow round the wall again and lastly follow round the crown, when the finished knot will appear as in the second diagram.
The Stopper Knot is used in the ends of stoppers and is made by forming a wall and half a wall, putting on a good whipping about two or three inches from the knot and cut off the ends.
The Turk’s Head Knot is worked upon a rope with a piece of small line. Take a clove hitch slack with the rope with the line round the rope. Then take one of the bights formed by the clove hitch and put it over the other, pass the end under, and up, through the bight which is underneath. Then cross the bights again and put the end round again, under, and up, through the bight which is underneath. After this follow the 59lead and it will make a turban of three parts to each cross.
Single Matthew Walker Knot is used for securing the standing part of a rope or making beckets for buckets, etc. To make this knot begin as for the wall knot but pass the first strand A under both B and C as shown in the first diagram. Then pass B under both strands C and A, and bring up through the first loop formed by A, shown in the second diagram.
60

Similarly pass C under A and B and bring up through the loops first formed by A and B as seen in the third diagram.
The Double Matthew Walker is easily made when one notices the difference between a single Matthew Walker and a wall knot. In the wall knot each strand is simply interlaced with the strand immediately on its right coming up through the loop formed by the second strand. In the single Matthew Walker each 61strand interlaces the two strands to its right coming up through the loop of the third strand. Another evolution in the same order gives the double Matthew Walker. It is formed as will be seen in the diagram by making each strand contain its own loop, the other two strands and its own end, that is, each strand leads 62up through its own bight after interlacing the other two.
The Single Diamond Knot is made some distance from the end of a rope. It is therefore necessary to unlay the rope considerably more than is required in the preceding knots and as the strands will have to be laid up again, try to preserve the original lay in the strands as much as possible. Now bring each of the three strands down alongside the standing part of the rope, thus forming three bights, and hold them thus with the left hand. Take the first strand A as shown in the diagram and putting it over the next, B, bring it up through the bight of the third strand, C.
63
Take the end of the second strand over the third and up through the bight of the first. The last strand is brought over the first and up through the bight of the second. Haul taut and lay the rope up again. The first diagram above shows the loops in their places with the ends through them before they are hauled taut and the second diagram shows the completed knot.
64
The Double Diamond Knot is made first like the single diamond and then the ends are made to follow the lead of the single knot through two single bights, the ends coming out on top of the knot. The last strand passes through two double bights. The ends are then hauled taut and laid up as for the manrope knot.
The Shroud Knot is of use in joining two ropes together, particularly in joining a stay or shroud that has been carried away. Each rope is unlaid the necessary length and they are then brought close together. A wall knot is formed on each rope with the strands 65of the other as seen in the first diagram. The completed knot is seen in the second diagram but to make a neat job the ends should be marled and served as in the third diagram.
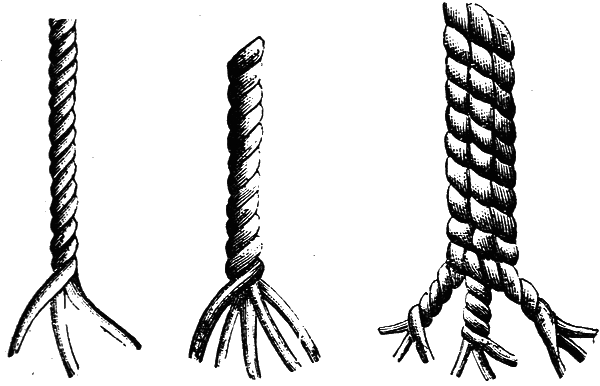
Snaking or Seizing is done by taking the end under and over the outer turns of the seizing alternately, passing over the whole. The whole may be whipped also with small twine. The ends of a four-stranded rope may be thus secured. The end is first whipped as shown at A in the diagram. The four strands are then opened out. They are then brought down over the end in loops and the strands tied together, as in the second diagram, or they may be simply brought 66down and bound to the cable with twine, as shown in the third diagram.
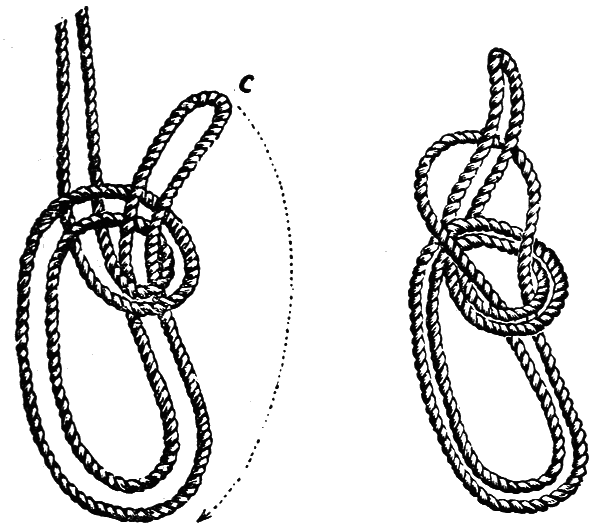
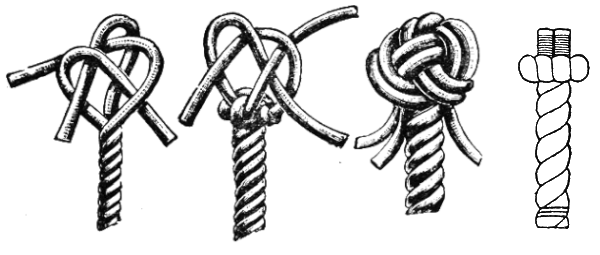
A Spritsail Sheet Knot is made by unlaying both ends of a rope and bringing the two standing parts together as in the first diagram. Grasp both parts of the rope at A, with the six strands form a wall knot, that is, by passing 1 under 2, 2 under 3, 3 under 4, 4 under 5, 5 under 6 and 6 under the loop formed by 1. Now lay any opposite two of the strands across the 67top in an opposite direction and crown by passing the other four, each in turn, alternately over and under these two. Each of the six strands will then come out leading in a downward direction alongside the strands forming the first walling. Now follow round the walling again, when the strands will come through in an upward direction, each alongside a strand of the first crowning. Follow through the crowning once more and cut off the short ends, when a handsome and useful stopper knot will result as in the second diagram.
68
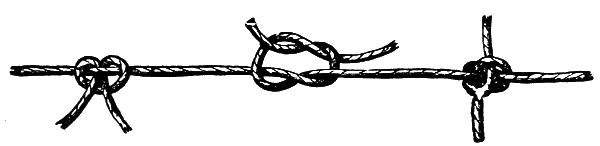
Shortenings are, as the term implies, knots that take up the surplus cord and keep the ends from being in the way. A piece of rope or cord is often too long and to cut it would be waste, so a shortening knot is used. Sometimes the tie, four, five or six-fold knots are used for this purpose.
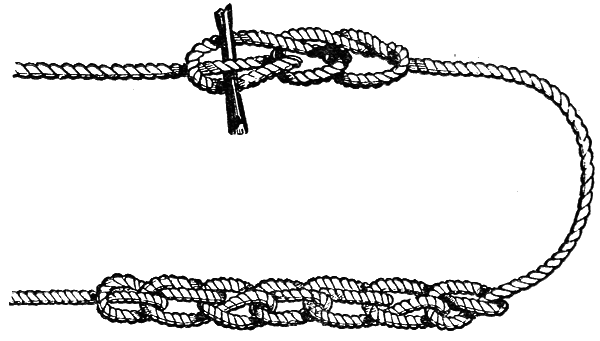
The Single Plait, or as the sailor terms it, the Chain Knot, is the commonest of all these knots. First make a running loop and then draw the loose end 69through the loop and repeat this operation until all excess of cord has been taken up. The end may be secured by bringing the end of the rope through the loop or by passing a belaying pin through the loop. These two methods are illustrated in the diagram.
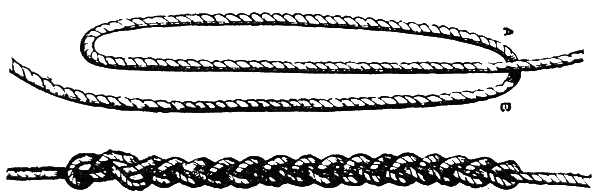
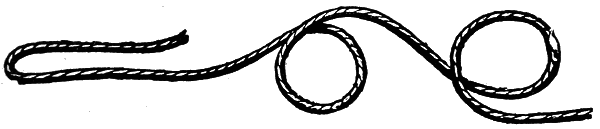
The Twist Knot is an ordinary three plait, although it is formed with one piece of rope. It is more useful than when formed of three separate pieces, for the ends are fastened and it cannot come undone. To make this twist hold the double loop in the left hand; the side A is then brought over to B, with a half turn B is crossed over to A and the process of an ordinary three plait is continued until the end of the rope is reached, when the loose end is passed through the bight and the knot is fastened and completed.
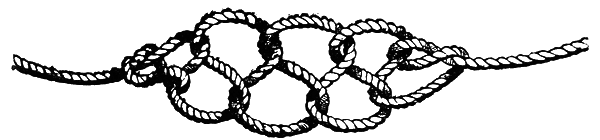
The Double Chain Knot is very easily made, if the first loop is made secure by a twist in the rope as shown in the diagram, and then pass the loose end 70through the preceding loop right and left until the knot is finished.
71
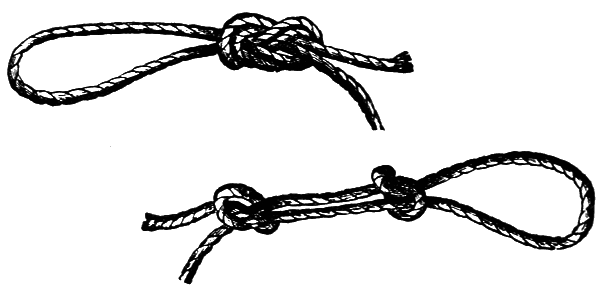
The Sheep Shank, or Dog Shank as it is sometimes called, is an old-fashioned method of shortening a rope and can be used on any sized cordage. It is used for shortening a rope which requires lengthening again. Gather up the amount to be shortened in the form of the upper illustration. Then with parts A and B form a half hitch round the two parts of the bight as in the second figure.
To render it still more dependable the bights A and B may be seized or toggled to the standing parts as in the third and fourth figures.

Bend Shortening or Simple Loop is a plain, useful expedient for stout rope and has the merit of not injuring the ropes by an unnecessary strain, or crossing the fibres of the hemp. It will not, however, stand any great strain.
72
The Bow or Knot Shortening is very quickly made. It is simply an ordinary knot in the middle of a rope in which a double bend has previously been made. It is not adapted to heavy ropes nor will it stand a heavy strain.
The Catspaw is one of the easiest made loops to be used for hooking on the block of a tackle or shortening up a bale sling stop. First throw back a bight as shown in the first diagram. Then taking hold of A and B, one in each hand, twist them up as in the second diagram. Bring the two eyes A and B together and hook in the tackle.
73
When the many varieties of knots and ties are analyzed it will be found that ties used in trades are all taken first from the mariner. The sailor learned to fasten ropes so that they were able to take up all strains evenly and to hold without chafing or without any undue strain being put on any one part of the rope. Consequently when builders erect scaffolding they use the ties and knots long known at sea. The Clove Hitch is also known as the Builder’s Knot because it is used to hold the scaffolding. The Clove Hitch is used by surgeons in cases of dislocation. The Reef Knot is also used by surgeons to tie arteries when performing operations. So it is with many other knots and because of their uses for other than nautical work they have often received other names.

74
The Simple Knot is the foundation for many ties. In the illustration this knot is seen made around a mast or other solid substance. This simple knot can at once become a clove hitch or the builder’s knot which is illustrated on page 39.
|
DOUBLE BUILDER’S KNOT SINGLE BOW KNOT |
DOUBLE BOW KNOT SINGLE TWIST KNOT |
The Double Builder’s Knot is shown in the diagram above, upper left. It is made in the same way as the clove hitch or builder’s knot except that the end goes 75around again as before and underneath its own part so making it much stronger.
The Single Bow Knot is one of the most common of the knots in general use. It is commenced with the simple knot and made by doubling one of the loose ends as shown in the diagram.
The Double Bow Knot or rosette knot is begun in the same way. Care must be taken to keep the simple knot taut until the bow knot is completed. The ends must lie straight as in the reef knot or it will become the false knot.
76
The Double Twist Knot is useful when small cords are used and tightness is required. The diagram below, upper left, shows how it is made.
The Tent Pole Knot, below, lower left, is one that can be used to advantage by all who have to occupy tents or to travel much. It is a simple loop made by joining the two ends of a rope with a fisherman’s knot. This admits a short cross-bar or wooden pin and it will enable the traveler to suspend clothes or other articles around a tent pole. The cord may also be used for a toggle when two pieces of wood have to be joined together.

|
DOUBLE TWIST KNOT TENT POLE KNOT |
RUNNING KNOT RUNNING KNOT CHECKED |
77
A Running Knot with two ends is used when it is inconvenient to divide the rope. Unless the ends are at liberty it could not be used round a mast, but it can be easily slipped round a pier.
This knot is frequently checked by a bow as shown in the diagram above, lower right.
It is sometimes checked by a Flemish Knot or by a Check Knot. These two knots cannot be tied unless the ends are loose. They cannot be untied without assistance from a marlinespike or some similar contrivance.
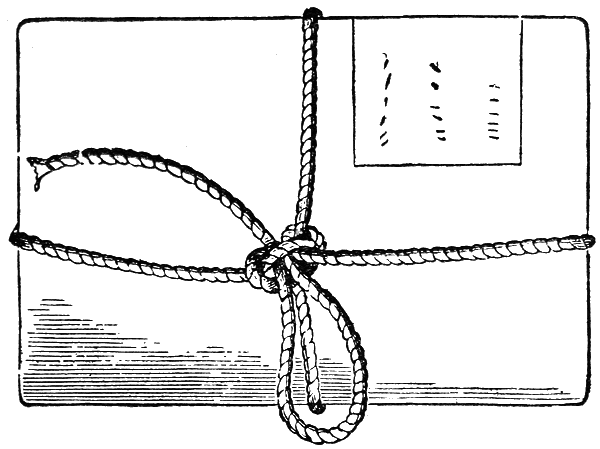
The Stationer’s Knot is handy for tying a parcel as it can be made rapidly and undone with ease. Make a running noose at the end of a piece of twine and bring it to the center of the parcel. Take the twine round the parcel at right angles, round the noose and making a bight slip it under as illustrated. A pull at the end releases the knot instantly.
79
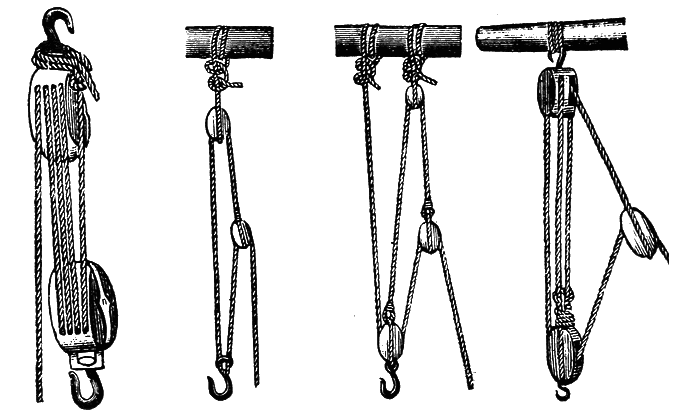
Single Whip—rope rove through a single block fixed in any position. It is used for light work. No power is gained.
Double Whip—rope rove through two single blocks—upper block a tail block, lower one movable hook block. The standing part of the fall is secured close to the tail block. The power gained is double.
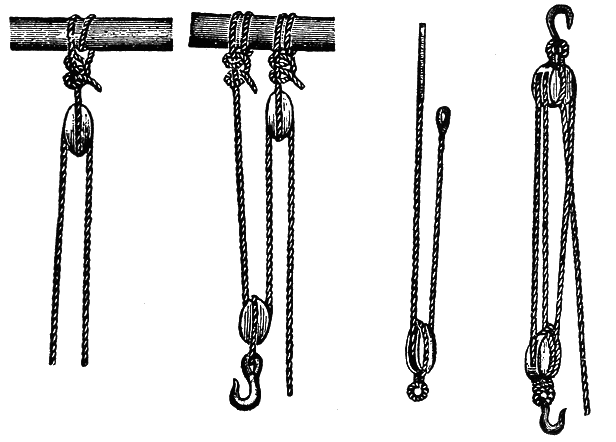
| SINGLE WHIP | DOUBLE WHIP | RUNNER | GUN TACKLE |
80
Runner—a piece of rope rove through a single block with a standing eye in one end and pointed at the other. The power gained is double.
Gun Tackle—two single blocks. Power gained—twice or three times according to which is the movable block.
|
HANDY BILLY OR JIGGER |
WATCH OR LUFF TACKLE |
DOUBLE LUFF |
THREE-FOLD PURCHASE |
Jigger—a small tackle for general use; a double block with a tail called a jigger and a single block 81with a hook. The standing part of the fall is spliced into the strop of the single block. Power gained—three or four times.
Handy Billy is a small tackle for general use.
Up and Down Tackle—a double and single block. The double block is fitted with a thimble, the single block is a hook block, fitted with a long strop. The standing part of the fall is spliced in the strop of the single block. Power gained—three times.
Luff Tackle—two hook blocks, one double and one single. The standing part of the fall of this tackle is spliced into a strop of the single block. It is sometimes rove through a becket in the single block and secured by being spliced round the strop at the neck of it. Power gained—three or four times.
Double Luff Tackle—two double blocks.
Three-fold Purchase—two three-fold blocks. Power gained—six or seven times.
|
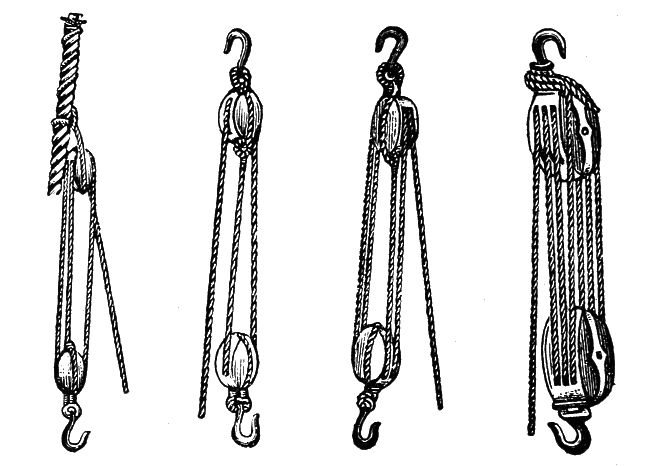
FOUR-FOLD PURCHASE |
SINGLE SPANISH BURTON |
DOUBLE SPANISH BURTON |
Four-fold Purchase—two four-fold blocks. Power gained—eight times.
Single Spanish Burton—two blocks and a hook. Power gained—three times. It is not in general use.
Burton—a double hook block and a single hook block, fitted with a long strop, the standing part being 82spliced round the strop and hook of the single block. Power gained—three times.
Runner and Tackle—consists of three blocks, one double and two single. One of the single blocks is fitted with a thimble, as a lashing or shackling block, through which the runner is rove. The double block of the tackle is turned in one end of the runner. The standing part of the tackle is spliced in the seat of the 83single block which is fitted with a long strop and hook. Power gained—eight times.
Double Spanish Burton—There are two forms of this purchase. One by using three single blocks and the other by using one double and two single blocks. Power gained—five times.
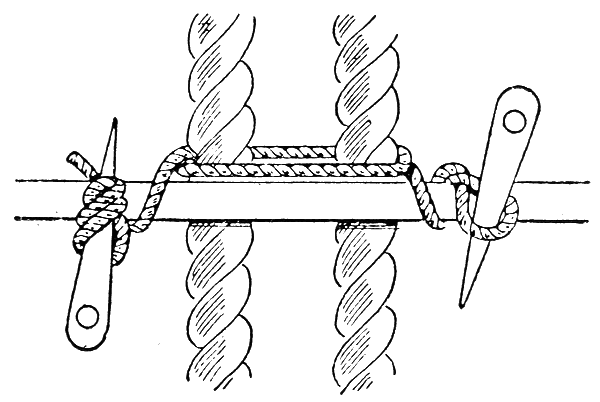
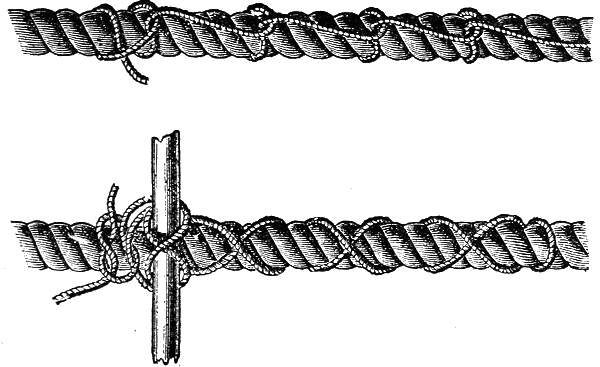
A Spanish Windlass—To rig a Spanish windlass take a good strand well greased in the center. Place the strand over the two parts of the rope that are to be hove together and bringing the ends of the strand up again, place a bolt close to the strand. Take the ends of the strand and lay them up with their own parts so as to form two eyes. Take a round turn with this round the bolt, put a marlinespike in each eye and heave around.
84
A Parbuckle is used for hauling up or lowering down a cask, or any cylindrical object where there is no crane or tackle. Middle the rope to be used for the parbuckle, place the bight over a post or pin as most convenient; the two ends are then passed under the two quarters of the cask, bring the ends back again over it and they both being hauled taut or slackened together either raise or lower the cask as may be required. Care must be taken to keep an equal strain on both parts to prevent the cask slipping out.
There are several methods of slinging a cask, viz., with butt slings, bale slings and head up, also by means of can hooks.
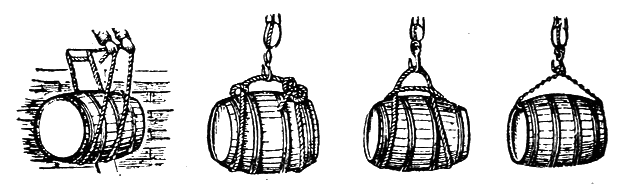
| PARBUCKLE | BUTT SLINGS | BALE SLINGS | CAN HOOKS |
A Butt Sling is a single piece of rope fitted with an eye splice in one end and the other end pointed or whipped. To sling the cask, the cask is placed on its bilge bung up; reeve the end of the sling through the eye splice and place the loop thus formed over one 85end of the cask between the first and second hoops and haul well taut, the eye splice being in line with the bungs; then take the end of the sling round the other end of the cask between the first and second hoops and clove-hitch it to its own part in line with the bung.
A Bale Sling is a single piece of rope short spliced together. To sling a cask, the cask is placed on its bilge bung up, the slings passed underneath both ends of the cask between the first and second hoops; the bights are then taken over the cask, and one bight passed through the other, taking care the cross is in line with the bung.
Can Hooks are used for breaking off a cask, that is for lifting out the first cask of a tier where there is not room to put on a butt or bale sling. Casks are never hoisted up with can hooks.
To pass a life line dip the end under the slings and over the davit and take two or three turns round all parts and hold on to the end.
To pass a life line for a “full due” proceed as above but substitute half hitches for round turns and tuck the end in.
86
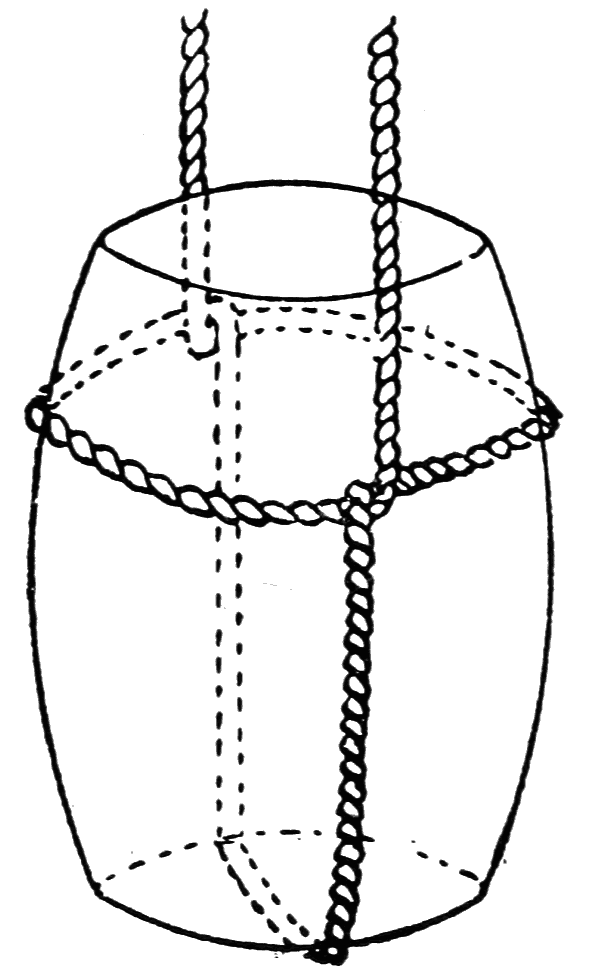
To sling a cask head up the cask is placed on its end, pass a rope under the bottom fairly in the center, then form an overhand knot with both ends of the rope on the top of the cask, open the knot out and place bights over the head between the first and second loops, haul them well taut, then reef-knot both ends together on top.
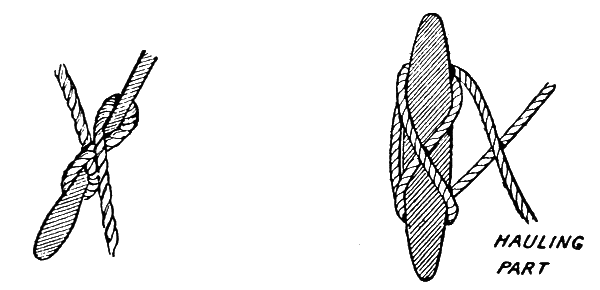
A Stropper is used for securing a rope while it is being belayed. Take the stropper in the left hand, make a half hitch against the lay, dog the end with the lay of the rope and seize it. With left-handed rope the end of the stropper should be passed under the rope from left to right. To put a strop on a hemp rope, center the bight of the strop and place it over the 87rope, then dog the ends opposite ways under and over, and hook on the tackle to both bights.
To put a strop on a Spar use the ordinary bale sling strop.
|
TO PAN A STROPPER |
TO PUT A STROP ON A SPAR | TAIL JIGGER |
A Tail Jigger is similar to a stropper but with an additional turn. To put on a tail jigger take the first two parts of a rolling hitch, dog the end with the lay and seize it.
88
A landsman is always fascinated by the ease with which the sailor will handle big ropes and the way in which he will warp a vessel in or out of a dock or moor it to a pier by the simple twisting of the cable round a post or cleat which are on the vessels themselves or on the pier-head.
The Simple Stoppered Loop is familiar to all and when the end of the rope can be constantly used no other fastening is required.
| LARK’S HEAD | SIMPLE STOPPERED LOOP |
89
A Lark’s Head can easily be made over a post when there is a running noose or knot. This is clearly shown in the diagram.
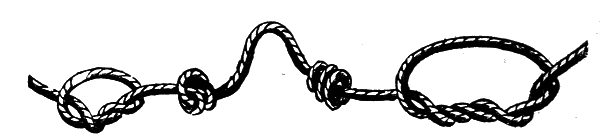
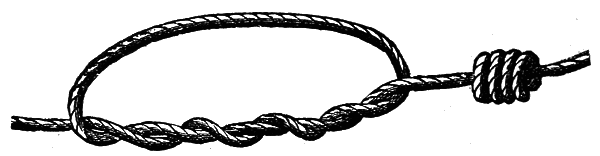
| WATERMAN’S KNOT | TWISTED ROPE FASTENING |
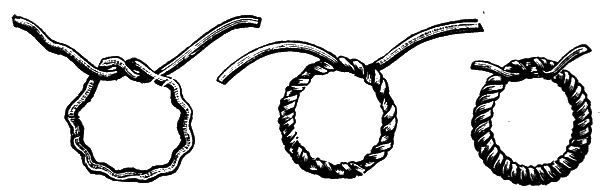
The Waterman’s Knot is used when the end of the rope is not stoppered or when the middle of the rope must be used. This is similar to the clove hitch. It can very quickly be made by placing two loops on the rope as shown in the diagram.
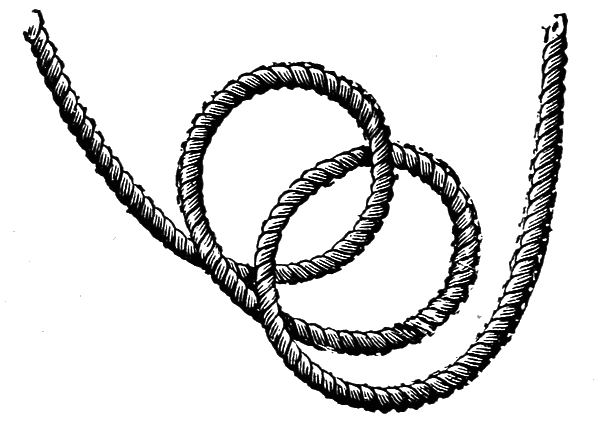
The holding power of a twisted rope is illustrated clearly in the diagram to the right of the Waterman’s Knot.
90
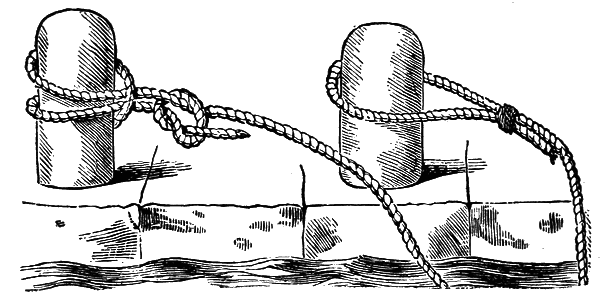
The Chain Fastening is of a more permanent character, and is used when a vessel is to be moored for any length of time.
91
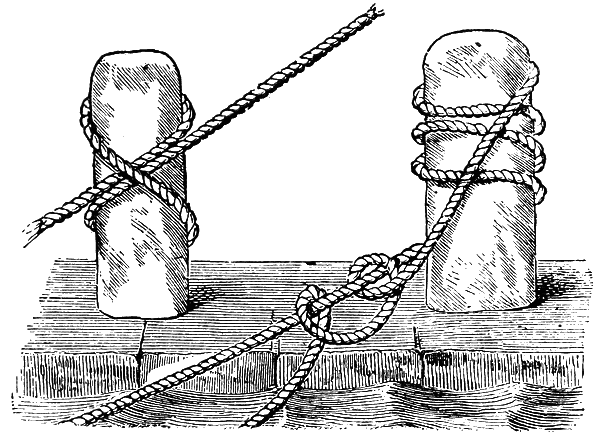
Square moorings or sheaves are occasionally used for the mooring of vessels. In these instances the fastenings vary. The diagram shows a double fastening to sheaves.
A loop fastening to sheaves may be tied or untied without untying the loop itself. It is made by passing the loops, A, B, C, D, and E as shown and then placing the loop F over the head of the right-hand post of the sheaves. When slackened the loop of the cable F will again slip over the head of the post and the turns and then reversed. There is a more simple fastening by wrapping the cable round the angle of the sheaves.
92
The crossed and square fastenings as shown in the diagrams need no explanation. The ends are secured by being stoppered to the cable.
93

To secure a rope round a cleat first take a round turn, then a figure of 8 knot is made round the cleat pin and repeated twice. On no account should a half hitch be made over the pin or cleat afterwards. The main object is to insure that the rope will not jamb.
94
A study of the many knots used for fastenings or moorings show that they are only practical applications of many of the knots, bends or hitches that have already been illustrated in preceding chapters of this book.
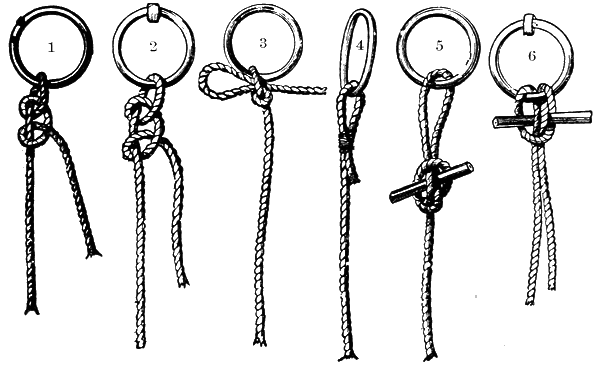
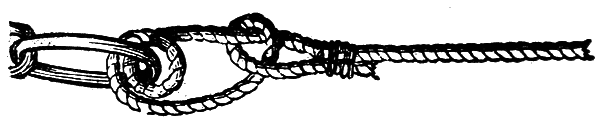
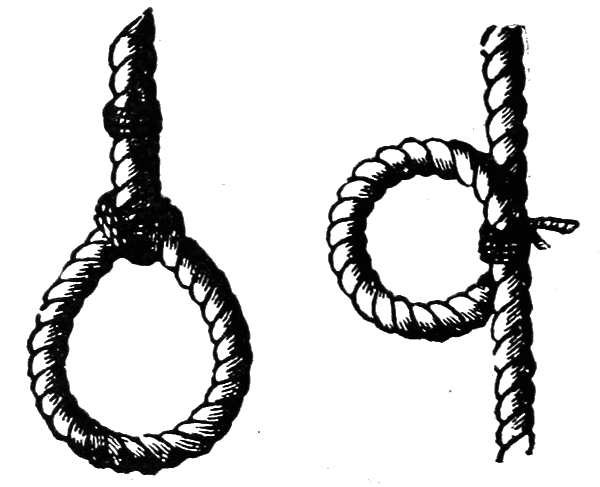
The Sailor’s Knot is a very simple mooring knot for the painter of a small boat. It is shown on Figs. 1 and 2. This knot shows one line straight while the end is twisted round in two hitches.
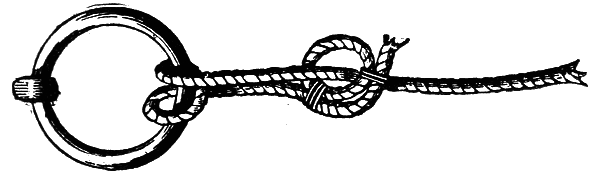
The Slippery Ring Knot is shown in Fig. 3. It can be cast off at any moment. Fig. 4 shows the same 95knot but it is made permanent by being stoppered as seen in Fig. 4. The slippery ring knot has one turn in the ring.
The Simple Boat Knot, Fig. 5, has an advantage for rapidity of unmooring. It is made with only one turn in the ring. The loose end is left longer than in the diagram but as it sometimes catches in the ring it is not very popular with sailors.
The Lark Boat Knot, Fig. 6, is really a double boat knot. It differs from the boat knot in that a bight instead of a single end of rope is put through the ring and a thole used to fasten it.
96
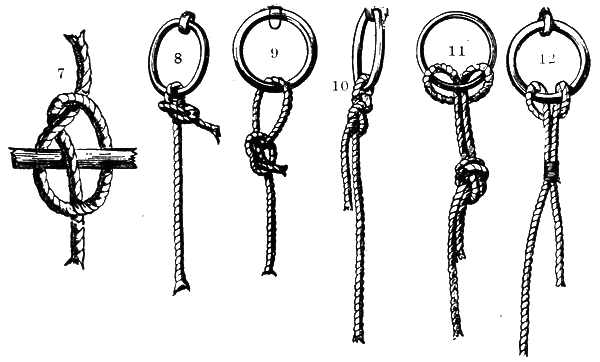
The Boat Knot, Fig. 7, is made in the same way as the marlinespike hitch, the only difference being that a thole pin or other small piece of wood is put through the center of the knot instead of a marlinespike. By withdrawing the pin the knot comes adrift of its own accord.
Simple and Crossed Running Knots are shown in Figs. 8 and 9. The simple fastening, Fig. 8, is not so secure, but chafes less than the crossed running knot, Fig. 9.
The Capstan Knot, Fig. 10, is an application of the figure of 8 knot. To make this cross the end of the rope after it is through the ring, bring it round the standing part, through the first bight and through its own bight.
The Lark’s Head Knot, Fig. 11, is somewhat like the lark boat knot but instead of the ends being brought down outside the bight after being passed through the ring, they are put through it. This is seen in the ring part of Fig. 11. The whole illustration shows a Lark’s Head stoppered.
The Lark’s Head Stoppered may be made by passing a bight through the ring and drawing the two parts of the rope through the bight. Where this is not practical by reason of one end of the rope being fast, the end may be passed up through the ring behind the 97standing part and drawn down through the right and bight again. Sometimes instead of being stoppered with an overhand knot as seen in Fig. 11 the end is seized to the standing part with twine, as shown in Fig. 12.
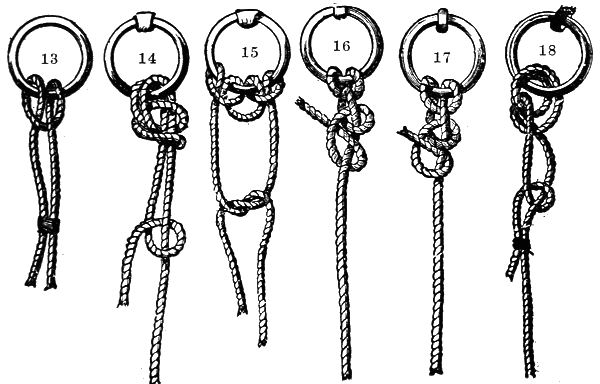
The Lark’s Head with Crossed Ends in Fig. 13 is made in the same way as the Lark’s head except that the end comes over instead of through the bight. If the standing part is taken in one hand and the end in the other and drawn apart this knot is the clove hitch or builder’s knot.
98
The Double Lark’s Head, Fig. 14, is easily followed in the diagram. A bight is first made and the ends passed through it, the ends are then put through the ring and through the loop already made and hauled taut.
The Treble Lark’s Head, Fig. 15, is not as difficult as it appears in the diagram. First bring the bight of the rope up through the ring, then take one of the ends and pass it through the bight and up through the ring. Then put it down through its own bight. Do the same with the other part and the knot is formed.
Back-Handed Sailors’ Knots are shown in Figs. 16 and 17. This knot is made by passing an end through the ring round at the back of the standing part and through the ring again, finishing with two half hitches round the standing part.
Slip Knots stoppered as shown in Fig. 18 and above are easily made and the diagrams show their formation clearly.
99
Slip Knot secured by a slip clinch is another simple knot and easily followed in the diagram.
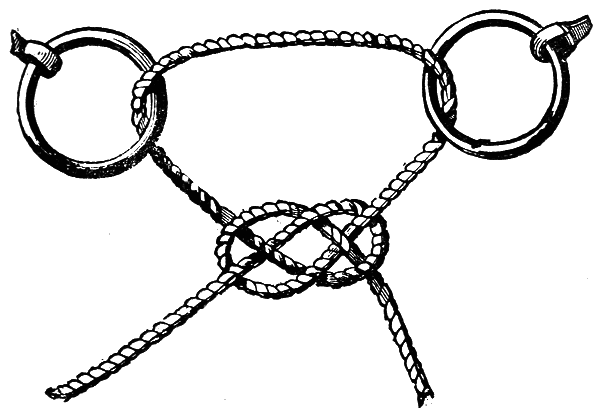
The Gunner’s Knot is simply a carrick bend made with the two ends of a rope after it has been passed through two rings. This is sometimes called a delay knot.
100

Securing Lead Line to Lead.—The lead is fitted with a good wire grommet parcelled over. The lead line should have a long eye spliced in it and is secured by passing the eye through the grommet and over the lead.
Hawsers are bent together by two half hitches and seizing the ends in addition to methods already explained.
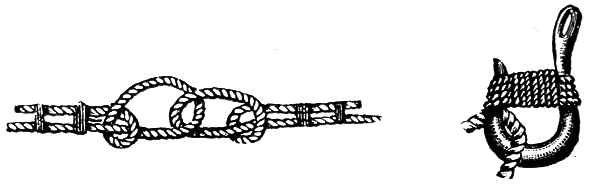
| BEND HAWSERS | MOUSING A HOOK |
Mousing a hook is to prevent a chain or rope from slipping off or to prevent it becoming unhooked. A few turns of a rope yarn are passed round the ends of the hook and the standing part, the ends are brought round the middle a few times and fastened with a reef knot.
101
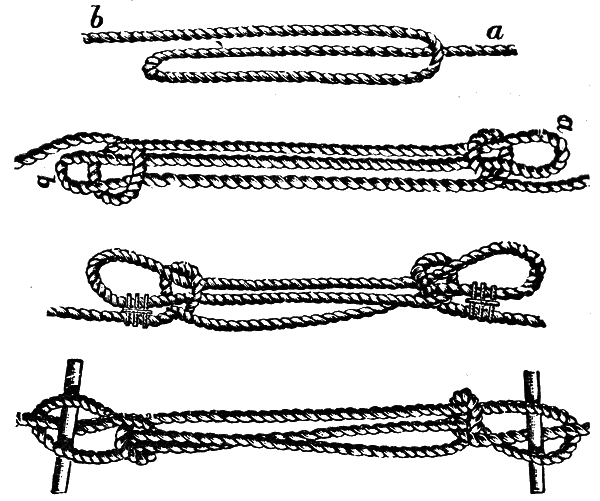
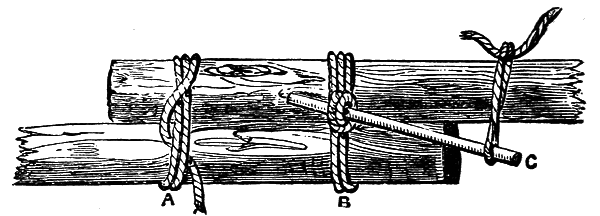
A practical knowledge of the proper way to lash a rope is necessary to anyone who has anything to do with a vessel no matter what its character. Occasions constantly occur on sea and on land, in fair weather and foul, to unite ropes on the bight or that are fitted with eyes or with other loops.

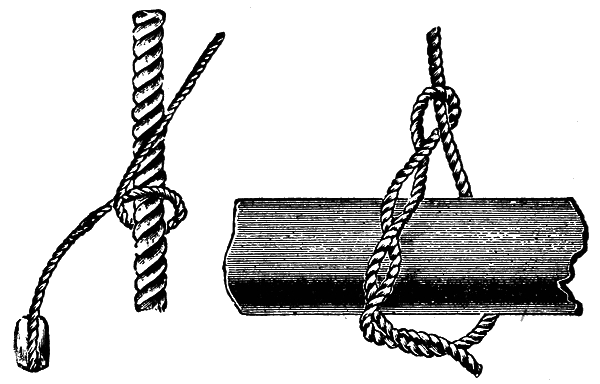
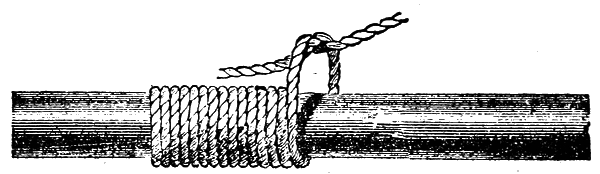
A Running knot fastened in the eye of a rope is the simplest of these knots. The diagram shows how this is made.

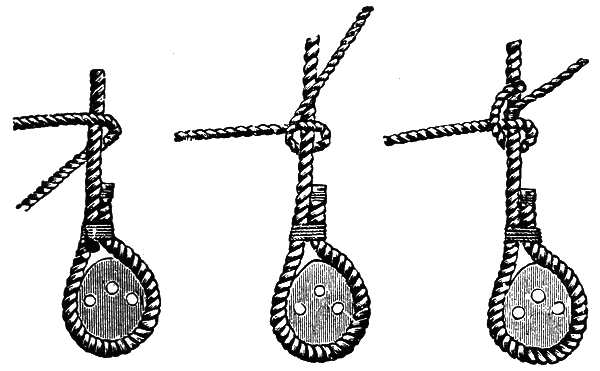
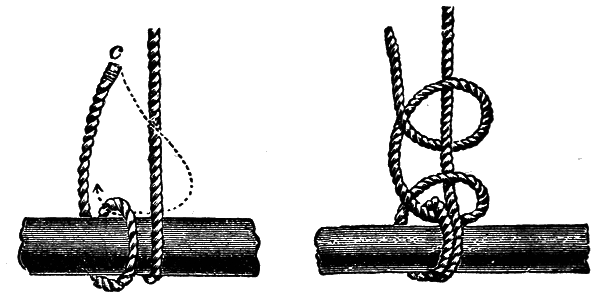
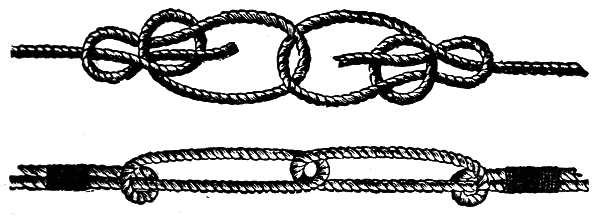
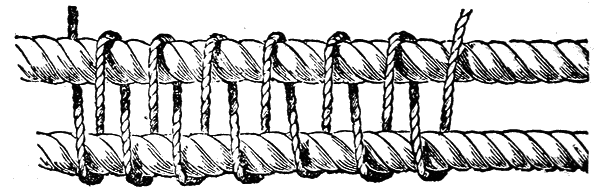
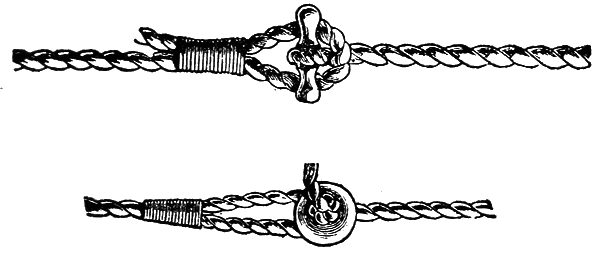
The Dead-Eye Lashing is one of frequent use on board full-rigged ships. It admits of easy adjustment to the strain of the ropes. The ram blocks are fastened in the eyes, which are made by simple lashings and tightened by the lanyards, A, A, which pass through 102holes on the dead-eye, so as to tighten or slacken the rope at will. The ends of the lanyard are fastened to the main rope.

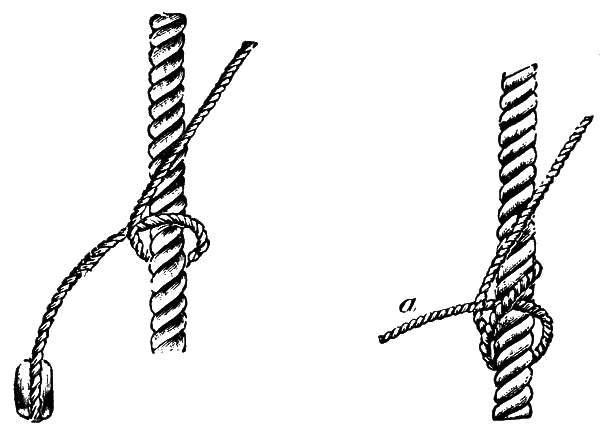
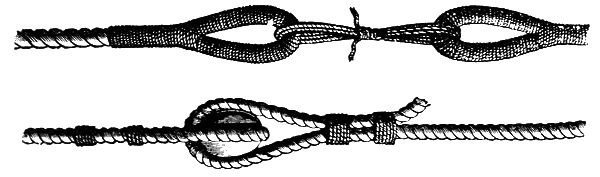
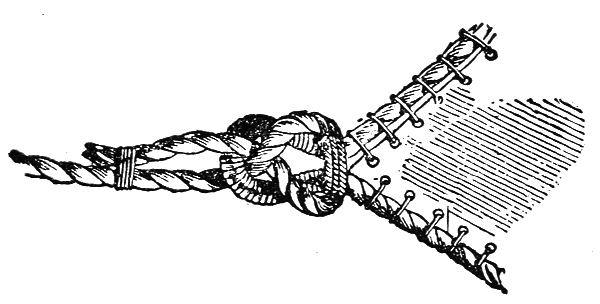
The Belaying-Pin Splice as shown in the diagram really illustrates three methods of joining cordage. The belaying pin is marked A. It is stoppered on the end of the rope and served with yarn, passed through the eye of the rope and at the other end a loop is formed. Through this loop or bend a button secured to the rope, B, by a single knot is passed, and the double junction is complete.
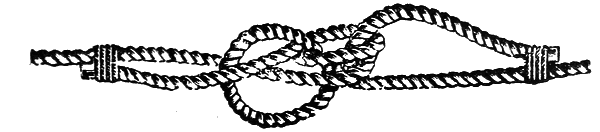
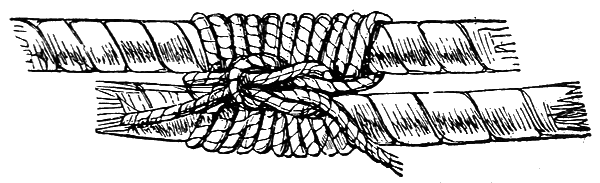
The Wedding Knot or Rose Lashing is one to join two rope ends both having eyes. The lashing is passed successively through both eyes and then tied in the center.
103
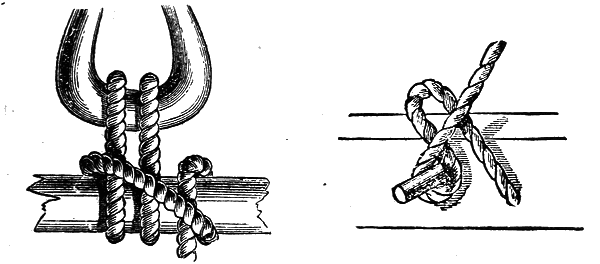
The Shell Lashing is made by looping two ends of rope around a spherical shell and seizing the end to the standing parts.

A Cross Lashing is used when a lever is used to a rope. After several turns round the rope, the lashing is crossed round the lever and fastened with a reef knot.
The Portuguese Knot or Necklace Tie is made by 104taking several turns round the spars to be joined, then two turns round the lashings and secured with a reef knot.
Nippering or Packing is a method for securing two ropes together with cross turns. These are hauled taut and further secured by round turns over all after the ropes have been jammed together. The ends are fastened with a reef knot.
A West Country Whipping is formed by middling the twine around the part of the rope to be marked and half-knotting it at every half turn so that each 105knot will be on opposite sides. When a sufficient number of turns are passed finish it off with a reef knot.
To finish off a whipping without showing a knot lay one end forward as at A in the diagram, then pass the other end round and round a sufficient number of times, hauling taut each time. Three or four loose turns are then made and the end passed under these backwards. These ends are worked down into their places and when they are hauled taut are cut off.
Another method is, instead of having a single end, a bight of the seizing is laid along the part to be whipped and the turns passed over it. When these are 106completed the end is passed through the bight at A. The end B is then hauled upon to bring the bight and the end of the rope snug under the coils. There are now two loops interlacing at the center of the work and these cannot come undone. When the ends are cut off close to the turns the whole is fair and smooth.
A useful band is shown in the diagram above. The second end B is drawn through by a turn—a very useful method of securing a ligature or a fractured fishing rod.
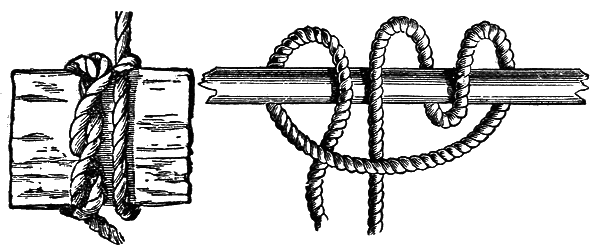
The Packing Knot is used for binding timbers together. The first diagram shows it started at A and B 107shows it completed. It is tightened by means of a packing-stick, C, which is twisted under the knot and then twisted round and secured as shown. A quicker plan is two toggles shown in the second diagram. After twisting the sticks round tie the two ends of the sticks together.
A Toggle is a piece of wood turned to shape and having a groove in the center round which the end of a rope is spliced. An eye is made in another rope by any method and the toggle is slipped into it. To unfasten it the ropes are slackened. Another form of toggle is a round piece of wood shaped like a button. 108It has a hole in the center through which a rope is passed and the end knotted.
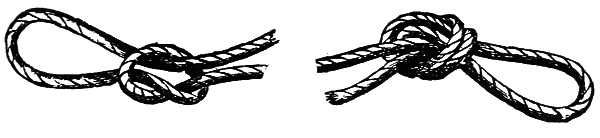
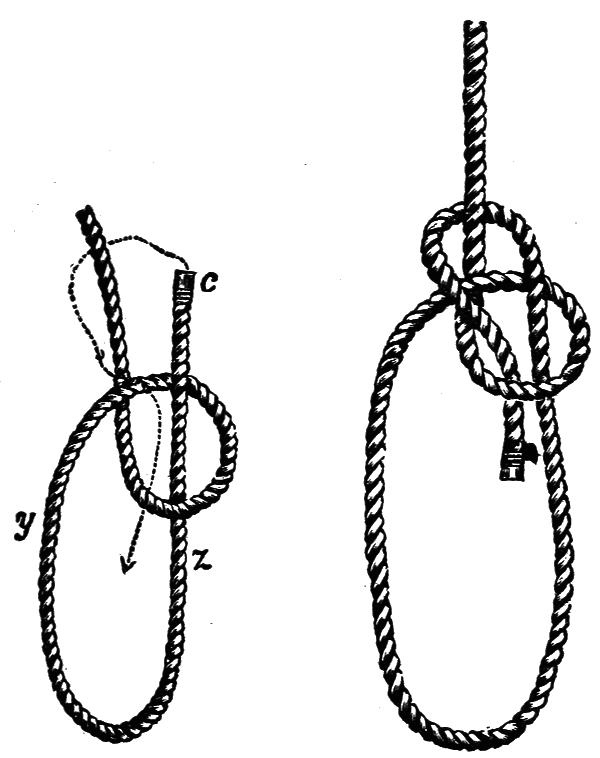
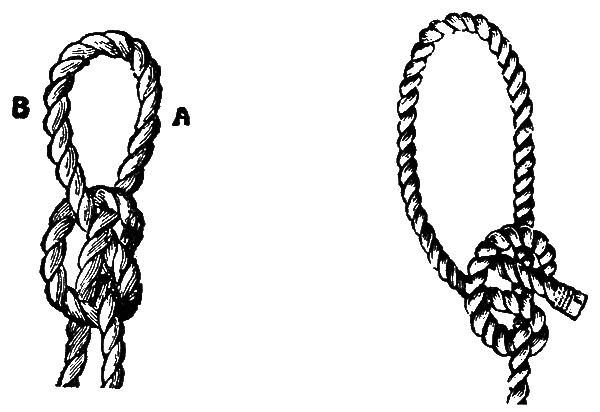
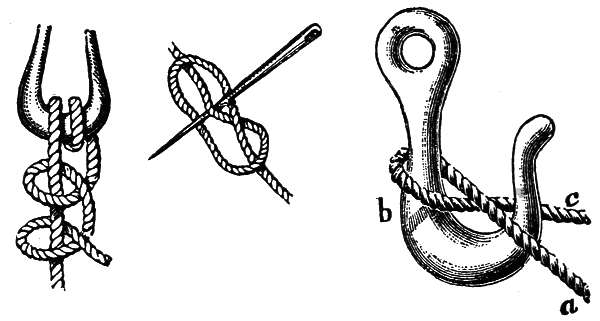
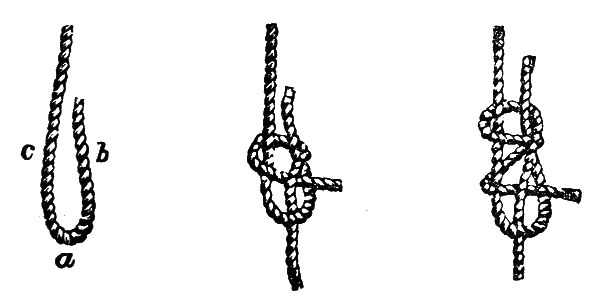
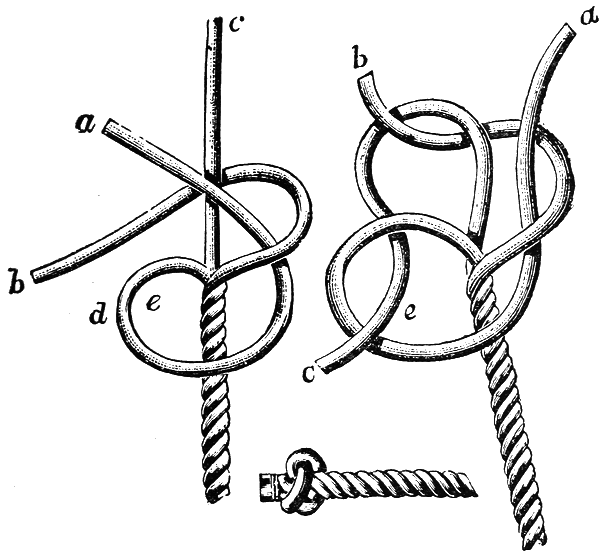
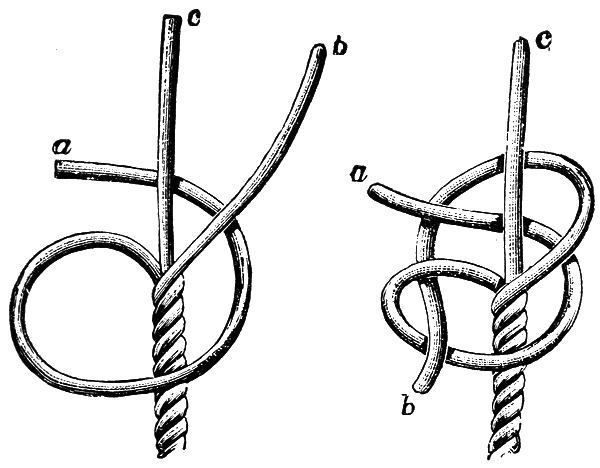
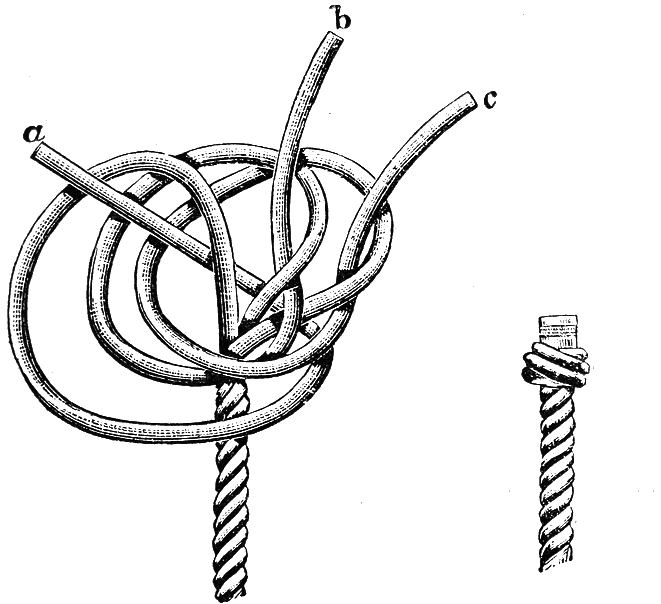
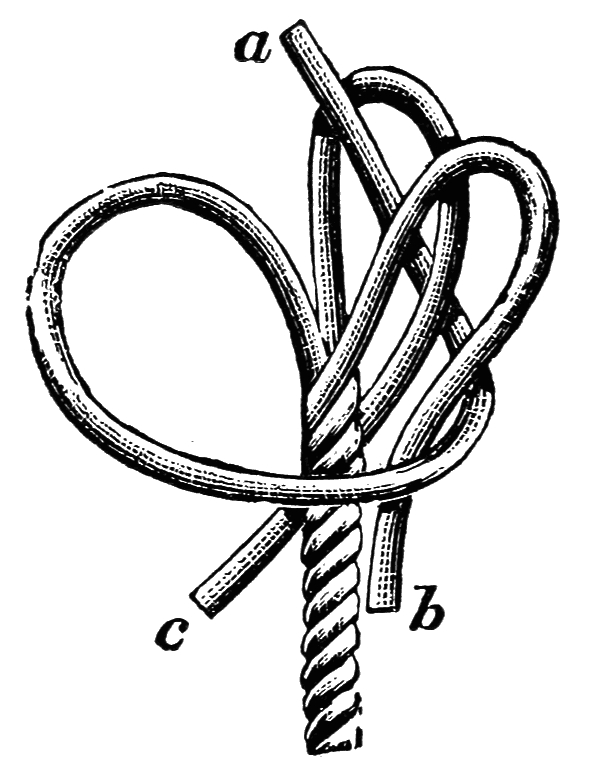
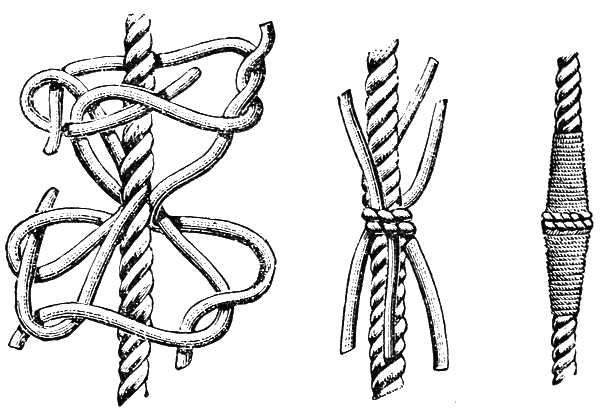
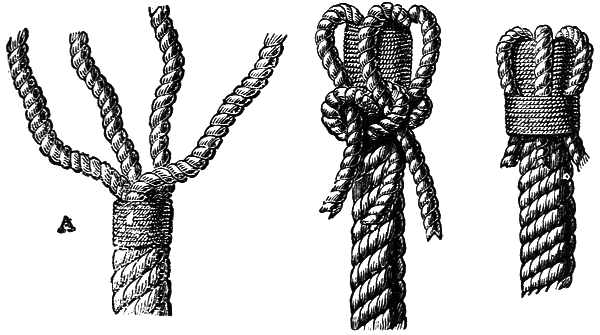
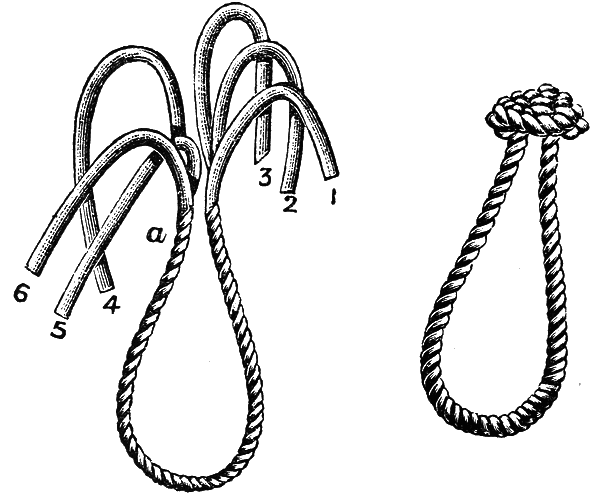
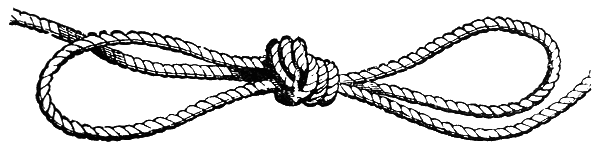
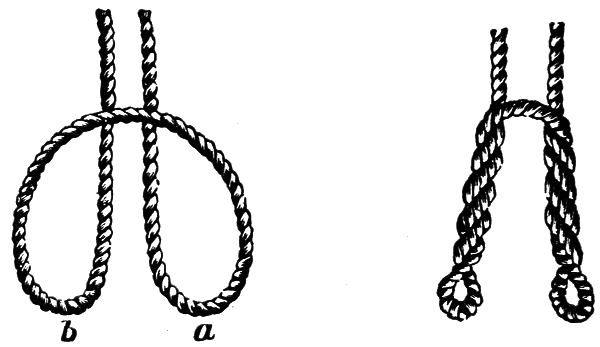
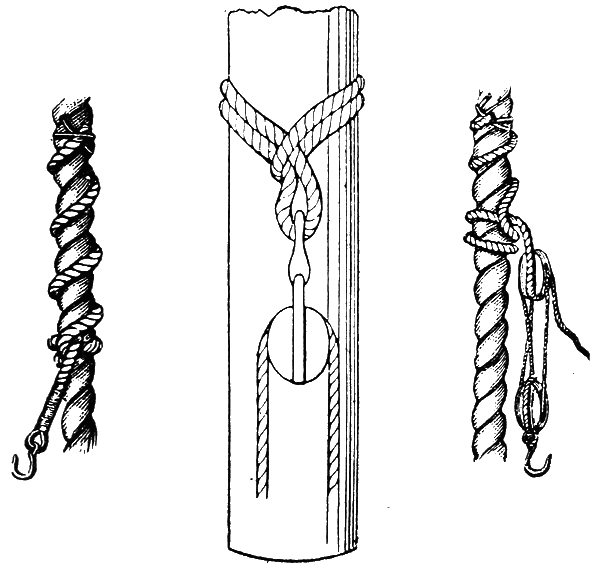
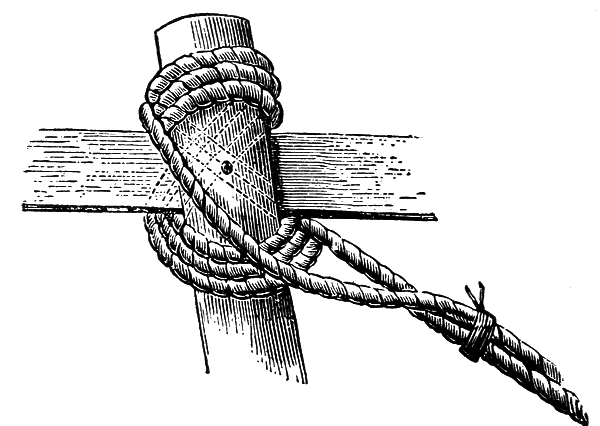
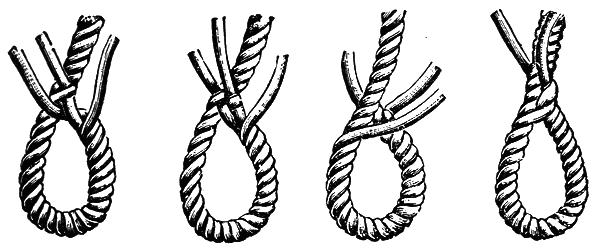
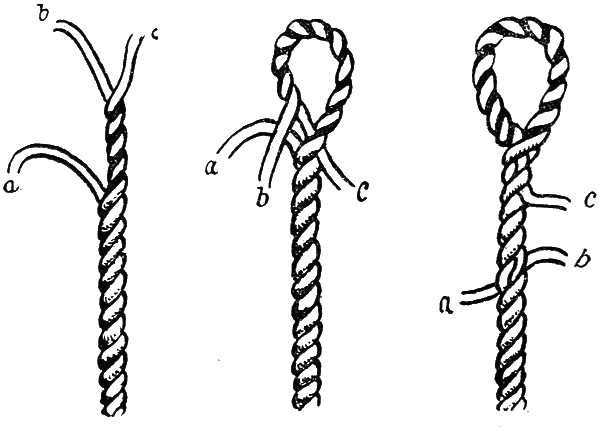
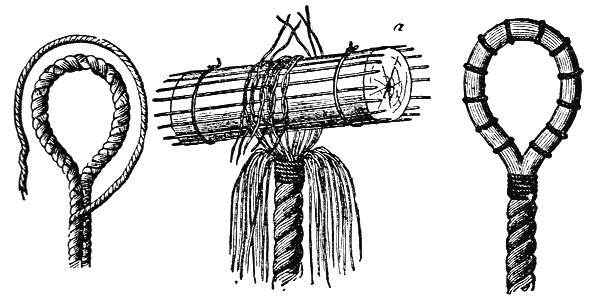
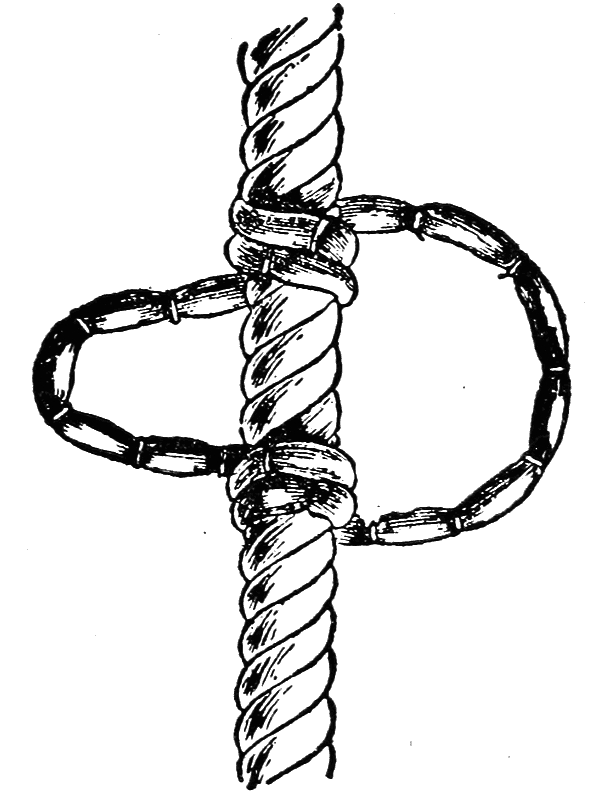
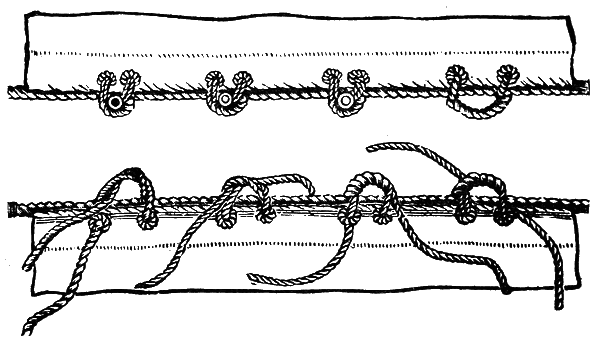
The Jury, or Double Pitcher Knot as it is sometimes called, is useful when a jury mast has to be rigged, as the loops form a means of attaching the necessary supports to the mast. The center K in the second diagram is slipped over the masthead and the weight brought on the stays tightens it and holds it in its position on the mast.
109
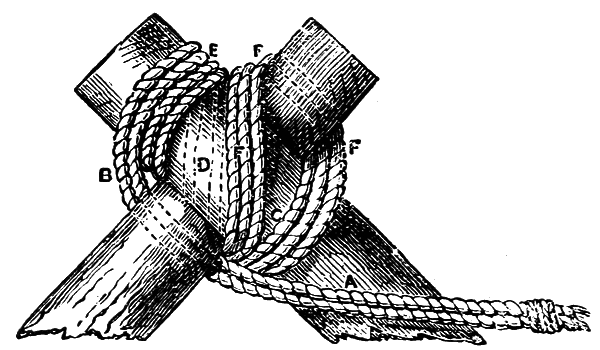
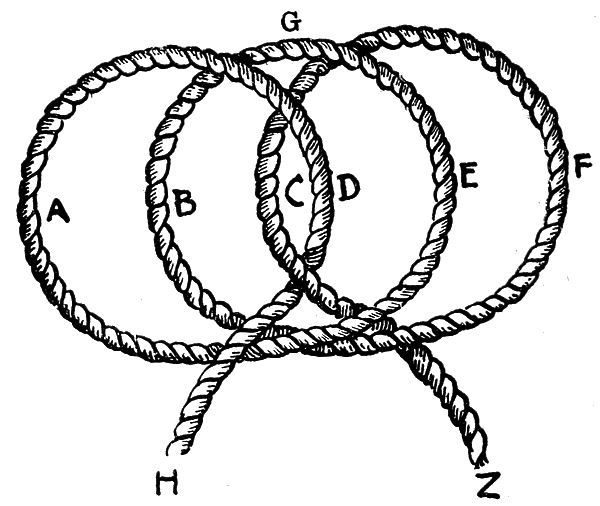
It is formed by three ordinary half hitches each placed behind the other with the loop of the last laid over the first. Keep the hitches together with the right hand and with the left take A and dip it under B and pull C through A and B.
Then, holding the knot with the left hand, place F over E and pull D between E and F. Take G in the teeth and pull on the parts G, F and A. The ends H and Z may be either knotted or spliced.

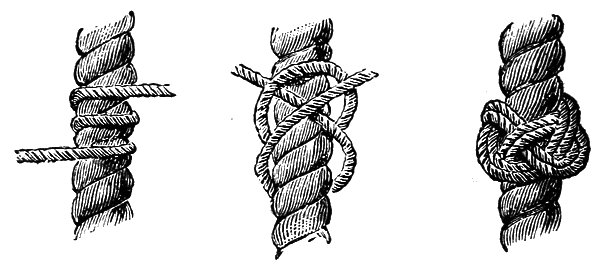
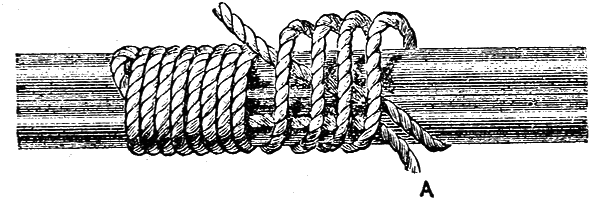
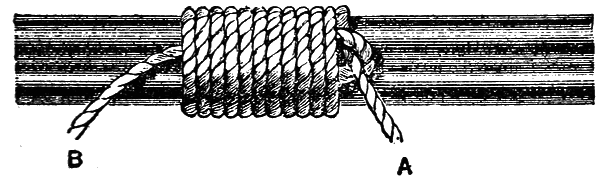
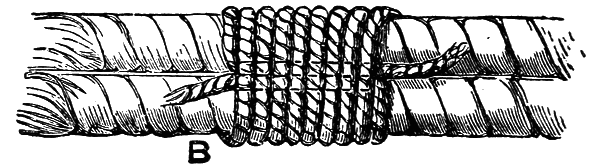
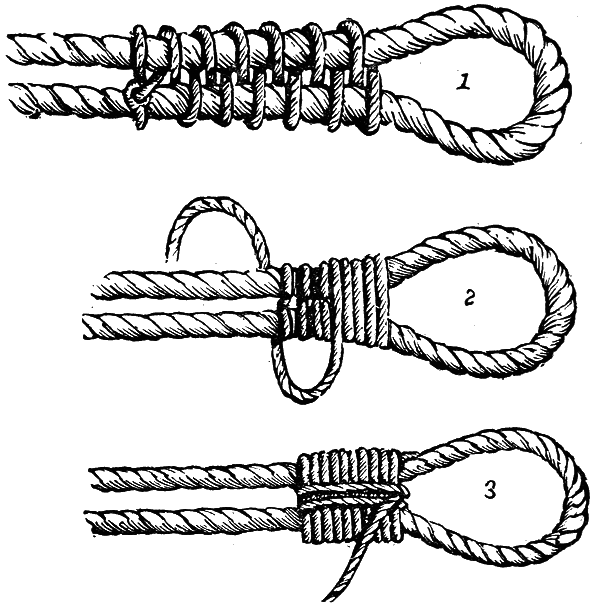
Racking Seizing is used where the strain is on only one part of the rope. An eye splice is formed in one end of racking and the first turn is passed round both parts of the rope like a round seizing; it is then dipped 110between both parts and the remaining turns are passed as racking turns, over and under, leaving sufficient space between each racking turn for a roundabout 111turn to lie, the usual number taken being thirteen. After these are passed the end is dipped down inside the last turn and the roundabout turns are passed from the end towards the eye between the racking turns. When the last roundabout turn is passed, the end is passed up between both parts of the shroud, ready for passing the cross turns, which are passed by taking the end along the seizing and passing it down between the seventh and sixth turns along the seizing, again towards the eye, up between the two parts of the shroud, as before, and again drawn between the seventh and sixth turns so as to form a clove hitch. Then finish off with a crown and wall as in other seizings.
To make the racking neater after passing the last roundabout turn, the end is taken outside all parts of the racking instead of between the six and seven turns, and clove formed at the same time.
112
It is sometimes necessary to unite hawsers, cables and even ropes in such a manner that there is no obvious difference in their diameter and no substantial weakening of their strength. This can be done only by splicing, that is, putting the ends together by opening the strands and placing them into one another, or if equal diameter is not essential by putting strands of the end of a rope between those of a bight. When ropes are knotted they cannot be run through a block. In driving ropes, too, knotting is out of the question. It is calculated that a splice will weaken the strength of a rope about one-eighth.

113
A short splice is used for joining any rope not needed to travel through a block.
To make a short splice unlay the rope to the required length which is twice the circumference of the rope for the long ends and one and a half times the circumference for the short ends. When this is done whip all the ends with yarn. The ends are then placed together as shown in the first diagram, the strands of one rope alternately between the strands of the other. The two ropes are then jammed closely together. The end of one rope with the strands of the other rope are now held firmly in the left hand. Sometimes it is better to put a lashing round the strands to keep them down to the rope on which they lie. The long ends are tucked in twice and the short ends once. Pass the left hand over the first strand next to it and underneath the second strand. Haul it taut in the lay of the rope. Then enter the right-hand strand and lastly the middle strand in a similar manner to the first or left-hand strand. Haul them taut along the lay of the rope. Put the long ends in again as before, cut the stop off the fork and put the short ends in once in a similar way. Stretch the splice, whip the ends and cut them off. If it is intended to serve over the splice, put the strands in once and a half each way, take a few of the underneath yarns from each strand to fill up the 114lay of the rope for worming, scrape the ends and marl them down ready for serving.
The Long Splice has many advantages over the short one. To make it unlay the ends of two ropes to the length of five and a half times the circumference of the rope. Crutch them together as for the short splice. Unlay one strand and fill up the vacant space which it leaves with the opposite strand next to it. Then turn the rope round and lay hold of the two next strands that will come opposite their respective lays. Unlay one filling up the vacant space, as before, with the other. Take one-third out of each strand, knot the opposite strands together and heave them well in place. Stick all six ends once under one strand. Having stretched the splice well cut off the ends.
115
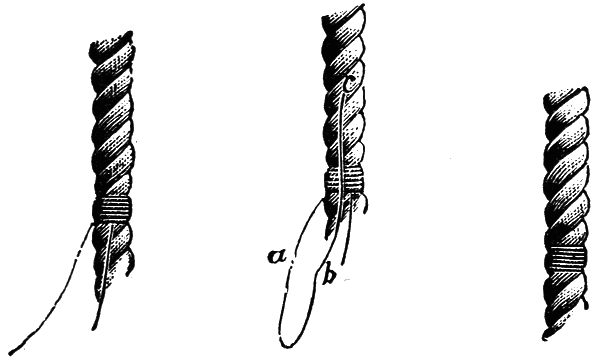
An Eye Splice is used by seafarers to splice round a block, dead-eye or thimble and is formed by unlaying the end of a rope for a short distance and then laying three strands upon the standing part so as to form an eye. Put one end in the strand next to it in the same manner as for the short splice. Then put the next end over that strand and through the second and put the remaining end through the third strand on the other side of the rope. Taper them, divide the strands and put them in again. To finish off split the strands and take half of each, seizing them together, and cut the ends off. When serving is used the strands should be tapered off.
A Chain Splice is used for splicing hemp tails into chain when required to travel through a block or fairlead, such as earrings and outhauls for forecastle and 116quarterdeck awnings. To make a chain splice unlay strands rather more than for an eye splice, then unlay the strand, A, for a few inches. Reeve the two remaining strands, B and C, through the link in the end of the chain; continue unlaying the strand, A, and lay up strand, B, in its place for about a foot, then half knot it and tuck as for a long splice. Then tuck the strand C as for an eye splice.
A Cut Splice is made by laying two ropes in the position indicated in the upper diagram. Leaving the 117ropes between A, A, to form an oblong loop, tuck the strands of one rope into the other as done in the eye splice. Splices are often wormed, parcelled and served.
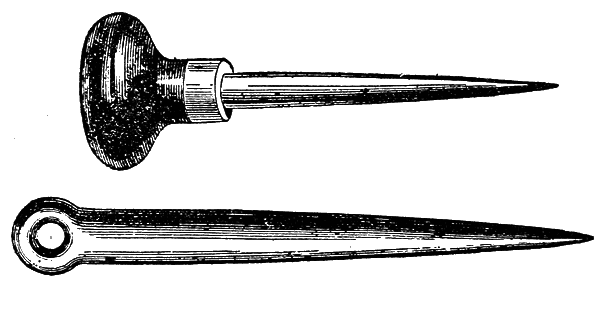
It is rather difficult to force apart the twisted strands of ropes. For this purpose a marlinespike is used for large ropes. This is made of iron, copper or hard wood. Copper is preferable as it does not rust like iron or break like wood. A steel pricker is used for small stuff. For very large ropes a fid, which is a tapered wooden pin usually made of lignum vitæ, is used.
118
A Grommet is a ring of rope. To make it cut a strand about three and one-half times the length of the grommet required. Unlay the rope carefully and keep the turns of the strand in. Close up the strand in the form of a ring as shown in the first diagram and then pass the ends round and round in their original lay until all the intervals are filled up as shown in the second diagram. Then finish off the two ends as in a long splice.
119
An Artificial Eye is made somewhat like a long splice. Take the end of a rope and unlay one strand; lay the two strands back to the standing part of the rope; pass the strand which has been unlaid over the end and in the intervals round the eye, until it returns down the standing part and lies under the eye with strands. Then divide the strands, taper them down and serve them over with spunyarn.
| ARTIFICIAL EYE | FLEMISH EYE |
The Flemish Eye is a little more difficult to make. The rope is first whipped and the strands unlaid to the whipping and opened out, separating each rope yarn. Take a piece of wood the size of the intended eye, A, between and along it lay three or more stops, hitch over the yarns and tie with the overhand knot crossing 120them somewhat; seize the ends and worm them between the strands at the shoulder. Then marl all down, parcel and serve the ends.
Throat Seizing is made by opening the end slightly and lashing it to the standing part. The ring shown in the diagram is one of a variety occasionally used. It is useful to pass other ropes through in the rigging. Another ring is formed by lashing the two ends of a short piece of rope to the side of a long one, looping the short piece to give the requisite ring.

A Selvagee is used to form a neat stropping for blocks or to go round a spar to which a hook is to be 121fastened. To make a selvagee strop drive a couple of bolts or large nails into a piece of plank, or any convenient place, or else seize a couple of hooks which will answer the same purpose. Put the nails or hooks at the required distance apart, according to the length of strop needed. Take the end of a ball of rope yarn and make it fast to one of the spikes or hooks. Pass it round the other spike and keep passing roundabout turns, taking care to have every turn well taut until the strop is the required thickness. If it is to be a very large strop marl it down with spunyarn; if a small strop use two-rope yarn.
122
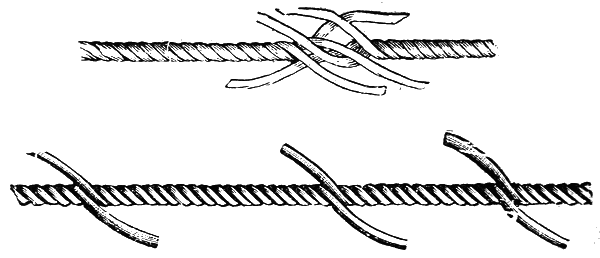
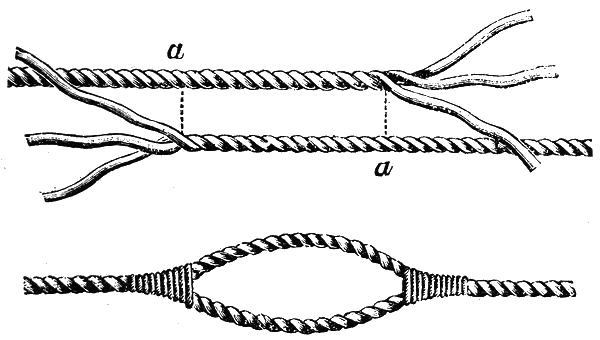
To Lengthen a Rope of a Sail with a Single Strand.—To do this is necessary when a sail is increased by the addition of, say, one cloth. Then the foot rope must be lengthened. Suppose the width of the cloth is 2 feet and the size of the rope 3 inches. After ripping the rope off four cloths, first cut the strand at the distance 2 feet 6 inches from each other, as shown in the diagram below.
Cut one strand at A and unlay it to C, then cut one of the remaining strands at C and unlay it to B, laying the strand A up again as far as B. Then cut the remaining strand at B, which will be the center, and the rope will be in two parts, as seen in the diagram above.
Now marry the long end A to the end B, then lay up the long strand A and marry it to the other strand B, as in the diagram below.
123
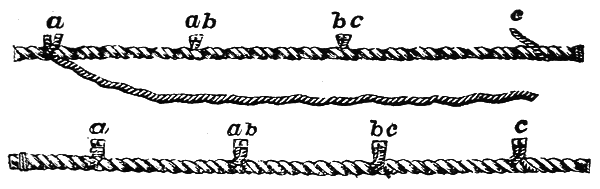
Take a strand about 10 feet in length of the same size rope and marry one end to the short strand A, as shown in the diagram. Fill up the space left from A to C by laying in the new strand and marry the other end to the short strand C. There will then be four splices to finish off as ordinary long splices.
A rope is wormed, parcelled or served to preserve it from wet or chafe.
124
Worming is done to fill up the space between the strands of the rope with spunyarn or small rope, to render the surface smooth and round for parcelling and serving.
Parcelling a rope is laying round it with the lay of the rope strips of clad canvas, tarred, from 2 to 3 inches wide according to the size of the rope, before serving it, the upper turn of the parcelling overlapping the upper edge of the turn below it.
| WORMING | PARCELLING | SERVING |
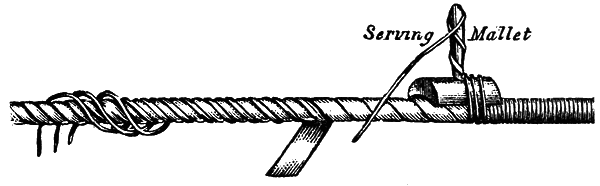
Serving is covering the rope with coils of spunyarn or other small stuff laid on quite close. The spunyarn is put, or, hove on by a serving mallet which has a score in the underpart according to the size of the rope. Service is always laid on against the lay of the rope. The sailor’s adage says:
125
The end of the yarn is first secured by placing it under the first two or three coils. The serving mallet after being placed against the rope has two or three turns passed round its body and another turn or two on the handle. This enables the coils to be pulled taut as the mallet is worked round the rope by its handle. An extra man is needed for passing the ball of serving stuff. When the required length of service is put on, the end is put under the last two turns, hauled taut and cut off.
To make a cringle unlay a single strand from the rope the size the cringle is required to be. Whip both ends, reeve the strand through the left-hand eyelet-hole in the sail, keeping one end nearly a third longer than the other, keeping the roping of the sail toward you. If a thimble is to be put in the cringle, lay up the two parts of the strand together, counting three lays. Commence with the short end of the strands toward you, through the right-hand eyelet-hole, taking it through the cringle and it will be in right position to lay up in the vacant space left in the cringle. When done the one end will hand down inside the right-hand eyelet-hole and the other end outside the left-hand one. The ends are then hitched by being rove through their respective eyelet-holes and passed over the leech rope and under their own part, one hitch 126being towards you and the other from you. Then take the ends down under one strand on the right and two on the left of the cringle nearest to it. Tuck the ends under the first two strands nearest the hitch leaving them well in place. The cringle is then fidded out and the thimble is put in on the forward of the sail. The ends of the strands are then tucked back left-handed, under one strand, again under two right-handed as in the first place. Heave them taut in place at each tuck, whip the ends with two of their own yarns and cut off. If a large cringle is needed count an extra number of lays, 5, 7, 9, etc., always an odd number.
127
To finish a cringle off on a crown commence as already told. After laying up the strand together instead of forming a hitch with each end, the ends are rove through their respective eyelet-holes and tucked back under two strands of the cringle and again laid up as far as the crown forming a four-stranded cringle. It is finished off by tucking the ends under two strands and crossing them under the crown of the cringle and cut off close.
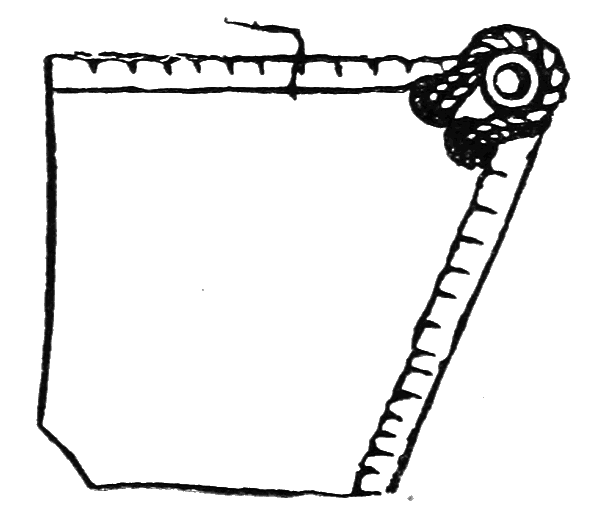
128
In splicing wire rope great care must be taken to prevent kinks getting into the rope or strands. Once a kink is made no amount of strain can take it out, and the rope is unsafe to work. If possible a turntable should be employed (an old cart wheel mounted on a spindle makes an excellent one)—the rope will then lead off perfectly straight without kinks.
With steel wire rope, always before working it put a stop on at the place to which you intend to unlay, and put a good whipping of twine at the end of each strand. In splicing wire all tucks are made against the lay of the rope.
In making an eye splice the rope is handled better if hung up in a convenient position, so that when standing up the eye will be at about the level of the chest of the person working.
A long, tapering steel marlinespike is required and after placing it under a strand do not withdraw it until the tuck is made and all the slack of the strand drawn through.
To make a neat splice do not haul the part of the rope that has not been unlaid too close to the neck of 129the splice, and in tucking the strands never take a short nip, but take long lays.
In unlaying for a long splice always unlay two strands simultaneously to keep the rope in its original lay. For a fair-sized rope unlay about 9 feet of each end.
Proceed as in rope splicing and after the three pairs of strands are in their places, single them and continue to unlay and lay in until the six meeting places of the strands are equidistant.
To finish off the ends properly can only be learned by observation and actual practice. By using two marlinespikes the hempen heart is removed and the ends of the wire strands forced into the place it occupied, making a very neat job when finished.
Wire splices should be parcelled with oily canvas and served.
Short Splice.—The same procedure is gone through as for splicing hemp rope, only care must be taken to place a good whipping on where the ends marry, and that each strand prior to unlaying is whipped. The number of tucks taken should never be less than three whole and one-half and one-third, so as to taper the splice off. The number of tucks to be taken off varies according to the work required of the rope or strop, but as a rule the more the better.
130
In tucking wire strands the strand should be entered in front of the marlinespike, which should not be withdrawn until this has been done, care being taken not to kink the strand.
Eye Splice.—Make the crown of the eye, take half the girth of the thimble and rope to be used and put a good stout whipping on to the wire, break the wire into shape of the thimble and heave both parts of the wire together by means of the rigging screws supplied for this purpose. Put a good seizing of spun yarn around both sides of the wire and thimble at the ends of the latter. Then remove the rigging screws and unlay the end of the wire as far as the whipping, open each strand and remove the hemp heart by cutting it off. Then put a whipping on the ends of the six strands, commence the splice by tucking the right-hand strand first, then the others in succession, each strand under one. The left-hand strand being the last is tucked under two. This ensures that each strand takes a fair strain. Care should be taken to keep the strands straight. When all have been tucked once, beat well down with an iron hammer and put on a good seizing of spun yarn. Then tuck each strand a second time. Wire 2½ inches and over should be tucked three times full and tapered to a third.
Steel Wire Hawsers.—The splices of the wire are 131made against the lay of the rope tucked three times with the full size of the strand and a fourth time with the strand reduced one-half; to make a more suitable taper, each tuck is drawn tightly in the direction of the lay of the rope. The center core of the rope is removed on opening out the strands for splicing, and the cores of the strands removed after the first tuck has been made. The first tuck is taken at one and a half times the girth of the thimble plus the circumference of the rope. The splice is then parcelled and served, the thimble tightly seized in with flat seizing crossed.
Splicing Wire Rope into an Endless Band.—This can be done either by the long or short splice, but the former is recommended, as the short splice, though equally strong, leaves a thick place in the rope. In the long splice, if properly made, no such inequality exists; indeed the spliced part should be difficult to locate.
To make a long splice a rope say 3½-inch circumference should have a splice not less than 60 feet to be safe, and smaller sizes in proportion down to 1½-inch circumference, for which size 25 feet will do. Take the 3½-inch rope as an example.
Measure 30 feet off each end of the rope and put a sound marline serving at those points. Then cut off 132the end servings and tie the strands together in twos and interlock, as shown in the diagram.
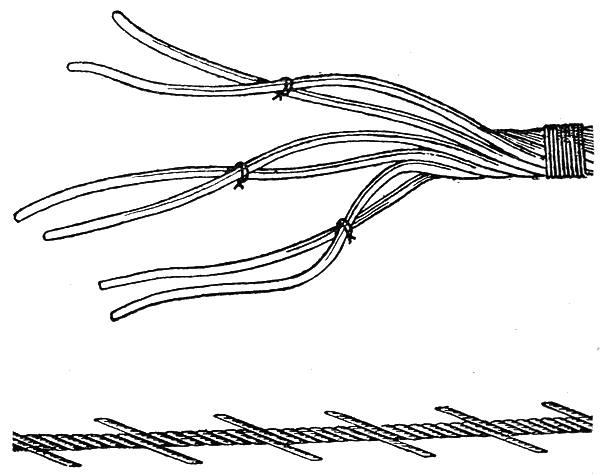
Lashings should only be cut off when parts are quite close together, otherwise rope has a tendency to open out further back and thus throw the length wrong. Then open strands out singly and snip off short six of the ends, three on either side, alternately. That is to say, leave a long end in each case opposite one of the 133snipped ends. Take each of the short ends in turn and carefully unlay them, at the same time laying in its place the corresponding long end.
This should be done with all the strands, and reckoning from the center on each side, the first one should be taken away 25 feet, the second 15 feet, and the third 5 feet. This will divide the splice up equally as shown in the lower diagram.
Then commence at the first strand at either end. First put the marlinespike through the center of the rope where the ends cross, cut and remove the hemp heart for about a foot. Then by the aid of the two spikes force the strand into place of heart just removed and follow up to the end of the strand, pulling out the heart a few inches at a time.
Repeat with all twelve ends, taking care that no empty space is left in the center of the rope by cutting of the hemp core further away than the strand end will reach. It is a good plan to marl or wrap each end with parcelling before it is put into the center of the rope, as this tends to give parts of the splice a good grip of one another. To finish off and remove inequalities, lay the splice on deck and hammer with a heavy wooden mallet.
134
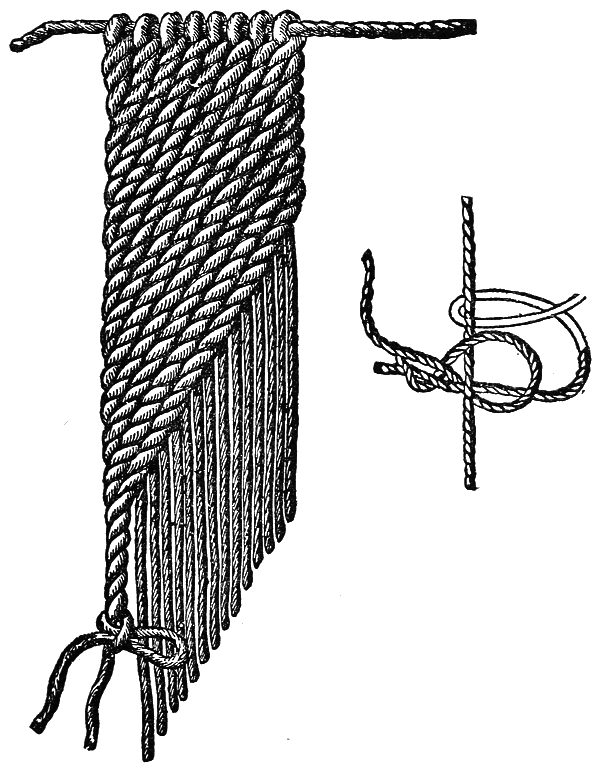
A Paunch Mat is used as a protection from chafe on shipboard. Stretch a piece of rope according to the size of the mat required in a horizontal position and fasten each end. Across this hanging by their middles, foxes are placed. Foxes are two or more rope yarns twisted together by hand and each rubbed down with tarred canvas or a handful of rope yarn. Beginning with the fox nearest the left hand twist a turn in the two parts and give one part to the man opposite. The next fox has a turn twisted in its two parts and one part is given to the opposite man. The other part is twisted round the first which is given to the partner and then again round its own part with the other foxes until the required breadth is reached. Then as no more foxes are added and the outside on the right is brought over from time to time, a selvage is formed as on the left side. There is a little difficulty in starting but afterwards all will go along very easily. Each fox from the right passes over the next one to it on the left and is pushed back. The one that has been passed over being taken up first over the next and pushed back as before. Each twist should be pressed tight as it is made. When the mat is deep enough a 136selvage is made by straining another piece of cord along the bottom securing both ends. As each fox comes down it is half hitched to this and the next fox is laid at the back of it and so on alternately.

Sword Matting is used for boats, gripes, etc. Two iron bars are slung in a horizontal position at the required distance apart for warping the mat off. Hitch one end of the warp which is of spunyarn to the bar at the end of which it is intended to finish the mat. The other end is then rove through the first hole in the loom over and under the other bar back through the first slit, over and under the other bar and so on 137until as many parts as are required for the breadth needed have been laid out. The last end is rove through a slit and secured to the bar at the end the mat is to be finished. When this is done lift the loom up, middle the fittings and lay it between the upper and lower parts. Then lower the loom and the parts 138that were lowest will rise in the slits and become the uppermost and thus put a cross in the warp.
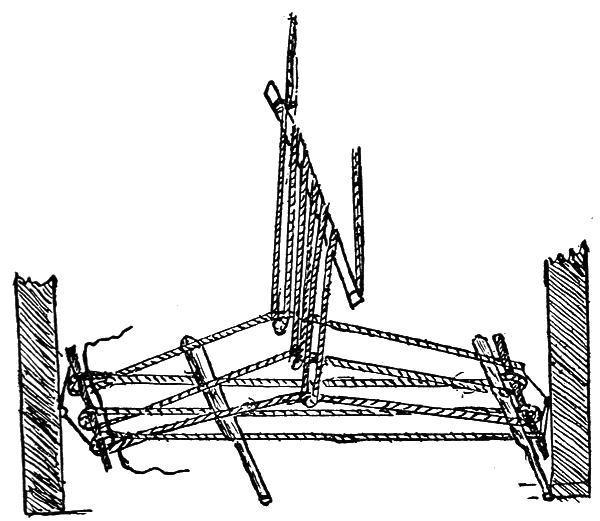
A piece of wood made in the shape of a knife, called a sword, is then inserted between the alternate parts of the warp and the crossing is driven close to the head against the bar over which the warp for weaving the mat is passed. Then turn of filling is passed to secure the crossing, reeving the ends through contraryways. Haul it taut, take out the sword, lift up the loom and continue to pass the filling. Half knot it with two turns. To finish off splice the mat. The loom is 139usually made of a piece of copper sheet with alternate holes and slits in it.
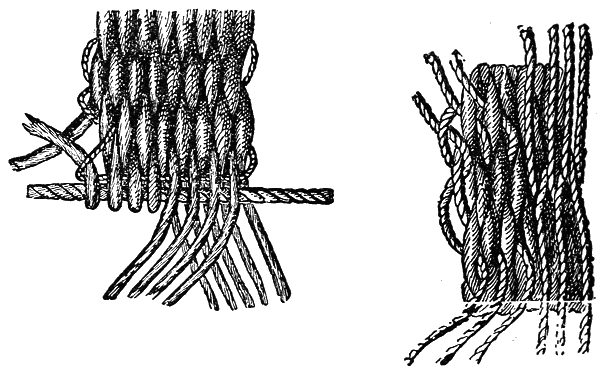
To Splice a Sword Mat unlay 6 or 7 inches of the mat, open the ends out, marry them together laying one up and one down flat along the mat. Withdraw the nettles on one side of one mat and point the nettles of the other mat through the holes they will come out of. All ends will then disappear from that side and there will be four rows of ends on the other. Turn the mats over, pick out the proper nettles of the side which have been married together, withdraw the ends belonging to one mat and introduce the corresponding ends of the other mat through the holes. Perform this operation on each mat and on each side there will be two rows of ends. Marry these ends together on each side laying one up and one down and go on splicing by withdrawing and reeving for two or three rows more in each mat. Leave off with the ends all out on the same side and finish off as with selvaging.
A cobbler’s stitch is used for joining the sides of sword mats together. Take a filling of roping twine, middle it and reeve each end through two bights in each mat (if a heavy mat through three bights at each side). Then reeve the lowermost end back through the same bights as the upper end which will bring the ends out at opposite sides. Draw the mats 140together and reeve both ends through two turns in each mat again, passing each other through the same hole opposite ways. Keep on doing this like stitching the sole of a shoe, hence the reason for calling it a cobbler’s stitch. Finish off each end by taking a hitch through a bight in the mat of the next lay above and cut off the ends.
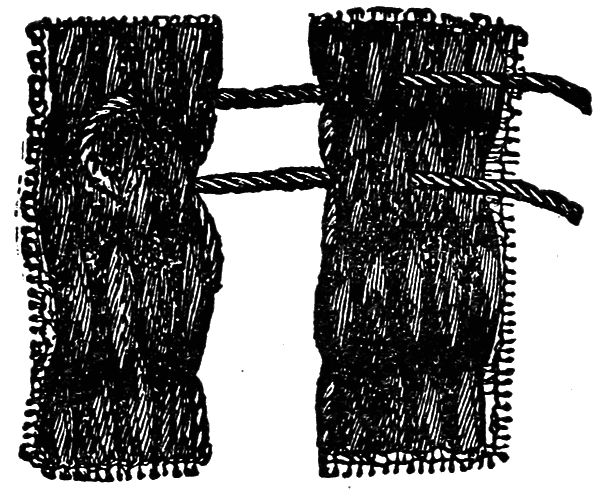
A Thrum Mat is made of canvas and short yarns of equal length. These yarns are rove through holes stabbed in the canvas, both ends of the yarns being on the same side.
A Common Sennit is made by taking three or four nettles according to the need required. Middle them over a belaying pin and plait three or four together the length it is intended to make the eye. Then work both parts together to form an eye and plait them by bringing 141the outside nettles on each side alternately over to the middle. The outside one is laid with the right hand and the remainder held firmly with the left hand. Work the whole together adding a nettle when necessary. After the eye is properly formed drop a yarn and continue to the end with an odd number. When it is of sufficient length lessen it by dropping a nettle at regular intervals. To finish it lay one end up, leaving its bight down and plait the other ends through this bight until they are all worked through it. Then haul on the end till the bight is taut. To secure all parts cut off the ends and whip it.
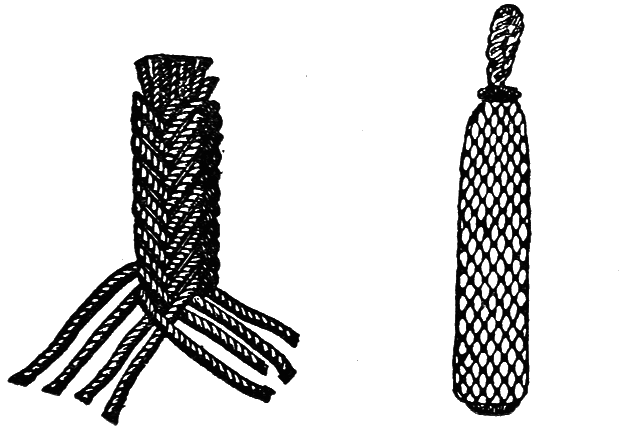
| SQUARE SENNIT | ROUND FENDER |
A Square Sennit is made somewhat in the same manner as the round sennit but without a heart. Nettles are used in the same ratio increasing by fours. 142Having put a whipping round the (eight) ends divide the nettles, and lay half on each side. Bring the uppermost left-handed nettle round underneath all and up inside two and over two of the right-handed ones. Cross over the latter ones to the left and make four on each side again. Then take the uppermost to the right-handed nettles, pass it underneath and under two and over two of the left-handed ones, still keeping four on a side, because the nettle taken up always comes round to its own side again. To proceed take the upper nettle on each side alternately and finish off as the round sennit is finished.
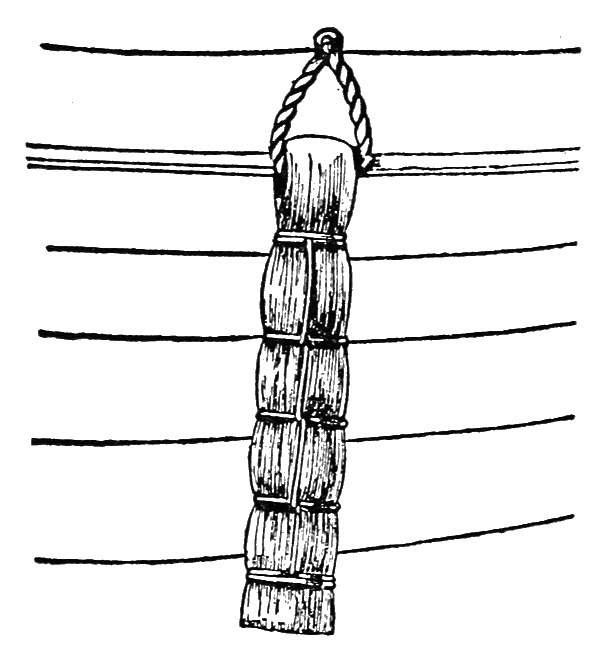
A Fender is used to protect the sides of a boat. 143Sometimes it is made of wood but more often is of canvas stuffed with oakum and painted.
To make a soft fender take a piece of Manilla rope double the length of the fender. Unlay it, open the strands and comb them until all the yarns lie straight. Double it and clap an eye-seizing on it, marling it down as shown in the diagram. A lanyard of small cords, such as log-line, is then spliced into the eye.
A Round or Pudding Fender is made of a center or heart of rope yarn worked over a grafted with short pieces of rope yarn nettles. The nettles are first cut to the proper length and the middle part slightly twisted. They are then brought snugly round a thimble and a seizing put on. The heart or pudding may be of any old stuff such as old strands, spunyarn, etc. This is put into its place and the nettles laid evenly over it. Half the nettles taken alternately are turned back over the eye and the other left lying down the heart. Pass a turn or two of twine or marline called the warp or filling round the fender where the nettles separate and hitch it. The nettles turned back must now be brought down and those that are down turned over the eye. The warp is now passed again and hitched as before. This must be repeated until the whole of the fender is covered with a woven coat as shown in the diagram. The ends of the nettles are 144brought round last turn of the warp and interlaced in the grafting.
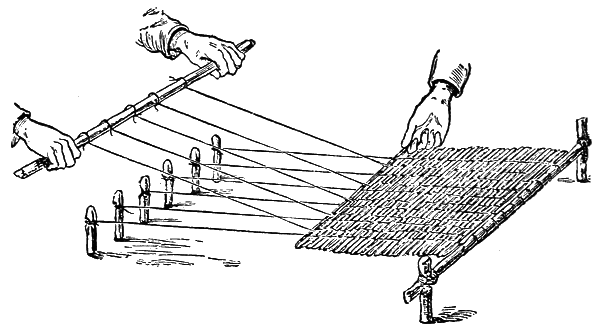
A simple weaving apparatus is shown in the diagram by which mats may easily be made. Take two pegs about 15 to 18 inches long, and drive them into the ground or attach them to a board so as to be firm.
These should stand about a foot out of the ground. Then take a stick or a piece of wood and lash it across the upright stakes. Next drive a row of pegs into the ground. These pegs should be at equal distances apart, not to exceed 6 inches, and parallel with the lashed stick. Two sets of strings are then tied to the cross stick. The ends of one set are fastened to the sticks and the ends of the other set to a staff held in 145the hands, as shown in the diagram. If there are a dozen strings, then the odd numbered should be fastened to the sticks and the even numbered to the staff. By alternately raising and depressing the staff, placing a handful of straw or rushes between the strings at each movement and making them lie close, a good mat is made. These mats may be joined together with the cobbler’s stitch or by tying the string ends together.
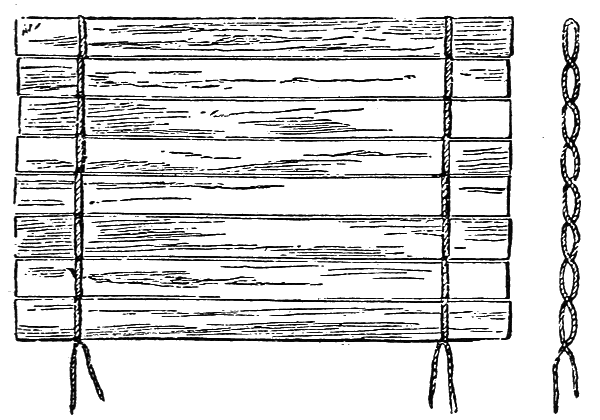
The Malay Hitch is a name given by Captain Galton, a noted traveler, to a method for fastening boards or planks together to make a shelter. The cord is twisted once and then as each board is inserted this twist holds them sufficiently tight for temporary purposes.
146
At the mention of a hammock one’s mind naturally reverts to the sailor and at the same time thinks of the pleasure a good hammock will afford under some shady tree or on a sheltered piazza. Hammock making is quite easy and the tools necessary are simple. First, a netting needle is required. There are two styles of these needles, which are shown in the diagram. In the top one the cord is brought round the end at A, up one side, round the pin at B and back the same side, the process being repeated on the other side of the needle. This needle is made of hardwood such as boxwood, and is 8 inches long by ¾ inch wide.
The needle shown in the middle diagram has the cord wound round it as in an ordinary shuttle.
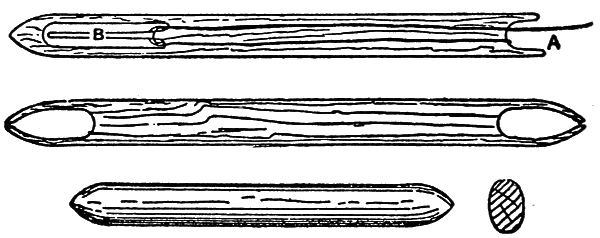
147
The mesh stick, the lower illustration, which also shows a cross section, is made of hardwood or bone and is about 5 inches long and oval in shape.
At one end of the string to be used for the net, tie a loop and place the knot on a nail fixed in some convenient position. Place the mesh stick under the loop as shown by A in the diagram, put the cord under it, then pass the needle through the loop and pull the cord taut.
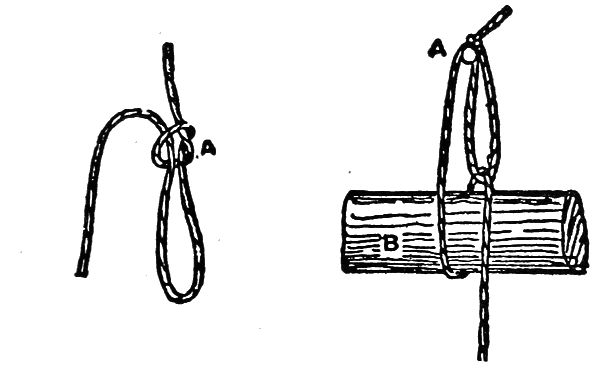
Now place the thumb of the left hand on the cord beyond the loop, as shown in the next diagram, and with a turn of the wrist of the right hand throw the cord to the position shown at B, then pass the needle under the loop C, through the bight B and down as at D and draw the knot tight.
148
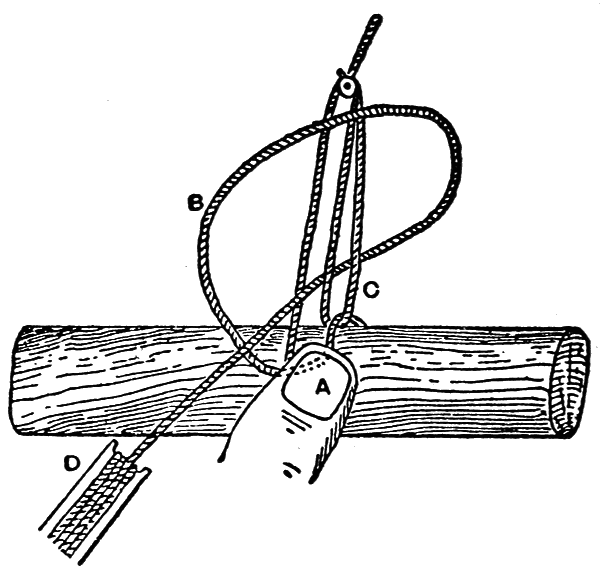
When this has been done the loop will assume the shape seen in the diagram illustrating the third meshing stage. The cord must be held firmly with the thumb at A when pulling up the knots, as the uniformity of the meshes depends on this.
To continue the netting the stick is withdrawn and placed under A, in the third meshing diagram. The needle is then passed under the stick as before, brought through the loop B and as before to form another mesh. This is continued to make a chain of meshes, 149say forty-five or fifty, sufficient for the width of the hammock. The loop A originally tied is then unfastened and it will be found that the meshes are all of the same size.
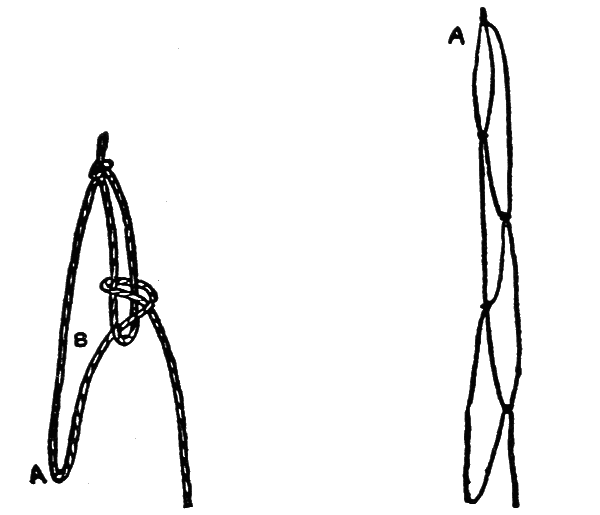
The chain is then opened out at right angles to the line in which it was made, shown in the next diagram, and working across is begun by making a mesh at A, then at B, C, and so on, until the length of the first lot of meshes has been reached, when the net is turned over and another row of meshes worked in the same manner.
150
To insure uniformity it will be well to put the loops, D, E, F and G, separately on the hook or nail as the meshes under them are made. After a little practice a cord may be reeved through the top line of meshes, tied into a loop and passed over the knee and then over the foot as the work progresses.

An ash stick may be used at each end to which the end meshes are looped and tied, and a piece of codline may be passed through the side meshes on each side and attached to the ends of the sticks. At each end a stout cord is secured to the stick in the form of a 151triangle for hanging the hammock. Another plan is to tie a number of cords together by doubling them in the center and forming a loop, and each of the free ends is attached to one of the meshes of the net. The best plan is to reeve a cord about the size of a little finger through the end meshes and splice it into the form of a grommet. A thimble, A, is fixed in the end to which the supporting cords are attached and the cords which are reeved through the side meshes are spliced into the eye B at C. When these clews are used the net must be made longer than for sticks.
152
Rope is measured by its circumference. A four-stranded rope is about one-fifth weaker than a three-stranded one.
Generally blocks should be three times the size of the rope which it is intended to reeve in them.
The hauling part bears twice the strain of the standing part of a fall, the pin of a block is often more worn on one of its sides than on the other and should be turned frequently.
Sheaves and pins of blocks should be carefully examined at short intervals.
Hawser-Laid Rope
Rule
Square the circumference and divide by 3 for the breaking strain; in tons. Divide by 4 for the proof strain; divide by 6 for the working strain.
Worked Example
A rope 4 inches in circumference; required the breaking strain.
153
| 4 | inches in circumference. | |
| × | 4 | |
| ÷ | 3) 16 | |
| Ans. | 5.3 | tons = breaking strain. |
| 4 | inches in circumference. | |
| × | 4 | |
| ÷ | 4) 16 | |
| Ans. | 4 | tons = proof strain. |
| 4 | inches in circumference. | |
| × | 4 | |
| ÷ | 6) 16 | |
| Ans. | 2.7 | tons = working strain. |
To find what weight a rope will lift when rove as a tackle.
Multiply the weight the rope is capable of suspending by the number of parts at the movable block and subtract ¼ of this for resistance.
To determine the relative strength of chain and rope.
Consider the proportional strength to be 10 to 1, using the diameter of the chain and the circumference of the rope; ½-inch chain may replace 5-inch rope.
Table showing the sized wire rope which may be used as a substitute for hempen rope.
154
|
Hemp Rope Inches |
Wire Rope Inches |
| 3 | 1½ |
| 4 | 1¾ |
| 5 | 2 |
| 6 | 2½ |
| 7 | 3 |
| 8 | 3½ |
| 9 | 4 |
| 10 | 4½ |
| 11 | 5 |
1. The four qualities of steel wire used for wire making are:
Breaking Strain p.s.i.—Extra plough steel, 110 to 120 tons. Mild plough steel, 95 to 100 tons. Best patent steel, 80 to 85 tons. Bessemer steel, 40 to 45 tons.
2. Specifications.—Specification should state: (1) Length of rope. (2) Size of gear. (3) Speed. (4) Load, exclusive of rope. (5) If for wet workings. (6) Gradients. (7) Particulars of curves.
3. Working Load.—The maximum working load at average speed, including weight of rope, should not exceed a tenth of the breaking strain as tabulated below.
155
4. Sheaves and Barrels.—Great care should be taken that wire ropes are not worked round drums or over pulleys of insufficient circumference, that they do not strike against any hard substance while in motion. They should be about 30 times the circumference of the rope in diameter.
5. Uncoiling.—Much care should be taken in uncoiling wire ropes, to prevent kinking. The coil should not be laid stationary, but should be placed on a turntable or reel and unwound from the outer end.
6. Grease.—To prevent corrosion, all working ropes should receive a regular dressing of wire rope grease thoroughly laid on.
7. Starting.—The greatest strain on a rope being at the moment of starting, every care should be taken to insure perfect steadiness of movement, as jerking is ruinous to ropes.
156
Weights and Breaking Strengths of Round Wire Ropes.
|
Diam. Inches. |
Circumf. Inches. |
Lbs.
per Fathom. |
Plough Steel |
Best
Patent Steel. |
Best
Bessemer Steel. |
||||||||
|---|---|---|---|---|---|---|---|---|---|---|---|---|---|
| Extra. | Mild. | ||||||||||||
| Tons. | Tons. | Tons. | Tons. | ||||||||||
| ½ | 1 | ½ | 2 | ¼ | 8 | ½ | 7 | ½ | 6 | ¼ | 3 | ¼ | |
| 1 | ¾ | 3 | 11 | ½ | 10 | 8 | ½ | 4 | ¼ | ||||
| ⅝ | 2 | 3 | ¾ | 15 | ¼ | 13 | 11 | 5 | ½ | ||||
| 2 | ¼ | 5 | 19 | ¼ | 16 | ½ | 14 | 7 | |||||
| ¾ | 2 | ⅜ | 5 | ½ | 20 | 17 | ¼ | 15 | ½ | 8 | |||
| 2 | ½ | 6 | ¼ | 23 | ¾ | 20 | ¼ | 17 | ½ | 8 | ¾ | ||
| ⅞ | 2 | ¾ | 7 | ½ | 28 | ¾ | 24 | ½ | 21 | 10 | ½ | ||
| 3 | 8 | ¾ | 34 | ¼ | 29 | ¾ | 25 | 12 | ½ | ||||
| 1 | 3 | ⅛ | 9 | ½ | 36 | ½ | 32 | 27 | 13 | ½ | |||
| 3 | ¼ | 11 | ¼ | 40 | 34 | 29 | 14 | ¾ | |||||
| 3 | ½ | 12 | ¼ | 46 | ½ | 39 | ¼ | 34 | 17 | ||||
| 3 | ¾ | 14 | 53 | ½ | 45 | ¾ | 39 | 19 | ½ | ||||
| 1 | ¼ | 4 | 16 | 61 | 54 | 44 | ½ | 22 | ¼ | ||||
| 4 | ¼ | 18 | 69 | 62 | 50 | 25 | |||||||
| 4 | ½ | 20 | 77 | 70 | 56 | 28 | |||||||
| 1 | ½ | 4 | ¾ | 22 | ½ | 86 | 76 | ½ | 63 | 31 | |||
| 5 | 25 | 95 | 85 | ½ | 70 | 34 | ½ | ||||||
| 5 | ¼ | 27 | 105 | 96 | 77 | 38 | ½ | ||||||
| 1 | ¾ | 5 | ½ | 30 | 115 | 106 | 84 | 42 | |||||
| 5 | ¾ | 33 | 126 | 114 | 92 | 46 | |||||||
| 6 | 36 | 138 | 125 | 100 | 50 | ||||||||
| 2 | 6 | ¼ | 39 | 155 | 133 | 120 | 60 | ||||||
157
Transcriber’s Notes.
Evident typographical and punctuation errors have been corrected silently. Inconsistent spelling/hyphenation has been normalised.
To improve text flow, illustrations have been relocated between paragraphs. Where necessary, references to illustrations in the text have been modified to reflect the change in position.
New original cover art included with this eBook is granted to the public domain.